
SpringBoot(三)thymeleaf+JPA+MySql
接着上一节的
第一步:在pom文件中加入以下代码:
<!--JPA-->

      <dependency>

            <groupId>org.springframework.boot</groupId>

            <artifactId>spring-boot-starter-data-jpa</artifactId>

       </dependency>

<!--   MySql-->

        <dependency>

            <groupId>mysql</groupId>

            <artifactId>mysql-connector-java</artifactId>

        </dependency>
第二步:在application.yml文件中加入以下代码
spring:
  datasource:
    driver-class-name: com.mysql.jdbc.Driver
    #useUnicode=true&characterEncoding=utf-8:这个代表允许用户自己设定数据库编码,而且设置成UTF-8
    #&useSSL=false:
    url: jdbc:mysql://localhost:3306/test1?useUnicode=true&characterEncoding=utf-8&useSSL=false
    username: root
    password: root

  jpa:
    hibernate:
      ddl-auto: update
#ddl-auto:有五个值可选,create:是每次都是先检查表是否存在,如果存在删除再新建;update:不会新建只是更新;
#         create-drop:新建但是一旦sessionFactory停止就自动销毁;none:什么都不做;validate:验证表结构

     show-sql: true
#show-sql:是否显示sql语句
第三步:在bean包选新建User类
package com.oda.springboot.bean;

import org.springframework.stereotype.Component;

import javax.persistence.Entity;

import javax.persistence.GeneratedValue;

import javax.persistence.Id;

//@Component

@Entity

//@Entity说明这个class是实体类,并且使用默认的orm规则,即class名即数据库表中表名,class字段名即表中的字段名

//如果想改变这种默认的orm规则,就要使用@Table来改变class名与数据库中表名的映射规则,@Column来改变class中字段名与db中表的字段名的映射规则

public class User {

    @Id

    @GeneratedValue

    private int id;

    private String name;

    private int age;

    public User() {

    }

    public User(int id, String name, int age) {

        this.id = id;

        this.name = name;

        this.age = age;

    }

    public int getId() {

        return id;

    }

    public void setId(int id) {

        this.id = id;

    }

    public String getName() {

        return name;

    }

    public void setName(String name) {

        this.name = name;

    }

    public int getAge() {

        return age;

    }

    public void setAge(int age) {

        this.age = age;

    }

}
第四步:新建dao包,在其下面新建UserMapper接口
package com.oda.springboot.dao;

import com.oda.springboot.bean.User;

import org.springframework.data.jpa.repository.JpaRepository;

import org.springframework.stereotype.Repository;

public interface UserMapper extends JpaRepository<User,Integer> {

}
第五步:新建service包,在其下面新建Userservice类
package com.oda.springboot.service;

import com.oda.springboot.bean.User;

import com.oda.springboot.dao.UserMapper;

import org.springframework.beans.factory.annotation.Autowired;

import org.springframework.stereotype.Service;

import javax.annotation.Resource;

import java.util.List;

@Service

public class UserService {

    @Autowired

    private UserMapper userMapper;

    public List<User> users() {

        return userMapper.findAll();

    }

}
第六步:在controller包下新建UserController
package com.oda.springboot.controller;

import com.oda.springboot.bean.User;

import com.oda.springboot.service.UserService;

import org.springframework.beans.factory.annotation.Autowired;

import org.springframework.stereotype.Controller;

import org.springframework.ui.Model;

import org.springframework.web.bind.annotation.RequestMapping;

import javax.annotation.Resource;

import java.util.List;

@Controller

public class UserController {

    @Resource

    private UserService userService;

    @RequestMapping("/users")

    public String uses(){

        return "redirect:/select";

    }

    @RequestMapping("/select")

    public String select(Model model){

       List<User> users = userService.users();

       model.addAttribute("users",users);

        return "users/index";

    }

}
第七步:在templates包下,新建users包,在其下新建index.html
<!DOCTYPE html>

<html lang="en" xmlns:th="http://www.thymeleaf.org"><!--这里引入thymeleaf命名空间-->

<head>

    <meta charset="UTF-8">

    <title>thymeleaf模板的应用</title>

</head>

<body>

    <table>

        <tr>

            <td>序号</td>

            <td>名字</td>

            <td>年龄</td>

        </tr>

        <tr th:each="user,count:${users}">

            <td th:text="${count.count}"></td>

            <td th:text="${user.name}"></td>

            <td th:text="${user.age}"></td>

        </tr>

    </table>

</body>

</html>
然后启动,访问http://localhost:8080/zm/users
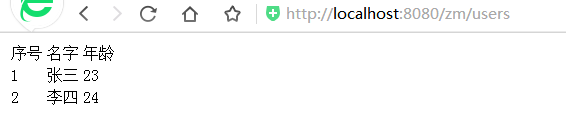
项目结构:

注意:application.yml文件中的
url: jdbc:mysql://localhost:3306/test1?useUnicode=true&characterEncoding=utf-8&useSSL=false
SpringBoot(三)thymeleaf+JPA+MySql的更多相关文章
- SpringBoot 使用JPA+MySQL+Thymeleaf 总结 二
SpringBoot 使用JPA+MySQL+Thymeleaf 总结 一 SpringBoot 使用JPA+MySQL+Thymeleaf 总结 二 方法一 使用原生sql查询 或者 为方法名增加 ...
- SpringBoot 使用JPA+MySQL+Thymeleaf 总结 一
SpringBoot 使用JPA+MySQL+Thymeleaf 总结 一 SpringBoot 使用JPA+MySQL+Thymeleaf 总结 二 pom引用 <?xml version=& ...
- springboot+jpa+mysql+redis+swagger整合步骤
springboot+jpa+MySQL+swagger框架搭建好之上再整合redis: 在电脑上先安装redis: 一.在pom.xml中引入redis 二.在application.yml里配置r ...
- springboot+jpa+mysql+swagger整合
Springboot+jpa+MySQL+swagger整合 创建一个springboot web项目 <dependencies> <dependency> < ...
- Springboot+Atomikos+Jpa+Mysql实现JTA分布式事务
1 前言 之前整理了一个spring+jotm实现的分布式事务实现,但是听说spring3.X后不再支持jotm了,jotm也有好几年没更新了,所以今天整理springboot+Atomikos+jp ...
- SpringBoot+Jpa+MySql学习
上一篇介绍了springboot简单整合mybatis的教程.这一篇是介绍springboot简单整合jpa的教程. 由于jpa的功能强大,后续会继续写关于jpa的介绍已经使用,本文只是简单介绍一下它 ...
- spring-boot jpa mysql emoji utfmb4 异常处理
spring-boot jpa mysql utf8mb4 emoji 写入失败 mysql database,table,column 默认为utf8mb4 Caused by: java.sql. ...
- IDEA SpringBoot+JPA+MySql+Redis+RabbitMQ 秒杀系统
先放上github地址:spike-system,可以直接下载完整项目运行测试 SpringBoot+JPA+MySql+Redis+RabbitMQ 秒杀系统 技术栈:SpringBoot, MyS ...
- 三、SpringBoot整合Thymeleaf视图
目录 3.1 Thymeleaf视图介绍 3.2 创建SpringBoot项目 3.2 配置Thymeleaf 3.3 编写Demo 3.4 小结 3.1 Thymeleaf视图介绍 先看下官网的介绍 ...
随机推荐
- [c/c++] programming之路(25)、字符串(六)——memset,Unicode及宽字符,strset
一.memset #include<stdio.h> #include<stdlib.h> #include<memory.h> void *mymemset(vo ...
- ts文件编译后变量在vscode里报错
需要将编译过的同名js文件删除才可以
- IdentityServer4支持的授权类型以及组合
支持的授权类型: implicit hybrid authorization_code client_credentials password 支持的组合: implicit implicit,cli ...
- Java使用Socket进行通信
什么是Socket 网络上的两个程序通过一个双向的通信连接实现数据的交换,这个连接的一端称为一个socket.通常也称作"套接字",用于描述IP地址和端口,是一个通信链的句柄,可以 ...
- P1325 雷达安装
传送门 思路: 采取贪心的思想. 把每个岛屿看作圆心,以雷达的范围 d 为半径,求出与 x 轴的左右两个交点,两交点所夹的区间就需要放置一个雷达,这样就把这道题转换为了区间取点问题.在枚举岛屿时,记录 ...
- ECharts注释
<!DOCTYPE html> <head> <meta charset="utf-8"> <title>ECharts</t ...
- [数据结构]P1.3 栈 Stack
* 注: 本文/本系列谢绝转载,如有转载,本人有权利追究相应责任. 栈是一种先进后出的结构(FILO),常见的操作有:push 入栈.pop删除栈顶元素并返回.peek 查看栈顶元素 与其他线性结构一 ...
- 雷林鹏分享:jQuery EasyUI 数据网格 - 列运算
jQuery EasyUI 数据网格 - 列运算 在本教程中,您将学习如何在可编辑的数据网格(datagrid)中包含一个运算的列.一个运算列通常包含一些从一个或多个其他列运算的值. 首先,创建一个可 ...
- JavaScript常见案例
一.点灯开关控制: <!DOCTYPE html><html lang="en"><head> <meta charset="U ...
- itchat和wordcloud对微信好友的签名进行画像
获取好友列表的时候,返回的json信息中还看到了有个性签名的信息,脑洞一开,把大家的个性签名都抓下来,看看高频词语,还做了个词云. # coding:utf-8 import itchat # 先登录 ...