Ubuntu+docker+gitlab安装和使用
以前自己写的代码都是在本地,因为都是自己一个人维护,现在交给团队维护了,所以想着搭建一个gitlab
1,拉镜像
安装非常简单
docker search gitlab 搜索镜像
docker pull gitlab/gitlab-ce 拉取镜像
docker images 查询镜像
2,创建本地映射文件
test-team-server:~$ mkdir gitlab
test-team-server:~$ cd gitlab/
test-team-server:~/gitlab$ mkdir config logs data
3,安装
docker run --detach -p 8843:443 -p 8090:80 -p 2222:22 --name gitlab --restart always -v /home/dapeng/gitlab/config:/etc/gitlab -v /home/dapeng/gitlab/logs:/var/log/gitlab -v /home/dapeng/gitlab/data:/var/opt/gitlab gitlab/gitlab-ce
docker ps -a | grep gitlab
docker logs -f gitlab
4,配置
访问gitlab http://192.168.1.119:8090
(1)设置密码,初始账户为root,设置密码之后就可以登录了
(2)重启、启动、停止、状态
gitlab-ctl restart // 重启
gitlab-ctl stop // 停止
gitlab-ctl start // 启动
gitlab-ctl status //状态
(3)修改hostname
gitlab项目默认是以容器id作为hostname,ssh访问的时候会提示hostname找不到,所以我们需要修改一下配置文件
/home/dapeng/gitlab/config/gitlab.rb 主要修改以下几个值
external_url 'http://192.168.1.119' #修改为http访问的外部映射的主机ip和port
gitlab_rails['gitlab_ssh_host'] = '192.168.1.119' #修改为ssh访问的外部映射的主机ip或者hostname
gitlab_rails['gitlab_shell_ssh_port'] = 2222 #ssh默认是22端口,改成映射到外部的2222端口
然后执行一下docker restart gitlab
这样在项目中显示的访问gitlab仓库的地址是
ssh://git@192.168.1.119:8090:2222/automation/apitest.git
http://192.168.1.119/automation/apitest.git
(4)下载git.exe 到本地windows
- Git-2.8.1-64-bit.exe 安装,默认选项即可
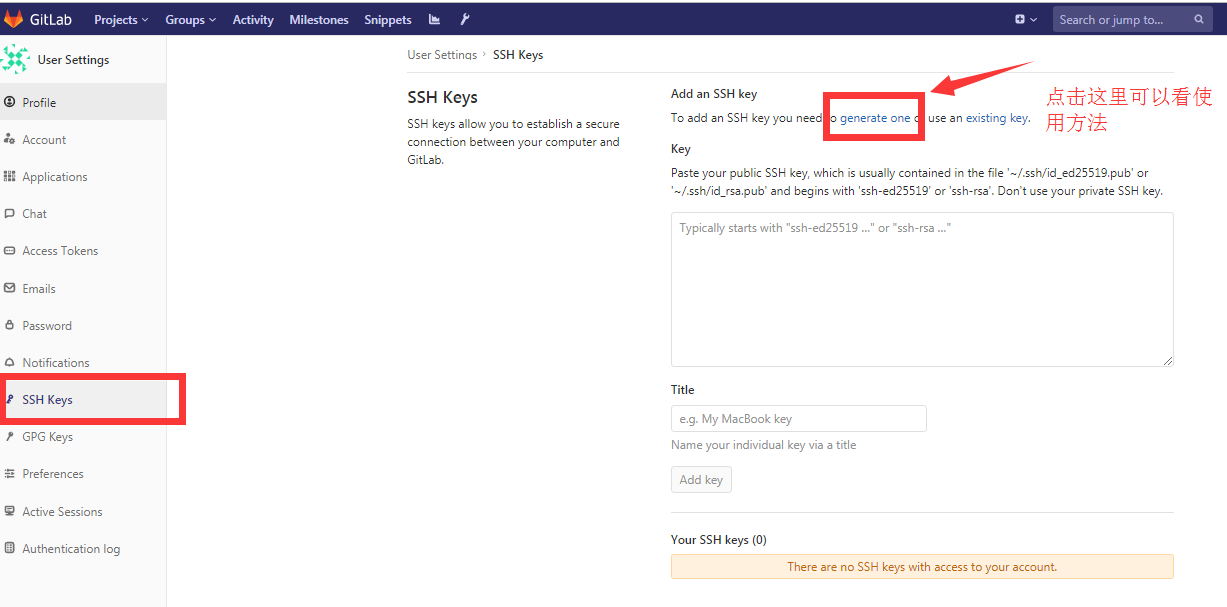
- 打开git bash, 生成密钥,有关密钥的说明可以参考 http://192.168.1.119:8090/help/ssh/README#generating-a-new-ssh-key-pair
ssh-keygen -o -t rsa -b 4096 -C "xxxxxxxxx@xxxxx.com" 然后一直回车
- 复制~/.ssh/id_rsa.pub内容,
~表示用户目录,比如windows就是C:\Users\Administrator
Administrator@ERIC MINGW64 ~/.ssh
$ cat id_rsa.pub
ssh-rsa AAAAB3NzaC1yc2EAAAADAQABAAACAQCrPgBRiWV7d6yRTdkLkP0ae+6P571uMDtxAL1x2fsNGWvmzFZTHUrHS49UJgPpaGu0ZtOv4X7bX4mmEHlmSXo5v6lZ5YC+oEAWXgg2c+ES9jf4llfOggCYEIrek//xF6OTOrZxpvzrTkAroiTdeRtivnFnIMgaNz3rO53ryH0M5L9vzWFKm7ufuKyqY/910X73+9pP9Rf1txWgY8cd3iVGSjooKPND0rY34sVm7JQ16llx49MjIKTX79e2V3p+wy6LOuSawwH9XtQrakj01aXmhQHKIRIqTn0M0FYtEitEQxuagBdzeyMF46rMWrk8k87FnJaPsIm/WNRMVimiL4UlSjp3iSg4p/+GebzdBr8S3oXT6lWglQBVXLEYHZgXRQXNhTCOoeOWEdW1wtKYPpGY+LtMkSEGbt0/v68Fj3oDXllVle3SjlI4i9KF86snfQPd3jDvBu7padvDmwtl3bLWKA38/DLe+cTUSHgymTTmfW6fDT5VpcAlKkyh6Dvcyb0hlUGdNVzasQ4nqtQtODpGhb5pfdtJlhZN2P0QlI7n0KAEPkuQUnpNMKf94fmUxiH6QQLOeVrWuZw4CW/B+bnYHoe85vySNhUI+H2qat5+3/p09AD+mxffKbSgmR6QWE9DXFTIGjtJ01dMFy699Qi8YOVsXwViOiu9Lab9ymxqLQ== hailiangyou@dingtalk.com
(4)网页上配置ssh-key
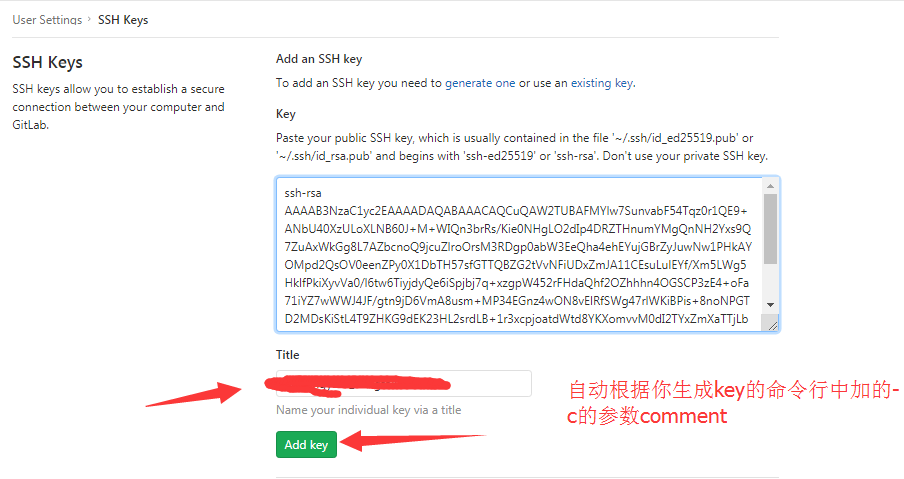
http://192.168.1.119:8090/profile/keys

把上面cat出来的内容复制到gitlab页面上

5,拉取项目,git常规使用
1,创建一个文件夹作为仓库repo D盘下的repo文件夹
打开git bash, cd /d/repo
2,设置用户名和邮箱
git config --global user.name "eric"
git config --global user.email "xxxx@xxx.com"
3,克隆项目,默认拉取的是master分支
git clone ssh://git@192.168.1.119:2222/automation/apitest.git
Administrator@ERIC MINGW64 /d/repo
$ git clone ssh://git@192.168.1.119:2222/automation/apitest.git
Cloning into 'apitest-framework'...
The authenticity of host '[192.168.1.119]:2222 ([192.168.1.119]:2222)' can't be established.
ECDSA key fingerprint is SHA256:IoMGBM4jlCN20ynwVKKrvwUFb8pKP5BjfZy5QG0/A2c.
Are you sure you want to continue connecting (yes/no)? yes
Warning: Permanently added '[192.168.1.119]:2222' (ECDSA) to the list of known hosts.
remote: Enumerating objects: 3, done.
remote: Counting objects: 100% (3/3), done.
remote: Compressing objects: 100% (2/2), done.
remote: Total 3 (delta 0), reused 0 (delta 0)
Receiving objects: 100% (3/3), done.
Checking connectivity... done.
4,git使用
在本地创建一个待push的测试文件,test.md
touch test,md
git status #可以看到红色提示该分支有需要更新的文档 test.md

git add test.md #添加文件到待上传的缓冲区里
git commit -m "test push test.md" #提交并解释

git push origin master #提交到仓库主分支

然后就可以在gitlab网页上看到刚刚提交的文件
关于更详细的git使用教程,可以查看https://www.runoob.com/git/git-tutorial.html
Ubuntu+docker+gitlab安装和使用的更多相关文章
- Ubuntu bitnami gitlab 安装
/************************************************************************************** * Ubuntu bit ...
- Centos + docker,Ubuntu + docker介绍安装及详细使用
docker笔记 常用命令 设置docker开机自启:sudo chkconfig docker on 查所有镜像: docker images 删除某个镜像:docker rmi CONTAINER ...
- ubuntu docker inflxudb(安装 使用 备份 还原 以及python编码) telegraf Grafana
inflxudb1.7.7 1.拉取最新的镜像 docker pull influxdb 2.运行实例: docker run -d --restart=always -p 8086:8086 -p ...
- ubuntu docker的安装和使用
Docker CE for Ubuntu Docker CE for Ubuntu is the best way to install the Docker platform on Ubuntu L ...
- Ubuntu Docker 简单安装 GitLab
相关博文: Ubuntu 简单安装 Docker Ubuntu 简单安装和配置 GitLab 服务器版本 Ubuntu 16.04 LTS. 1. 安装和配置 安装命令: sudo docker ru ...
- docker gitlab安装
mkdir -p /data/docker/volumes/gitlab chmod 777 /data/docker/volumes/gitlab cd /data/docker/volumes/g ...
- Ubuntu+docker+jenkins安装详细指南
最近项目上开始实行自动化测试,避免不了与jenkins等持续集成工具打交道,今天就给大家分享一下有关jenkins的简单安装和使用 1,准备环境 (1)ubuntu系统 (2)docker (3)je ...
- ubuntu docker 环境安装
转载:https://www.cnblogs.com/blog-rui/p/9946382.html 1. 在Ubuntu中安装Docker 更新ubuntu的apt源索引 sudo apt-get ...
- Ubuntu Docker 安装和配置 GitLab CI 持续集成
相关文章: Ubuntu Docker 简单安装 GitLab 劈荆斩棘:Gitlab 部署 CI 持续集成 目的:在 Ubuntu 服务器上,使用 Docker 安装和配置 GitLab Runne ...
随机推荐
- mybatisX插件的使用
MybatisX 插件 快捷 mapper方法生成对应-----> mapper.xml中 :ALT +enter
- 综述 | SLAM回环检测方法
本文作者任旭倩,公众号:计算机视觉life成员,由于格式原因,公式显示可能出问题,建议阅读原文链接:综述 | SLAM回环检测方法 在视觉SLAM问题中,位姿的估计往往是一个递推的过程,即由上一帧位姿 ...
- PythonI/O进阶学习笔记_1.抽象、面向对象、class/object/type
前言: 是自己在学习python进阶IO学习视频的时候的理解和笔记,因为很多都是本菜鸟学习时候的自己的理解,有可能理解有误. Content: - 抽象的概念和面向对象的概念?想要大概了解python ...
- Java连载22-for循环
一.循环结构 在程序当中总有一些需要反复的/重复的执行的代码,假设没有循环结构,那么这段需要重复执行的代码自然式子最需要重复编写的,代码无法得到重复使用,所以多数编程语言都是支持循环结构的,将来把需要 ...
- Python实现的一些常见简单问题(持续更新)
提纲: 1.汉诺塔 2.找到某个范围内的所有质数 3.杨辉三角 4.用闭包实现一个计数器,调用一次计数器加1 5.将类构造成可迭代对象,实现斐波那契数列 ...... 1.汉诺塔(汉诺塔) 用递归函数 ...
- MySQL之PXC集群搭建
一.PXC 介绍 1.1 PXC 简介 PXC 是一套 MySQL 高可用集群解决方案,与传统的基于主从复制模式的集群架构相比 PXC 最突出特点就是解决了诟病已久的数据复制延迟问题,基本上可以达到实 ...
- 关于C语言\b \t \n及转义序列的理解
转义序列 说明 \b 后退一格(Backspace) \t 水平制表(Tab=4个空格) \v 垂直制表 \r 回车(Enter) \f 换页 \a 发出鸣响 \n 换行 \" 输出/输入双 ...
- webstrom 内存溢出,软件崩溃卡死解决的方法
今天用gulp搭建了一个工程,准备做一个体育h5的项目,其中需要用到sass代码压缩,加版本号等功能. gulpfile.js和package.json都是已经写好的.我用CMD命令窗口cnpm安装n ...
- Spring Boot2 系列教程(四)理解Spring Boot 配置文件 application.properties
在 Spring Boot 中,配置文件有两种不同的格式,一个是 properties ,另一个是 yaml . 虽然 properties 文件比较常见,但是相对于 properties 而言,ya ...
- mybatis_plus插件——生成器
最近在学习mybatis框架,虽然已经简化了一些Dao代码,但是还想更上一层楼吗?不再被基本的pojo层,controller层,service层,dao层基本重复代码所困恼吗?这里,让我们来学习一下 ...
