
brew安装Nginx
安装流程
这里使用 brew 来安装软件。
- 安装
brew install nginx
- 查看安装信息(经常用到, 比如查看安装目录等)
brew info nginx
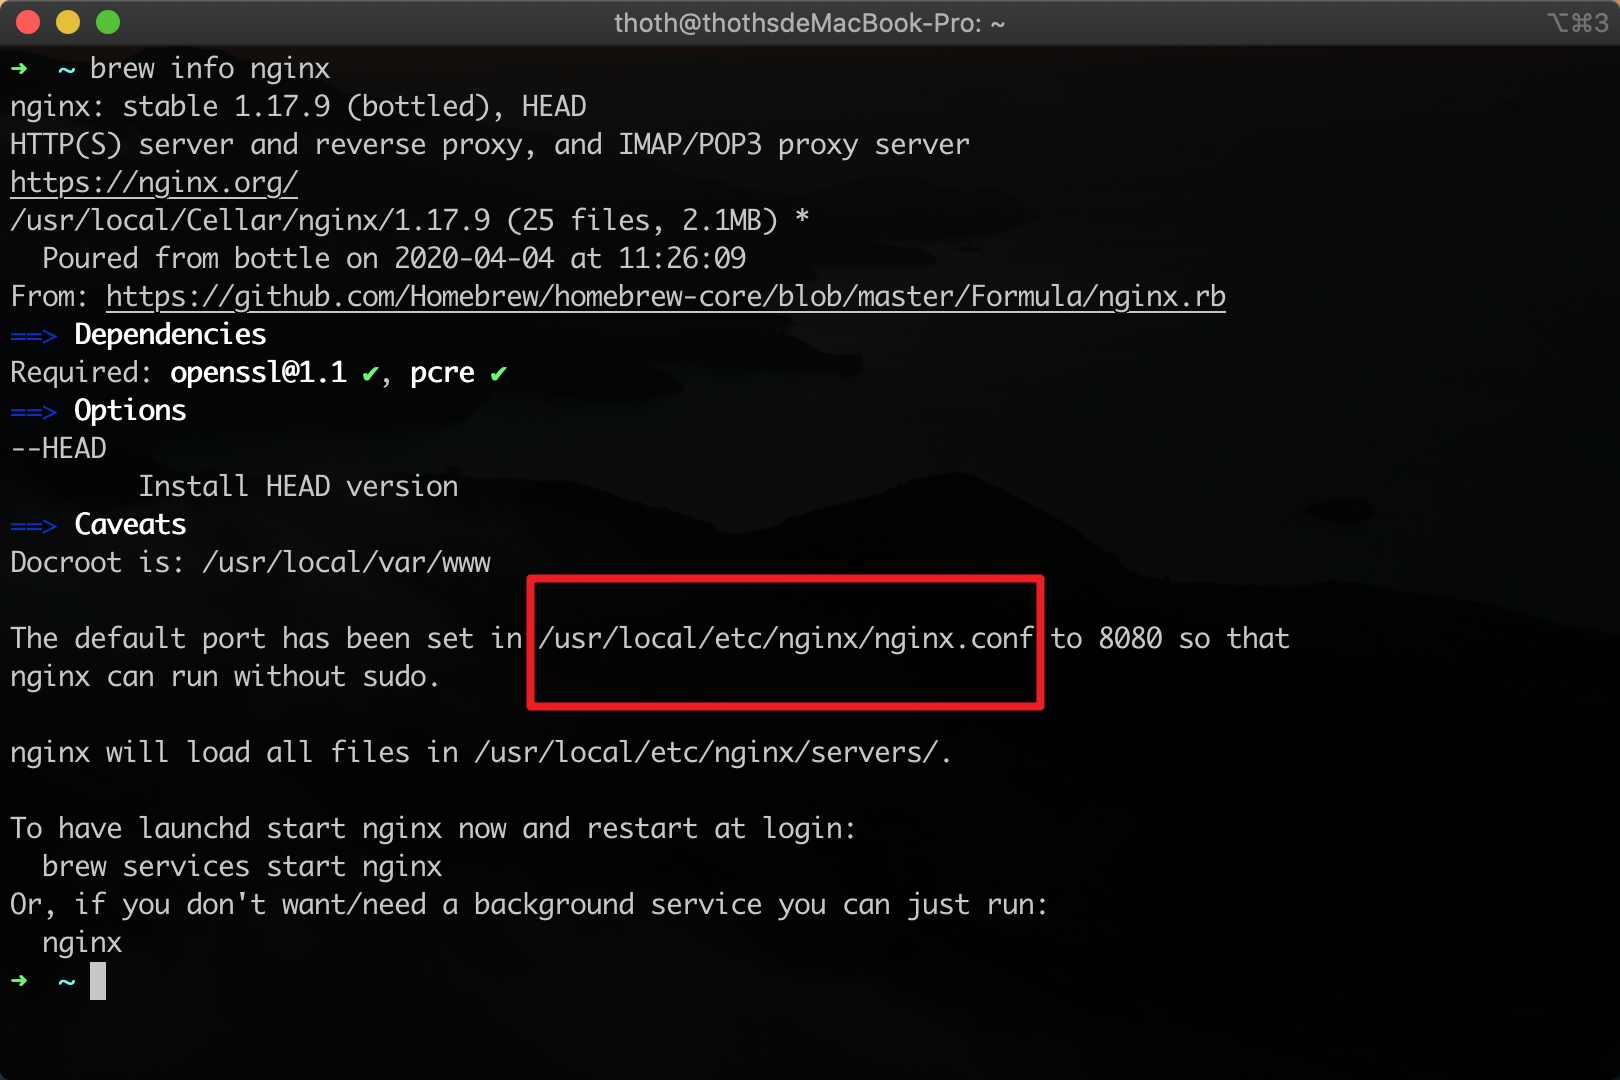
安装后,主要看brew把nginx安装到哪里去了,默认是安装到/usr/local/etc/nginx/nginx.conf
常用命令记录
如果不好使,统一在命令前面加上sudo;
- 查看nginx版本
nginx -v
- 启动nginx服务
brew services start nginx
访问:http://localhost:8080/后,看到如下内容就是启动成功了。

如果没有启动成功,查看一下进程,ps -ef|grep nginx:

# 查看报错文件的路径

➜  ~ nginx -V

nginx version: nginx/1.17.9

built by clang 11.0.0 (clang-1100.0.33.17)

built with OpenSSL 1.1.1d  10 Sep 2019 (running with OpenSSL 1.1.1f  31 Mar 2020)

TLS SNI support enabled

configure arguments: --prefix=/usr/local/Cellar/nginx/1.17.9 --sbin-path=/usr/local/Cellar/nginx/1.17.9/bin/nginx --with-cc-opt='-I/usr/local/opt/pcre/include -I/usr/local/opt/openssl@1.1/include' --with-ld-opt='-L/usr/local/opt/pcre/lib -L/usr/local/opt/openssl@1.1/lib' --conf-path=/usr/local/etc/nginx/nginx.conf --pid-path=/usr/local/var/run/nginx.pid --lock-path=/usr/local/var/run/nginx.lock --http-client-body-temp-path=/usr/local/var/run/nginx/client_body_temp --http-proxy-temp-path=/usr/local/var/run/nginx/proxy_temp --http-fastcgi-temp-path=/usr/local/var/run/nginx/fastcgi_temp --http-uwsgi-temp-path=/usr/local/var/run/nginx/uwsgi_temp --http-scgi-temp-path=/usr/local/var/run/nginx/scgi_temp --http-log-path=/usr/local/var/log/nginx/access.log --error-log-path=/usr/local/var/log/nginx/error.log --with-compat --with-debug --with-http_addition_module --with-http_auth_request_module --with-http_dav_module --with-http_degradation_module --with-http_flv_module --with-http_gunzip_module --with-http_gzip_static_module --with-http_mp4_module --with-http_random_index_module --with-http_realip_module --with-http_secure_link_module --with-http_slice_module --with-http_ssl_module --with-http_stub_status_module --with-http_sub_module --with-http_v2_module --with-ipv6 --with-mail --with-mail_ssl_module --with-pcre --with-pcre-jit --with-stream --with-stream_realip_module --with-stream_ssl_module --with-stream_ssl_preread_module
path=/usr/local/var/log/nginx/error.log
tail -f *
- 重新加载nginx
# 答应我,有任何一丁点修改过nginx的配置文件后,都第一时间重新加载一遍nginx  好吗!

# 答应我,有任何一丁点修改过nginx的配置文件后,都第一时间重新加载一遍nginx  好吗!

# 答应我,有任何一丁点修改过nginx的配置文件后,都第一时间重新加载一遍nginx  好吗!不然你就没法使 你修改的过的功能。

brew services restart nginx
- 关闭nginx服务
brew services stop nginx

- 查看nginx进程
# off

[root@tv2-sec-scan-02 conf.d]# ps -aux | grep nginx

root     22155  0.0  0.0 112712   968 pts/0    S+   09:45   0:00 grep --color=auto nginx

# on

[root@tv2-sec-scan-02 conf.d]# ps -aux | grep nginx

root     22155  0.0  0.0 112712   968 pts/0    S+   09:45   0:00 grep --color=auto nginx

[root@tv2-sec-scan-02 conf.d]# systemctl start nginx

[root@tv2-sec-scan-02 conf.d]# ps -aux | grep nginx

root     22365  0.0  0.0  44744   968 ?        Ss   09:45   0:00 nginx: master process /usr/sbin/nginx -c /etc/nginx/nginx.conf

root     22366  0.0  0.0  45172  1384 ?        S    09:45   0:00 nginx: worker process

root     22368  0.0  0.0 112712   968 pts/0    R+   09:45   0:00 grep --color=auto nginx
典型配置方式
在/usr/local/etc/nginx/nginx.conf主配置文件里 ,配置一个包含属性,内容如下:
# 省略...

include servers/*;

# 意思是加载当前目录下 .servers文件夹内的配置文件,都会被加载进来
在/usr/local/etc/nginx/servers 路径下,配置了一个转发服务,文件叫localhost_80.conf,内容如下:
server {

        listen        80;

        server_name  localhost;

        root   "/Users/thoth/program/nginxweb";

        location / {

            index index.php index.html;

            error_page 400 /error/400.html;

            error_page 403 /error/403.html;

            error_page 404 /error/404.html;

            error_page 500 /error/500.html;

            error_page 501 /error/501.html;

            error_page 502 /error/502.html;

            error_page 503 /error/503.html;

            error_page 504 /error/504.html;

            error_page 505 /error/505.html;

            error_page 506 /error/506.html;

            error_page 507 /error/507.html;

            error_page 509 /error/509.html;

            error_page 510 /error/510.html;

            autoindex  off;

        }

        location ~ \.php(.*)$ {

            fastcgi_pass   127.0.0.1:9000;

            fastcgi_index  index.php;

            fastcgi_split_path_info  ^((?U).+\.php)(/?.+)$;

            fastcgi_param  SCRIPT_FILENAME  $document_root$fastcgi_script_name;

            fastcgi_param  PATH_INFO  $fastcgi_path_info;

            fastcgi_param  PATH_TRANSLATED  $document_root$fastcgi_path_info;

            include        fastcgi_params;

        }

}
这个可以作为你的模版,你修改一下server_name、root即可。
        server_name  www.test.com;

        root   "/Users/thoth/program/testdir";
查看启动状态是否有报错
- nginx -t
 nginx -t

nginx: the configuration file /usr/local/etc/nginx/nginx.conf syntax is ok

nginx: [emerg] open() "/usr/local/Cellar/nginx/1.17.9/logs/error.log" failed (2: No such file or directory)  # 有报错

nginx: configuration file /usr/local/etc/nginx/nginx.conf test failed

➜  ~ nginx -t

nginx: the configuration file /usr/local/etc/nginx/nginx.conf syntax is ok

nginx: configuration file /usr/local/etc/nginx/nginx.conf test is successful
- 查看进程是否都起来了
➜  ~ ps -ef | grep nginx

    0  6419     1   0  6:59下午 ??         0:00.01 nginx: master process /usr/local/opt/nginx/bin/nginx -g daemon off;

   -2  6424  6419   0  6:59下午 ??         0:00.00 nginx: worker process

  501  6474  1018   0  7:03下午 ttys016    0:00.00 grep --color=auto --exclude-dir=.bzr --exclude-dir=CVS --exclude-dir=.git --exclude-dir=.hg --exclude-dir=.svn --exclude-dir=.idea --exclude-dir=.tox nginx
- 查看端口是否被占用
是不是打开了burp suite的8080拦截。
php 启动
关闭php-fpm
sudo killall php-fpm
启动php-fpm
sudo php-fpm
如果用brew安装的可以
brew services start php
重启php-fpm
先关闭php-fpm、再自动php-fpm即可
sudo  killall  php-fpm

sudo  php-fpm
参考
https://www.jianshu.com/p/6c7cb820a020
http://jalan.space/2017/01/12/2017-01-13-mac-os-nginx/
https://blog.csdn.net/weixin_42896137/article/details/88797094
https://blog.csdn.net/leiflyy/article/details/77717524 # mac 启动php 报错解决
brew安装Nginx的更多相关文章
- Mac下用brew安装nginx
1. nginx nginx [engine x] is an HTTP and reverse proxy server, a mail proxy server, and a generic TC ...
- Mac上使用brew安装Nginx服务器
使用brew安装nginx $ brew install nginx 启动nginx sudo nginx 访问localhost:8080 发现已出现nginx的欢迎页面了.  为方便期间,做个软 ...
- Mac OS使用brew安装Nginx、MySQL、PHP-FPM的LAMP开发环境
准备工作 新版的 Mac OS 内置了Apache 和 PHP,我的系统版本是OS X 10.9.3,可以通过以下命令查看Apache和PHP的版本号: httpd -v Server version ...
- mac brew 安装 nginx fpm mysql 教程
一. 安装brew 要求:OS X 10.6以上系统,并且安装有XCode命令行工具 对于10.11的系统需要设置下local的权限为当前用户 $ sudo chown -R $(whoami):ad ...
- Mac使用brew安装nginx,并解决端口访问权限问题
1.安装 brew install nginx 2.修改配置文件 sudo vi /usr/local/etc/nginx/nginx.conf 修改默认的8080端口为80 修改日志文件地方 err ...
- mac 使用 brew 安装 nginx 及各种命令
一.安装 brew install nginx 或 sudo brew install nginx 二.启动 brew services start nginx 或 sudo brew service ...
- Mac使用brew安装nginx,并解决端口80访问权限问题
1.安装 brew install nginx 2.修改配置文件 sudo vi /usr/local/etc/nginx/nginx.conf 修改默认的8080端口为80 修改日志文件地方 err ...
- mac下安装nginx及相关配置
1. 安装 Homebrew 首先 homebrew是什么?它是Mac中的一款软件包管理工具,通过brew可以很方便的在Mac中安装软件或者是卸载软件.不了解的同学看以看官网(https://br ...
- 在 Mac OSX 上安装 nginx
今天在使用 brew 安装 nginx 时,提示错误,安装不上去: brew install nginx, 提示:/usr/local is not writable. 这个是需要修改 /usr/lo ...
随机推荐
- 2019牛客暑期多校训练营(第十场)F.Popping Balloons(线段树)
题意:现在给你n个点 现在让你横着划三条线间距为r 然后竖着划三条线间距同样为r 现在让你求经过最多的点数 思路:我们首先建一棵关于y区间的线段树 然后枚举x轴 每次更新重叠的点 然后再更新回去 找一 ...
- AtCoder Beginner Contest 176
比赛链接:https://atcoder.jp/contests/abc176 A - Takoyaki #include <bits/stdc++.h> using namespace ...
- AtCoder Beginner Contest 182 D - Wandering (前缀和)
题意:在\(x\)轴上,你刚开始在\(0\)的位置,第\(i\)次操作需要走\(A_1,...,A_i\)个单位,如果\(A_i\)为正向右走,否则向左走,求你所能走到的最大坐标. 题解:我们一步一步 ...
- poj 2566 Bound Found 尺取法
一.首先介绍一下什么叫尺取 过程大致分为四步: 1.初始化左右端点,即先找到一个满足条件的序列. 2.在满足条件的基础上不断扩大右端点. 3.如果第二步无法满足条件则到第四步,否则更新结果. 4.扩大 ...
- 头疼的Python 脚本报错
Python 脚本报错 检查是否用了制表符.变量声明前面不能用制表符,只能用空格,版本为2.7.14
- Redis内存管理中的LRU算法
在讨论Redis内存管理中的LRU算法之前,先简单说一下LRU算法: LRU算法:即Least Recently Used,表示最近最少使用页面置换算法.是为虚拟页式存储管理服务的,是根据页面调入内存 ...
- Node.js Spider
Node.js Spider How To Write a Spider using JavaScript, in order to auto download some svg images for ...
- vue-parent-child-lifecycle-order
vue-parent-child-lifecycle-order vue parent child lifecycle order live demo https://99kyx.csb.app/ h ...
- Flutter NotificationListener 监听列表的滚动
import 'package:flutter/material.dart'; import 'package:flutter_imagenetwork/flutter_imagenetwork.da ...
- NGK发力社区 打造三大社群模式
当人们谈论区块链.数字货币的时候,常常会提到这样一些词汇:社区.社群,社区对区块链项目乃至于整个区块链行业的重要性已经形成了基本的行业共识,几乎每个项目方都在想尽办法营造社区.激发社区活力. 为什么区 ...