
Spring Security 快速了解
在Spring Security之前
我曾经使用 Interceptor 实现了一个简单网站Demo的登录拦截和Session处理工作,虽然能够实现相应的功能,但是无疑Spring Security提供的配置方法更加简单明确,能够更好的保护Web应用。
Spring Security的相关结构
这里大家可以参考Spring Security的官方介绍文档:spring-security-architecture
简单的来说:
Spring Security是一个单一的
Filter,其具体的类型是FilterChainProxy,其是作为@Bean在ApplicationContext中配置的。从容器的角度来看,Spring Security是一个单一的Filter,但是在其中有很多额外的Filter,每一个都扮演着他们各自的角色,如下图所示:
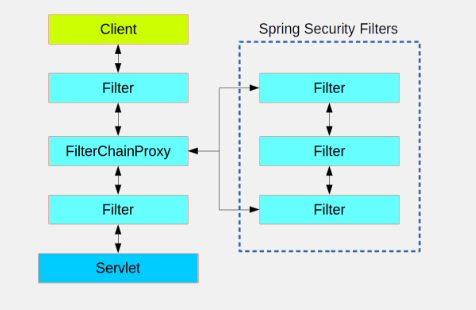
Spring Security的身份验证,主要由
AuthenticationManager这个接口完成,其验证的主要方法是authenticate()
public interface AuthenticationManager {

  Authentication authenticate(Authentication authentication)

    throws AuthenticationException;

}
- 该方法可以完成三件事:
- 如果它可以验证输入代表一个有效的主体,就返回一个
Authentication(通常包含authenticated=true) - 如果它可以验证输入代表一个无效的主体,就throw一个
AuthenticationException - 如果它不能决断,就返回
null
- 如果它可以验证输入代表一个有效的主体,就返回一个
- 最常用的
AuthicationManager的实现是ProviderManager,它将其委托给AuthticationProvider这个实例,AuthenticationProvider和AuthenticationManager有一点像,但是含有一些额外的方法,来允许调用者来查询是否支持该Authenticaion形式。
public interface AuthenticationProvider {

	Authentication authenticate(Authentication authentication)

			throws AuthenticationException;

	boolean supports(Class<?> authentication);

}
supports()方法中的Class<?>参数是Class<? extends Authentication>,它只会询问其是否支持传递给authenticate()方法。
在同一个程序中,一个
ProviderManager通过委托一系列的AuthenticaitonProviders,以此来支支持多个不同的认证机制,如果ProviderManager无法识别一个特定的Authentication实例类型,则会跳过它。很多时候,一个程序含有多个资源保护逻辑组,每一个组都有他们独有的
AuthenticationManager,通常他们共享父级,那么父级就成为了了一个"global"资源,作为所有provider的后背。
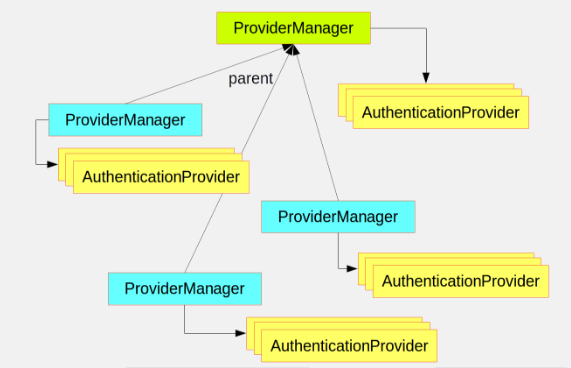
Spring Security提供了一些配置帮助我们快速的开启验证功能,最常用的就是
AuthenticationManagerBuiler,它在内存(in-memory)、JDBC、LDAP或者个人定制的UserDetailService这些领域都很擅长。
使用Spring Security实现访问和权限控制
注意:本后续代码以SpringBoot为框架实现,其DEMO Git: Spring-Security-Demo
- 主要通过重载WebSecurityConfigurerAdapter的configure方法进行访问和权限控制
| 方法 | 描述 |
|---|---|
| configure(WebSecurity) | 通过重载,配置Spring Security的Filter链 |
| configure(HttpSecurity) | 通过重载,配置如何拦截器保护请求 |
| configure(AuthenticationManagerBuilder) | 通过重载,配置user-detail服务 |
- 我们重写如下方法:
	@Override

	protected void configure(HttpSecurity http) throws Exception {

		http

		.authorizeRequests()

		.antMatchers("/index").hasAnyAuthority("ROLE_USER","ROLE_ADMIN")

		.antMatchers("/oss").hasAuthority("ROLE_ADMIN")

		.antMatchers(HttpMethod.GET, "/login").permitAll()

		.anyRequest().authenticated()

		.and()

		.formLogin()

		.loginPage("/login")

		.permitAll()//.successHandler(successHandler)

		.and()

		.logout()

		.logoutSuccessUrl("/")

		.permitAll();

	}

	@Override

	protected void configure(AuthenticationManagerBuilder auth) throws Exception {

		auth.inMemoryAuthentication().passwordEncoder(new BCryptPasswordEncoder())

				.withUser("root").password(new BCryptPasswordEncoder().encode("root")).roles("USER","ADMIN").and()

				.withUser("normal").password(new BCryptPasswordEncoder().encode("normal")).roles("USER");

		//auth.authenticationProvider(userProvider);

		//auth.authenticationProvider(afterProvider);

	}
- 通过`antMatchers()`进行URL匹配,再进行相应的处理,比如见上代码,我们将**/index**和**/oss**两个链接进行了拦截,并分别要求拥有`ROLE_USER`或`ROLE_ADMIN`、`ROLE_ADMIN`这两个身份才能访问。

- `anyRequest().authenticated()`指其他请求都会需要验证

- `formLogin()`使其有了登录页面,如果没有后面的`loginPage()`,则会默认生成一个Spring Security的页面,而后面注释掉的`successHandler`则是后续会讲到的。

- `permitAll()`则表示当前连接不需要认证。

- `logout()`会拦截所以的**\logout**请求,完成登出操作,`logoutSuccessUrl()`则是登出后的重定向地址。

- `and()`在其中起连接作用。
一些常用的保护路径配置方法
- authenticated() : 允许认证过的用户访问
- denyAll() : 无条件拒绝所有访问
- fullyAuthenticated() : 如果用户是完整认证(不通过Remeber me)访问
- hasIpAdress(String) : 如果骑牛来自给定IP地址,就可以访问
- hasAnyAuthority(String ...) : 如果用于具备任意一个给定角色,就可以访问
- hasAnthority(String) : 如果用户具备给定角色,就可以访问
- permitAl() : 无条件允许方法
- remeberMe():如果用户是通过Remeber-me认证的,就可以访问
- 另外,与Autheority对应有一个Role,两者是一个概念,Autheority必须以“ROLE_”开头,而Role不需要,见上代码。
则此时我们的root账号既能够访问index也能够访问oss,而normal账号只能访问index,不能访问oss,如果访问oss会出现:
There was an unexpected error (type=Forbidden, status=403).上面我们通过重载configure(AuthenticationManagerBuilder auth)生成了两个内存用户root和normal,我们也可以通过jdbc等方法实现。
通过AuthenticationSuccessHandler实现认证成功后的处理
- 通过实现AuthenticationSuccessHandler接口,我们可以在验证成功后执行相应的代码,比如
Token的设置等等,比如我现在打印一条登录信息,并将请求重定向到首页
@Component

public class SuccessHandler implements AuthenticationSuccessHandler{

	@Override

	public void onAuthenticationSuccess(HttpServletRequest request, HttpServletResponse response,

			Authentication authentication) throws IOException, ServletException {

		System.out.println(authentication.getName()+" is loging , role is"+authentication.getAuthorities());

		response.sendRedirect("/");

	}
- 并将其添加到
formLogin()后,即:
.formLogin()

		.loginPage("/login")

		.permitAll().successHandler(successHandler)
- 再次登录root账户,则会在控制台看到: root is loging , role is[ROLE_ADMIN, ROLE_USER]
通过AuthenticationProvider实现个性化认证
- 我们建立一个
UserAuthProvider,并让其实现AuthenticationProvider接口:
@Override

	public Authentication authenticate(Authentication authentication) throws AuthenticationException {

		System.out.println("-----------------------------------------------------------------------");

		System.out.println("This is UserAuthProvider");

		System.out.println("starting authenticate ... ...");

		System.out.println("Credentials:"+authentication.getCredentials());

		System.out.println("Name:"+authentication.getName());

		System.out.println("Class:"+authentication.getClass());

		System.out.println("Details:"+authentication.getDetails());

		System.out.println("Principal:"+authentication.getPrincipal());

		System.out.println("-----------------------------------------------------------------------");

		UsernamePasswordAuthenticationToken auth=new UsernamePasswordAuthenticationToken(authentication.getPrincipal(), authentication.getCredentials());

		return auth;

	}

	@Override

	public boolean supports(Class<?> authentication) {

		System.out.println("This is UserAuthProvider");

		System.out.println("starting supports");

		System.out.println(authentication.getClass());

		return false;

	}
- 同时,我们注释掉以前的
auth.inMemoryAuthentication(),将UserAuthProvider加入到AuthenticationManagerBuilder中,即:
	@Override

	protected void configure(AuthenticationManagerBuilder auth) throws Exception {

//		auth.inMemoryAuthentication().passwordEncoder(new BCryptPasswordEncoder())

//				.withUser("root").password(new BCryptPasswordEncoder().encode("root")).roles("USER","ADMIN").and()

//				.withUser("normal").password(new BCryptPasswordEncoder().encode("normal")).roles("USER");

		auth.authenticationProvider(userProvider);

		auth.authenticationProvider(afterProvider);

	}
- 此时我们再次登录,会发现控制台会输出
	This is UserAuthProvider

	starting supports

	 java.lang.  Class
- 其原因是我们重写的
supports()方法,永远返回false,而返回false时,即不会再调用authenticate()进行认证操作(正如上面所介绍的),我们将supports()的返回值变成true,再次登录(username: root password: 1234),则控制台会输出
This is UserAuthProvider

starting supports

class java.lang.Class

-----------------------------------------------------------------------

This is UserAuthProvider

starting authenticate ... ...

Credentials:1234

Name:root

Class:class org.springframework.security.authentication.UsernamePasswordAuthenticationToken

Details:org.springframework.security.web.authentication.WebAuthenticationDetails@166c8: RemoteIpAddress: 0:0:0:0:0:0:0:1; SessionId: node04v47liue6knt1oghnzgiqb9dx0

Principal:root

-----------------------------------------------------------------------

root is loging , role is[]
即成功登录了,因为我们在
authenticate()方法中直接声明了一个Authentication的实例UsernamePasswordAuthenticationToken,并返回了,正如上面所说,当返回Authentication实例时,则默认为授权成功,而如果我们返回null,则说明无法判断,不会登录成功。此时我们再创建一个对象
UserAfterProvider,其也实现AuthenticationProvider接口,并将UserAfterProvider和UserAuthProvider的authenticate()返回值都设置为null,我们再次使用上面的数据进行登录,控制台输出如下:
This is UserAuthProvider

starting supports

class java.lang.Class

-----------------------------------------------------------------------

This is UserAuthProvider

starting authenticate ... ...

Credentials:1234

Name:root

Class:class org.springframework.security.authentication.UsernamePasswordAuthenticationToken

Details:org.springframework.security.web.authentication.WebAuthenticationDetails@43458: RemoteIpAddress: 0:0:0:0:0:0:0:1; SessionId: node01m47f3t6xq5a470fu07jaipzb0

Principal:root

-----------------------------------------------------------------------

This is UserAfterProvider

starting supports

class java.lang.Class

-----------------------------------------------------------------------

This is UserAfterProvider

starting authenticate ... ...

Credentials:1234

Name:root

Class:class org.springframework.security.authentication.UsernamePasswordAuthenticationToken

Details:org.springframework.security.web.authentication.WebAuthenticationDetails@43458: RemoteIpAddress: 0:0:0:0:0:0:0:1; SessionId: node01m47f3t6xq5a470fu07jaipzb0

Principal:root

-----------------------------------------------------------------------
- 即两个Porvider都进行了验证,都没有通过(返回null),说明所有加入
AuthenticationManagerBuilder的验证都会进行一遍,那么如果我们将其中一个Provider的authenticate()返回值还原为Authentication实例,再次登录,则控制台会输出如下结果:
This is UserAuthProvider

starting supports

class java.lang.Class

-----------------------------------------------------------------------

This is UserAuthProvider

starting authenticate ... ...

Credentials:1234

Name:root

Class:class org.springframework.security.authentication.UsernamePasswordAuthenticationToken

Details:org.springframework.security.web.authentication.WebAuthenticationDetails@166c8: RemoteIpAddress: 0:0:0:0:0:0:0:1; SessionId: node04v47liue6knt1oghnzgiqb9dx0

Principal:root

-----------------------------------------------------------------------

root is loging , role is[]

This is UserAuthProvider

starting supports

class java.lang.Class

-----------------------------------------------------------------------

This is UserAuthProvider

starting authenticate ... ...

Credentials:null

Name:root

Class:class org.springframework.security.authentication.UsernamePasswordAuthenticationToken

Details:org.springframework.security.web.authentication.WebAuthenticationDetails@166c8: RemoteIpAddress: 0:0:0:0:0:0:0:1; SessionId: node04v47liue6knt1oghnzgiqb9dx0

Principal:root

-----------------------------------------------------------------------
因为我们重写了
AuthenticationSuccessHandler,所以验证成功后悔重定向到/,而我Controller里对/又做了一次重定向到/index,所以发生了两次验证,而这次我们发现因为UserAuthProvider通过了,所以UserAfterProvider并没有进行验证,所以我们可以知道,只要有一个Provider通过了验证我们就可以认为通过了验证。因此,我们可以通过实现
AuthenticationProvider来写入自己的一些认证逻辑,甚至可以@Autowire相关Service来辅助实现。
我的博客即将搬运同步至腾讯云+社区,邀请大家一同入驻:https://cloud.tencent.com/developer/support-plan?invite_code=1353hw8jzy7ee
Spring Security 快速了解的更多相关文章
- Spring Security 快速上手
Spring Security 框架简介 Spring Security 说明 Spring Security 基于 Spring 框架,提供了一套 Web 应用安全性的完整解决方案 关于安全方面的两 ...
- Spring Security LDAP简介
1.概述 在本快速教程中,我们将学习如何设置Spring Security LDAP. 在我们开始之前,了解一下LDAP是什么? - 它代表轻量级目录访问协议.它是一种开放的,与供应商无关的协议,用于 ...
- SpringBoot安全篇Ⅵ --- 整合Spring Security
知识储备: 关于SpringSecurity的详细学习可以查看SpringSecurity的官方文档. Spring Security概览 应用程序的两个主要区域是"认证"和&qu ...
- springboot集成spring security安全框架入门篇
一. :spring security的简介 Spring Security是一个能够为基于Spring的企业应用系统提供声明式的安全访问控制解决方案的安全框架.它提供了一组可以在Spring应用上下 ...
- 【Spring Security】一、快速入手
一 概要 Spring Security,这是一种基于 Spring AOP 和 Servlet 过滤器的安全框架.它提供全面的安全性解决方案,同时在 Web 请求级和方法调用级处理身份确认和授权.这 ...
- SpringBoot学习(二)—— springboot快速整合spring security组件
Spring Security 简介 spring security的核心功能为认证(Authentication),授权(Authorization),即认证用户是否能访问该系统,和授权用户可以在系 ...
- 快速搭建基于Spring Boot + Spring Security 环境
个人博客网:https://wushaopei.github.io/ (你想要这里多有) 1.Spring Security 权限管理框架介绍 简介: Spring Security 提供了基于 ...
- 【Spring Security】1.快速入门
1 导入Spring Security的相关依赖 <dependency> <groupId>org.springframework.boot</groupId> ...
- 这个Spring Security登录插件牛啊,验证码、小程序、OAuth2都能快速接入
上次我们把验证码登录.小程序登录优雅地集成到了Spring Security,很多同学大呼过瘾,相比较一些传统玩法高级了很多.胖哥就赶紧抓住机会举一反三,把几个非标准的OAuth2也接入了进来,主要是 ...
随机推荐
- openresty 配置 mongodb 可操作插件
1.下载lua-resty-mongol https://github.com/bigplum/lua-resty-mongol 2.配置_mongo.conf文件,在conf创建_mongo.con ...
- RAC初体验(环境搭建)
实施阶段: 1.主机配置 2.安装Clusterware 3.安装Oracle Database 4.配置Listener 5.创建ASM 6.创建Database 一.主机配置 1.网络设置 I ...
- 消息队列MSMQ的使用
1.MSMQ安装 控制面板-程序和功能-打开或关闭Windows功能-Microsoft Message Queue(MSMQ)服务器,选中所有,点击确定. 2.消息队列的应用场景(转载自http:/ ...
- SQL Server 2012 - 开窗函数
-- 开窗函数:在结果集的基础上进一步处理(聚合操作) -- Over函数,添加一个字段显示最大年龄 SELECT * , MAX(StuAge) OVER ( ) MaxStuAge FROM db ...
- Spring的绿草丛
Spring 轻量级框架,JavaEE的春天,当前主流框架 “站立式”的企业应用开发框架 目标 实现有的技术更加易用,推进编码最佳实践 内容:loC容器,AOP实现,数据访问支持:简化JDBC/ORM ...
- 导入/导出excel和PHPExcel基本使用
* PHPExcel基本使用 * PS:文章如果有误,请及时指出,给予修改 * 项目中导入PHPExcel * 可以去网上下载 github composer 都可以 * 为了方便下载,我将压缩包添加 ...
- Drill-On-YARN
1. Drill-On-YARN介绍 功能 启动 停止 扩容 缩容 failover 启动流程 下载drill的社区包,进行必要的配置,执行drill-on-yarn.sh start命令,启动dri ...
- 使用bison和yacc制作脚本语言(1)
使用bison和yacc制作脚本语言(1) 环境: 环境 windows 10 Cygwin64 语言 C 工具 mingw bison flex 主要是使用bison和flex这两个软件,编译器无所 ...
- HyperLedger Fabric 1.4 基础环境搭建(7)
学习了前面几章理论知识后,本章开始介绍实践操作,先介绍Fabric基础环境搭建,采用的操作系统为Centos 7 64位,依次介绍Docker安装.Docker-Compose安装.GO语言环境安装. ...
- python 感叹号的作用
1. !表示反转逻辑表达式的值 2. 打印格式控制中: x!r代表repr(x),x!s代表str(x),x!a代表ascii(x)