STM32 HAL库 UART使用printf
// 添加这个函数

int fputc(int ch,FILE *f)

{

    uint8_t temp[]={ch};

    HAL_UART_Transmit(&UartHandle,temp,,);

}
MDK设置:勾选Use Micro LIB
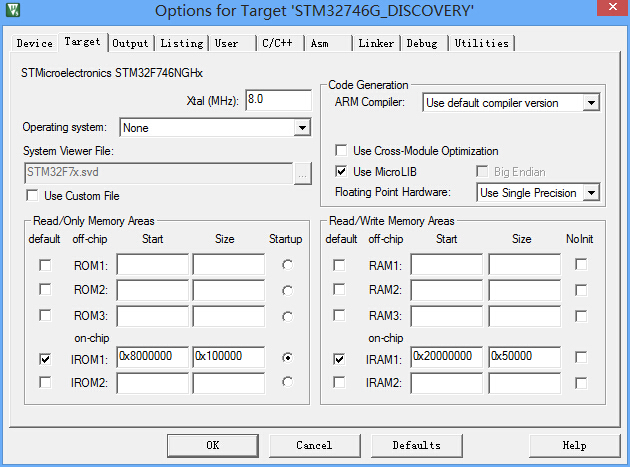
测试板子:STM32F746NG-DISCOVERY
main.c文件
/* Includes ------------------------------------------------------------------*/

#include "main.h"

#include <stdio.h>

/** @addtogroup STM32F7xx_HAL_Examples

  * @{

  */

/** @addtogroup UART_TwoBoards_ComDMA

  * @{

  */

/* Private typedef -----------------------------------------------------------*/

/* Private define ------------------------------------------------------------*/

#define TRANSMITTER_BOARD

/* Private macro -------------------------------------------------------------*/

/* Private variables ---------------------------------------------------------*/

/* UART handler declaration */

UART_HandleTypeDef UartHandle;

__IO ITStatus UartReady = RESET;

__IO uint32_t UserButtonStatus = ;  /* set to 1 after User Button interrupt  */

/* Buffer used for transmission */

uint8_t aTxBuffer[] = " ****UART_TwoBoards communication based on DMA****  ****UART_TwoBoards communication based on DMA****  ****UART_TwoBoards communication based on DMA**** ";

/* Buffer used for reception */

uint8_t aRxBuffer[RXBUFFERSIZE];

/* Private function prototypes -----------------------------------------------*/

void SystemClock_Config(void);

static void Error_Handler(void);

static uint16_t Buffercmp(uint8_t* pBuffer1, uint8_t* pBuffer2, uint16_t BufferLength);

static void MPU_Config(void);

static void CPU_CACHE_Enable(void);

/* Private functions ---------------------------------------------------------*/

UART_HandleTypeDef UartHandle;

uint8_t sendbuf[]="send ok ";

// 添加这个函数

int fputc(int ch,FILE *f)

{

    uint8_t temp[]={ch};

    HAL_UART_Transmit(&UartHandle,temp,,);

}

/**

  * @brief  Main program

  * @param  None

  * @retval None

  */

int main(void)

{

  /* Configure the MPU attributes as Write Through */

  MPU_Config();

  /* Enable the CPU Cache */

  CPU_CACHE_Enable();

  /* STM32F7xx HAL library initialization:

       - Configure the Flash ART accelerator

       - Systick timer is configured by default as source of time base, but user

         can eventually implement his proper time base source (a general purpose

         timer for example or other time source), keeping in mind that Time base

         duration should be kept 1ms since PPP_TIMEOUT_VALUEs are defined and

         handled in milliseconds basis.

       - Set NVIC Group Priority to 4

       - Low Level Initialization

     */

  HAL_Init();

  /* Configure the system clock to 216 MHz */

  SystemClock_Config();

  /* Configure LED1 */

  BSP_LED_Init(LED1);

  UartHandle.Instance        = DISCOVERY_COM1;

  UartHandle.Init.BaudRate   = ;

  UartHandle.Init.WordLength = UART_WORDLENGTH_8B;

  UartHandle.Init.StopBits   = UART_STOPBITS_1;

  UartHandle.Init.Parity     = UART_PARITY_NONE;

  UartHandle.Init.HwFlowCtl  = UART_HWCONTROL_NONE;

  UartHandle.Init.Mode       = UART_MODE_TX_RX;

    BSP_COM_DeInit(COM1,&UartHandle);

    BSP_COM_Init(COM1,&UartHandle);

//    HAL_UART_Transmit(&UartHandle,sendbuf,sizeof(sendbuf),10);

  /* Configure User push-button in Interrupt mode */

  BSP_PB_Init(BUTTON_KEY, BUTTON_MODE_EXTI);

  /* Wait for User push-button press before starting the Communication.

     In the meantime, LED1 is blinking */

    printf("hello");

  while(UserButtonStatus == )

  {

      /* Toggle LED1*/

      BSP_LED_Toggle(LED1);

      HAL_Delay();

  }

  /* Turn on LED1 if test passes then enter infinite loop */

  BSP_LED_On(LED1);

  /* Infinite loop */

  while ()

  {

  }

}

/**

  * @brief  System Clock Configuration

  *         The system Clock is configured as follow :

  *            System Clock source            = PLL (HSE)

  *            SYSCLK(Hz)                     = 216000000

  *            HCLK(Hz)                       = 216000000

  *            AHB Prescaler                  = 1

  *            APB1 Prescaler                 = 4

  *            APB2 Prescaler                 = 2

  *            HSE Frequency(Hz)              = 25000000

  *            PLL_M                          = 25

  *            PLL_N                          = 432

  *            PLL_P                          = 2

  *            PLL_Q                          = 9

  *            VDD(V)                         = 3.3

  *            Main regulator output voltage  = Scale1 mode

  *            Flash Latency(WS)              = 7

  * @param  None

  * @retval None

  */

void SystemClock_Config(void)

{

  RCC_ClkInitTypeDef RCC_ClkInitStruct;

  RCC_OscInitTypeDef RCC_OscInitStruct;

  HAL_StatusTypeDef ret = HAL_OK;

  /* Enable HSE Oscillator and activate PLL with HSE as source */

  RCC_OscInitStruct.OscillatorType = RCC_OSCILLATORTYPE_HSE;

  RCC_OscInitStruct.HSEState = RCC_HSE_ON;

  RCC_OscInitStruct.PLL.PLLState = RCC_PLL_ON;

  RCC_OscInitStruct.PLL.PLLSource = RCC_PLLSOURCE_HSE;

  RCC_OscInitStruct.PLL.PLLM = ;

  RCC_OscInitStruct.PLL.PLLN = ;

  RCC_OscInitStruct.PLL.PLLP = RCC_PLLP_DIV2;

  RCC_OscInitStruct.PLL.PLLQ = ;

  ret = HAL_RCC_OscConfig(&RCC_OscInitStruct);

  if(ret != HAL_OK)

  {

    while() { ; }

  }

  /* Activate the OverDrive to reach the 216 MHz Frequency */

  ret = HAL_PWREx_EnableOverDrive();

  if(ret != HAL_OK)

  {

    while() { ; }

  }

  /* Select PLL as system clock source and configure the HCLK, PCLK1 and PCLK2 clocks dividers */

  RCC_ClkInitStruct.ClockType = (RCC_CLOCKTYPE_SYSCLK | RCC_CLOCKTYPE_HCLK | RCC_CLOCKTYPE_PCLK1 | RCC_CLOCKTYPE_PCLK2);

  RCC_ClkInitStruct.SYSCLKSource = RCC_SYSCLKSOURCE_PLLCLK;

  RCC_ClkInitStruct.AHBCLKDivider = RCC_SYSCLK_DIV1;

  RCC_ClkInitStruct.APB1CLKDivider = RCC_HCLK_DIV4;

  RCC_ClkInitStruct.APB2CLKDivider = RCC_HCLK_DIV2;

  ret = HAL_RCC_ClockConfig(&RCC_ClkInitStruct, FLASH_LATENCY_7);

  if(ret != HAL_OK)

  {

    while() { ; }

  }

}

/**

  * @brief  Tx Transfer completed callback

  * @param  UartHandle: UART handle.

  * @note   This example shows a simple way to report end of DMA Tx transfer, and

  *         you can add your own implementation.

  * @retval None

  */

void HAL_UART_TxCpltCallback(UART_HandleTypeDef *UartHandle)

{

  /* Set transmission flag: trasfer complete*/

  UartReady = SET;

}

/**

  * @brief  Rx Transfer completed callback

  * @param  UartHandle: UART handle

  * @note   This example shows a simple way to report end of DMA Rx transfer, and

  *         you can add your own implementation.

  * @retval None

  */

void HAL_UART_RxCpltCallback(UART_HandleTypeDef *UartHandle)

{

  /* Set transmission flag: trasfer complete*/

  UartReady = SET;

}

/**

  * @brief  UART error callbacks

  * @param  UartHandle: UART handle

  * @note   This example shows a simple way to report transfer error, and you can

  *         add your own implementation.

  * @retval None

  */

void HAL_UART_ErrorCallback(UART_HandleTypeDef *UartHandle)

{

    Error_Handler();

}

/**

  * @brief EXTI line detection callbacks

  * @param GPIO_Pin: Specifies the pins connected EXTI line

  * @retval None

  */

void HAL_GPIO_EXTI_Callback(uint16_t GPIO_Pin)

{

  if(GPIO_Pin == KEY_BUTTON_PIN)

  {

    UserButtonStatus = ;

  }

}

/**

  * @brief  Compares two buffers.

  * @param  pBuffer1, pBuffer2: buffers to be compared.

  * @param  BufferLength: buffer's length

  * @retval 0  : pBuffer1 identical to pBuffer2

  *         >0 : pBuffer1 differs from pBuffer2

  */

static uint16_t Buffercmp(uint8_t* pBuffer1, uint8_t* pBuffer2, uint16_t BufferLength)

{

  while (BufferLength--)

  {

    if ((*pBuffer1) != *pBuffer2)

    {

      return BufferLength;

    }

    pBuffer1++;

    pBuffer2++;

  }

  return ;

}

/**

  * @brief  This function is executed in case of error occurrence.

  * @param  None

  * @retval None

  */

static void Error_Handler(void)

{

  /* Turn LED1 on */

  BSP_LED_On(LED1);

  while()

  {

    /* Error if LED1 is slowly blinking (1 sec. period) */

    BSP_LED_Toggle(LED1);

    HAL_Delay();

  }

}

#ifdef  USE_FULL_ASSERT

/**

  * @brief  Reports the name of the source file and the source line number

  *         where the assert_param error has occurred.

  * @param  file: pointer to the source file name

  * @param  line: assert_param error line source number

  * @retval None

  */

void assert_failed(uint8_t* file, uint32_t line)

{

  /* User can add his own implementation to report the file name and line number,

     ex: printf("Wrong parameters value: file %s on line %d\r\n", file, line) */

  /* Infinite loop */

  while ()

  {

  }

}

#endif

/**

  * @brief  Configure the MPU attributes as Write Through for SRAM1/2.

  * @note   The Base Address is 0x20010000 since this memory interface is the AXI.

  *         The Region Size is 256KB, it is related to SRAM1 and SRAM2  memory size.

  * @param  None

  * @retval None

  */

static void MPU_Config(void)

{

  MPU_Region_InitTypeDef MPU_InitStruct;

  /* Disable the MPU */

  HAL_MPU_Disable();

  /* Configure the MPU attributes as WT for SRAM */

  MPU_InitStruct.Enable = MPU_REGION_ENABLE;

  MPU_InitStruct.BaseAddress = 0x20010000;

  MPU_InitStruct.Size = MPU_REGION_SIZE_256KB;

  MPU_InitStruct.AccessPermission = MPU_REGION_FULL_ACCESS;

  MPU_InitStruct.IsBufferable = MPU_ACCESS_NOT_BUFFERABLE;

  MPU_InitStruct.IsCacheable = MPU_ACCESS_CACHEABLE;

  MPU_InitStruct.IsShareable = MPU_ACCESS_NOT_SHAREABLE;

  MPU_InitStruct.Number = MPU_REGION_NUMBER0;

  MPU_InitStruct.TypeExtField = MPU_TEX_LEVEL0;

  MPU_InitStruct.SubRegionDisable = 0x00;

  MPU_InitStruct.DisableExec = MPU_INSTRUCTION_ACCESS_ENABLE;

  HAL_MPU_ConfigRegion(&MPU_InitStruct);

  /* Enable the MPU */

  HAL_MPU_Enable(MPU_PRIVILEGED_DEFAULT);

}

/**

  * @brief  CPU L1-Cache enable.

  * @param  None

  * @retval None

  */

static void CPU_CACHE_Enable(void)

{

  /* Enable I-Cache */

  SCB_EnableICache();

  /* Enable D-Cache */

  SCB_EnableDCache();

}

/**

  * @}

  */

/**

  * @}

  */

/************************ (C) COPYRIGHT STMicroelectronics *****END OF FILE****/
STM32 HAL库 UART使用printf的更多相关文章
- STM32 HAL库 UART 串口读写功能笔记
https://www.cnblogs.com/Mysterious/p/4804188.html STM32L0 HAL库 UART 串口读写功能 串口发送功能: uint8_t TxData[10 ...
- stm32 HAL库笔记(零)
最近在设计四旋翼飞行器,用stm32f407,有三种开发方式可以选择:一.寄存器开发.二:库函数开发.三:HAL库开发,考虑了一下,选择了HAL库,原因如下: 1. 寄存器开发相对较慢,寄存器很多,配 ...
- STM32 HAL库详解 及 手动移植
源: STM32 HAL库详解 及 手动移植
- 【书籍连载】《STM32 HAL 库开发实战指南—基于F7》-第一章
从今天起,每天开始连载一章<STM32 HAL 库开发实战指南—基于F7>.欢迎各位阅读.点评.学习. 第1章 如何使用本书 1.1 本书的参考资料 本书参考资料为:<STM32 ...
- stm32 hal库串口通信资料汇集
串口的发送接收函数:HAL_UART_Transmit();串口轮询模式发送,使用超时管理机制.HAL_UART_Receive();串口轮询模式发送,使用超时管理机制.HAL_UART_Transm ...
- 【有趣的全彩LED | 编程】用STM32 HAL库让WS2812B为你所动
一.效果展示 观看演示效果:https://www.bilibili.com/video/BV1dv411Y7x3 使用STM32 HAL库编程 PWM+DMA控制输出,CubeMX生成初始工程 实现 ...
- 【情人节选帽子】TCS34725颜色传感器和Python图形界面编程(STM32 HAL库)
截图 描述: l STM32 HAL库编程 l 使用模拟IIC通信,方便程序移植 l Python界面编写,蘑菇头的帽子是什么颜色 l STM32 HAL库串口通信 l Python界面使用 ...
- 【春节歌曲回味 | STM32小音乐盒 】PWM+定时器驱动无源蜂鸣器(STM32 HAL库)
l STM32通过PWM与定时器方式控制无源蜂鸣器鸣响 l STM32小音乐盒,歌曲进度条图形显示与百分比显示,歌曲切换 l 编程使用STM32 HAL库 l IIC OLED界面编程,动画实 ...
- STM32 HAL库利用DMA实现串口不定长度接收方法
参考:https://blog.csdn.net/u014470361/article/details/79206352 我这里使用的芯片是 F1 系列的,主要是利用 DMA 数据传输方式实现的,在配 ...
随机推荐
- Nginx探索三
这次探索一下http 请求 request 这节我们讲request,在nginx中我们指的是http请求,详细到nginx中的数据结构是ngx_http_request_t. ngx_http_re ...
- C语言之基本算法33—矩阵的基本运算
//矩阵基础 /* ================================================================== 题目:输入矩阵a,b,输出a,b,a的转置矩阵 ...
- 使用UI Automation实现自动化测试--2
1. 首先建立一个待测试的winform程序,即UI Automation的服务端. 下面是button事件处理程序. private void CalculateButton_Click(objec ...
- Ubuntu下安装配置和卸载Tomcat
转载自:http://zyjustin9.iteye.com/blog/2177291 注:此处不采用apt-get安装,因为这种方式安装后,tomcat安装目录会到处都是,像天女散花一样.此处采取下 ...
- tomcat 使用log4j进行日志切割
因为tomcat catalina.out日志不会自己主动切割, 一.日志切割所需包在附近中 1. 压缩包中有三个jar包: log4j-1.2.16.jar tomcat-juli ...
- (三)spark算子 分为3大类
ation算子通过sparkContext执行提交作业的runJob,触发rdd的DAG执行 (foreach) foreach(f) 会对rdd中的每个函数进行f操作,下面的f操作就是打印输出没有元 ...
- iOS自动化构建 xcode-select: error: tool 'xcodebuild' requires Xcode, but active developer directory '/Library/D...
报这个错误的原因是xcode-select不在默认的路径 1.找到xcode-select的当前路径终端命令行 xcode-select --print-path /Library/Developer ...
- Socket编程之Tomcat模拟_采坑汇总
用java.net.Socket来模拟实现Tomcat,碰到了一些坑,大部分是没有想到的,记录下来自查. 直接上代码, public class TomcatDemo { private static ...
- POJ 1654 area 解题
Description You are going to compute the area of a special kind of polygon. One vertex of the polygo ...
- Linux安装php-7.0.16,完成php和apache的配置
Linux安装php-7.0.16,完成php和apache的配置 版本:php-7.0.16.tar.gz,libxml2-2.9.2.tar.gz(php需要它的支持,首先安装它) 说明 ...