springboot之rabbitmq
一、RabbitMQ是实现了高级消息队列协议(AMQP)的开源消息代理软件(亦称面向消息的中间件)。RabbitMQ服务器是用Erlang语言编写的,而集群和故障转移是构建在开放电信平台框架上的。所有主要的编程语言均有与代理接口通讯的客户端库。
二、目录结构
三、是使用springboot搭建rabbitmq我们需要基本的依赖包
  <parent>

        <groupId>org.springframework.boot</groupId>

        <artifactId>spring-boot-starter-parent</artifactId>

        <version>2.0.0.RELEASE</version>

    </parent>

    <dependencies>

        <dependency>

            <groupId>org.springframework.boot</groupId>

            <artifactId>spring-boot-starter-web</artifactId>

        </dependency>

        <dependency>

            <groupId>org.springframework.boot</groupId>

            <artifactId>spring-boot-starter-amqp</artifactId>

        </dependency>

    </dependencies>
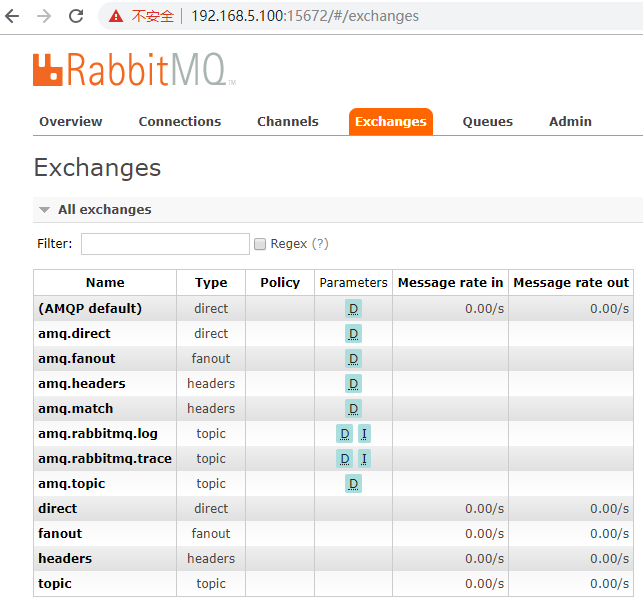
四、这里我们主要介绍6中模式的配置和使用
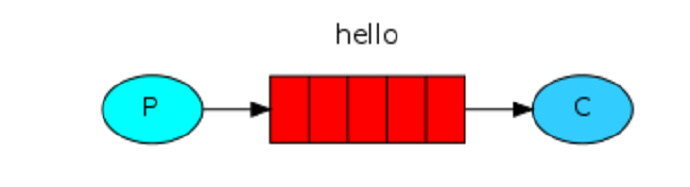
1)默认的模式(这种方式不是没有exchange,而是使用默认的exchange。默认为Direct)
声明方式:
/**

 * 第一种:使用默认的交换机(direct模式)

 */

@Configuration

public class QueueConfiguration {

    /**

     * 声明队列:队列有五个参数(String name, boolean durable, boolean exclusive, boolean autoDelete, Map<String, Object> arguments)

     * name:队列名称

     * durable:持久性

     * exclusive:排他性(独立性)

     * autoDelete:自动删除

     * arguments:其他相关参数

     * @return

     */

    @Bean

    public Queue queue() {

        return new Queue("queue", false);

    }

}
(1)简单:只有一个listener在监听queue,这样消息只能传到这个队列
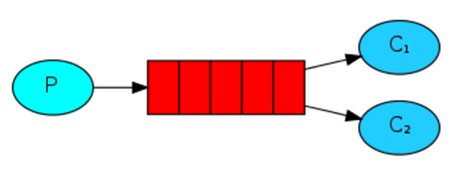
(2)进阶:如果存在多个listener监听这个queue,rabbitmq会优雅的平均分配给listener
(3)arguments(参数配置)
x-message-ttl(Time-To-Live):消息存活时间,单位毫秒
x-expires:队列没有访问超时时,自动删除(包含没有消费的消息),单位毫秒。
x-max-length:限制队列最大长度(新增后挤出最早的),单位个数。
x-max-length-bytes :限制队列最大容量
x-dead-letter-exchange:死信交换机,将删除/过期的数据,放入指定交换机。
x-dead-letter-routing-key:死信路由,将删除/过期的数据,放入指定routingKey
x-max-priority:队列优先级。
x-queue-mode:对列模式,默认lazy(将数据放入磁盘,消费时放入内存)。
x-queue-master-locator:镜像队列
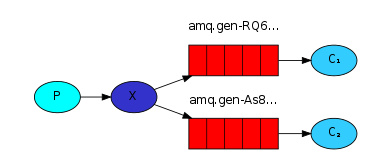
2)主题模式/通配符模式(topicExchange)

声明方式:
/**

 * 第二种:topic交换机模式(主题模式)

 */

@Configuration

public class TopicExchangeConfiguration {

    @Bean

    public Queue queue1() {

        return new Queue("queue1", false);

    }

    @Bean

    public Queue queue2() {

        return new Queue("queue2", false);

    }

    /**

     * 声明交换机类型:存在4个参数(String name, boolean durable, boolean autoDelete, Map<String, Object> arguments)

     * 这里的参数基本和queue一样的理解

     * @return

     */

    @Bean

    public TopicExchange topicExchange() {

        return new TopicExchange("topic", false, false);

    }

    /**

     * 绑定队列到交换机上面

     * @return

     */

    @Bean

    public Binding binding1() {

        return BindingBuilder.bind(queue1()).to(topicExchange()).with("*.topic");

    }

    /**

     * 这里存在两种匹配符

     * *:代表一个单位的字符(1.topic)

     * #:代表多个单位的字符(2.2.topic)

     * @return

     */

    @Bean

    public Binding binding2() {

        return BindingBuilder.bind(queue2()).to(topicExchange()).with("#.topic");

    }

}
通配符:
*:代表一个单位的字符(1.topic)
#:代表多个单位的字符(2.2.topic)
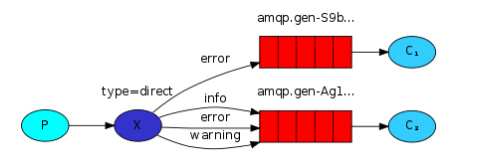
3)直连模式(directExchange)
声明方式:
/**

 * 第三种:Direct模式(直连模式,默认交换机也是这种类型)

 */

@Configuration

public class DirectExchangeConfiguration {

    @Bean

    public Queue queue3() {

        return new Queue("queue3", false);

    }

    @Bean

    public Queue queue4() {

        return new Queue("queue4", false);

    }

    /**

     * 参数和topic的交换机类型一样

     * @return

     */

    @Bean

    public DirectExchange directExchange() {

        return new DirectExchange("direct", false, false);

    }

    @Bean

    public Binding binding3() {

        return BindingBuilder.bind(queue3()).to(directExchange()).with("direct.3");

    }

    @Bean

    public Binding binding4() {

        return BindingBuilder.bind(queue4()).to(directExchange()).with("direct.4");

    }

}
4)发布/订阅模式(fanout模式)
声明方式:
/**

 * 第四种:fanout模式(发布/订阅模式)

 */

@Configuration

public class FanoutExchangeConfiguration {

    @Bean

    public Queue queue5() {

        return new Queue("queue5", false);

    }

    @Bean

    public Queue queue6() {

        return new Queue("queue6", false);

    }

    @Bean

    public FanoutExchange fanoutExchange() {

        return new FanoutExchange("fanout", false, false);

    }

    /**

     * 这里的绑定不需要routingKey

     * @return

     */

    @Bean

    public Binding binding5() {

        return BindingBuilder.bind(queue5()).to(fanoutExchange());

    }

    /**

     * 相比于topic,fanout只能全部发送,topic可以更具匹配规则进行

     * @return

     */

    @Bean

    public Binding binding6() {

        return BindingBuilder.bind(queue6()).to(fanoutExchange());

    }

}
说明:fanout模式是不需要绑定routingKey,这种方式也是广播形式的主要方式
5)消息头模式(headers模式)
/**

 * 第五种:headers模式(消息头模式)

 */

@Configuration

public class HeadersExchangeConfiguration {

    @Bean

    public Queue queue7() {

        return new Queue("queue7", false);

    }

    @Bean

    public Queue queue8() {

        return new Queue("queue8", false);

    }

    @Bean

    public HeadersExchange headersExchange() {

        return new HeadersExchange("headers", false, false);

    }

    /**

     * 确认header是否存在

     * @return

     */

    @Bean

    public Binding binding7() {

        return BindingBuilder.bind(queue7()).to(headersExchange()).where("header").exists();

    }

    @Bean

    public Binding binding8() {

        return BindingBuilder.bind(queue8()).to(headersExchange()).where("header").exists();

    }

}
说明:这种方式主要是限定headers,方便通过其他方式携带数据。
6)rpc:
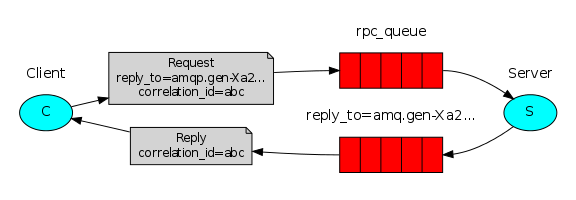
声明方式(大同小异):
@Configuration

public class RpcConfiguration {

    @Bean

    public Queue rpc() {

        return new Queue("rpc", false);

    }

    @Bean

    public DirectExchange rpcExchange() {

        return new DirectExchange("rpcExchange", false, false);

    }

    @Bean

    public Binding rpcBinding() {

        return BindingBuilder.bind(rpc()).to(rpcExchange()).with("rpcRoutingKey");

    }

}
lisntener:
@Component

@RabbitListener(queues = "rpc")

public class RpcListener {

    @RabbitHandler

    public String rpcListener(String text, Channel channel, Message message) throws IOException {

        System.out.println("rpcServer:" + text);

        MessageProperties messageProperties = message.getMessageProperties();

        channel.basicAck(messageProperties.getDeliveryTag(), false);

        return "success";

    }

}
注意这里是有返回数据的。
客户端(publish)
这里推送存在两种方式,同步和异步
a、同步:主题这里默认超时是5秒,可以通过rabbitTemplate设置setReceiveTimeout超时时间。
     String message = (String) rabbitTemplate.convertSendAndReceive("rpcExchange", "rpcRoutingKey", time);

        System.out.println("rpcClient:" + message);
b、异步:
     AsyncRabbitTemplate.RabbitConverterFuture<Object> future =

                asyncRabbitTemplate.convertSendAndReceive("rpcExchange", "rpcRoutingKey", time);

        System.out.println("rpcClient:" + future.get());
注意:AsyncRabbitTemplate是需要手动去配置的。并且需要配置AbstractMessageListenerContainer
如果没有配置AbstractMessageListenerContainer,则需要配置amq.rabbitmq.reply-to(amq.*需要权限才可以配置)
这里是spring对rabbitmq在源码部分对其进行的判断,如果不理解可以自己跟convertSendAndReceive函数
    @Bean

    public AsyncRabbitTemplate asyncRabbitTemplate(DirectMessageListenerContainer container) {

        AsyncRabbitTemplate asyncRabbitTemplate = new AsyncRabbitTemplate(rabbitTemplate, container);

        return asyncRabbitTemplate;

    }

    @Bean

    public DirectMessageListenerContainer directMessageListenerContainer(ConnectionFactory connectionFactory) {

        DirectMessageListenerContainer container = new DirectMessageListenerContainer();

        container.setConnectionFactory(connectionFactory);

        container.setQueueNames("rpc");

        //这里我改成手动了,但是没有好的方式去获取channel,然后ack.所以我这里使用的自动。

        container.setAcknowledgeMode(AcknowledgeMode.AUTO);

        //这里可以使用默认的执行器:SimpleAsyncTaskExecutor(但是,这里不是采用的线程池而是直接new Thread)

        container.setTaskExecutor(new ThreadPoolExecutor(5, 60, 60L, TimeUnit.SECONDS, new LinkedBlockingQueue<>(3000)));

        return container;

    }
五、消息发送者
1)yaml配置
server:

  port: 9001

spring:

  rabbitmq:

    host: 192.168.5.100

    port: 5672

    username: guest

    password: guest

    publisher-confirms: true

    publisher-returns: true

    template:

      #参数意义:true当没有合适的queue直接返回到ReturnCallback

      #         false没有合适的直接丢弃

      mandatory: true
2)如果配置了publisher-confirms、publisher-returns为true.并且加入template.mandatory为true。可以配置如下
@Component

public class RabbitmqPublisherConfiguration {

    @Autowired

    private RabbitTemplate rabbitTemplate;

    @PostConstruct

    public RabbitTemplate rabbitTemplate() {

        //1、设置publisher-confirms为true

        //2、发布确认,只是在exchange范围

        //3、如果没有exchange,则false.如果过为true,则说明发送到exchange成功

        rabbitTemplate.setConfirmCallback((correlationData, ack, s) -> {

            if (ack) {

                System.out.println("send success");

            } else {

                System.out.println("send fail");

            }

        });

        //1、设置publisher-returns为true

        //2、如果没有发布成功,则将消息返回。当然这只是在接受消息层,不是exchange。

        rabbitTemplate.setReturnCallback((message, id, reason, exchange, routingKey) -> {

            StringBuffer buffer = new StringBuffer();

            buffer.append("----------------------------------------\n");

            buffer.append("接受消息: {0},失败!\n");

            buffer.append("消息ID: {1}\n");

            buffer.append("原因: {2}\n");

            buffer.append("exchange: {3}\n");

            buffer.append("routingKey: {4}\n");

            buffer.append("----------------------------------------");

            MessageFormat messageFormat = new MessageFormat(buffer.toString());

            String text = messageFormat.format(new Object[]{new String(message.getBody()), id, reason, exchange, routingKey});

            System.out.println(text);

        });

        return rabbitTemplate;

    }

}
a、ConfirmCallback:只是针对exchange,如果消息可以通过exchange,则发送成功。反之则失败
b、ReturnCallback:这个只是针对于routingKey,是否通过。如果这个routingKey不存在,则将消息返回。反之则发送。
3)消息发送
@Component

@EnableScheduling

public class RabbitmqPublisher {

    @Autowired

    private RabbitTemplate rabbitTemplate;

    @Scheduled(cron = "0/15 * * * * ?")

    public void execute() {

        DateTimeFormatter formatter = DateTimeFormatter.ofPattern("yyyy-MM-dd HH:mm:ss");

        String time = formatter.format(LocalDateTime.ofInstant(Instant.now(), ZoneId.systemDefault()));

        //默认

        rabbitTemplate.convertAndSend("queue", time);

        //主题模式

        rabbitTemplate.convertAndSend("topic", "1.topic", time);

        rabbitTemplate.convertAndSend("topic", "2.2.topic", time);

        //直连模式

        rabbitTemplate.convertAndSend("direct", "direct.3", time);

        rabbitTemplate.convertAndSend("direct", "direct.4", time);

        //广播模式

        rabbitTemplate.convertAndSend("fanout", "", time);

        //headers模式

        MessageProperties messageProperties = new MessageProperties();

        messageProperties.setHeader("header", "header");

        messageProperties.setContentType(MessageProperties.CONTENT_TYPE_TEXT_PLAIN);

        Message message = MessageBuilder.withBody(time.getBytes()).andProperties(messageProperties).build();

        rabbitTemplate.convertAndSend("headers", "", message);

    }

}
六、消息监听者
1)yaml配置
server:

  port: 9002

spring:

  rabbitmq:

    host: 192.168.5.100

    port: 5672

    username: guest

    password: guest

    listener:

      direct:

        acknowledge-mode: manual

      simple:

        acknowledge-mode: manual
说明:如果配置acknowledge-mode: manual(手动模式),则需要手动确认消息。如果没有则不需要手动确认,否则会报错。
需要在每个listener下面加上
channel.basicAck(message.getMessageProperties().getDeliveryTag(), false);
listener的对手动对消息的处理方式有3种:Ack、Nack、Reject
Ack:确认收到消息
Nack:不确认收到消息
Reject:拒接消息
2)listener
@Component

public class RabbitmqListener {

    //1.默认队列

    @RabbitListener(queues = "queue")

    public void queueDouble1(String text, Channel channel, Message message) throws IOException {

        System.out.println("queueDouble1:" + text);

        channel.basicAck(message.getMessageProperties().getDeliveryTag(), false);

    }

    @RabbitListener(queues = "queue")

    public void queueDouble2(String text, Channel channel, Message message) throws IOException {

        System.out.println("queueDouble2:" + text);

        channel.basicAck(message.getMessageProperties().getDeliveryTag(), false);

    }

    //2.主题队列

    @RabbitListener(queues = "queue1")

    public void queue1(String text, Channel channel, Message message) throws IOException {

        System.out.println("queue1:" + text);

        channel.basicAck(message.getMessageProperties().getDeliveryTag(), false);

    }

    @RabbitListener(queues = "queue2")

    public void queue2(String text, Channel channel, Message message) throws IOException {

        System.out.println("queue2:" + text);

        channel.basicAck(message.getMessageProperties().getDeliveryTag(), false);

    }

    //3.直连队列

    @RabbitListener(queues = "queue3")

    public void queue3(String text, Channel channel, Message message) throws IOException {

        System.out.println("queue3:" + text);

        channel.basicAck(message.getMessageProperties().getDeliveryTag(), false);

    }

    @RabbitListener(queues = "queue4")

    public void queue4(String text, Channel channel, Message message) throws IOException {

        System.out.println("queue4:" + text);

        channel.basicAck(message.getMessageProperties().getDeliveryTag(), false);

    }

    //4.广播队列

    @RabbitListener(queues = "queue5")

    public void queue5(String text, Channel channel, Message message) throws IOException {

        System.out.println("queue5:" + text);

        channel.basicAck(message.getMessageProperties().getDeliveryTag(), false);

    }

    @RabbitListener(queues = "queue6")

    public void queue6(String text, Channel channel, Message message) throws IOException {

        System.out.println("queue6:" + text);

        channel.basicAck(message.getMessageProperties().getDeliveryTag(), false);

    }

    //5.消息头队列

    @RabbitListener(queues = "queue7")

    public void queue7(String text, Channel channel, Message message) throws IOException {

        System.out.println("queue7:" + text);

        System.out.println("header7:" + message.getMessageProperties().getHeaders().get("header"));

        channel.basicAck(message.getMessageProperties().getDeliveryTag(), false);

    }

    @RabbitListener(queues = "queue8")

    public void queue8(String text, Channel channel, Message message) throws IOException {

        System.out.println("queue8:" + text);

        System.out.println("header8:" + message.getMessageProperties().getHeaders().get("header"));

        channel.basicAck(message.getMessageProperties().getDeliveryTag(), false);

    }

}
2)也可以写成,另外一种方式
@Component

@RabbitListener(queues = "queue")

public class RabbitmqHandlerListener {

    @RabbitHandler

    public void messageHandler(String text, Channel channel, Message message) throws IOException {

        System.out.println("queueDouble3:" + text);

        channel.basicAck(message.getMessageProperties().getDeliveryTag(), false);

    }

}
七、测试
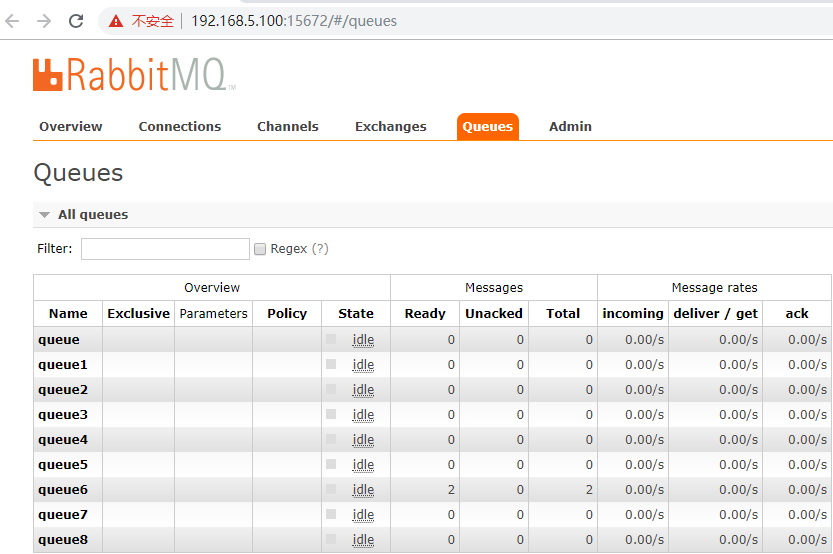
1)默认:

均匀的分配到每一个节点
2)主题(topic):

只要符合规则就接受
3)直连(direct)
和模式方式一样,一对一。多个均匀分布
4)广播(fanout)
5)消息头(headers)
八、当然例子也可以参考官网:https://www.rabbitmq.com/getstarted.html
九、源码:https://github.com/lilin409546297/springboot-rabbitmq
springboot之rabbitmq的更多相关文章
- SpringBoot集成rabbitmq(二)
前言 在使用rabbitmq时,我们可以通过消息持久化来解决服务器因异常崩溃而造成的消息丢失.除此之外,我们还会遇到一个问题,当消息生产者发消息发送出去后,消息到底有没有正确到达服务器呢?如果不进行特 ...
- SpringBoot之RabbitMQ的使用
一 .RabbitMQ的介绍 RabbitMQ是消息中间件的一种,消息中间件即分布式系统中完成消息的发送和接收的基础软件,消息中间件的工作过程可以用生产者消费者模型来表示.即,生产者不断的向消息队列发 ...
- SpringBoot集成RabbitMQ消息队列搭建与ACK消息确认入门
1.RabbitMQ介绍 RabbitMQ是实现AMQP(高级消息队列协议)的消息中间件的一种,最初起源于金融系统,用于在分布式系统中存储转发消息,在易用性.扩展性.高可用性等方面表现不俗.Rabbi ...
- Spring-boot之 rabbitmq
今天学习了下spring-boot接入rabbitmq. windows下的安装:https://www.cnblogs.com/ericli-ericli/p/5902270.html 使用博客:h ...
- springboot学习笔记-6 springboot整合RabbitMQ
一 RabbitMQ的介绍 RabbitMQ是消息中间件的一种,消息中间件即分布式系统中完成消息的发送和接收的基础软件.这些软件有很多,包括ActiveMQ(apache公司的),RocketMQ(阿 ...
- SpringBoot集成RabbitMQ
官方说明:http://www.rabbitmq.com/getstarted.html 什么是MQ? MQ全称为Message Queue, 消息队列(MQ)是一种应用程序对应用程序的通信方法.MQ ...
- 【SpringBoot系列5】SpringBoot整合RabbitMQ
前言: 因为项目需要用到RabbitMQ,前几天就看了看RabbitMQ的知识,记录下SpringBoot整合RabbitMQ的过程. 给出两个网址: RabbitMQ官方教程:http://www. ...
- SpringBoot系列八:SpringBoot整合消息服务(SpringBoot 整合 ActiveMQ、SpringBoot 整合 RabbitMQ、SpringBoot 整合 Kafka)
声明:本文来源于MLDN培训视频的课堂笔记,写在这里只是为了方便查阅. 1.概念:SpringBoot 整合消息服务 2.具体内容 对于异步消息组件在实际的应用之中会有两类: · JMS:代表作就是 ...
- rabbitmq学习(五):springboot整合rabbitmq
一.Springboot对rabbitmq的支持 springboot提供了对rabbitmq的支持,并且大大简化了rabbitmq的相关配置.在springboot中,框架帮我们将不同的交换机划分出 ...
随机推荐
- .net Cookie的操作
using System; using System.Collections.Generic; using System.Web; namespace Zhong.Core { /// <sum ...
- Shell: extract more from listener.log (分析oracle监听日志)
最近遇到了两起数据库连接数不足的问题, 通常都会预留一些会话增加的情况, 但在一些特殊情况下如连接风暴(logon storm), 如果在监听中没有做rate限流,对数据库来说巨大的冲击可能会导致数据 ...
- 用CAShapeLayer写股市K线图动画效果
用CAShapeLayer写股市K线图动画效果 说明 入市有风险,炒股需谨慎.(因项目需求,本人提供了写这种效果的源码) 效果 源码 // // ViewController.m // Path // ...
- python安装lib库
time:2015/11/11 双十一 一.初衷 看到一篇帖子[1],里面有python代码,就想实现一下,代码如下: import cv2 as cv import numpy as np from ...
- RabbitMQ学习---RabbitMQ的学习
[更多参考]http://www.cnblogs.com/alex3714/articles/5248247.html
- web开发方面会遇到哪些缓存?分别如何优化
Web缓存定义: Web缓存游走于服务器和客户端之间,这个服务器可能是源服务器(资源所驻留的服务器Add),数量可能是1个或多个. Web缓存就在服务器-客户端之间搞监控,监控请求,并且把请求输出的内 ...
- .Linode服务器的使用 网站迁移
很多建站的朋友习惯了虚拟主机的 Cpanel 面板,但是面对 VPS 都感觉无所适从.毕竟外贸人很少接触到这类知识,所以需要一个贴心的新手教程. Linode VPS:国外最好的VPS注册购买教程 撇 ...
- 【模块化】 RequireJS入门教程总结与推荐
之所以学习RequireJS,肯定对 模块化有一定的理解.这里有几篇学习 RequireJS的文章,推荐给大家去学习. Javascript模块化编程(一):模块的写法 Javascript模块化编程 ...
- python第十七课——列表生成式
1.列表生成式: 什么是列表生成式? 它就是一串表达式,专门用于生成列表对象,当中包含一系列的业务逻辑: 结构:简介.优雅.阅读性好:比传统获取列表对象来的更加的方便: 它是语法糖的一种: 什么是语法 ...
- 代理错误[WinError 10061]
操作过程: import urllib.request from urllib.error import URLError,HTTPError proxy_handler = urllib.reque ...