android 开发 实现一个activity变成dialog对话框
效果图
前言
首先说说为什么需要大费周章的去用activity实现一个dialog,明明android系统已经提供了一个更方便的dialog了。原因如下:
1.activity模式的dialog可以实现更多的功能,比如activity的值传入与传出,生命周期的使用等等。这个是一个dialog无法具备的功能。
2.这样一个activity有的对话框就算可以实现很多功能,用那些地方可以实现运用环境呢?举例一个,在头像设置或者图片选择的情况下可以使用这种模式的对话框,因为头像设置如果在很多地方有大量需要复用,在这个需要使用头像设置的activity下面就需要复写启动相机或者启动相册的代码,而将activity作为对话框(这对话框activity里写入启动相机或者相册的代码),我们就可以反复调用它。因为我们可以使用Intent传入关键的值在分别获取我们想要的图片。
3.在一些不在前台的情况下,启动一个对话框(比如在service里..)
实现思维
1.首先我们需要在styles.xml 写一个适用与dialog形式的theme
2.在AndroidManifest.xml,添加我们写的theme的配置。
3.然后是创建activity,并且写入自己想要的xml布局。
4.有时候,你已经在AndroidManifest.xml里面隐藏了标题栏,但是这个时候在sytles.xml的隐藏标题栏没有作用,我们需要在代码上隐藏标题栏。
1.首先我们需要在styles.xml 写一个适用与dialog形式的theme
<style name="dialogStyle" parent="AppTheme">

        <!--android:windowBackground 设置背景透明-->

        <item name="android:windowBackground">@android:color/transparent</item>

        <!--android:windowNoTitle 设置没有标题-->

        <item name="android:windowNoTitle">true</item>

        <!--android:windowIsFloating  设置浮在最上面 -->

        <item name="android:windowIsFloating">true</item>

        <!--android:windowIsTranslucent 设置窗口是半透明的-->

        <item name="android:windowIsTranslucent">true</item>

        <!--android:windowContentOverlay 设置窗口内容叠加 是否有覆盖-->

        <item name="android:windowContentOverlay">@null</item>

        <!--android:windowAnimationStyle 设置弹出动画-->

        <item name="android:windowAnimationStyle">@android:style/Animation.Dialog</item>

        <!--android:backgroundDimEnabled 设置背景是否模糊 -->

        <item name="android:backgroundDimEnabled">true</item>

    </style>
2.然后是创建activity,并且在AndroidManifest.xml,添加我们写的theme
 <activity

            android:name=".myAppTools.AddAvatar"

            android:theme="@style/MyToolsAddAvatar" />
3.写入自己想要的xml布局
<?xml version="1.0" encoding="utf-8"?>

<RelativeLayout xmlns:android="http://schemas.android.com/apk/res/android"

    xmlns:app="http://schemas.android.com/apk/res-auto"

    xmlns:tools="http://schemas.android.com/tools"

    android:layout_width="match_parent"

    android:layout_height="match_parent"

    android:orientation="horizontal"

    android:id="@+id/AddAvatar_Dialog_blank"

    tools:context="com.example.lenovo.mydemoapp.myAppTools.AddAvatar">

        <LinearLayout

            android:layout_width="match_parent"

            android:layout_height="wrap_content"

            android:orientation="vertical"

            android:background="@color/colorWhite"

            android:layout_alignParentBottom="true"

            android:padding="10dp">

            <LinearLayout

                android:layout_width="match_parent"

                android:layout_height="wrap_content"

                android:layout_marginTop="10dp"

                android:orientation="horizontal">

                <TextView

                    android:layout_width="match_parent"

                    android:layout_height="wrap_content"

                    android:layout_gravity="center"

                    android:layout_marginLeft="10dp"

                    android:text="选择添加方式"

                    android:textColor="@color/colorBlue"

                    android:textSize="@dimen/BigTextSize" />

            </LinearLayout>

            <LinearLayout

                android:layout_width="match_parent"

                android:layout_height="1px"

                android:layout_margin="10dp"

                android:background="@color/colorBlue"></LinearLayout>

            <LinearLayout

                android:id="@+id/AddAvatar_Dialog_CameraButton"

                android:layout_width="match_parent"

                android:layout_height="wrap_content"

                android:background="@drawable/button_background_white_change_gray"

                android:orientation="horizontal">

                <ImageView

                    android:layout_width="wrap_content"

                    android:layout_height="wrap_content"

                    android:src="@mipmap/ic_camera" />

                <TextView

                    android:layout_width="wrap_content"

                    android:layout_height="wrap_content"

                    android:layout_gravity="center"

                    android:layout_marginLeft="20dp"

                    android:text="拍摄照片"

                    android:textColor="@color/colorBlue"

                    android:textSize="@dimen/BigTextSize" />

            </LinearLayout>

            <LinearLayout

                android:id="@+id/AddAvatar_Dialog_GalleryButton"

                android:layout_width="match_parent"

                android:layout_height="wrap_content"

                android:background="@drawable/button_background_white_change_gray"

                android:orientation="horizontal">

                <ImageView

                    android:layout_width="wrap_content"

                    android:layout_height="wrap_content"

                    android:src="@mipmap/ic_gallery" />

                <TextView

                    android:layout_width="wrap_content"

                    android:layout_height="wrap_content"

                    android:layout_gravity="center"

                    android:layout_marginLeft="20dp"

                    android:text="在相册中选择"

                    android:textColor="@color/colorBlue"

                    android:textSize="@dimen/BigTextSize" />

            </LinearLayout>

        </LinearLayout>

</RelativeLayout>
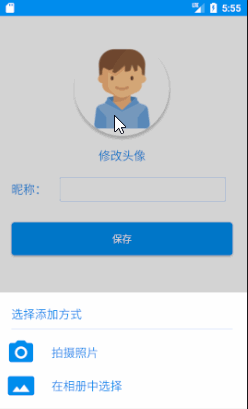
预览图:

4.有时候,你已经在AndroidManifest.xml里面隐藏了标题栏,但是这个时候在sytles.xml的隐藏标题栏没有作用,我们需要在代码上隐藏标题栏。
protected void onCreate(Bundle savedInstanceState) {

        super.onCreate(savedInstanceState);

        setContentView(R.layout.activity_add_avatar);

        //也可以用下面的办法,在代码里隐藏标题栏

        ActionBar actionbar = getSupportActionBar();

        if(actionbar != null){

            actionbar.hide();

        }

}
android 开发 实现一个activity变成dialog对话框的更多相关文章
- android开发中一个activity如何调用另一个xml中的控件
有时候,我们需要在一个activity中使用另一个activity中的控件,这时候就不能直接findViewById,不然会报错指向空对象,这时就需要像下面这样做. LayoutInflater fa ...
- Android开发(19)---常见dialog对话框的运用
Dialog是android开发过程中最常用到的组件之一,Dialog的创立办法有两种: 一是直接new一个Dialog目标,然后调用Dialog目标的show和dismiss办法来操控对话框的显现和 ...
- Android Activity作为dialog对话框的使用详细介绍
Activity做为Android应用层四大组件的重要组成部分,它的灵活性.可扩性无论是在应用还是游戏方面都得到了广泛应用,本文主要介绍Activity作为dialog对话框 的使用方法进行说明. 本 ...
- android开发中的 Activity 与 Context 区别与联系
Context 是 Application /Activity /Service的基类 Intent(Context , Class); Activity中的上下文Context是随着活动的产生而产生 ...
- Android开发工程师文集-Activity生命周期,启动方式,Intent相关介绍,Activity详细讲解
前言 大家好,给大家带来Android开发工程师文集-Activity生命周期,启动方式,Intent相关介绍,Activity详细讲解的概述,希望你们喜欢 Activity是什么 作为一个Activ ...
- Android开发之入口Activity
Android开发之入口Activity Adnroid App是怎样确定入口Activity的? 难道就由于class的类名叫MainActivity,布局文件叫activity_main.xml? ...
- Android世界第一个activity启动过程
Android世界第一个activity启动过程 第一次使用Markdown,感觉不错. Android系统从按下开机键一直到launcher的出现,是一个如何的过程,中间都做出了什么操作呢.带着这些 ...
- Android开发中在一个Activity中关闭另一个Activity
比如有ActivityA, ActivityB,在ActivityB中关闭ActivityA 解决方案: 1. 在 ActivityA 里面设置一个静态的变量instance,初始化为this在 Ac ...
- Android学习(十九)Dialog对话框
一.什么是Dialog对话框 对话框是当前页面中弹出的一个小窗口,用于显示重要的提示信息,提示用户输入信息,确认信息,或者显示某种状态,如下载进度,退出提示等等.用户需要与对话框进行交互,才能回到原窗 ...
随机推荐
- MS DSVM、DLVM
DSVM(Data Science Virtual Machine 数据科学虚拟机) 是专为研究数据科学生成的 Microsoft Azure 云上的自定义 VM 映像.它预装并预配了许多热门数据科 ...
- 2017.11.7 ant design - upload 组件的使用, react 条件渲染以及 axios.all() 的使用
一.主要任务:悉尼小程序管理后台,添加景点页面的开发 二.所遇问题及解决 1. 上传多个不同分类音频信息时,如中文音频和英文音频,要求音频不是放在一个数组中的,每个音频是一个独立的字段,此时: < ...
- DynArrayToVariant DynArrayFromVariant复制动态数
type intArr=array of Integer; procedure TfrmMainDA.Button2Click(Sender: TObject);var aa:intArr;bb:in ...
- LeetCode——10. Regular Expression Matching
一.题目链接:https://leetcode.com/problems/regular-expression-matching/ 二.题目大意: 实现一个正则表达式,该正则表达式只有两种特殊的字符— ...
- 搜索引擎(lucene及周边) 涉及的一些算法总结
一)分词 1)正向/逆向最大匹配算法 典型:IKAnalyzer采用的是正向迭代最细粒度切分算法 IKAnalyzer源码简单分析: http://www.cnblogs.com/huangfox/p ...
- 【Centos7裁剪】
#!/bin/sh rootdir=`pwd` rm -rf ${rootdir}/centos* KERNEL_DIR=${rootdir}/kernel ROOTFS_DIR=${rootdir} ...
- Windows进程单实例运行
场景 Windows进程单实例运行,如果有进程没有退出,继续等待,直到进程完全退出,才会进入下一个实例 HANDLE pHandle = NULL; do { pHandle = ...
- erlang 安装
[root@Aliyun software]# rpm -Uvh erlang-solutions-1.0.1.noarch.rpm [root@Aliyun software]# yum -y in ...
- 学习笔记之Everything
Everything (software) - Wikipedia https://en.wikipedia.org/wiki/Everything_(software) Everything is ...
- hessian 反序列化问题
有class 比如 class Test{ private TestArrayList list=new TestArrayList(""); public static void ...