How to install cacti on centos 6
Cacti – Network and performance monitoring tool
Cacti is one of best monitoring tool used to monitor network, CPU load, memory, Disk and other services.
Cacti uses PHP for front end, RRDTool for graphing and mysql for storage.
Cacti installation on centos requires LAMP setup and SNMP.
Install cacti on centos 6.
Before installing cacti, first we need to setup apache with php, mysql and SNMP services. you can also refer this post (Installing Apache2 , Mysql server and PHP on Centos 6 (LAMP)) for complete LAMP setup.
Install apache, php and mysql
注意 : 新版本Cacti要求版本在5.6以上
Install cacti on centos 6.
Step 1 » Issue the below command to install apache, php and mysql.#####[root@krizna ~]# yum install mysql-server mysql php php-mysql httpd
[root@krizna ~]# yum install httpd
下载安装最新的rpm文件
rpm -Uvh http://repo.mysql.com/mysql-community-release-el6-5.noarch.rpm

- 6
安装MySQL,输入命令:
yum install mysql-community-server
Step 2 » Start mysql and apache service[root@krizna ~]# chkconfig --level 235 httpd on
[root@krizna ~]# service httpd start
[root@krizna ~]# chkconfig --level 235 mysqld on
[root@krizna ~]# service mysqld start
Setup mysql server
Step 3 » Issue the below command to create mysql root password.[root@krizna ~]# mysqladmin -u root password 'newpassword'
[and]
issue this command to secure your mysql database.[root@krizna ~]# /usr/bin/mysql_secure_installation
Step 4 » Create new database “cactidb” and username/password to access “cactidb” database .[root@krizna ~]# mysql -u root -pmysql> create database cactidb;
Query OK, 1 row affected (0.00 sec)mysql> GRANT ALL ON cactidb.* TO usercacti@localhost IDENTIFIED BY 'passwordcacti';
Query OK, 0 rows affected (0.00 sec)
mysql> quit
Here “usercacti” is the username and “passwordcacti” is the password to access “cactidb” database.
Install SNMP
Step 5 » Now install SNMP by typing the below command.[root@krizna ~]# yum install net-snmp-utils php-snmp net-snmp-libs
Step 6 » Rename the original snmpd.conf file and create a new one .[root@krizna ~]# mv /etc/snmp/snmpd.conf snmpd.conf.org
[root@krizna ~]# touch /etc/snmp/snmpd.conf
Step 7 » Add the below lines to /etc/snmp/snmpd.conf ( New file ).
|
1
2
3
4
5
6
7
8
|
com2sec local localhost public
group MyRWGroup v1 local
group MyRWGroup v2c local
group MyRWGroup usm local
view all included .1 80
access MyRWGroup "" any noauth exact all all none
syslocation srvroom , linux monitor
syscontact krizna (admin@krizna.com)
|
Step 8 » Now start the snmp service[root@krizna ~]# chkconfig --level 235 snmpd on
[root@krizna ~]# service snmpd start
Step 9 » Issue the below command to test your snmp config[root@krizna ~]# snmpwalk -v 1 -c public localhost IP-MIB::ipAdEntIfIndex
IP-MIB::ipAdEntIfIndex.127.0.0.1 = INTEGER: 1
IP-MIB::ipAdEntIfIndex.192.168.1.10 = INTEGER: 2
You should able to get your ip details .
Install Cacti
For installing cacti through yum , you must enable EPEL repository. you can find latest EPEL repository rpm here ( http://ftp.jaist.ac.jp/pub/Linux/Fedora/epel/6/i386/repoview/epel-release.html )
Step 10 »Install the latest EPEL rpm .[root@krizna ~]# rpm -ivh http://ftp.jaist.ac.jp/pub/Linux/Fedora/epel/6/i386/epel-release-6-8.noarch.rpm
Step 11 » Install cacti through yum[root@krizna ~]# yum install cacti
Configure cacti
Step 12 » Now import cacti database tables from the file cacti.sql . Issue the below command to find the location of cacti.sql file.[root@krizna ~]# rpm -ql cacti | grep cacti.sql
/usr/share/doc/cacti-0.8.8a/cacti.sql
Issue the below command to import tables to cactidb[root@krizna ~]# mysql -u root -p cactidb < /usr/share/doc/cacti-0.8.8a/cacti.sql
Step 13 » Now open /etc/cacti/db.php file and edit the below lines .
|
1
2
3
4
|
$database_default = "cactidb";
$database_hostname = "localhost";
$database_username = "usercacti";
$database_password = "passwordcacti";
|
Step 14 » Open /etc/httpd/conf.d/cacti.conf file and comment all “Deny from all” lines.
Step 15 » open /etc/cron.d/cacti file and uncomment the line .*/5 * * * * cacti /usr/bin/php /usr/share/cacti/poller.php > /dev/null 2>&1
Step 16» Now restart apache and cron services[root@krizna ~]# service httpd restart
[root@krizna ~]# service crond restart
Step 17» Now open http://serverip/cacti in your browser , you can see the cacti installation page.
if you are not getting installation page , Disable the firewall ( iptables ) and selinux service on your server .
Disable firewall ( Iptables ) »[root@krizna ~]# service iptables stop
[root@krizna ~]# chkconfig iptables off
Disable Selinux » open the file /etc/selinux/config and find the lineSELINUX=enforcing
and replace withSELINUX=disabled
now reboot the server and try again.
After getting installation page, proceed with the default values and make sure all the binary paths are found as per the below image.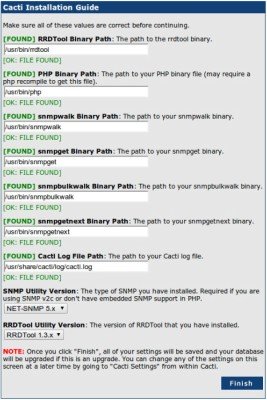
upon completion, you can see the login prompt .
Step 18» The default username and password for cacti is admin/admin. you will be forced to change the password at first login.
Step 19» After login . Choose – > Devices – > Localhost and find “SNMP Options“. select SNMP Version -> “Version 2” and SNMP Community -> public and click the “save” button at the bottom.
Step 20» Now you can see the SNMP information at the TOP . Click “Create Graphs for this Host” and choose Graph Types:-> ALL and choose all the check boxes as below and press “create“. Now choose the colour option ( Leave as it is ) and press “create“.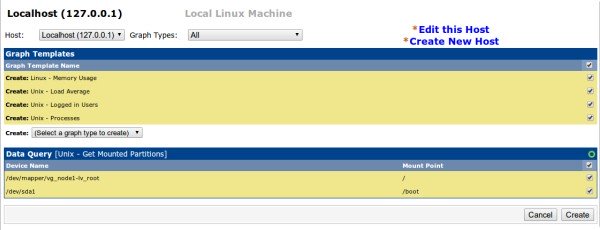
After few minutes , you can see the initial stage of graphs for localhost in the Graphs section . after few hours you can see the graphs like below .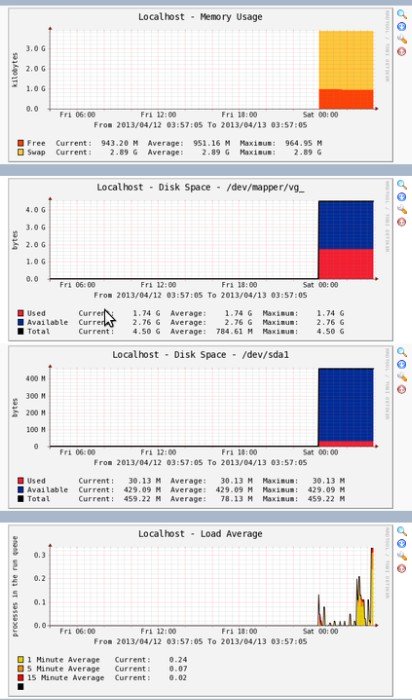
Adding linux machines
» Follow steps 5,6,7,8 and 9 ( In client ).
» Now in cacti , “Create devices” and Add description and hostname (or) IP .
» Choose “Host Template” as “Local linux machine”.
» Under SNMP Options select SNMP Version -> “Version 2” and SNMP Community -> public and click the “save” button at the bottom.
» Follow step 20
» Add the device to the Graph tree.
Adding Windows machines
» Enable SNMP service ( Refer this post)
» Make sure you added community name “public” and allowed your Cacti server IP.
» Now in cacti , “Create devices” and Add description and hostname (or) IP .
» Choose “Host Template” as “Windows 2000/XP host”.
» Under SNMP Options select SNMP Version -> “Version 2” and SNMP Community -> public and click the “save” button at the bottom.
» Follow step 20
» Add the device to the Graph tree.
Good luck
How to install cacti on centos 6的更多相关文章
- How To Install Java on CentOS and Fedora
PostedDecember 4, 2014 453.8kviews JAVA CENTOS FEDORA Introduction This tutorial will show you how ...
- Install Redis on CentOS 6.4--转
Install Redis on CentOS 6.4 source:http://thoughts.z-dev.org/2013/05/27/install-redis-on-centos-6-4/ ...
- Install ssdb-rocks on CentOS 6
Install ssdb-rocks on CentOS 6 C.C. 发表于 2014年08月10日 20:14 | Hits: 649 为了优化节操精选的弹幕系统,打算更换到Facebook的R ...
- How to install cacti With Nginx
转载于:https://github.com/blackyboy/Ubuntu-Linux-Stuffs/blob/master/How-to-install-Cacti-Monitoring-Ser ...
- Steps to Install Hadoop on CentOS/RHEL 6---reference
http://tecadmin.net/steps-to-install-hadoop-on-centosrhel-6/# The Apache Hadoop software library is ...
- How to install MP4box on CentOS 6
How to install MP4box on CentOS 6 MP4Box is a MP4 multiplexer. It can import MPEG-4 video, DivX, Xvi ...
- How to Install MySQL on CentOS 7
CentOS 7的yum源中貌似没有正常安装mysql时的mysql-sever文件,需要去官网上下载 # wget http://dev.mysql.com/get/mysql-communit ...
- How to install Jenkins on CentOS 7
How to install Jenkins on CentOS 7 on March 3, 2018 by AmirLeave a comment Introduction Jenkins is a ...
- How To Install Cacti On Ubuntu 14
How To Install Cacti On Ubuntu 14.04/14.10 by anismaj Cacti is an open source web based network moni ...
随机推荐
- are only available on JDK 1.5 and higher
根本原因是项目中的一些配置包括jar包什么的根当前jdk版本(我刚开始用的是1.8的,好像是不支持低版本的springjar包),反正正确的思路是更改jdk版本是最合理的,叫我去把所有spring版本 ...
- cJSON序列化工具解读一(结构剖析)
cJSON简介 JSON基本信息 JSON(JavaScript Object Notation)是一种轻量级的数据交换格式.易于人阅读和编写.同时易于机器解析和生成.是一种很好地数据交换语言. 官方 ...
- LA-4255 Guess (拓扑排序+构造)
题目大意:一个未知的整数序列,给出其任意一个区间和的正负,还原这个序列.任意一个满足条件的序列即可. 题目分析:将连续区间和转化为前缀和之差,sumx-1与sumy的大小关系已知,以此建立一条有向边, ...
- asp.net服务器上无法发送邮件的问题
前几天为开发的网站做了个发送邮件的功能,但是部署到服务器上无法发送邮件,提示由于目标机器积极拒绝,无法连接.在网上找到了一个解决办法 如果安装了McAfee杀毒软件(按照“手工安装方法”安装),首先需 ...
- git重要命令
body, table{font-family: 微软雅黑; font-size: 13.5pt} table{border-collapse: collapse; border: solid gra ...
- fidder设置断点,修改请求参数等
设置断点(来自:http://jingyan.baidu.com/article/17bd8e52216c8d85ab2bb8e9.html): 可以看到当前有一个抓取的很多的包的链接的地址的信息,那 ...
- Python的介绍及Pycharm软件的安装
一.Python介绍 1. Python是一种解释性.面向对象.动态数据类型的高级程序设计语言. Python语言创始人是吉多.范罗苏姆:起源与1989年 2. 缺点:运行速度慢(由于是解释性语言 ...
- etl工具-Bireme
前段时间做数据仓库项目,自己实现了一部分etl功能,后面一直没有时间去深入挖掘.这个工具貌似不错,写个帖子做下记录: https://hashdatainc.github.io/bireme/READ ...
- Laravel 文件夹结构简介
表 1.1:Laravel 文件夹结构简介 文件夹名称 简介 app 应用程序的业务逻辑代码存放文件夹 app/Console 存放自定义 Artisian 命令文件 app/Http/Control ...
- Jquery如何获取ASP.NET服务器控件的值
关键字: Jquery 服务器控件 获取值 由于ASP.NET网页运行后,服务器控件会随机生成客户端id,jquery获取时候不太好操作,总结有以下3种方法: 服务器控件代码:<asp:Te ...