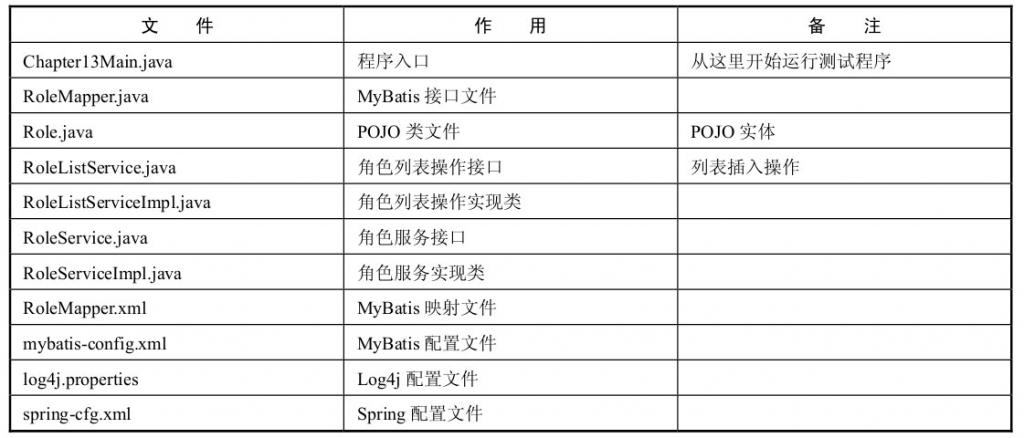
在Spring+MyBatis组合中使用事务


代码清单:配置Spring+MyBatis测试环境
<?xml version='1.0' encoding='UTF-8' ?>
<beans xmlns="http://www.springframework.org/schema/beans" xmlns:xsi="http://www.w3.org/2001/XMLSchema-instance"
xmlns:p="http://www.springframework.org/schema/p" xmlns:aop="http://www.springframework.org/schema/aop"
xmlns:tx="http://www.springframework.org/schema/tx" xmlns:context="http://www.springframework.org/schema/context"
xsi:schemaLocation="http://www.springframework.org/schema/beans http://www.springframework.org/schema/beans/spring-beans-4.0.xsd
http://www.springframework.org/schema/aop http://www.springframework.org/schema/aop/spring-aop-4.0.xsd
http://www.springframework.org/schema/tx http://www.springframework.org/schema/tx/spring-tx-4.0.xsd
http://www.springframework.org/schema/context http://www.springframework.org/schema/context/spring-context-4.0.xsd"> <!--启用扫描机制,并指定扫描对应的包-->
<context:annotation-config/>
<context:component-scan base-package="com.ssm.chapter13.*"/> <!-- 数据库连接池 -->
<bean id="dataSource" class="org.apache.commons.dbcp.BasicDataSource">
<property name="driverClassName" value="com.mysql.cj.jdbc.Driver"/>
<property name="url" value="jdbc:mysql://localhost:3306/springmvc?useSSL=false&serverTimezone=Hongkong&characterEncoding=utf-8&autoReconnect=true"/>
<property name="username" value="root"/>
<property name="password" value="123456"/>
<property name="maxActive" value="255"/>
<property name="maxIdle" value="5"/>
<property name="maxWait" value="10000"/>
</bean> <!-- 集成MyBatis -->
<bean id="SqlSessionFactory" class="org.mybatis.spring.SqlSessionFactoryBean">
<property name="dataSource" ref="dataSource"/>
<!--指定MyBatis配置文件-->
<property name="configLocation" value="classpath:ssm/chapter13/mybatis-config.xml"/>
</bean> <!-- 事务管理器配置数据源事务 -->
<bean id="transactionManager" class="org.springframework.jdbc.datasource.DataSourceTransactionManager">
<property name="dataSource" ref="dataSource"/>
</bean> <!-- 使用注解定义事务 -->
<tx:annotation-driven transaction-manager="transactionManager"/> <!-- 采用自动扫描方式创建mapper bean -->
<bean class="org.mybatis.spring.mapper.MapperScannerConfigurer">
<property name="basePackage" value="com.ssm.chapter13"/>
<property name="SqlSessionFactory" ref="SqlSessionFactory"/>
<property name="annotationClass" value="org.springframework.stereotype.Repository"/>
</bean> </beans>
代码清单:POJO类——Role.java
package com.ssm.chapter13.pojo;

public class Role {

    private Long id;

    private String roleName;

    private String note;

}
代码清单:搭建MyBatis的RoleMapper.xml
<?xml version="1.0" encoding="UTF-8" ?>

<!DOCTYPE mapper   PUBLIC "-//mybatis.org//DTD Mapper 3.0//EN"   "http://mybatis.org/dtd/mybatis-3-mapper.dtd">

<mapper namespace="com.ssm.chapter13.mapper.RoleMapper">

    <insert id="insertRole" parameterType="com.ssm.chapter13.pojo.Role">

        insert into t_role (role_name, note)

        values (#{roleName}, #{note})

    </insert>

</mapper>
代码清单:RoleMapper接口
package com.ssm.chapter13.mapper;

import com.ssm.chapter13.pojo.Role;

import org.springframework.stereotype.Repository;

@Repository

public interface RoleMapper {

    public int insertRole(Role role);

}
代码清单:mybatis-config.xml
<?xml version="1.0" encoding="UTF-8"?>

<!DOCTYPE configuration PUBLIC "-//mybatis.org//DTD Config 3.0//EN" "http://mybatis.org/dtd/mybatis-3-config.dtd">

<configuration>

    <!-- 指定映射器路径 -->

    <mappers>

        <mapper resource="ssm/chapter13/mapper/RoleMapper.xml"/>

    </mappers>

</configuration>
代码清单:操作角色的两个接口
public interface RoleService {

    public int insertRole(Role role);

}

public interface RoleListService {

    public int insertRoleList(List<Role> roleList);

}
代码清单:两个接口的实现类
@Service

public class RoleServiceImpl implements RoleService {

    @Autowired

    private RoleMapper roleMapper;

    @Override

    @Transactional(propagation = Propagation.REQUIRES_NEW, isolation = Isolation.READ_COMMITTED)

    public int insertRole(Role role) {

        return roleMapper.insertRole(role);

    }

}

@Service

public class RoleListServiceImpl implements RoleListService {

    Logger log = Logger.getLogger(RoleListServiceImpl.class);

    @Autowired

    private RoleService roleService;

    @Override

    @Transactional(propagation = Propagation.REQUIRED, isolation = Isolation.READ_COMMITTED)

    public int insertRoleList(List<Role> roleList) {

        int count = 0;

        for (Role role : roleList) {

            try {

                count += roleService.insertRole(role);

            } catch (Exception ex) {

                log.info(ex);

            }

        }

        return count;

    }

}
代码清单:测试隔离级别和传播行为——Chapter13Main.java
public class Chapter13Main {

    public static void main(String[] args) {

        ApplicationContext ctx = new ClassPathXmlApplicationContext("ssm/chapter13/spring-cfg.xml");

        RoleListService roleListService = ctx.getBean(RoleListService.class);

        List<Role> roleList = new ArrayList<Role>();

        for (int i = 1; i <= 2; i++) {

            Role role = new Role();

            role.setRoleName("role_name_" + i);

            role.setNote("note_" + i);

            roleList.add(role);

        }

        int count = roleListService.insertRoleList(roleList);

        System.out.println(count);

    }

}
由于保存点技术并不是每一个数据库都能支持的,所以当你把传播行为设置为NESTED时,Spring会先去探测当前数据库是否能够支持保存点技术。如果数据库不予支持,它就会和REQUIRES_NEW一样创建新事务去运行代码,以达到内部方法发生异常时并不回滚当前事务的目的。
文章来源:ssm13.6
在Spring+MyBatis组合中使用事务的更多相关文章
- Spring IO Platform 解决Spring项目组合中版本依赖
简介: Spring IO Platform是Spring官网中排第一位的项目.它将Spring的核心API集成到一个适用于现代应用程序的平台中.提供了Spring项目组合中的版本依赖.这些依赖关系是 ...
- spring+mybatis之声明式事务管理初识(小实例)
前几篇的文章都只是初步学习spring和mybatis框架,所写的实例也都非常简单,所进行的数据访问控制也都很简单,没有加入事务管理.这篇文章将初步接触事务管理. 1.事务管理 理解事务管理之前,先通 ...
- spring+mybatis之注解式事务管理初识(小实例)
1.上一章,我们谈到了spring+mybatis声明式事务管理,我们在文章末尾提到,在实际项目中,用得更多的是注解式事务管理,这一章将学习一下注解式事务管理的有关知识.注解式事务管理只需要在上一节的 ...
- Spring+MyBatis框架中sql语句的书写,数据集的传递以及多表关联查询
在很多Java EE项目中,Spring+MyBatis框架经常被用到,项目搭建在这里不再赘述,现在要将的是如何在项目中书写,增删改查的语句,如何操作数据库,以及后台如何获取数据,如何进行关联查询,以 ...
- SpringMVC笔记——Spring+MyBatis组合开发简单实例
简介 SSH框架很强大,适合大型项目开发.但学无止境,多学会一门框架组合开发会让自己增值许多. SSM框架小巧精致,适合中小型项目快速开发,对于新手来说也是简单上手的.在SSM框架搭建之前,我们先学习 ...
- 事务隔离级别与传播机制,spring+mybatis+atomikos实现分布式事务管理
1.事务的定义:事务是指多个操作单元组成的合集,多个单元操作是整体不可分割的,要么都操作不成功,要么都成功.其必须遵循四个原则(ACID). 原子性(Atomicity):即事务是不可分割的最小工作单 ...
- Spring事务隔离级别与传播机制详解,spring+mybatis+atomikos实现分布式事务管理
原创说明:本文为本人原创作品,绝非他处转载,转账请注明出处 1.事务的定义:事务是指多个操作单元组成的合集,多个单元操作是整体不可分割的,要么都操作不成功,要么都成功.其必须遵循四个原则(ACID). ...
- spring+mybatis+atomikos 实现JTA事务
1. 选择哪种transaction manager? 在单数据源情况下,JDBC,Hibernate,ibatis等自带的 transaction manager已能用于处理事务. ...
- spring+mybatis+druid+mysql+maven事务配置
1.首先pom.xml文件里面需要用到的jar配置: <!-- spring事务,包含了@Transactional标注 --> <dependency> <groupI ...
随机推荐
- 完成一个springboot项目的完整总结------三
这一次的总结是最关键的部分,主要涉及了ORM的三种操作,这些操作是项目的难点,三种操作包括多对一.多对多.一对多三种模式,接下来展示项目代码 1.多对一 clazz表对应grade表和charge表 ...
- Java - Annotation使用
本文转载于(这个写的很好):https://www.cnblogs.com/be-forward-to-help-others/p/6846821.html Annotation Annotation ...
- 2019/10/22 test T1 题解
题目描述 给定n个a[i],b[i],求min(x$\in$R){$\sum\limits_{i=1}^{n}$|a[i]*x+b[i]|} 输入格式 第 1行 1个整数 n第 2行 n个整数,第 i ...
- luogu 2312 解方程 乱搞+取模
思路非常好想,但是你很难想到去用这个算法,因为这个几乎就是个乱搞~ 我们发现多项式中每一个系数都很大,但是 $m$ 却很小,即最多只用 $10^6$ 个整数需要验证. 我们知道,如果一个数等于 $0$ ...
- python写一个随机点名软件
最近有个随机点名软件的需求,故写了一个,上代码:github地址 # -*- coding: utf-8 -*- # @Time : 18-12-31 下午4:21 # @Author : Felix ...
- YII框架的依赖注入容器
依赖注入(Dependency Injection,DI)容器就是一个对象,它知道怎样初始化并配置对象及其依赖的所有对象. 所谓的依赖就是,一个对象,要使用另外一个对象才能完成某些功能.那么这个对象就 ...
- kubernetes 1.14安装部署EFK日志收集系统
简单介绍: EFK 组合插件是k8s项目的一个日志解决方案,它包括三个组件:Elasticsearch, Fluentd, Kibana.相对于ELK这样的架构,k8s官方推行了EFK,可能Fluen ...
- 在应用中显示的图片很多情况不满足业务需求,我们需要动态根据图片的宽高进行缩放或加载中显示的缺省图片,这是我没就需要监听图片加载完成回调,来看看微信小程序怎么实现图片加载完成回调。
<swiper-item> <image src="{{item.image}}" class="slide-image" mode=&quo ...
- FLUENT求解传热系数surfaceheattransfercoef.的参考值的设置【转载】
转载自:http://blog.sina.com.cn/s/blog_7ef78d170101ch30.html surface heat transfer coef. 计算公式: FLUENT求解传 ...
- 范仁义web前端介绍课程---3、课程大纲(初步)
范仁义web前端介绍课程---3.课程大纲(初步) 一.总结 一句话总结: 知识点脉络(知识架构):刚开始对这个稍微了解一下就可以了,在逐步的学习过程中,心里大概有这样一套知识点的脉络 二.范仁义前端 ...
