OSPFV3综合实验 (第三组)
拓扑图
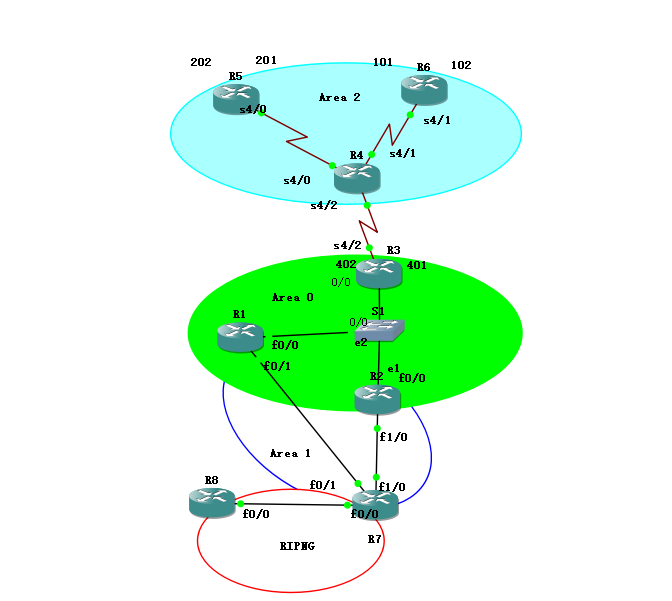
本次试验规划:拓扑分4个区域,其中区域2采用帧中继实现区域内互通的前提下配置OSPF、ospfv3.R7与R8之间配置rip实现互通,区域1作为nssa区域,实现路由注入.最终实现全局互通。
ospf 配置
(1)ipv4地址规划
|
R1 |
F0/0 |
10.29.10.1/24 |
|
F0/1 |
10.29.20.1/24 |
|
|
R2 |
F0/0 |
10.29.10.2/24 |
|
F1/0 |
10.29.30.2/24 |
|
|
R3 |
S4/2 |
10.29.40.3/24 |
|
F0/0 |
10.29.10.3/24 |
|
|
R5 |
S4/0 |
10.29.40.2/24 |
|
R6 |
S4/1 |
10.29.40.1/24 |
|
R7 |
F1/0 |
10.29.30.1/24 |
|
F0/1 |
10.29.20.2/24 |
|
|
F0/0 |
10.29.50.2/24 |
|
|
R8 |
F0/0 |
10.29.50.1/24 |
|
R1 |
Looback0 |
10.29.1.1/24 |
|
R2 |
Looback0 |
10.29.2.1/24 |
|
R3 |
Looback0 |
10.29.3.1/24 |
|
R4 |
Looback0 |
10.29.4.1/24 |
|
R5 |
Looback0 |
10.29.5.1/24 |
|
R6 |
Looback0 |
10.29.6.1/24 |
|
R7 |
Looback0 |
10.29.7.1/24 |
|
R8 |
Looback0 |
10.29.8.1/24 |
(2) 配置步骤
1:配置路由器各端口地址以及个路由器的环回接口地址
2:区域二采用帧中继连接,R4作为帧中继交换机
R4#configure terminal
R4(config)#frame-relay switching
R4(config)#interface serial 4/0
R4(config-if)# encapsulation frame-relay
R4(config-if)#no arp frame-relay //关闭动态dicl
R4(config-if)# frame-relay lmi-type cisco //定义信令类型
R4(config-if)# frame-relay intf-type dce //定义设备类型
R4(config-if)# frame-relay route 201 interface Serial4/1 101 //配置帧中继路由表
R4(config-if)#frame-relay route 202 interface Serial4/2 402
R4(config-if)#exit
R4(config)#interface serial 4/1
R4(config-if)# encapsulation frame-relay
R4(config-if)# frame-relay lmi-type cisco //定义信令类型
R4(config-if)# frame-relay intf-type dce //定义设备类型
R4(config-if)# frame-relay route 101 interface Serial4/0 201 //配置帧中继路由表
R4(config-if)#frame-relay route 102 interface Serial4/2 401
R4(config-if)#exit
R4(config)#interface serial 4/2
R4(config-if)# encapsulation frame-relay
R4(config-if)# frame-relay lmi-type cisco //定义信令类型
R4(config-if)# frame-relay intf-type dce //定义设备类型
R4(config-if)# frame-relay route 401 interface Serial4/1 102 //配置帧中继路由表
R4(config-if)#frame-relay route 402 interface Serial4/2 202
R4(config-if)#exit
R5 R6配置静态dlci
R5#configure terminal
R5(config)interface Serial4/0
R5(config-if)# encapsulation frame-relay
R5(config-if)#no arp frame-relay //关闭动态dicl
R5(config-if)# frame-relay map ip 10.29.40.1 201 broadcast
R5(config-if)# frame-relay map ip 10.29.40.3 202 broadcast
R5(config-if)#exit
R6#configure terminal
R6(config)#interface Serial4/1
R6(config-if)# encapsulation frame-relay
R6(config-if)#no arp frame-relay //关闭动态dicl
R6(config-if)# frame-relay map ip 10.29.40.3 102 broadcast
R6(config-if)# frame-relay map ip 10.29.40.2 101 broadcast
R6(config-if)#exit
测试连通性:
R5#ping 10.29.40.3

3:配置ospf
R2配置以R1为例:
R1#conf terminal
R1(config)#router ospf 1
R1(config-router)# router-id 1.1.1.1
R1(config-router)#area 1 nssa //定义区域1为nssa区域
R1(config-router)#network 10.29.1.0 0.0.0.255 area 0 // 宣告直连网段
R1(config-router)# network 10.29.10.0 0.0.0.255 area 0
R1(config-router)# network 10.29.20.0 0.0.0.255 area 1
R1(config-router)#exit
4:区域2基于帧中继配置Ospf
R5参照R6配置
R6#configure terminal
R6(config)#router ospf 1
R6(config-router)#router-id 6.6.6.6
R6(config-router)# network 10.29.40.0 0.0.0.255 area 2
R6(config-router)#exit
R6(config)interface Serial4/1
R6(config-if)# ip ospf priority 0 //设置端口优先级为0,不参于选举。
R6(config-if)# exit
R3#conf terminal
R3(config)#router ospf 1
R3(config-router)# router-id 3.3.3.3
R3(config-router)#network 10.29.3.0 0.0.0.255 area 0 //宣告直连网段
R3(config-router)#network 10.29.10.0 0.0.0.255 area 0
R3(config-router)#network 10.29.40.0 0.0.0.255 area 2
R3(config-router)#neighbor 10.29.40.2 //手动配置R5,R6为邻居
R3(config-router)# neighbor 10.29.40.1
R3(config-router)# area 0 range 10.29.0.0 255.255.0.0 //配置路由汇总
R3(config-router)#exit
查看邻居状态
R3#show ip ospf neighbor
Neighbor ID Pri State Dead Time Address Interface
1.1.1.1 1 FULL/DROTHER 00:00:39 10.29.10.1 FastEthernet0/0
2.2.2.2 1 FULL/BDR 00:00:32 10.29.10.2 FastEthernet0/0
5.5.5.5 0 FULL/DROTHER 00:01:44 10.29.40.2 Serial4/2
6.6.6.6 0 FULL/DROTHER 00:01:46 10.29.40.1 Serial4/2
5:配置rip 并重发布到ospf中
R7#configure terminal
R7(config)router ospf 1
R7(config-router)#router-id 7.7.7.7
R7(config-router)#area 1 nssa
R7(config-router)# network 10.29.20.0 0.0.0.255 area 1 //宣告直连网段
R7(config-router)# network 10.29.30.0 0.0.0.255 area 1
R7(config-router)#redistribute rip metric 25 subnets //将RIP重发布到ospf中
R7(config-router)#exit
R7(config)#router rip
R7(config-router)#version 2
R7(config-router)# network 10.0.0.0
R7(config-router)#no auto-summary
R7(config-router)#redistribute ospf 1 metric 4 //将ospf重发布到Rip中
测试连通性:R8 ping R6 R5
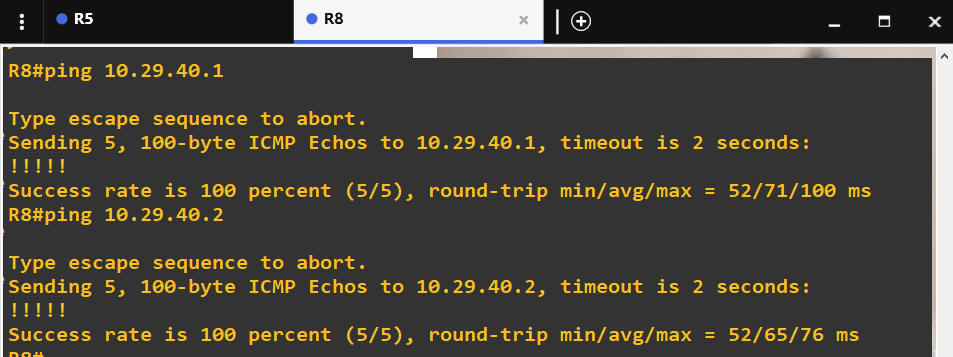
R5 ping R1
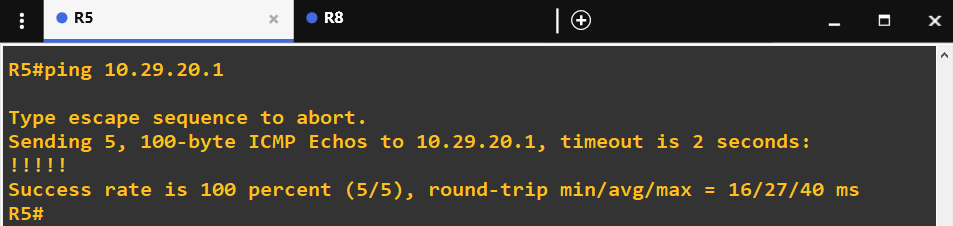
至此,ospf配置成功,接下来在此配置下配置ospfv3
OSPFV3配置
(1)ipv6地址规划
|
R1 |
F0/0 |
2001:db8:29:3::1/64 |
|
F0/1 |
2001:db8:29:4::1/64 |
|
|
R2 |
F0/0 |
2001:db8:29:3::2/64 |
|
F1/0 |
2001:db8:29:5::1/64 |
|
|
R3 |
S4/2 |
2001:db8:29:1::3/64 |
|
F0/0 |
2001:db8:29:3::3/64 |
|
|
R5 |
S4/0 |
2001:db8:29:1::1/64 |
|
R6 |
S4/1 |
2001:db8:29:1::2/64 |
|
R7 |
F1/0 |
2001:db8:29:5::2/64 |
|
F0/1 |
2001:db8:29:4::2/64 |
|
|
F0/0 |
2001:db8:29:2::2/64 |
|
|
R8 |
F0/0 |
2001:db8:29:2::1/64 |
|
R1 |
Looback0 |
2001:cf:29:9::1/64 |
|
R1 |
Looback0 |
2001:cf:29:1::1/64 |
|
R2 |
Looback0 |
2001:cf:29:2::1/64 |
|
R3 |
Looback0 |
2001:cf:29:3::1/64 |
|
R4 |
Looback0 |
2001:cf:29:4::1/64 |
|
R5 |
Looback0 |
2001:cf:29:5::1/64 |
|
R6 |
Looback0 |
2001:cf:296::1/64 |
|
R7 |
Looback0 |
2001:cf:29:7::1/64 |
|
R8 |
Looback0 |
2001:cf:29:8::1/64 |
(2)配置步骤
1:配置路由器各端口地址以及个路由器的环回接口地址
2:区域二采用帧中继连接,R4作为帧中继交换机,配置与之前相同
3:帧中继路由R3,R5,R6静态配置dlci
R3#configure terminal
R3(config)#ipv6 unicast-routing
R3(config)#interface Serial4/2
R3(config-if)# frame-relay map ipv6 2001:DB8:29:1::1 402 broadcast
R3(config-if)# frame-relay map ipv6 2001:DB8:29:1::2 401 broadcast
R3(config-if)#frame-relay map ipv6 FE80::CE01:1EFF:FE28:0 401 broadcast //此映射是为ospfv3铺垫
R3(config-if)# frame-relay map ipv6 FE80::CE02:EFF:FE60:0 402 broadcast
R3(config-if)#exit
R5#configure terminal
R5(config)#ipv6 unicast-routing
R5(config)interface Serial4/0
R5(config-if)#frame-relay map ipv6 2001:DB8:29:1::3 202 broadcast
R5(config-if)#frame-relay map ipv6 2001:DB8:29:1::2 201 broadcast
R5(config-if)# frame-relay map ipv6 FE80::CE01:1EFF:FE28:0 201 broadcast
R5(config-if)# frame-relay map ipv6 FE80::CE04:19FF:FE18:0 202 broadcast
R5(config-if)#exit
R6#configure terminal
R6(config)#ipv6 unicast-routing
R6(config)interface Serial4/1
R6(config-if)# frame-relay map ipv6 2001:DB8:29:1::3 102 broadcast
R6(config-if)# frame-relay map ipv6 2001:DB8:29:1::1 101 broadcast
R6(config-if)#frame-relay map ipv6 FE80::CE04:19FF:FE18:0 102 broadcast
R6(config-if)#frame-relay map ipv6 FE80::CE02:EFF:FE60:0 101 broadcast
R6(config-if)#exit
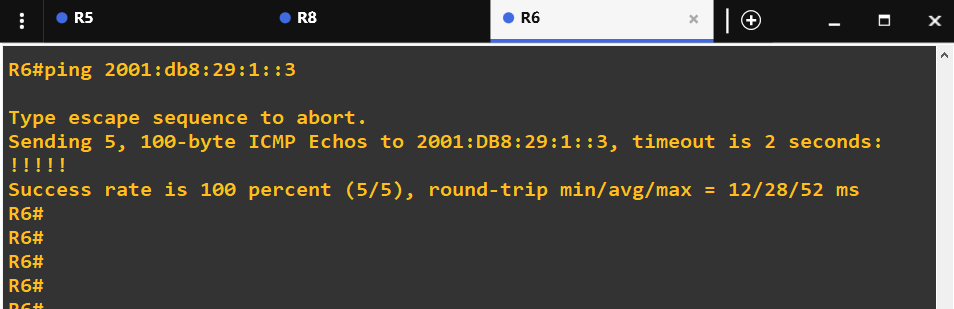
测试连通性:
R6 ping R3
R6#ping 2001:db8:29:1::3
R6 ping R3 链路本地地址

4:帧中继环境下配置ospf
R3#configure terminal
R3(config)#ipv6 router ospf 1
R3(config-rtr)#router-id 3.3.3.3 //配置路由id
R3(config-rtr)# area 0 range 2001:DB8::/32 //配置路由汇总
R3(config-rtr)# exit
R3(config)#interface Serial4/2
R3(config-if)#ipv6 ospf 1 area 2
R3(config-if)# ipv6 enable
R3(config-if)# ipv6 ospf neighbor FE80::CE02:EFF:FE60:0 priority 1 //手动配置邻居,优先级为零,此地址为R5 R6 的链路本地地址
R3(config-if)# ipv6 ospf neighbor FE80::CE01:1EFF:FE28:0 priority 1
R3(config-if)#exit
R3(config)#interface fastEthernet 0/0
R3(config-if)#ipv6 ospf 1 area 0
R6配置参考下面R5配置
R5#configure terminal
R5(config)#ipv6 router ospf 1
R5(config-rtr)#router-id 5.5.5.5 //配置路由id
R5(config-rtr)# exit
R5(config)#interface Serial4/2
R5(config-if)# ipv6 ospf 1 area 2
R5(config-if)# ipv6 enable
R5(config-if)#exit
5:配置其他区域的OSPFV3
R2参考R1配置
R1#configure terminal
R1(config)#ipv6 unicast-routing
R1(config)#ipv6 router ospf 1
R1(config-rtr)#router-id 1.1.1.1
R1(config-rtr)#area 1 nssa 定义区域1为nssa区域
R1(config-rtr)#exit
R1(config)#interface fastEthernet 0/0
R1(config-if)#ipv6 enable
R1(config-if)#ipv6 ospf 1 area 0
R1(config-if)#exit
R1(config)#interface fastEthernet 0/1
R1(config-if)#ipv6 enable
R1(config-if)# ipv6 ospf 1 area 1
R1(config-if)#exit
6配置路由重发布
R7#configure terminal
R7(config)#ipv6 unicast-routing
R7(config)#ipv6 router rip ys
R7(config-rtr)#redistribute ospf 1 metric 4 //将ospfv3重发布到RIP中,定义最大条数为4
R7(config-rtr)# redistribute connected
R7(config-rtr)#exit
R7(config)#ipv6 router ospf 1
R7(config-rtr)# router-id 7.7.7.7
R7(config-rtr)#area 1 nssa
R7(config-rtr)# redistribute rip ys //将rip重发布到ospfv3中
R7(config-rtr)# redistribute connected //由于重分布 RIPng,不能把连接 R8 的接口网段重分布进入OSPFv3,因此重分布直连,把连接 R8 的网段重分布到 OSPFv3
R7(config-rtr)# exit
测试连通性
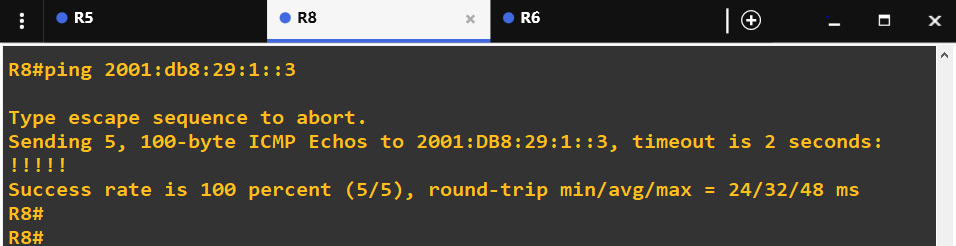
R8 ping R3
查看路由汇总后R6的路由
R6#show ipv6 route ospf
IPv6 Routing Table - 13 entries
Codes: C - Connected, L - Local, S - Static, R - RIP, B - BGP
U - Per-user Static route, M - MIPv6
I1 - ISIS L1, I2 - ISIS L2, IA - ISIS interarea, IS - ISIS summary
O - OSPF intra, OI - OSPF inter, OE1 - OSPF ext 1, OE2 - OSPF ext 2
ON1 - OSPF NSSA ext 1, ON2 - OSPF NSSA ext 2
D - EIGRP, EX - EIGRP external
OI 2001:CF:29:1::1/128 [110/65]
via FE80::CE04:19FF:FE18:0, Serial4/1
OI 2001:CF:29:2::1/128 [110/65]
via FE80::CE04:19FF:FE18:0, Serial4/1
OI 2001:CF:29:7::1/128 [110/66]
via FE80::CE04:19FF:FE18:0, Serial4/1
OE2 2001:CF:29:9::/64 [110/20]
via FE80::CE04:19FF:FE18:0, Serial4/1
OI 2001:DB8::/32 [110/65] //区域0经过汇总后的路由表
via FE80::CE04:19FF:FE18:0, Serial4/1
OE2 2001:DB8:29:2::/64 [110/20]
via FE80::CE04:19FF:FE18:0, Serial4/1
OI 2001:DB8:29:4::/64 [110/66]
via FE80::CE04:19FF:FE18:0, Serial4/1
OI 2001:DB8:29:5::/64 [110/66]
via FE80::CE04:19FF:FE18:0, Serial4/1
查看R5的邻居:
R5#show ipv6 ospf neighbor
Neighbor ID Pri State Dead Time Interface ID Interface
6.6.6.6 1 FULL/BDR 00:01:40 10 Serial4/0
3.3.3.3 1 FULL/DR 00:01:57 11 Serial4/0
实验总结:此次实验的目的是了解两个版本的ospf与其所相关的知识点,通过本次实验,我了解到了ospf与ospfv3原理上的差别,ospfv3比ospf配置更加便捷,其通过路由器的链路本地地址建立邻居,所以配置中开启了帧中继的部分要设置关于链路本地地址的静态dicl映射,还要是该部分的区域间路由作为DR,否则邻居即使建立成功也无法多路发送”hello”包。本次实验我获益匪浅,遇到的问题就是帧中继部分的ospf建立,通过查阅资料解决了问题。对这两个协议的理解更加深刻了。
OSPFV3综合实验 (第三组)的更多相关文章
- OSPFv3综合实验(GNS3)
一.实验目的 1. 掌握 OSPFv3(v2) 的配置方法 2. 掌握在帧中继环境下 OSPFv3 (v2)的配置方法 3. 掌握 OSPFv3(v2) NSSA 的配置方法 4. 掌握外部路 ...
- 第三组 通信一班 030 OSPFv2、OSPFv3综合实验
一. 实验目的 掌握 OSPFv2. OSPFv3 的配置方法 掌握在帧中继环境下OSPFv2. OSPFv3 的配置方法 掌握 OSPFv2. OSPFv3 NSSA 的配置方法 ...
- 第九组 通信3班 063 OSPFv2与OSPFv3综合实验
实验目的 1. 掌握 OSPFv3(v2) 的配置方法 2. 掌握在帧中继环境下 OSPFv3 (v2)的配置方法 3. 掌握 OSPFv3(v2) NSSA 的配置方法 4. 掌握外部路由汇总的配置 ...
- 【Linux程序设计】之环境系统函数综合实验
这个系列的博客贴的都是我大二的时候学习Linux系统高级编程时的一些实验程序,都挺简单的.贴出来纯粹是聊胜于无. 实验题目:Linux环境下系统函数综合实验 实验目的:熟悉并掌握Linux环境下数学函 ...
- CCNP第四天 OSPF综合实验(1)
ospf综合实验(1) 本实验主要考察ospf中的接口上的多种工作方式 实验如图所示: 所用拓扑为CCNP标准版,如图: --------------------------------------- ...
- 华为路由交换综合实验 ---IA阶段
目录 华为路由交换综合实验 ---IA阶段 实验拓扑 实验需求 华为路由交换综合实验 ---IA阶段 实验拓扑 实验需求 根据拓扑合理规划IP地址以及VLANIf地址(PC1属于运营部,PC2属于市场 ...
- PBOC金融IC卡,卡片与终端交互的13个步骤,简介-第三组
七:终端风险管理-必选但包含可选步骤异常文件:终端检查应用主账号是否在异常文件列表(卡号黑名单)中.商户强制联机:商户可以将当前交易强制为联机处理.最低限额:控制交易当前交易金额或同一张卡片连续几笔交 ...
- 旧书重温:0day2【2】 实验:三种获取kernel32.dll基址的方法
0x01 找kernel32基地址的方法一般有三种: 暴力搜索法.异常处理链表搜索法.PEB法. 0x02 基本原理 暴力搜索法是最早的动态查找kernel32基地址的方法.它的原理是几乎所有的win ...
- select、poll、epoll三组IO复用
int select(int nfds,fd_set* readfds,fd_set* writefds,fd_set* exceptfds,struct timeval* timeout)//其中n ...
随机推荐
- 剑指Offer (汇总)
刷完剑指Offer很久了,前几天想起来去年开通的博客园,正好把刷题笔记整理一下 刷题平台:牛客网 刷题语言:Python **链表(8道)** [剑指Offer 3. 从尾到头打印链表 (链表)](h ...
- 测试计划的编写6要素(5W1H)
Why --为什么要进行这些测试 WHat--测试哪些内容 When--测试不同阶段的起止时间 WHere--相应文档,缺陷的存放位置,测试环境 Who--项目有关人员组成 How--如何去做,使用哪 ...
- 嵌入式C语言编译器
GCC与gcc: 初识编译器: 扩展问题: 如何理解“多语言混合开发”? 参考: 狄泰软件学院唐佐林视频教程
- Dapp混合模型开发--Dice2win的解读
前言: 之前讲到Dapp原生态对随机函数的支持并不友好, 现在讲讲一种解决思路. 既能保证随机函数的不可预测性, 又能保证公平性, 平台和玩家都能满意. 而Dapp中的Dice2Win实现, 刚好是其 ...
- java.lang.NoSuchMethodError: com.opensymphony.xwork2.config.ConfigurationManager.addConfigurationPro
java.lang.NoSuchMethodError: com.opensymphony.xwork2.config.ConfigurationManager.addConfigurationPro ...
- 如何查看jar包的版本号?(转)
转自 : http://www.cnblogs.com/wych/p/4072913.html jar包根目录里的META-INF目录下的MANIFEST.MF文件里一般有会记录版本信息,可以到这个文 ...
- poj 3641 快速幂
Description Fermat's theorem states that for any prime number p and for any integer a > 1, ap = a ...
- Spring-Cloud-Netflix
Spring Cloud Netflix组件以及部署 (1)Eureka,服务注册和发现,它提供了一个服务注册中心.服务发现的客户端,还有一个方便的查看所有注册的服务的界面. 所有的服务使用Eurek ...
- 14. Encryption tools (加密工具 8个)
SSH(Secure Shell)现在是无处不在的程序,用于在远程机器上登录或执行命令. 它通过不安全的网络在两个不受信任的主机之间提供安全的加密通信,取代了可怕的不安全的telnet / rlogi ...
- Spark源码系列:RDD repartition、coalesce 对比
在上一篇文章中 Spark源码系列:DataFrame repartition.coalesce 对比 对DataFrame的repartition.coalesce进行了对比,在这篇文章中,将会对R ...