使用UICollectionView
使用UICollectionView

使用UICollectionView的流程:
1. 设定一个UICollectionViewFlowLayout
2. 使用这个设定的UICollectionViewFlowLayout来初始化UICollectionView
3. 设置代理对象
4. 继承UICollectionViewCell设定重用的cell
源码:
LargeUICollectionViewFlowLayout.h + LargeUICollectionViewFlowLayout.m
#import <UIKit/UIKit.h>

@interface LargeUICollectionViewFlowLayout : UICollectionViewFlowLayout

@end
#import "LargeUICollectionViewFlowLayout.h"

@implementation LargeUICollectionViewFlowLayout

- (instancetype)init

{

    self = [super init];

    if (self)

    {

        self.itemSize                = CGSizeMake(, );

        self.sectionInset            = UIEdgeInsetsMake(, , , );

        self.minimumInteritemSpacing = 40.0f;

        self.minimumLineSpacing      = 5.0f;

    }

    return self;

}

@end
ShowCollectionViewCell.h + ShowCollectionViewCell.m
#import <UIKit/UIKit.h>

@interface ShowCollectionViewCell : UICollectionViewCell

@end
#import "ShowCollectionViewCell.h"

@implementation ShowCollectionViewCell

- (id)initWithFrame:(CGRect)frame

{

    self = [super initWithFrame:frame];

    if (self)

    {

        self.backgroundColor = [UIColor redColor];

    }

    return self;

}

@end
RootViewController.h + RootViewController.m
#import <UIKit/UIKit.h>

@interface RootViewController : UIViewController

@end
#import "RootViewController.h"

#import "ShowCollectionViewCell.h"

#import "LargeUICollectionViewFlowLayout.h"

static NSString *identify = @"ItemIdentifier";

@interface RootViewController ()<UICollectionViewDelegate, UICollectionViewDataSource>

@property (nonatomic, strong) UICollectionView *collectionView;

@end

@implementation RootViewController

- (void)viewDidLoad

{

    [super viewDidLoad];

    // 初始化UICollectionView并指定一个UICollectionViewFlowLayout

    self.collectionView = \

    [[UICollectionView alloc] initWithFrame:self.view.bounds

                       collectionViewLayout:[LargeUICollectionViewFlowLayout new]];

    // 给UICollectionViewCell注册重用标示(collectionView会自动给我们创建重用的cell对象)

    [self.collectionView registerClass:[ShowCollectionViewCell class]

            forCellWithReuseIdentifier:@"ItemIdentifier"];

    // 设置代理对象

    self.collectionView.delegate   = self;

    self.collectionView.dataSource = self;

    // 将UICollectionView添加进父视图

    [self.view addSubview:_collectionView];

}

-(NSInteger)collectionView:(UICollectionView *)collectionView

    numberOfItemsInSection:(NSInteger)section

{

    return ;

}

-(UICollectionViewCell *)collectionView:(UICollectionView *)collectionView

                 cellForItemAtIndexPath:(NSIndexPath *)indexPath

{

    ShowCollectionViewCell *cell = \

    [collectionView dequeueReusableCellWithReuseIdentifier:@"ItemIdentifier"

                                              forIndexPath:indexPath];

    return cell;

}

@end
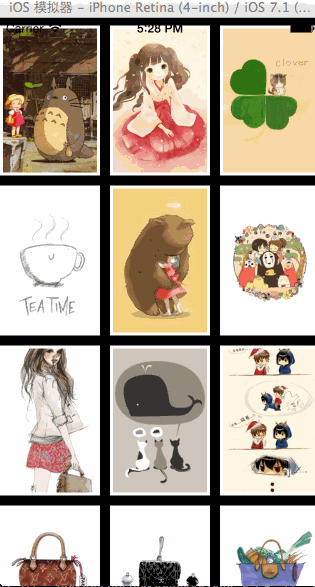
运行后效果如下:

很重要的参数如下所示:


在ShowCollectionViewCell.m中执行打印操作:
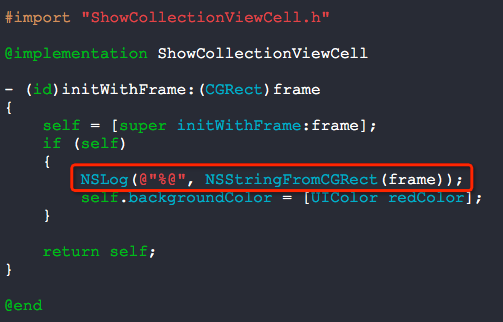
打印信息如下:
2014-05-19 16:52:58.873 UICollectionView[3077:60b] {{0, 0}, {70, 70}} A
2014-05-19 16:52:58.875 UICollectionView[3077:60b] {{125, 0}, {70, 70}} B
2014-05-19 16:52:58.875 UICollectionView[3077:60b] {{250, 0}, {70, 70}} C
2014-05-19 16:52:58.875 UICollectionView[3077:60b] {{0, 75}, {70, 70}} D
2014-05-19 16:52:58.876 UICollectionView[3077:60b] {{125, 75}, {70, 70}}
2014-05-19 16:52:58.876 UICollectionView[3077:60b] {{250, 75}, {70, 70}}
2014-05-19 16:52:58.876 UICollectionView[3077:60b] {{0, 150}, {70, 70}}
2014-05-19 16:52:58.877 UICollectionView[3077:60b] {{125, 150}, {70, 70}}
2014-05-19 16:52:58.877 UICollectionView[3077:60b] {{250, 150}, {70, 70}}
2014-05-19 16:52:58.877 UICollectionView[3077:60b] {{0, 225}, {70, 70}}
2014-05-19 16:52:58.878 UICollectionView[3077:60b] {{125, 225}, {70, 70}}
2014-05-19 16:52:58.878 UICollectionView[3077:60b] {{250, 225}, {70, 70}}
2014-05-19 16:52:58.878 UICollectionView[3077:60b] {{0, 300}, {70, 70}}
2014-05-19 16:52:58.879 UICollectionView[3077:60b] {{125, 300}, {70, 70}}
2014-05-19 16:52:58.879 UICollectionView[3077:60b] {{250, 300}, {70, 70}}
2014-05-19 16:52:58.879 UICollectionView[3077:60b] {{0, 375}, {70, 70}}
2014-05-19 16:52:58.880 UICollectionView[3077:60b] {{125, 375}, {70, 70}}
2014-05-19 16:52:58.901 UICollectionView[3077:60b] {{250, 375}, {70, 70}}
2014-05-19 16:52:58.901 UICollectionView[3077:60b] {{0, 450}, {70, 70}}
2014-05-19 16:52:58.902 UICollectionView[3077:60b] {{125, 450}, {70, 70}}
2014-05-19 16:52:58.902 UICollectionView[3077:60b] {{250, 450}, {70, 70}}
2014-05-19 16:52:58.902 UICollectionView[3077:60b] {{0, 525}, {70, 70}}
2014-05-19 16:52:58.903 UICollectionView[3077:60b] {{125, 525}, {70, 70}}
2014-05-19 16:52:58.903 UICollectionView[3077:60b] {{250, 525}, {70, 70}}
2014-05-19 16:53:24.995 UICollectionView[3077:60b] {{0, 600}, {70, 70}}
2014-05-19 16:53:24.996 UICollectionView[3077:60b] {{125, 600}, {70, 70}}
2014-05-19 16:53:24.996 UICollectionView[3077:60b] {{250, 600}, {70, 70}}
分析上述打印信息A,B不难发现:125 - 70 = 55 > 40,所以,minimumInteritemSpacing只是单元格间的最小间距而已.
分析A,D发现,75 - 70 = 5,与minimumLineSpacing设定一致,因为我们是垂直滚动,所以纵向方向的间距是一致的.
知道这些,我们来实现网络请求照片墙的效果.
修改LargeUICollectionViewFlowLayout中的代码如下:
self.itemSize = CGSizeMake(100, 150); // 单元格尺寸
self.sectionInset = UIEdgeInsetsMake(0, 0, 0, 0); // 单元格边缘
self.minimumInteritemSpacing = 10.0f; // 横排单元格最小间隔
self.minimumLineSpacing = 10.0f; // 单元格最小行间距
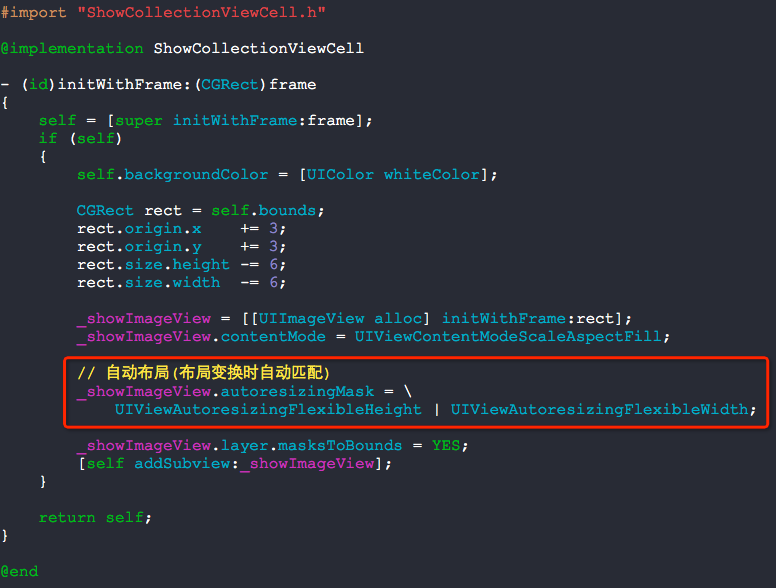
修改ShowCollectionViewCell.h + ShowCollectionViewCell.m
#import <UIKit/UIKit.h>

@interface ShowCollectionViewCell : UICollectionViewCell

@property (nonatomic, strong) UIImageView  *showImageView;

@end
#import "ShowCollectionViewCell.h"

@implementation ShowCollectionViewCell

- (id)initWithFrame:(CGRect)frame

{

    self = [super initWithFrame:frame];

    if (self)

    {

        self.backgroundColor = [UIColor whiteColor];

        CGRect rect = self.bounds;

        rect.origin.x    += ;

        rect.origin.y    += ;

        rect.size.height -= ;

        rect.size.width  -= ;

        _showImageView = [[UIImageView alloc] initWithFrame:rect];

        [self addSubview:_showImageView];

    }

    return self;

}

@end
RootViewController.m
#import "RootViewController.h"

#import "ShowCollectionViewCell.h"

#import "LargeUICollectionViewFlowLayout.h"

#import "YXGCD.h"

#import "SDWebImage.h"

// 重用标示

static NSString *identify = @"ItemIdentifier";

// 数据源

#define SOURCE_DATA @"http://www.duitang.com/album/1733789/masn/p/0/100/"

@interface RootViewController ()<UICollectionViewDelegate, UICollectionViewDataSource>

@property (nonatomic, strong) UICollectionView *collectionView;

@property (nonatomic, strong) NSMutableArray   *dataArray;  // 数据源

@end

@implementation RootViewController

- (void)viewDidLoad

{

    [super viewDidLoad];

    // 初始化数据源

    _dataArray = [[NSMutableArray alloc] init];

    // 初始化UICollectionView并指定一个UICollectionViewFlowLayout

    self.collectionView = \

    [[UICollectionView alloc] initWithFrame:self.view.bounds

                       collectionViewLayout:[LargeUICollectionViewFlowLayout new]];

    // 给UICollectionViewCell注册重用标示(collectionView会自动给我们创建重用的cell对象)

    [self.collectionView registerClass:[ShowCollectionViewCell class]

            forCellWithReuseIdentifier:@"ItemIdentifier"];

    // 设置代理对象

    self.collectionView.delegate   = self;

    self.collectionView.dataSource = self;

    // 将UICollectionView添加进父视图

    [self.view addSubview:_collectionView];

    [[GCDQueue globalQueue] execute:^{

        // 获取json数据

        NSData *data = [[NSData alloc] initWithContentsOfURL:[NSURL URLWithString:SOURCE_DATA]];

        // 转换数据

        NSDictionary *dataDictionary = [NSJSONSerialization JSONObjectWithData:data

                                                                       options:NSJSONReadingMutableLeaves|| NSJSONReadingMutableContainers

                                                                         error:nil];

        if (dataDictionary)

        {

            NSArray *dataArray = dataDictionary[@"data"][@"blogs"];

            for (NSDictionary *dic in dataArray)

            {

                NSLog(@"%@", dic[@"isrc"]);

                // 存储数据

                [_dataArray addObject:dic[@"isrc"]];

            }

        }

        // 主线程更新

        [[GCDQueue mainQueue] execute:^{

            [self.collectionView reloadData];

        }];

    }];

}

-(NSInteger)collectionView:(UICollectionView *)collectionView

    numberOfItemsInSection:(NSInteger)section

{

    return [_dataArray count];

}

-(UICollectionViewCell *)collectionView:(UICollectionView *)collectionView

                 cellForItemAtIndexPath:(NSIndexPath *)indexPath

{

    ShowCollectionViewCell *cell = \

    [collectionView dequeueReusableCellWithReuseIdentifier:@"ItemIdentifier"

                                              forIndexPath:indexPath];

    [cell.showImageView setImageWithURL:[NSURL URLWithString:_dataArray[indexPath.row]]];

    return cell;

}

@end
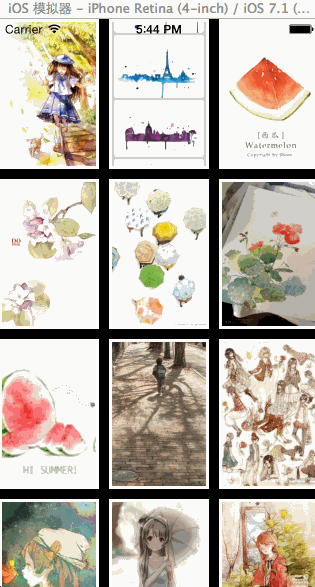
效果图如下:
一款显示壁纸的软件就这么搞定雏形了......
我们来尝试一下实时更换layout让图片自动布局,效果如下:
源码:
#import "RootViewController.h"
#import "ShowCollectionViewCell.h"
#import "LargeUICollectionViewFlowLayout.h"
#import "AnotherCollectionViewFlowLayout.h"
#import "YXGCD.h"
#import "SDWebImage.h" // 重用标示
static NSString *identify = @"ItemIdentifier"; // 数据源
#define SOURCE_DATA @"http://www.duitang.com/album/1733789/masn/p/0/100/" @interface RootViewController ()<UICollectionViewDelegate, UICollectionViewDataSource> @property (nonatomic, strong) UICollectionView *collectionView; @property (nonatomic, strong) LargeUICollectionViewFlowLayout *largeLayout;
@property (nonatomic, strong) AnotherCollectionViewFlowLayout *anotherLayout; @property (nonatomic, strong) NSMutableArray *dataArray; // 数据源 @end @implementation RootViewController - (void)viewDidLoad
{
[super viewDidLoad]; // 初始化数据源
_dataArray = [[NSMutableArray alloc] init]; // 初始化两种布局
_largeLayout = [LargeUICollectionViewFlowLayout new];
_anotherLayout = [AnotherCollectionViewFlowLayout new]; // 初始化UICollectionView并指定一个UICollectionViewFlowLayout
self.collectionView = \
[[UICollectionView alloc] initWithFrame:self.view.bounds
collectionViewLayout:_largeLayout]; // 给UICollectionViewCell注册重用标示(collectionView会自动给我们创建重用的cell对象)
[self.collectionView registerClass:[ShowCollectionViewCell class]
forCellWithReuseIdentifier:@"ItemIdentifier"]; // 设置代理对象
self.collectionView.delegate = self;
self.collectionView.dataSource = self; // 将UICollectionView添加进父视图
[self.view addSubview:_collectionView]; [[GCDQueue globalQueue] execute:^{
// 获取json数据
NSData *data = [[NSData alloc] initWithContentsOfURL:[NSURL URLWithString:SOURCE_DATA]]; // 转换数据
NSDictionary *dataDictionary = [NSJSONSerialization JSONObjectWithData:data
options:NSJSONReadingMutableLeaves|| NSJSONReadingMutableContainers
error:nil];
if (dataDictionary)
{
NSArray *dataArray = dataDictionary[@"data"][@"blogs"];
for (NSDictionary *dic in dataArray)
{
NSLog(@"%@", dic[@"isrc"]); // 存储数据
[_dataArray addObject:dic[@"isrc"]];
}
} // 主线程更新
[[GCDQueue mainQueue] execute:^{
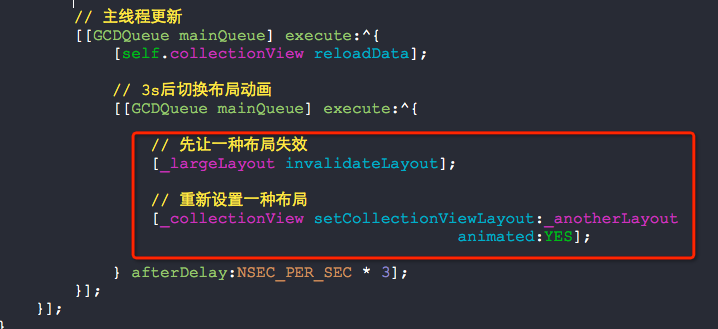
[self.collectionView reloadData]; // 3s后切换布局动画
[[GCDQueue mainQueue] execute:^{ [_largeLayout invalidateLayout];
[_collectionView setCollectionViewLayout:_anotherLayout
animated:YES]; } afterDelay:NSEC_PER_SEC * ];
}];
}];
} -(NSInteger)collectionView:(UICollectionView *)collectionView
numberOfItemsInSection:(NSInteger)section
{
return [_dataArray count];
} -(UICollectionViewCell *)collectionView:(UICollectionView *)collectionView
cellForItemAtIndexPath:(NSIndexPath *)indexPath
{
ShowCollectionViewCell *cell = \
[collectionView dequeueReusableCellWithReuseIdentifier:@"ItemIdentifier"
forIndexPath:indexPath]; [cell.showImageView setImageWithURL:[NSURL URLWithString:_dataArray[indexPath.row]]]; return cell;
} @end
RootViewController.m
AnotherCollectionViewFlowLayout.h + AnotherCollectionViewFlowLayout.m
#import <UIKit/UIKit.h>

@interface AnotherCollectionViewFlowLayout : UICollectionViewFlowLayout

@end
#import "AnotherCollectionViewFlowLayout.h"

@implementation AnotherCollectionViewFlowLayout

- (instancetype)init

{

    self = [super init];

    if (self)

    {

        self.itemSize                = CGSizeMake(, );         // 单元格尺寸

        self.sectionInset            = UIEdgeInsetsMake(, , , ); // 单元格边缘

        self.minimumInteritemSpacing = 10.0f;                        // 横排单元格最小间隔

        self.minimumLineSpacing      = 20.0f;                        // 单元格最小行间距

    }

    return self;

}

@end
几个核心的地方:(布局变化时自动匹配对于UICollectionView很重要哦)
so easy :)
使用UICollectionView的更多相关文章
- 【iOS】Xcode8+Swift3 纯代码模式实现 UICollectionView
开发环境 macOS Sierra 10.12.Xcode 8.0,如下图所示: 总体思路 1.建立空白的storyboard用于呈现列表 2.实现自定义单个单元格(继承自:UICollectionV ...
- 使用UICollectionView实现首页的滚动效果
实现类似这样的效果,可以滚动大概有两种实现方案 1. 使用scrollview来实现 2. 使用UICollectionView来实现 第一种比较简单,而且相对于性能来说不太好,于是我们使用第二种方案 ...
- 用NSCalendar和UICollectionView自定义日历,并实现签到显示
前一段时间因为工作需要实现了一个可以签到的日历,来记录一下实现的思路 效果如图: 这里的基本需求是: 1,显示用户某个月的签到情况,已经签到的日子打个圈,没有签到且在某个时间范围内的可以签到,其他 ...
- UICollectionView布局cell的三种方式
UICollectionViewFlowLayout里面: // 方法一 - (void)prepareLayout{} // 方法二 - (nullable NSArray<__kindof ...
- 【Swift】iOS UICollectionView 计算 Cell 大小的陷阱
前言 API 不熟悉导致的问题,想当然的去理解果然会出问题,这里记录一下 UICollectionView 使用问题. 声明 欢迎转载,但请保留文章原始出处:) 博客园:http://www.cn ...
- UICollectionLayout布局 —— UIKit之学习UICollectionView记录二《流水布局》
重点知识 一. 加载collectionView注意事项 1.创建collectionView,有两种方式 :一种是xib和一种是纯代码:设置代理和数据源,注册cell,配置流水布局的属性,如上.下. ...
- UICollectionView中使用 UICollectionViewFlowLayout进行布局(模仿苹果相册)
现在都知道,在初始化UICollectionView的时候,必须要传入一Layout对象,进行布局管理.这也是collectionview和tableview的明显区别,通过collectionvie ...
- UI第十九节——UICollectionView
UICollectionView其实就是UITableView的升级版,在布局方面比UITableView更出色.下面,先看代码吧 #import "RootViewController.h ...
- iOS6新特征:UICollectionView介绍
http://blog.csdn.net/eqera/article/details/8134986 1.1. Collection View 全家福: UICollectionView, UITab ...
- 【iOS】UITabView/UICollectionView 全选问题
UITabView/UICollectionView 全选问题 SkySeraph July. 30th 2016 Email:skyseraph00@163.com 更多精彩请直接访问SkySera ...
随机推荐
- Druid连接池(三)
十二.Druid缓存 连接Oracle数据库,打开PSCache,在其他的数据库连接池都会存在内存占用过多的问题,Druid是唯一解决这个问题的连接池. Oracle数据库下PreparedState ...
- Java连接GBase并封装增删改查
1.介绍 GBase 是南大通用数据技术有限公司推出的自主品牌的数据库产品,目前在国内数据库市场具有较高的品牌知名度;GBase品牌的系列数据库都具有自己鲜明的特点和优势:GBase 8a 是国内第一 ...
- [CQOI 2018]九连环
Description 题库链接 给你一个 \(n\) 连环,游戏规则是: 第一个(最右边)环任何时候都可以任意装上或卸下: 如果第 \(k\) 个环没有被卸下,且第 \(k\) 个环右边的所有环都被 ...
- [转载]Angular4 组件通讯方法大全
组件通讯,意在不同的指令和组件之间共享信息.如何在两个多个组件之间共享信息呢. 最近在项目上,组件跟组件之间可能是父子关系,兄弟关系,爷孙关系都有.....我也找找了很多关于组件之间通讯的方法,不同的 ...
- Jquery ui draggable在chrome和ie7下的bug
当页面足够长,向下滚动一些之后, 在拖动时,被拖动的div会向下产生滚动距离那么高(scrolltop)的差距 鼠标位置距div顶部差距了正好页面scroll的距离,页面scoll越多差的越多. 解决 ...
- Head First Python学习笔记1
# 递归 def recursion(movies): for item in movies: # isinstance是一个判断类型的函数 if isinstance(item,list): rec ...
- sgsdg
wrjow we wetwer werwer werwer werqw qweqwrq qwrqwr @ApiOperation("根据条件分页查询试卷") @ApiRespons ...
- Access restriction: The type BASE64Encoder is not accessible due to restrict(转载)
Access restriction: The type BASE64Encoder is not accessible due to restrict 2011年11月18日 20:47:06 阅读 ...
- EF6 CodeFirst代码迁移笔记
由于EF7只支持codefirst only.朕无奈被微软逼上了梁山学一下codefirst,就算是为明年做准备吧.写的这些网上大致都有,基本没啥 新内容, 迁移 使用自动迁移 Enable- ...
- 由表生成代码:mybatis-generator入门
application.properties ## mapper xml 文件地址 mybatis.mapper-locations=classpath*:mapper/*Mapper.xml ##数 ...