Spring boot Sample 001之spring-boot-begin-hello
一、环境
1.1、Idea 2020.1
1.2、JDK 1.8
二、目的
三、步骤
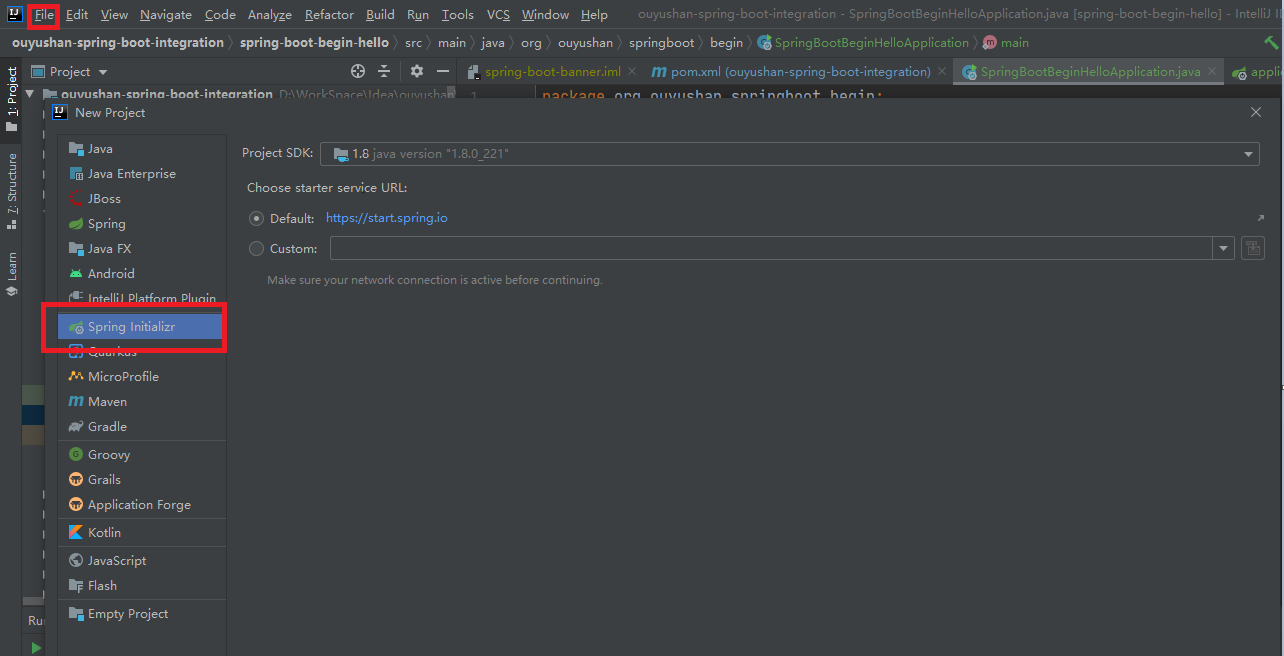
3.1、点击File -> New Project -> Spring Initializer,点击next
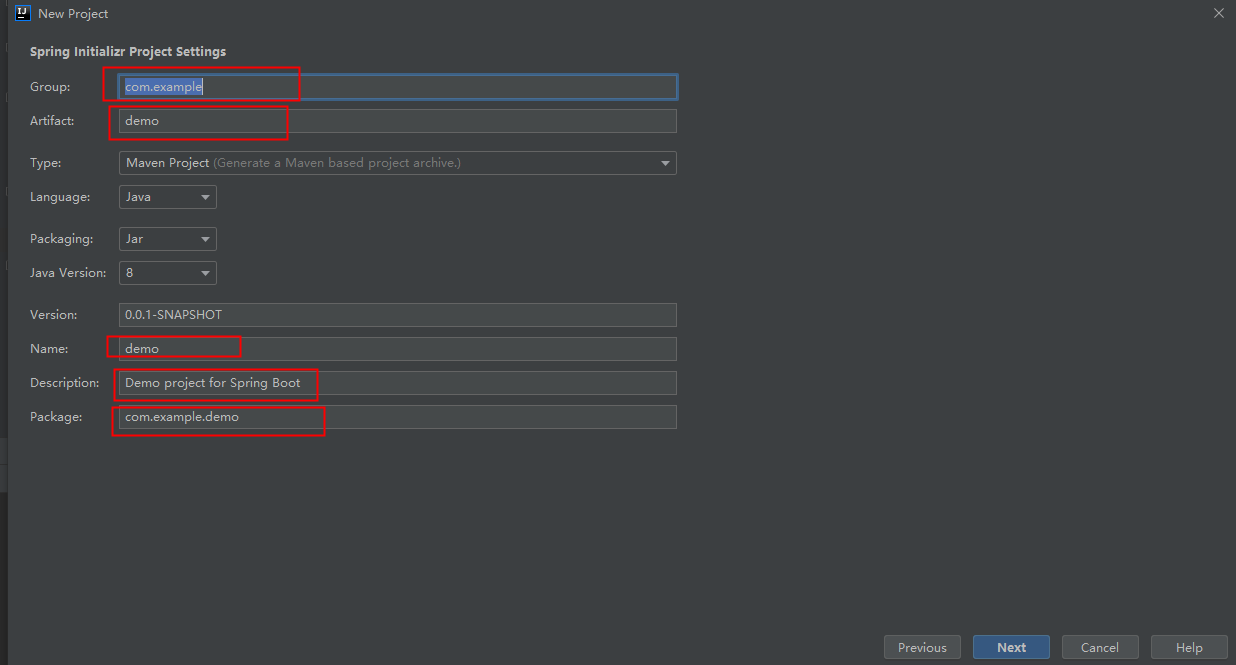
3.2、在对应地方修改自己的项目信息
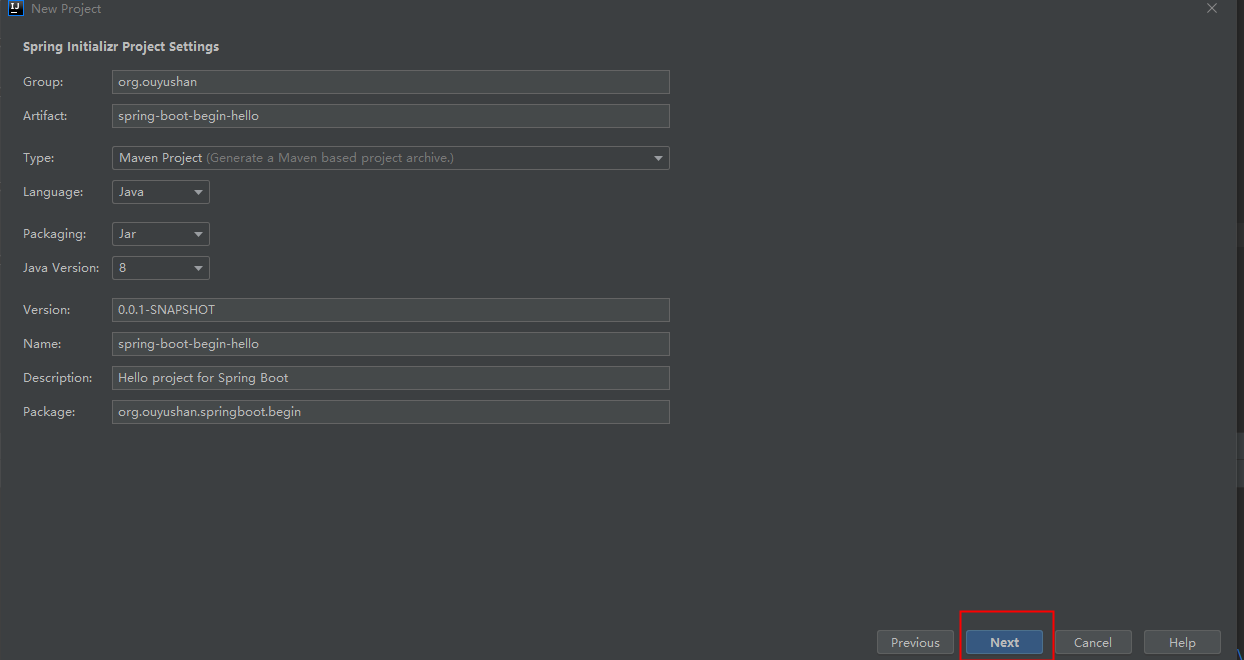
3.3、修改后如下,点击next
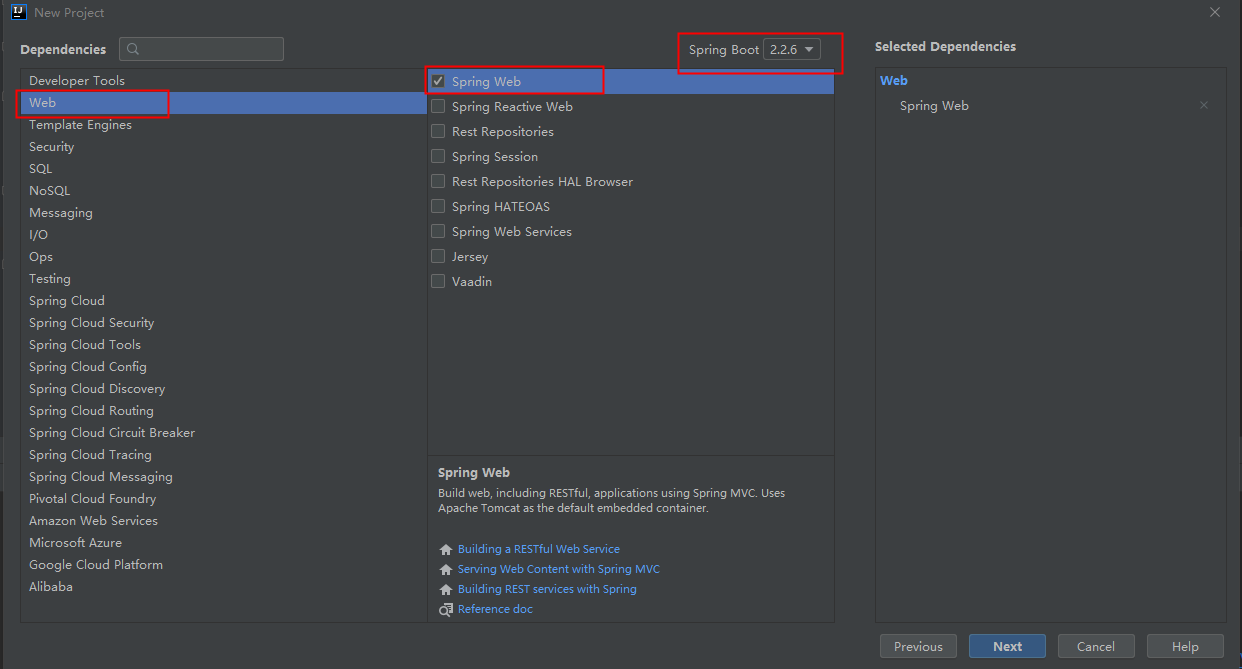
3.4、选择Web依赖,选中Spring Web。可以选择Spring Boot版本,本次默认为2.2.6,点击Next
3.5、编辑工程名和项目路径,确定后点击Finish完成

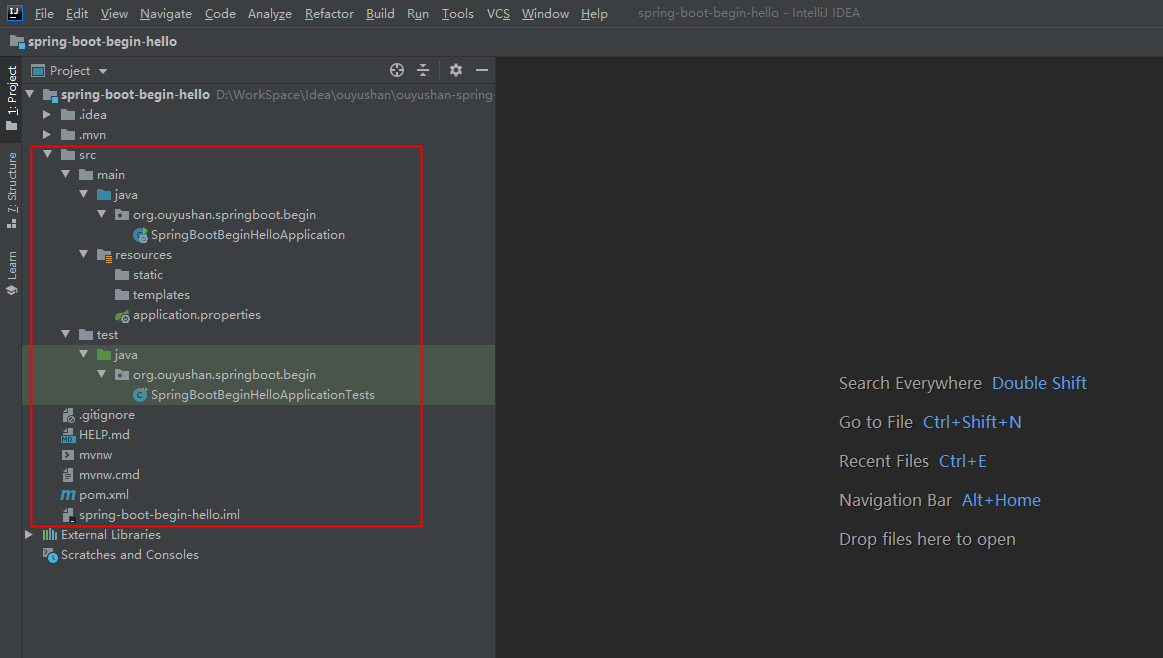
3.6、完成新建工程
四、代码分析
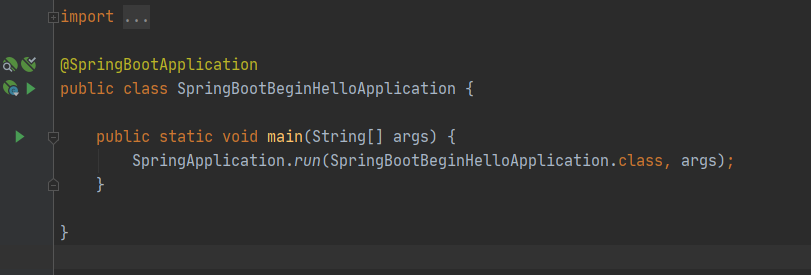
4.1、运行项目 执行SpringBootBeginHelloApplication下的main方法
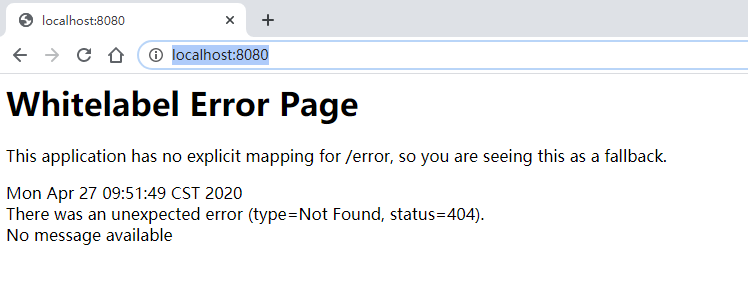
4.2、测试运行
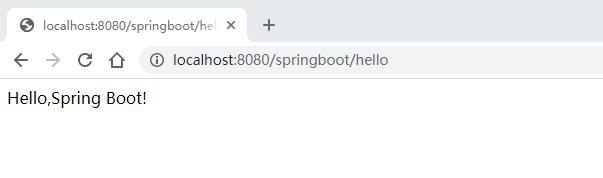
4.3、新增测试接口

 package org.ouyushan.springboot.begin.controller;

 import org.springframework.web.bind.annotation.GetMapping;

 import org.springframework.web.bind.annotation.RequestMapping;

 import org.springframework.web.bind.annotation.RestController;

 /**

  * @Description

  * @Author ouyushan

 * @Email ouyushan@hotmail.com

 * @Date 2020/4/27

 */

 @RestController

 @RequestMapping("/springboot")

 public class HelloController {

     @GetMapping("/hello")

     public String hello() {

         return "Hello,Spring Boot!";

     }

 }
4.4、新接口测试
 <?xml version="1.0" encoding="UTF-8"?>

 <project xmlns="http://maven.apache.org/POM/4.0.0" xmlns:xsi="http://www.w3.org/2001/XMLSchema-instance"

          xsi:schemaLocation="http://maven.apache.org/POM/4.0.0 https://maven.apache.org/xsd/maven-4.0.0.xsd">

     <modelVersion>4.0.0</modelVersion>

     <parent>

         <groupId>org.springframework.boot</groupId>

         <artifactId>spring-boot-starter-parent</artifactId>

         <version>2.2.6.RELEASE</version>

         <relativePath/> <!-- lookup parent from repository -->

     </parent>

     <groupId>org.ouyushan</groupId>

     <artifactId>spring-boot-begin-hello</artifactId>

     <version>0.0.1-SNAPSHOT</version>

     <name>spring-boot-begin-hello</name>

     <description>Hello project for Spring Boot</description>

     <!--指定jdk版本-->

     <properties>

         <java.version>1.8</java.version>

     </properties>

     <dependencies>

         <!--指定spring boot web依赖-->

         <dependency>

             <groupId>org.springframework.boot</groupId>

             <artifactId>spring-boot-starter-web</artifactId>

         </dependency>

         <dependency>

             <groupId>org.springframework.boot</groupId>

             <artifactId>spring-boot-starter-test</artifactId>

             <scope>test</scope>

             <exclusions>

                 <exclusion>

                     <groupId>org.junit.vintage</groupId>

                     <artifactId>junit-vintage-engine</artifactId>

                 </exclusion>

             </exclusions>

         </dependency>

     </dependencies>

     <build>

         <plugins>

             <plugin>

                 <groupId>org.springframework.boot</groupId>

                 <artifactId>spring-boot-maven-plugin</artifactId>

             </plugin>

         </plugins>

     </build>

 </project>
五、知识点
5.1、spring boot 项目可通过以下方式指定jdk版本
     <!--指定jdk版本-->

     <properties>

         <java.version>1.8</java.version>

     </properties>
5.2、spring boot 端口默认是8080
Spring boot Sample 001之spring-boot-begin-hello的更多相关文章
- Spring boot Sample 012之spring-boot-web-upload
一.环境 1.1.Idea 2020.1 1.2.JDK 1.8 二.目的 spring boot 整合web实现文件上传下载 三.步骤 3.1.点击File -> New Project -& ...
- Spring boot Sample 0010之spring-boot-web-freemarker
一.环境 1.1.Idea 2020.1 1.2.JDK 1.8 二.目的 spring boot 整合freemarker模板开发web项目 三.步骤 3.1.点击File -> New Pr ...
- Spring boot Sample 009之spring-boot-web-thymeleaf
一.环境 1.1.Idea 2020.1 1.2.JDK 1.8 二.目的 spring boot 整合thymeleaf模板开发web项目 三.步骤 3.1.点击File -> New Pro ...
- Spring boot Sample 006之spring-boot-custom-servlet
一.环境 1.1.Idea 2020.1 1.2.JDK 1.8 二.步骤 2.1.点击File -> New Project -> Spring Initializer,点击next 2 ...
- Spring boot Sample 005之spring-boot-profile
一.环境 1.1.Idea 2020.1 1.2.JDK 1.8 二.目的 通过yaml文件配置spring boot 属性文件 三.步骤 3.1.点击File -> New Project - ...
- Spring Boot (五)Spring Data JPA 操作 MySQL 8
一.Spring Data JPA 介绍 JPA(Java Persistence API)Java持久化API,是 Java 持久化的标准规范,Hibernate是持久化规范的技术实现,而Sprin ...
- Spring 5.x 、Spring Boot 2.x 、Spring Cloud 与常用技术栈整合
项目 GitHub 地址:https://github.com/heibaiying/spring-samples-for-all 版本说明: Spring: 5.1.3.RELEASE Spring ...
- spring cloud教程之使用spring boot创建一个应用
<7天学会spring cloud>第一天,熟悉spring boot,并使用spring boot创建一个应用. Spring Boot是Spring团队推出的新框架,它所使用的核心技术 ...
- Spring Boot——2分钟构建spring web mvc REST风格HelloWorld
之前有一篇<5分钟构建spring web mvc REST风格HelloWorld>介绍了普通方式开发spring web mvc web service.接下来看看使用spring b ...
随机推荐
- k-modes聚类算法
为什么要用k-modes算法 k-means算法是一种简单且实用的聚类算法,但是传统的k-means算法只适用于连续属性的数据集(数值型数据),而对于离散属性的数据集,计算簇的均值以及点之间的欧式距离 ...
- filebeat-kafka:WARN producer/broker/0 maximum request accumulated, waiting for space
You need to configure 3 things: Brokers Filebeat kafka output Consumer Here a example (change paths ...
- RobotFramework Selenium2Library 关键字详解
*** Settings *** Library Selenium2Library *** Keywords *** Checkbox应该不被选择 [Arguments] ${locator} Che ...
- ArrrayList底层代码的实现
定义变量 首先要想实现该块代码,必须定义三个私有变量. private Object[] elementData;该变量用来存储容器中元素的个数. private int size:该变量表示当前容器 ...
- mysql小白系列_05 日常操作
mysql启动/关闭 my.cnf的调用顺序 [root@docker02 bin]# ./mysql --help Default options are read from the followi ...
- MYSQL 中binlog 参数的记录
http://dev.mysql.com/doc/refman/5.7/en/replication-options-binary-log.html binlog_cache_size Command ...
- ios审核 "prefs:root="被拒
https://blog.csdn.net/xnickname666/article/details/83068516 使用TZImagePicker https://github.com/banc ...
- Spring全家桶——SpringBoot渐入佳境
Spring全家桶系列--SpringBoot渐入佳境 萌新:小哥,我在实体类写了那么多get/set方法,看着很迷茫 小哥:那不是可以自动生成吗? 萌新:虽然可以自动生成,但是如果我要修改某个变量的 ...
- airflow的安装和使用 - 完全版
之前试用了azkaban一小段时间,虽然上手快速方便,但是功能还是太简单,不够灵活. Airflow使用代码来管理任务,这样应该是最灵活的,决定试一下. 我是python零基础,在使用airflow的 ...
- Angular SPA基于Ocelot API网关与IdentityServer4的身份认证与授权(三)
在前面两篇文章中,我介绍了基于IdentityServer4的一个Identity Service的实现,并且实现了一个Weather API和基于Ocelot的API网关,然后实现了通过Ocelot ...