
PyQt4 / PyQt5
Python事多,做个笔记,区分。
PySide2 Signal Slot Test
from PySide2.QtWidgets import QMainWindow,QApplication,QWidget,QPushButton

from PySide2 import QtWidgets

from PySide2.QtCore import Slot, Signal

import sys

class MyCenWidget(QWidget):

    closeSignal = Signal()

    quitSignal = Signal()

    def __init__(self,parent = None):

        super(MyCenWidget, self).__init__(parent)

        # first create layout

        self.createAndSetLayout()

        # add widget to my layout

        self.createButtons()

    def createAndSetLayout(self):

        self.mainLayout = QtWidgets.QHBoxLayout()

        self.setLayout(self.mainLayout)

    def createButtons(self):

        self.closeBtn = QPushButton(self)

        self.closeBtn.setText("Close")

        self.closeBtn.clicked.connect(self.closeSignal)  # 信号连接信号

        self.mainLayout.addWidget(self.closeBtn)

        # Quit button settings

        self.quitBtn = QPushButton(self)

        self.quitBtn.setText("Quit")

        self.quitBtn.clicked.connect(self.quitSlot)

        self.mainLayout.addWidget(self.quitBtn)

    def quitSlot(self):

        print("我的中心控件点了quit button")

        self.quitSignal.emit()

class MyWindow(QMainWindow):

    def __init__(self):

        super(MyWindow, self).__init__()

        # create my widget

        self.setupMenuBar()

        # bind my widget to function

        self.accessMenuBar()

        # take my widget to here

        cenWidget = MyCenWidget()  # 野指针

        cenWidget.closeSignal.connect(self.close)  # 从我定义的窗口里发射的信号,这个是closeSignal

        cenWidget.quitSignal.connect(self.close)

        self.setCentralWidget(cenWidget) # 基类有个函数让我设置它到我的QMainWindow

    def setupMenuBar(self):

        parentMenuBar = self.menuBar()

        fileMenu = parentMenuBar.addMenu("File")

        self.newAction = fileMenu.addAction("new")

        editMenu = parentMenuBar.addMenu("Edit")

        self.undoAction = editMenu.addAction("undo")

    # make connection new action

    def accessMenuBar(self):

        self.newAction.triggered.connect(self.newSlot)

    @Slot(bool)

    def newSlot(self, checked):

        print("into my new slot")

if __name__ == "__main__":

    app = QApplication(sys.argv)

    print("My window argv:", sys.argv)

    w = MyWindow()

    w.show()

    app.exec_()
PyQt5 Reference Guide
http://pyqt.sourceforge.net/Docs/PyQt5/index.html
Qt4 signal:
class CopyFileThread(QtCore.QThread):

    signal_process = QtCore.pyqtSignal(str, str, bool)

    def __init__(self, parent=None):

        super(CopyFileThread, self).__init__(parent)

        self.finished.connect(self.taskEnd)

    def setSourceAndDestination(self, src, des):

        self.source = src

        self.des = des

        self.status = False

    def run(self):

        #print "copy -> ", self.source, self.des

        # QtCore.QFile.copy(self.source,self.des)

        try:

            shutil.copy(self.source, self.des)

            self.status = True

        except:

            self.status = False

    def taskEnd(self):

        self.signal_process.emit(self.source, self.des, self.status)
接受这个signal槽:
@QtCore.pyqtSlot(str, str, bool)

    def perThreadCopyEnd(self, src, des, status):

        self.taskNum += 1

        if (status):

            self.throwMessage(">>" + src + "\t->->->->\t" + des + "<<copy end")

        else:

            self.throwMessage(">>" + src + "\tT_T T_T T_T\t" + des + "<<copy failed")

        if self.taskNum == len(self.sources):

            self.throwMessage(">>   process end")
Qt5展示的一些发射信号:
from PyQt5.QtCore import QObject, pyqtSignal

class Foo(QObject):

    # Define a new signal called 'trigger' that has no arguments.

    trigger = pyqtSignal()

    def connect_and_emit_trigger(self):

        # Connect the trigger signal to a slot.

        self.trigger.connect(self.handle_trigger)

        # Emit the signal.

        self.trigger.emit()

    def handle_trigger(self):

        # Show that the slot has been called.

        print "trigger signal received"
信号重载
from PyQt5.QtWidgets import QComboBox

class Bar(QComboBox):

    def connect_activated(self):

        # The PyQt5 documentation will define what the default overload is.

        # In this case it is the overload with the single integer argument.

        self.activated.connect(self.handle_int)

        # For non-default overloads we have to specify which we want to

        # connect.  In this case the one with the single string argument.

        # (Note that we could also explicitly specify the default if we

        # wanted to.)

        self.activated[str].connect(self.handle_string)

    def handle_int(self, index):

        print "activated signal passed integer", index

    def handle_string(self, text):

        print "activated signal passed QString", text
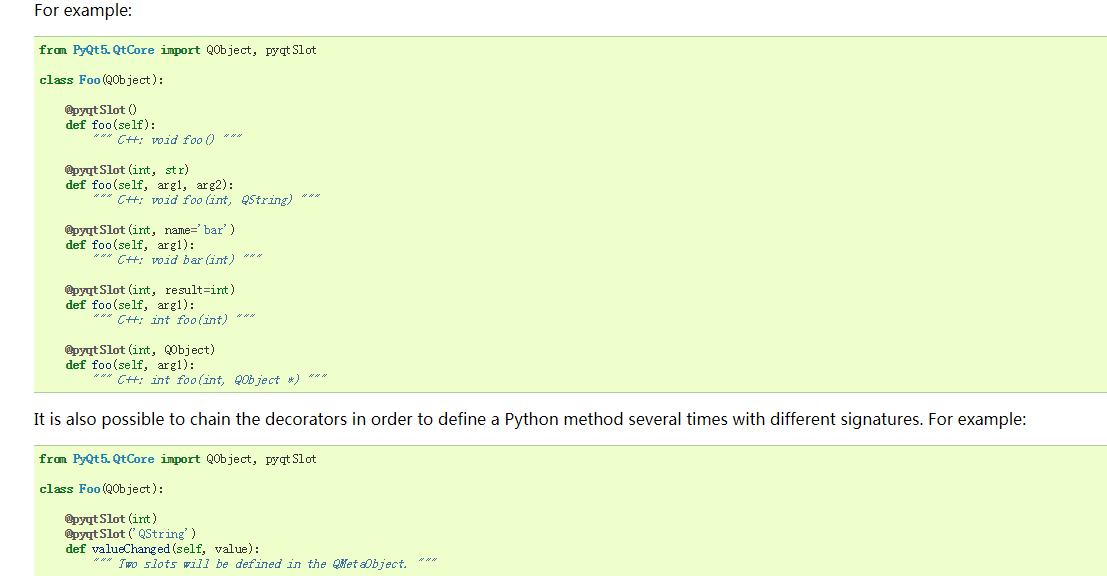
QML:
<1> show 一个qml里的window
import QtQuick 2.0

import QtQuick.Window 2.2

import QtQuick.Controls 1

import QtQuick.Dialogs 1.2

Window

{

    id:root

    width:1280

    height:720

    Rectangle

    {

        id:rec

        color:"#FF2020"

        width:100

        height:100

        anchors.centerIn:parent

        border.color:"#202020"

        border.width:1

    }

    MouseArea

    {

        id:quitArea

        anchors.fill:

        {

            rec

        }

        onClicked:

        {

            close()

        }

    }

}
main.py:
from PyQt5 import QtWidgets,QtGui,QtCore

from PyQt5 import QtQml

from PyQt5.QtQuick import QQuickView,QQuickWindow

import sys

if __name__ == "__main__":

    app = QtGui.QGuiApplication(sys.argv)

    eng = QtQml.QQmlApplicationEngine()

    eng.load(QtCore.QUrl.fromLocalFile('./UI/main.qml'))

    topLevel = eng.rootObjects()[0]

    print topLevel

    topLevel.show()

    app.exec_()
创建混合窗口:

按钮是QPushButton,下面的白色区域是QtQuickWindow
from PyQt5 import QtWidgets,QtGui,QtCore

from PyQt5 import QtQml

from PyQt5.QtQuick import QQuickView,QQuickWindow

import sys

if __name__ == "__main__":

    app = QtWidgets.QApplication(sys.argv)

    eng = QtQml.QQmlApplicationEngine()

    eng.load(QtCore.QUrl.fromLocalFile('./UI/Main.qml'))

    topLevel = eng.rootObjects()[0]

    print topLevel

    #topLevel.show()

    layout = QtWidgets.QVBoxLayout()

    button = QtWidgets.QPushButton()

    button.setText("houdini")

    layout.addWidget(button)

    mainWidget = QtWidgets.QWidget()

    quickWidget = QtWidgets.QWidget.createWindowContainer(topLevel)

    #quickWidget.show()

    mainWidget.setLayout(layout)

    layout.addWidget(quickWidget)

    mainWidget.show()

    app.exec_()
PyQt4 / PyQt5的更多相关文章
- Python pyQt4/PyQt5 学习笔记3(绝对对位,盒布局,网格布局)
本节研究布局管理的内容. (一)绝对对位 import sys from PyQt4 import QtGui class Example(QtGui.QWidget): def __init__( ...
- Python pyQt4/pyQt5 学习笔记2(状态栏、菜单栏和工具栏)
例子:状态栏.菜单栏和工具栏 import sys from PyQt4 import QtGui class Example(QtGui.QMainWindow): def __init__(sel ...
- Python pyQt4/pyQt5 学习笔记1(空白窗口,按钮,控件事件,控件提示,窗体显示到屏幕中间,messagebox)
PyQt4是用来编写有图形界面程序(GUI applications)的一个工具包.PyQt4作为一个Python模块来使用,它有440个类和超过6000种函数和方法.同时它也是一个可以在几乎所有主流 ...
- Python pyQt4/PyQt5 学习笔记4(事件和信号)
信号 & 槽 import sys from PyQt5.QtCore import Qt from PyQt5.QtWidgets import (QWidget,QLCDNumber,QS ...
- PyQt 5.4参考指南 ---- PyQt5和PyQt4之间的差异
欢迎关注博主主页,学习python视频资源,还有大量免费python经典文章 sklearn实战-乳腺癌细胞数据挖掘(博主亲自录制视频) https://study.163.com/course/in ...
- PyQt5初识
学习PyQt5是个机缘,那是因为我的linux16.04+python3.6使了浑身解数也装不上PyQt4! PyQt5的官方文档貌似是要钱的!又想快速了解这个东东,我还是借鉴了万能的博客园大佬博主: ...
- GUI1_综合介绍
最终比较,选择pyqt用于GUI开发 https://pythonspot.com/en/gui/ 图形化界面可以使用PyQt5, PyQt4, wxPython or Tk.模板 Graphical ...
- 共有49款Windows GUI开发框架开源软件 【转】
源文 : http://www.oschina.net/project/tag/178/gui?lang=36&os=0&sort=view&p=1 桌面应用开发引擎 Allo ...
- 【pyqtgraph绘图】安装pyqtgraph
解读官方API-安装 安装 参考:http://www.pyqtgraph.org/documentation/installation.html 根据您的需要,有许多不同的方式来安装pyqtgrap ...
随机推荐
- 洛谷P1228 分治
https://www.luogu.org/problemnew/show/P1228 我真傻,真的,我单知道这种题目可以用dfs剪枝过,没有想到还能构造分治,当我敲了一发dfs上去的时候,只看到一个 ...
- 91 Testing MySQL学习总结
91 Testing MySQL学习总结 --------- 在WEB应用方面MySQL是最好的RDBMS(Relational Database Management System什么是数据库?数据 ...
- jmeter5.0 while controller使用总结
while controller 配合sql使用的方式 在while控制器条件中填空,这样当里面的请求断言失败后就会跳出循环 在while控制器条件中填LAST,当里面的请求断言失败后就会跳出循环,如 ...
- 原版js生成银行卡号
function init() { undefined = "undefined"; mkCClist(); } function ccchk(cdi) { document.co ...
- Hadoop记录-NameNode优化
1.NameNode启动过程 加载FSImage: 回放EditLog: 执行CheckPoint(非必须步骤,结合实际情况和参数确定,后续详述): 收集所有DataNode的注册和数据块汇报. 采用 ...
- PHP7 网络编程(五)进程间通信【待】
https://blog.csdn.net/godleading/article/details/78391159
- pycharm仿sublime配色
1.设置IDE皮肤主题 file->setting->appearance->theme->darcula 2.setting中搜索python,将主题设置成Monokai,然 ...
- SQL Server Management Studio 使用技巧
Ø 前言 本文主要介绍 SQL Server Management Studio 工具的使用,相信很多开发人员都比较熟悉此工具,特别是做 C# 开发的程序员,基本上都会经常使用该工具,当然也可以使用 ...
- 三十三、Linux 进程与信号——中断系统调用和函数可重入性
33.1 中断系统调用 进程调用 “慢” 系统调用时,如果发生了信号,内核会重启系统调用. 慢系统调用 可能会永久阻塞的系统调用 从终端设备.管道或网络设备上的文件读取 向上述文件写入 某些设备上的文 ...
- Docker(四)Dockerfile入门
摘自: https://mp.weixin.qq.com/s/Im4axroExgrJoj05g_TQ-w 一.Docker的工作流程 Docker组件协作运行容器可以分为以下几个过程: Docker ...