spring security 自动登录 --- 心得
1.前言
仍然是使用cookie存储登录数据,但是存储的数据 由 spring security自动创建 ,当登出后自动删除cookie,
如果不登出也仍在生命周期内,关闭浏览器再打开将会自动登录,无需手动再登录。
2.操作
需要在设置有spring security 的spring boot 工程基础上【详细可查看我的其他随笔,有详细记载,具体操作这里不解释】加上下面配置
(1)
security 配置里有两种写法 【但是只能选择一种】
方法一: 使用注解风格的Java配置
完整的security配置
package com.example.security5500.securityConfig; import org.springframework.beans.factory.annotation.Autowired;
import org.springframework.context.annotation.Bean;
import org.springframework.context.annotation.Configuration;
import org.springframework.security.authentication.AuthenticationManager;
import org.springframework.security.config.annotation.authentication.builders.AuthenticationManagerBuilder;
import org.springframework.security.config.annotation.method.configuration.EnableGlobalMethodSecurity;
import org.springframework.security.config.annotation.web.builders.HttpSecurity;
import org.springframework.security.config.annotation.web.builders.WebSecurity;
import org.springframework.security.config.annotation.web.configuration.WebSecurityConfigurerAdapter;
import org.springframework.security.config.annotation.web.configuration.EnableWebSecurity;
import org.springframework.security.crypto.bcrypt.BCryptPasswordEncoder;
import org.springframework.security.crypto.password.NoOpPasswordEncoder;
import org.springframework.security.crypto.password.PasswordEncoder;
import org.springframework.security.web.util.matcher.AntPathRequestMatcher;
import org.springframework.stereotype.Component; //这个加不加无所谓
@Configuration
//开启security自定义配置
@EnableWebSecurity
//开启 Controller层的访问方法权限,与注解@PreAuthorize("hasRole('ROLE_admin')")配合,会拦截注解了@PreAuthrize注解的配置
// 想要@PreAuthorize正确执行 ,权限关键字必须带前缀 ROLE_ ,后面的部分可以随便写!!!!靠,琢磨了4小时了 ,终于找到原因了
@EnableGlobalMethodSecurity(prePostEnabled = true)
//, securedEnabled = true
public class WebSecurityConfig extends WebSecurityConfigurerAdapter { //实例自定义登录校验接口 【内部有 数据库查询】
@Autowired
private DbUserDetailsService dbUserDetailsService; // @Bean
// @Override
// protected AuthenticationManager authenticationManager() throws Exception {
// return super.authenticationManager();
// } //忽略拦截的静态文件路径
@Override
public void configure(WebSecurity web) throws Exception {
web.ignoring()
.antMatchers(
"/js/**",
"/css/**",
"/img/**",
"/webjars/**");
} //拦截规则设置
@Override
protected void configure(HttpSecurity http) throws Exception {
http
//允许基于使用HttpServletRequest限制访问
//即授权请求设置
.authorizeRequests()
//设置不拦截页面,可直接通过,路径访问 "/", "/index", 则不拦截,
.antMatchers("/", "/index", "/hhk/**")
//是允许所有的意思
.permitAll()
// //访问 /hai 需要admin权限 ,无权限则提示 403
// .antMatchers("/hai").hasAuthority("admin")
// //访问 /kk 需要admin或user权限 ,无权限则提示 403
// .antMatchers("/kk").hasAnyAuthority("admin", "user")
// //路径/admin/**所有的请求都需要admin权限 ,无权限则提示 403
// .antMatchers("/admin/**").hasAuthority("admin")
//其他页面都要拦截,【需要在最后设置这个】
.anyRequest().authenticated()
.and()
//设置自定义登录页面
//即开启登录设置
.formLogin()
//指定自定义登录页面的访问虚拟路径
.loginPage("/login")
.permitAll()
.and()
// 添加退出登录支持。当使用WebSecurityConfigurerAdapter时,这将自动应用。默认情况是,访问URL”/ logout”,使HTTP Session无效
// 来清除用户,清除已配置的任何#rememberMe()身份验证,清除SecurityContextHolder,然后重定向到”/login?success”
//即开启登出设置
.logout()
// //指定的登出操作的虚拟路径,需要以post方式请求这个 http://localhost:5500/mylogout 才可以登出 ,也可以直接清除用户认证信息达到登出目的
// .logoutUrl("/mylogout")
//使httpsession失效
.invalidateHttpSession(true)
//清除认证信息
.clearAuthentication(true)
//登出请求匹配器,新建一个蚂蚁路径请求匹配器 ,与 .logoutUrl("/mylogout")效果一样
.logoutRequestMatcher(new AntPathRequestMatcher("/mylogout"))
//登出成功后访问的地址
.logoutSuccessUrl("/home")
.permitAll()
.and()
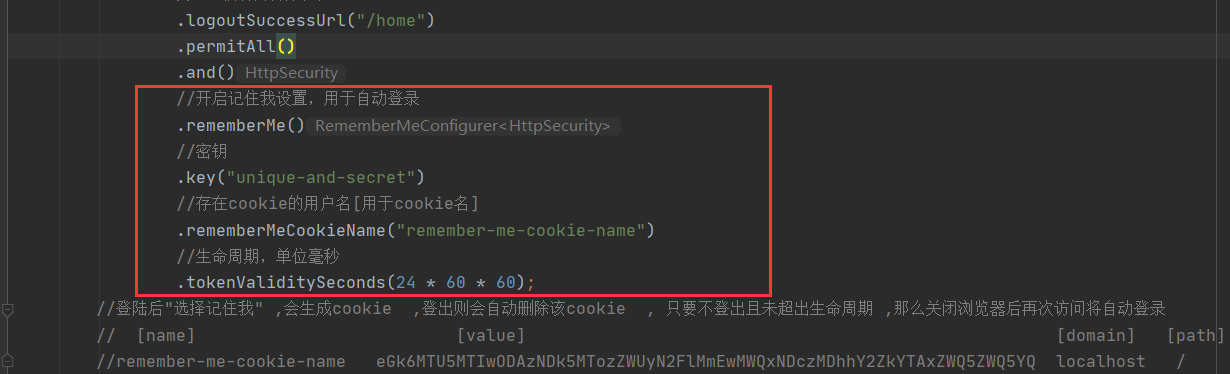
//开启记住我设置,用于自动登录
.rememberMe()
//密钥
.key("unique-and-secret")
//存在cookie的用户名[用于cookie名]
.rememberMeCookieName("remember-me-cookie-name")
//生命周期,单位毫秒
.tokenValiditySeconds(24 * 60 * 60);
//登陆后"选择记住我" ,会生成cookie ,登出则会自动删除该cookie , 只要不登出且未超出生命周期 ,那么关闭浏览器后再次访问将自动登录
// [name] [value] [domain] [path] [expires/max-age] [size] [httponly] [priority]
//remember-me-cookie-name eGk6MTU5MTIwODAzNDk5MTozZWUyN2FlMmEwMWQxNDczMDhhY2ZkYTAxZWQ5ZWQ5YQ localhost / 2020-06-03T18:13:54.992Z 89 ✓ Medium } /**
* 添加 UserDetailsService, 实现自定义登录校验,数据库查询
*/
@Override
protected void configure(AuthenticationManagerBuilder builder) throws Exception {
//注入用户信息,每次登录都会来这查询一次信息,因此不建议每次都向mysql查询,应该使用redis
//密码加密
builder.userDetailsService(dbUserDetailsService);
// .passwordEncoder(passwordEncoder());
} /**
* BCryptPasswordEncoder相关知识:
* 用户表的密码通常使用MD5等不可逆算法加密后存储,为防止彩虹表破解更会先使用一个特定的字符串(如域名)加密,然后再使用一个随机的salt(盐值)加密。
* 特定字符串是程序代码中固定的,salt是每个密码单独随机,一般给用户表加一个字段单独存储,比较麻烦。
* BCrypt算法将salt随机并混入最终加密后的密码,验证时也无需单独提供之前的salt,从而无需单独处理salt问题。
*/
@Bean
public BCryptPasswordEncoder passwordEncoder() {
return new BCryptPasswordEncoder();
} // /**
// * 选择加密方式 ,密码不加密的时候选择 NoOpPasswordEncoder,不可缺少,否则报错
// * java.lang.IllegalArgumentException: There is no PasswordEncoder mapped for the id "null"
// */
// @Bean
// public static PasswordEncoder passwordEncoder() {
// return NoOpPasswordEncoder.getInstance();
// } }
方法二: xml风格
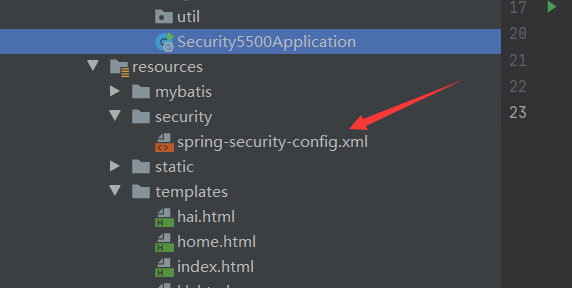

xml源码
<?xml version="1.0" encoding="UTF-8"?>

<beans:beans xmlns="http://www.springframework.org/schema/security"

             xmlns:xsi="http://www.w3.org/2001/XMLSchema-instance"

             xmlns:beans="http://www.springframework.org/schema/beans"

             xsi:schemaLocation="http://www.springframework.org/schema/security

                                 http://www.springframework.org/schema/security/spring-security.xsd

                                 http://www.springframework.org/schema/beans

                                 http://www.springframework.org/schema/beans/spring-beans.xsd">

    <http>

        <!--设置不拦截的路径-->

        <!--        登录路径-->

        <intercept-url pattern="/login" access="permitAll()"/>

        <!--        静态文件路径-->

        <intercept-url pattern="/js/**" access="permitAll()"/>

        <intercept-url pattern="/css/**" access="permitAll()"/>

        <intercept-url pattern="/img/**" access="permitAll()"/>

        <intercept-url pattern="/webjars/**" access="permitAll()"/>

        <!--     设置路径需要的指定权限   -->

        <intercept-url pattern="/hai" access="hasAuthority('admin')"/>

        <!--        其他路径都需要拦截认证-->

        <intercept-url pattern="/**" access="isAuthenticated()"/>

        <!--Spring Security 4.0以后默认开启宽展请求伪造保护,这里配置禁用,不安全的操作。-->

        <csrf disabled="true"/>

        <!--        表单登录指定路径-->

        <form-login

                login-page="/login"/>

        <!--        登出操作-->

        <!--        分别是清除session , 指定登出路径 ,指定登出成功后路径-->

        <logout

                invalidate-session="true"

                logout-url="/logout"

                logout-success-url="/login?logout"/>

        <!--        记住我[自动登录]设置 -->

        <!--       三个参数分别是  密钥 ,存在cookie的用户名[用于cookie名] ,存放的生命周期[单位毫秒] -->

        <remember-me

                key="unique-and-secret"

                remember-me-cookie="remember-me-cookie-name"

                token-validity-seconds="86400"/>

    </http>

    <!-- //在内存中进行注册公开内存的身份验证信息

    //    // 在内存中添加 用户名 ,密码 ,  权限-->

    <authentication-manager>

        <authentication-provider>

            <user-service>

                <user name="user"

                      password="password"

                      authorities="ROLE_USER"/>

            </user-service>

        </authentication-provider>

    </authentication-manager>

</beans:beans>
需要在启动类导入xml文件
package com.example.security5500;

import org.mybatis.spring.annotation.MapperScan;

import org.springframework.boot.SpringApplication;

import org.springframework.boot.autoconfigure.SpringBootApplication;

import org.springframework.security.config.annotation.method.configuration.EnableGlobalMethodSecurity;

import org.springframework.web.servlet.config.annotation.EnableWebMvc;

@SpringBootApplication

//设置mapper接口包位置

@MapperScan(basePackages = "com.example.security5500.dao")

//

// 当使用xml的方式配置时,开启此注解,将会注释掉WebSecurityConfig文件配置,该xml功能有同等效果

// @ImportResource("classpath:security/spring-security-config.xml")

public class Security5500Application {

    public static void main(String[] args) {

        SpringApplication.run(Security5500Application.class, args);

    }

}
使用xml 则不可以使用 注解 @EnableWebSecurity ,会导致失效
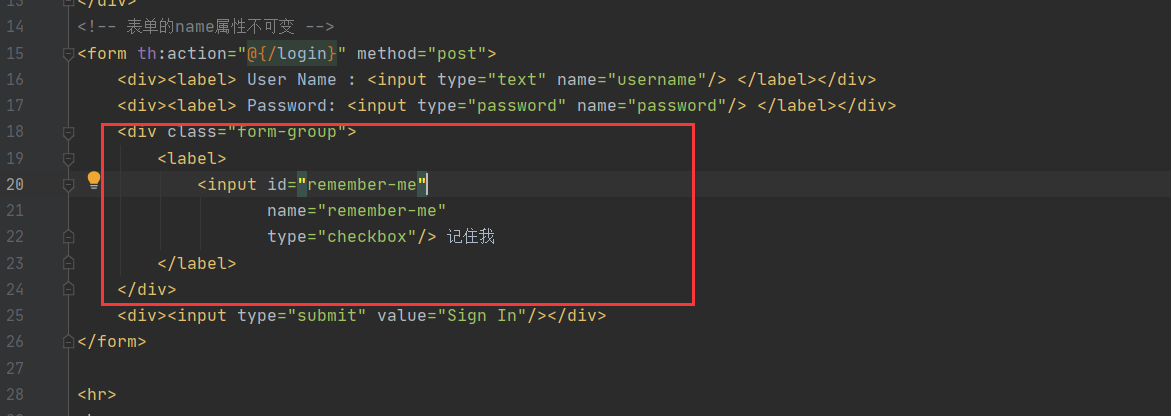
(2)在前端的自定义login.html 表单里添加“记住我”的单选框标签 ,name属性不可更改
完整源码
<!DOCTYPE html>

<html xmlns="http://www.w3.org/1999/xhtml" xmlns:th="http://www.thymeleaf.org"

      xmlns:sec="http://www.thymeleaf.org/thymeleaf-extras-springsecurity3">

<head>

    <title>Spring Security自定义</title>

</head>

<body>

<div th:if="${param.error}">

    Invalid username and password.

</div>

<div th:if="${param.logout}">

    You have been logged out.

</div>

<!-- 表单的name属性不可变 -->

<form th:action="@{/login}" method="post">

    <div><label> User Name : <input type="text" name="username"/> </label></div>

    <div><label> Password: <input type="password" name="password"/> </label></div>

    <div class="form-group">

        <label>

            <input id="remember-me"

                   name="remember-me"

                   type="checkbox"/> 记住我

        </label>

    </div>

    <div><input type="submit" value="Sign In"/></div>

</form>

<hr>

<br>

lalallalalal但是开发建设士大夫立刻

</body>

</html>
3.测试
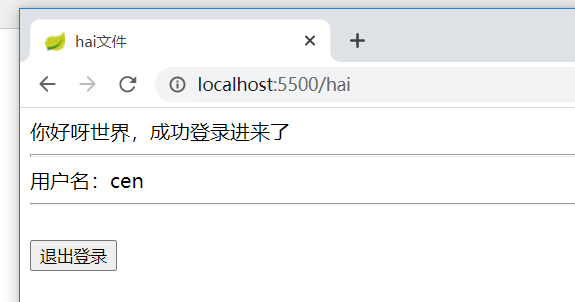
(1)启动 ,进入登录页面

(2)勾选记住我登录 ,此时cookie只有一个jsession数据
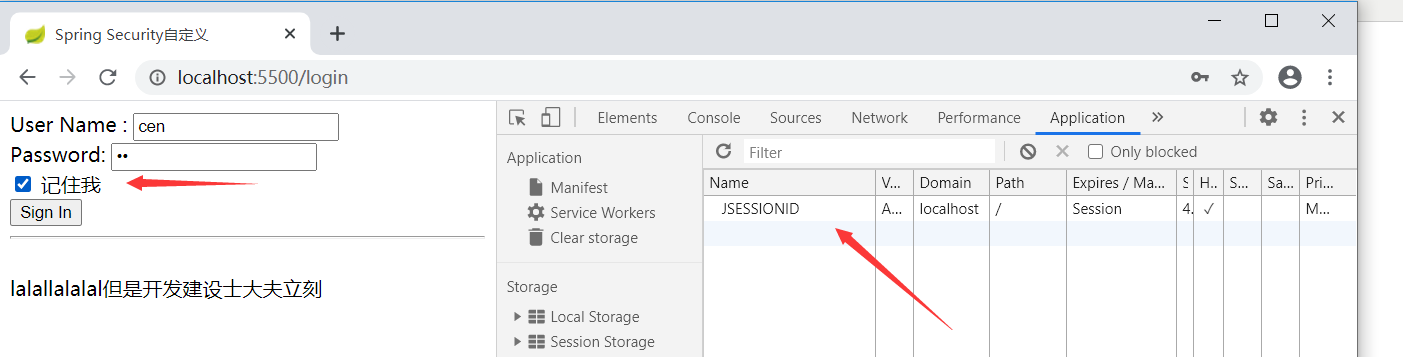
登陆后查看cookie ,多了个cookie数据

(2)关闭浏览器再打开该网址 ,会发现可直接进入,不需要手动输入账户密码登录
(3)登出后,查看cookie ,会发现cookie数据没有了,只剩下jsession

spring security 自动登录 --- 心得的更多相关文章
- Spring Security 自定义登录认证(二)
一.前言 本篇文章将讲述Spring Security自定义登录认证校验用户名.密码,自定义密码加密方式,以及在前后端分离的情况下认证失败或成功处理返回json格式数据 温馨小提示:Spring Se ...
- spring security简单登录的认证
一.思路 1.先导入相关配置(使用spring security校验之后,登录拦截的配置) 2.创建一个 WebSecurityConfig 继承 WebSecurityConfigurerAdapt ...
- Spring Security 基础登录实例
1 新建Java Web项目 导入Jar: 2 修改web.xml <?xml version="1.0" encoding="UTF-8"?> & ...
- (二)spring Security 自定义登录页面与校验用户
文章目录 配置 security 配置下 MVC 自定义登录页面 自定义一个登陆成功欢迎页面 效果图 小结: 使用 Spring Boot 的快速创建项目功能,勾选上本篇博客需要的功能:web,sec ...
- Spring Boot整合Spring Security自定义登录实战
本文主要介绍在Spring Boot中整合Spring Security,对于Spring Boot配置及使用不做过多介绍,还不了解的同学可以先学习下Spring Boot. 本demo所用Sprin ...
- springboot中使用spring security,登录url就出现403错误
参考链接:https://segmentfault.com/q/1010000012743613 有两个controller,一个是所有用户可以访问的@RequestMapping("use ...
- Spring Security在登录验证中增加额外数据(如验证码)
在使用Spring Security框架过程中,经常会有这样的需求,即在登录验证时,附带增加额外的数据,如验证码.用户类型等.下面将介绍如何实现. 注:我的工程是在Spring Boot框架基础上的, ...
- Spring Security 自定义登录页面
SpringMVC + Spring Security,自定义登录页面登录验证 学习参考:http://www.mkyong.com/spring-security/spring-security-f ...
- springboot集成spring security实现登录和注销
文章目录 一.导入坐标 二.Users实体类及其数据库表的创建 三.controller,service,mapper层的实现 四.核心–编写配置文件 五.页面的实现 运行结果 一.导入坐标 < ...
随机推荐
- ios消息队列APNS实现和证书申请
iOS消息推送的工作机制可以简单的用下图来概括: Provider是指某个iPhone软件的Push服务器,APNS是Apple Push Notification Service的缩写,是苹果的服务 ...
- 减轻内存负担,在 pymysql 中使用 SSCursor 查询结果集较大的 SQL
前言 默认情况下,使用 pymysql 查询数据使用的游标类是 Cursor,比如: import pymysql.cursors # 连接数据库 connection = pymysql.conne ...
- 一道栈溢出babystack
我太天真了,师傅说让我做做这个平台的题,我就注册了个号,信心满满的打开了change,找到了pwn,一看第一道题是babystack,我想着,嗯,十分钟搞定他!直到我下载了题目,题目给了libc,然后 ...
- python3 迭代器&生成器
前戏:列表生成式 等于 用列表生成式生成列表.需要将所有数据生成到内存中,占用空间,如果数据太多.生成数据就会耗时较久. 例如需要运行卡顿一下..... 定义一个生成器:定义时不生成任何数据,只有通过 ...
- 20款GitHub上优秀的Go开源项目
docker 无人不知的虚拟华平台,开源的应用容器引擎,借助该引擎,开发者可以打包他们的应用,移植到任何平台上. https://github.com/docker/docker 38154 star ...
- 使用.NET 6开发TodoList应用文章索引
系列导航 使用.NET 6开发TodoList应用(1)--系列背景 使用.NET 6开发TodoList应用(2)--项目结构搭建 使用.NET 6开发TodoList应用(3)--引入第三方日志 ...
- windows10使用VS(VC++)创建c++多进程命名管道通信
代码可以在 这里 下载 代码主要涉及到: 管道通信 多线程(含临界区) 多进程通信 创建的子进程独立运行 更新日志: 04-12-2020 1. 去除自定义函数返回值,改为int作为函数返回值并增加相 ...
- c++之Linux获取可用串口
1.关于 这份代码来自: stackoverflow 2. 测试 2.1 测试环境: vmware + ubuntu, vmware添加串口(虚拟机关机后再添加) 2.2 测试输出 3. 源码 #in ...
- 【LeetCode】500. Keyboard Row 解题报告(Java & Python)
作者: 负雪明烛 id: fuxuemingzhu 个人博客: http://fuxuemingzhu.cn/ 目录 题目描述 题目大意 解题方法 暴力解 字典 + set 日期 题目地址:https ...
- 【LeetCode】155. Min Stack 最小栈 (Python&C++)
作者: 负雪明烛 id: fuxuemingzhu 个人博客:http://fuxuemingzhu.cn/ 目录 题目描述 解题方法 栈同时保存当前值和最小值 辅助栈 同步栈 不同步栈 日期 题目地 ...