
keras—多层感知器MLP—MNIST手写数字识别
一、手写数字识别
现在就来说说如何使用神经网络实现手写数字识别。 在这里我使用mind manager工具绘制了要实现手写数字识别需要的模块以及模块的功能:
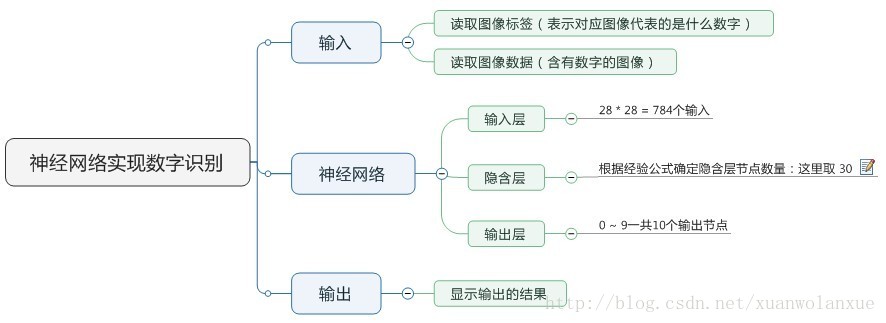
其中隐含层节点数量(即神经细胞数量)计算的公式(这只是经验公式,不一定是最佳值):
- m: 隐含层节点数
- n: 输入层节点数
- l:输出层节点数
- a:1-10之间的常数
本例子当中:
- 输入层节点n:784
- 输出层节点:10 (表示数字 0 ~ 9)
隐含层选30个,训练速度虽然快,但是准确率却只有91% 左右,如果将这个数字变为100 或是300,其训练速度回慢一些
,但准确率可以提高到93%~94% 左右。
因为这是使用的MNIST的手写数字训练数据,所以它的图像的分辨率是28 * 28,也就是有784个像素点,其下载地址为:http://yann.lecun.com/exdb/mnist/
二、查看数据程序
- 48000作为训练数据,12000作为验证数据,10000作为预测数据
 #coding=utf-

 import numpy as np             #导入模块,numpy是扩展链接库

 import pandas as pd             #类似一个本地的excel,偏向现在的非结构化的数据库

 import tensorflow as tf

 import keras

 from keras.utils import np_utils

 np.random.seed()            #设置seed可以产生的随机数据

 from keras.datasets import mnist  #导入模块,下载读取mnist数据

 (x_train_image,y_train_label),\

 (x_test_image,y_test_label)=mnist.load_data() #下载读取mnist数据

 print('train data=',len(x_train_image))

 print('test data=',len(x_test_image))

 print('x_train_image:',x_train_image.shape)

 print('y_train_label:',y_train_label.shape) #查看数据

 import matplotlib.pyplot as plt

 def plot_image(image):                      #定义显示函数

     fig=plt.gcf()

     fig.set_size_inches(,)           #设置显示图形的大小

     plt.imshow(image,cmap='binary')    #黑白灰度显示

     plt.show()                         #开始画图

 y_train_label[]                       #查看第0项label数据

 import matplotlib.pyplot as plt

 def plot_image_labels_prediction(image,lables,prediction,idx,num=):#显示多项数据

     fig=plt.gcf()

     fig.set_size_inches(,)        #设置显示图形的大小

     if num>:num=

     for i in range(,num):            #画出num个数字图形

         ax=plt.subplot(,,i+)       #建立subplot字图形为5行5列

         ax.imshow(image[idx],cmap='binary')   #画出subgraph

         title="lable="+str(lables[idx])       #设置字图形title,显示标签字段

         if len(prediction)>:                 #如果传入了预测结果

             title+=",predict="+str(prediction[idx])     #标题

         ax.set_title(title,fontsize=)                 #设置字图形的标题

         ax.set_xticks([]);ax.set_yticks([])             #设置不显示刻度

         idx+=                               #读取下一项

     plt.show()

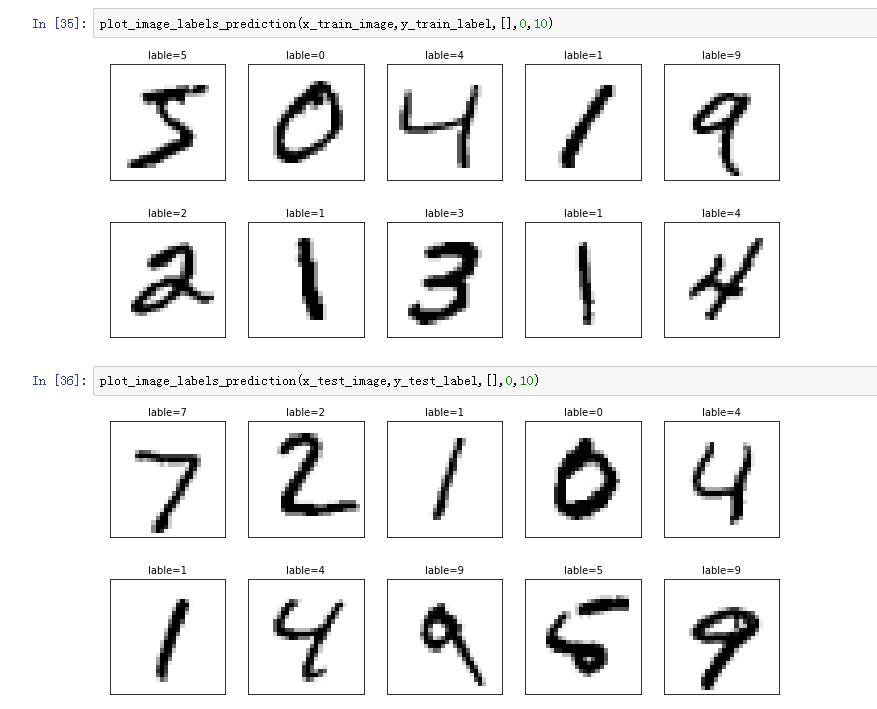
 plot_image_labels_prediction(x_train_image,y_train_label,[],,)#查看训练数据前10项

 plot_image_labels_prediction(x_test_image,y_test_label,[],,)  #查看测试数据前10项
三、运行结果
四、训练预测识别程序
 #coding=utf-8

 #1.数据预处理

 import numpy as np             #导入模块,numpy是扩展链接库

 import pandas as pd

 import tensorflow

 import keras

 from keras.utils import np_utils

 np.random.seed(10)            #设置seed可以产生的随机数据

 from keras.datasets import mnist  #导入模块,下载读取mnist数据

 (x_train_image,y_train_label),\

 (x_test_image,y_test_label)=mnist.load_data() #下载读取mnist数据

 print('train data=',len(x_train_image))

 print('test data=',len(x_test_image))

 print('x_train_image:',x_train_image.shape)

 print('y_train_label:',y_train_label.shape)

 import matplotlib.pyplot as plt

 def plot_image(image):

     fig=plt.gcf()

     fig.set_size_inches(2,2)

     plt.imshow(image,cmap='binary')

     plt.show()

 y_train_label[0]

 import matplotlib.pyplot as plt

 def plot_image_labels_prediction(image,lables,prediction,idx,num=10):

     fig=plt.gcf()

     fig.set_size_inches(12,14)

     if num>25:num=25

     for i in range(0,num):

         ax=plt.subplot(5,5,i+1)

         ax.imshow(image[idx],cmap='binary')

         title="lable="+str(lables[idx])

         if len(prediction)>0:

             title+=",predict="+str(prediction[idx])

         ax.set_title(title,fontsize=10)

         ax.set_xticks([]);ax.set_yticks([])

         idx+=1

     plt.show()

 plot_image_labels_prediction(x_train_image,y_train_label,[],0,10)

 plot_image_labels_prediction(x_test_image,y_test_label,[],0,10)

 x_Train=x_train_image.reshape(60000,784).astype('float32') #以reshape转化成784个float

 x_Test=x_test_image.reshape(10000,784).astype('float32')

 x_Train_normalize=x_Train/255    #将features标准化

 x_Test_normalize=x_Test/255

 y_Train_OneHot=np_utils.to_categorical(y_train_label)#将训练数据和测试数据的label进行one-hot encoding转化

 y_Test_OneHot=np_utils.to_categorical(y_test_label)

 #2.建立模型

 from keras.models import Sequential #可以通过Sequential模型传递一个layer的list来构造该模型,序惯模型是多个网络层的线性堆叠

 from keras.layers import Dense    #全连接层

 model=Sequential()

 #建立输入层、隐藏层

 model.add(Dense(units=256,

                 input_dim=784,

                 kernel_initializer='normal',

                 activation='relu'))

 #建立输出层

 model.add(Dense(units=10,

                 kernel_initializer='normal',

                 activation='softmax'))

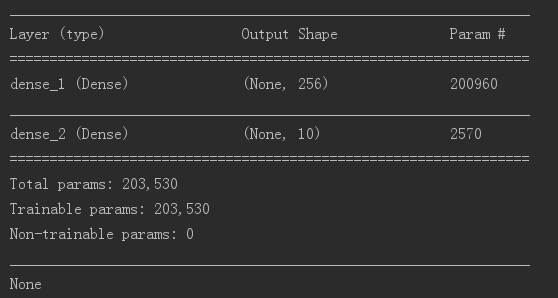
 print(model.summary())

 #3、进行训练

 #对训练模型进行设置,损失函数、优化器、权值

 model.compile(loss='categorical_crossentropy',

               optimizer='adam',metrics=['accuracy'])

 # 设置训练与验证数据比例,80%训练,20%测试,执行10个训练周期,每一个周期200个数据,显示训练过程2次

 train_history=model.fit(x=x_Train_normalize,

                         y=y_Train_OneHot,validation_split=0.2,

                         epochs=10,batch_size=200,verbose=2)

 #显示训练过程

 import matplotlib.pyplot as plt

 def show_train_history(train_history,train,validation):

     plt.plot(train_history.history[train])

     plt.plot(train_history.history[validation])

     plt.title('Train History')

     plt.ylabel(train)

     plt.xlabel('Epoch')

     plt.legend(['train','validation'],loc='upper left')    #显示左上角标签

     plt.show()

 show_train_history(train_history,'acc','val_acc')   #画出准确率评估结果

 show_train_history(train_history,'loss','val_loss') #画出误差执行结果

 #以测试数据评估模型准确率

 scores=model.evaluate(x_Test_normalize,y_Test_OneHot)   #创建变量存储评估后的准确率数据,(特征值,真实值)

 print()

 print('accuracy',scores[1])

 #进行预测

 prediction=model.predict_classes(x_Test)

 prediction

 plot_image_labels_prediction(x_test_image,y_test_label,prediction,idx=340)
五、运行结果

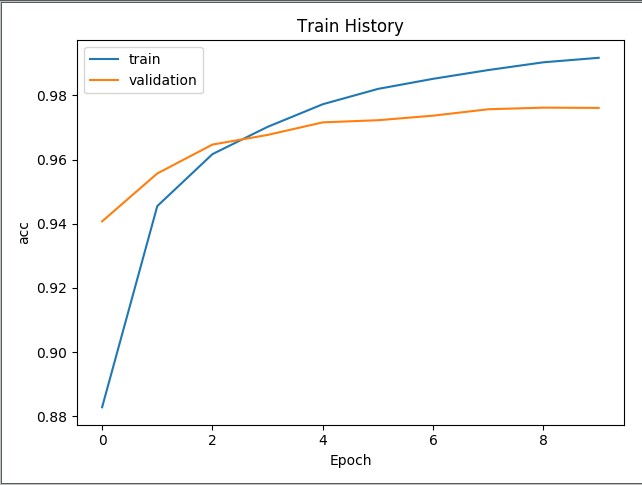

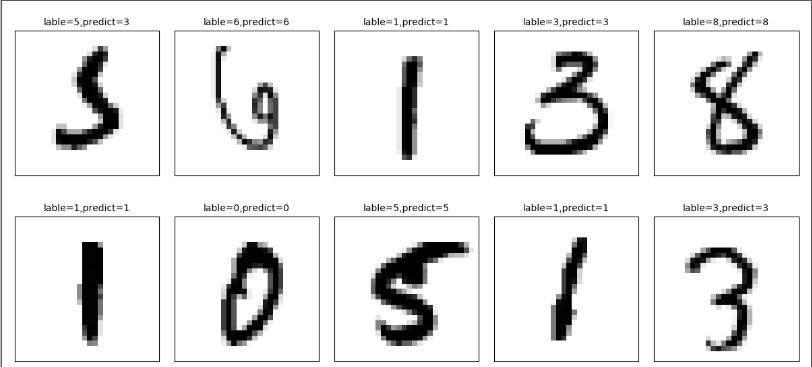
- 评估模型准确率结果为:0.9754

- 预测结果:有一个潦草的5预测错误为3
keras—多层感知器MLP—MNIST手写数字识别的更多相关文章
- mnist手写数字识别——深度学习入门项目(tensorflow+keras+Sequential模型)
前言 今天记录一下深度学习的另外一个入门项目——<mnist数据集手写数字识别>,这是一个入门必备的学习案例,主要使用了tensorflow下的keras网络结构的Sequential模型 ...
- 基于tensorflow的MNIST手写数字识别(二)--入门篇
http://www.jianshu.com/p/4195577585e6 基于tensorflow的MNIST手写字识别(一)--白话卷积神经网络模型 基于tensorflow的MNIST手写数字识 ...
- Tensorflow实现MNIST手写数字识别
之前我们讲了神经网络的起源.单层神经网络.多层神经网络的搭建过程.搭建时要注意到的具体问题.以及解决这些问题的具体方法.本文将通过一个经典的案例:MNIST手写数字识别,以代码的形式来为大家梳理一遍神 ...
- 持久化的基于L2正则化和平均滑动模型的MNIST手写数字识别模型
持久化的基于L2正则化和平均滑动模型的MNIST手写数字识别模型 觉得有用的话,欢迎一起讨论相互学习~Follow Me 参考文献Tensorflow实战Google深度学习框架 实验平台: Tens ...
- TensorFlow——MNIST手写数字识别
MNIST手写数字识别 MNIST数据集介绍和下载:http://yann.lecun.com/exdb/mnist/ 一.数据集介绍: MNIST是一个入门级的计算机视觉数据集 下载下来的数据集 ...
- Android+TensorFlow+CNN+MNIST 手写数字识别实现
Android+TensorFlow+CNN+MNIST 手写数字识别实现 SkySeraph 2018 Email:skyseraph00#163.com 更多精彩请直接访问SkySeraph个人站 ...
- 深度学习之 mnist 手写数字识别
深度学习之 mnist 手写数字识别 开始学习深度学习,先来一个手写数字的程序 import numpy as np import os import codecs import torch from ...
- 第三节,CNN案例-mnist手写数字识别
卷积:神经网络不再是对每个像素做处理,而是对一小块区域的处理,这种做法加强了图像信息的连续性,使得神经网络看到的是一个图像,而非一个点,同时也加深了神经网络对图像的理解,卷积神经网络有一个批量过滤器, ...
- mnist 手写数字识别
mnist 手写数字识别三大步骤 1.定义分类模型2.训练模型3.评价模型 import tensorflow as tfimport input_datamnist = input_data.rea ...
随机推荐
- 中点Brehensam画圆算法
#include<stdio.h> #include<stdlib.h> #include<graphics.h> #include<math.h> v ...
- python-appium520-3引入unittest,编写自动化用例
unittest是python的测试框架,和junit相似. test.py import unittest class Apptest(unittest.TestCase): def setUp(s ...
- Ubuntu 11.10 H3C iNode 客户端安装
下载客户端,放到桌面 双击打开,点击解压缩 Ctrl+Alt+T打开终端,依次输入以下代码并回车 代码: cd 桌面sudo cp iNodeClient /usr -Rcd /usr/iNodeCl ...
- 第3章 文件I/O(2)_文件I/O系统调用及文件描述符
2. 文件I/O系统调用及文件描述符 2.1 文件I/O系统调用 (1)主要函数 函数 功能 函数 功能 open() 打开文件 read() 读取文件 creat() 创建文件 write() 写入 ...
- 腾讯优图&港科大提出一种基于深度学习的非光流 HDR 成像方法
目前最好的高动态范围(HDR)成像方法通常是先利用光流将输入图像对齐,随后再合成 HDR 图像.然而由于输入图像存在遮挡和较大运动,这种方法生成的图像仍然有很多缺陷.最近,腾讯优图和香港科技大学的研究 ...
- ECCV 2018 | UBC&腾讯AI Lab提出首个模块化GAN架构,搞定任意图像PS组合
通常的图像转换模型(如 StarGAN.CycleGAN.IcGAN)无法实现同时训练,不同的转换配对也不能组合.在本文中,英属哥伦比亚大学(UBC)与腾讯 AI Lab 共同提出了一种新型的模块化多 ...
- solr的multivalued使用说明
solr的schema.xml配置文件在配置Filed的时候,有个属性: MutiValued:true if this field may containmutiple values per doc ...
- BigDecimal空指针异常——个人应用
背景: 将数据库统计的数据,封装成了两个BigDecimal,此时要将两个BigDecimal进行运算.其中有一个没有数据的话,会报null(不管null值在前在后) 先上解决: 我把数据库的数据进行 ...
- https://127.0.0.1:8080/test?param={%22..报错
使用场景:spring boot 1.5.x,内置的tomcat版本为8.5.1 原因: tomcat自tomcat 8.0.35版本之后对URL参数做了比较规范的限制,必须遵循RFC 7230 an ...
- uva-639-枚举
题意: 象棋里的車可以吃横竖的車,题目加了一个墙,用于阻断攻击,问4x4的棋盘最多可以放多少只車, 思路:枚举每一个点,2^16次方种情况 #include<stdio.h> #inclu ...