CentOS 7中firewall防火墙详解和配置以及切换为iptables防火墙
官方文档介绍地址:
一、firewall介绍
CentOS 7中防火墙是一个非常的强大的功能,在CentOS 6.5中在iptables防火墙中进行了升级了。
1、官方介绍
The dynamic firewall daemon firewalld provides a dynamically managed firewall with support for network “zones” to assign a level of trust to a network and its associated connections and interfaces. It has support for IPv4 and IPv6 firewall settings. It supports Ethernet bridges and has a separation of runtime and permanent configuration options. It also has an interface for services or applications to add firewall rules directly.
2、什么是区域Zone:
网络区域定义了网络连接的可信等级。这是一个 一对多的关系,这意味着一次连接可以仅仅是一个区域的一部分,而一个区域可以用于很多连接。
3、哪个区域可用?
由firewalld 提供的区域按照从不信任到信任的顺序排序。
4、区域的分类?
Firewalls can be used to separate networks into different zones based on the level of trust the user has decided to place on the devices and traffic within that network. NetworkManager informs firewalld to which zone an interface belongs. An interface’s assigned zone can be changed by NetworkManager or via the firewall-config tool which can open the relevant NetworkManager window for you.
The zone settings in /etc/firewalld/ are a range of preset settings which can be quickly applied to a network interface. They are listed here with a brief explanation:
drop
Any incoming network packets are dropped, there is no reply. Only outgoing network connections are possible.
block
Any incoming network connections are rejected with an icmp-host-prohibited message for IPv4 and icmp6-adm-prohibited for IPv6. Only network connections initiated from within the system are possible.
public
For use in public areas. You do not trust the other computers on the network to not harm your computer. Only selected incoming connections are accepted.
external
For use on external networks with masquerading enabled especially for routers. You do not trust the other computers on the network to not harm your computer. Only selected incoming connections are accepted.
dmz
For computers in your demilitarized zone that are publicly-accessible with limited access to your internal network. Only selected incoming connections are accepted.
work
For use in work areas. You mostly trust the other computers on networks to not harm your computer. Only selected incoming connections are accepted.
home
For use in home areas. You mostly trust the other computers on networks to not harm your computer. Only selected incoming connections are accepted.
internal
For use on internal networks. You mostly trust the other computers on the networks to not harm your computer. Only selected incoming connections are accepted.
trusted
All network connections are accepted.
It is possible to designate one of these zones to be the default zone. When interface connections are added to NetworkManager, they are assigned to the default zone. On installation, the default zone in firewalld is set to be the public zone.
注:具体内容,请参见官方文档介绍!
二、firewall配置
The configuration for firewalld is stored in various XML files in /usr/lib/firewalld/ and /etc/firewalld/.
This allows a great deal of flexibility as the files can be edited, written to, backed up, used as templates for other installations and so on.
注意:以下firewalld 的操作只有重启之后才有效:service firewalld restart 重启
1、系统配置目录
/usr/lib/firewalld/services目录中存放定义好的网络服务和端口参数,系统参数,不能修改。
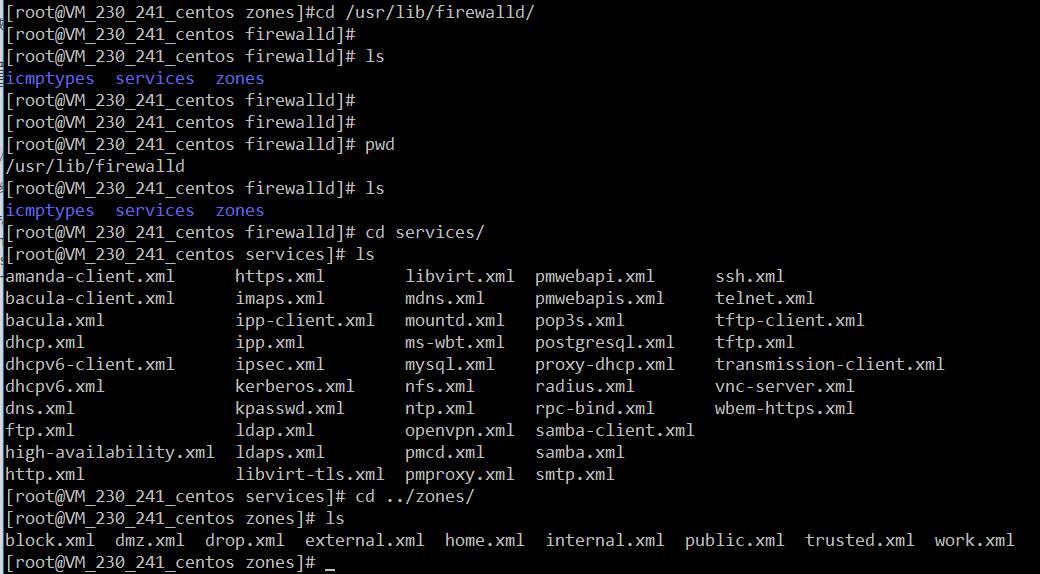
2、用户配置目录
/etc/firewalld/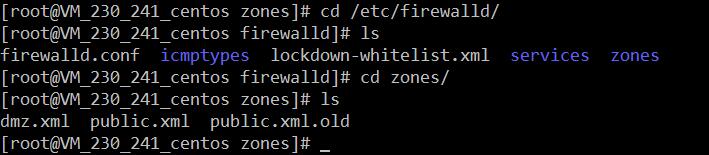
3、如何自定义添加端口
用户可以通过修改配置文件的方式添加端口,也可以通过命令的方式添加端口,注意,修改的内容会在/etc/firewalld/ 目录下的配置文件中还体现。
- 3.1、命令的方式添加端口
firewall-cmd --permanent --add-port=9527/tcp 参数介绍:
1、firewall-cmd:是Linux提供的操作firewall的一个工具;

2、--permanent:表示设置为持久;

3、--add-port:标识添加的端口;
另外,firewall中有Zone的概念,可以将具体的端口制定到具体的zone配置文件中。
例如:添加8010端口
firewall-cmd --zone=public --permanent --add-port=8010/tcp--zone=public:指定的zone为public;添加结果如下:

如果–zone=dmz 这样设置的话,会在dmz.xml文件中新增一条。
- 3.2、修改配置文件的方式添加端口
<?xml version="1.0" encoding="utf-8"?>

<zone>

  <short>Public</short>

  <description>For use in public areas.</description>

  <rule family="ipv4">

    <source address="122.10.70.234"/>

    <port protocol="udp" port="514"/>

    <accept/>

  </rule>

  <rule family="ipv4">

    <source address="123.60.255.14"/>

    <port protocol="tcp" port="10050-10051"/>

    <accept/>

  </rule>

 <rule family="ipv4">

    <source address="192.249.87.114"/> 放通指定ip,指定端口、协议

    <port protocol="tcp" port="80"/>

    <accept/>

  </rule>

<rule family="ipv4"> 放通任意ip访问服务器的9527端口

    <port protocol="tcp" port="9527"/>

    <accept/>

  </rule>

</zone>
上述的一个配置文件可以很好的看出:
1、添加需要的规则,开放通源ip为122.10.70.234,端口514,协议tcp;

2、开放通源ip为123.60.255.14,端口10050-10051,协议tcp;/3、开放通源ip为任意,端口9527,协议tcp;
三、firewall常用命令
1、重启、关闭、开启firewalld.service服务
、firewalld的基本使用

启动: systemctl start firewalld

查看状态: systemctl status firewalld

停止: systemctl disable firewalld

禁用: systemctl stop firewalld

.systemctl是CentOS7的服务管理工具中主要的工具,它融合之前service和chkconfig的功能于一体。

启动一个服务:systemctl start firewalld.service

关闭一个服务:systemctl stop firewalld.service

重启一个服务:systemctl restart firewalld.service

显示一个服务的状态:systemctl status firewalld.service

在开机时启用一个服务:systemctl enable firewalld.service

在开机时禁用一个服务:systemctl disable firewalld.service

查看服务是否开机启动:systemctl is-enabled firewalld.service

查看已启动的服务列表:systemctl list-unit-files|grep enabled

查看启动失败的服务列表:systemctl --failed

.配置firewalld-cmd

查看版本: firewall-cmd --version

查看帮助: firewall-cmd --help

显示状态: firewall-cmd --state

查看所有打开的端口: firewall-cmd --zone=public --list-ports

更新防火墙规则: firewall-cmd --reload

查看区域信息:  firewall-cmd --get-active-zones

查看指定接口所属区域: firewall-cmd --get-zone-of-interface=eth0

拒绝所有包:firewall-cmd --panic-on

取消拒绝状态: firewall-cmd --panic-off

查看是否拒绝: firewall-cmd --query-panic

那怎么开启一个端口呢

添加

firewall-cmd --zone=public --add-port=/tcp --permanent    (--permanent永久生效,没有此参数重启后失效)

重新载入

firewall-cmd --reload

查看

firewall-cmd --zone= public --query-port=/tcp

删除

firewall-cmd --zone= public --remove-port=/tcp --permanent
2、查看firewall服务状态
systemctl status firewall 3、查看firewall的状态
firewall-cmd --state
4、查看防火墙规则
firewall-cmd --list-all 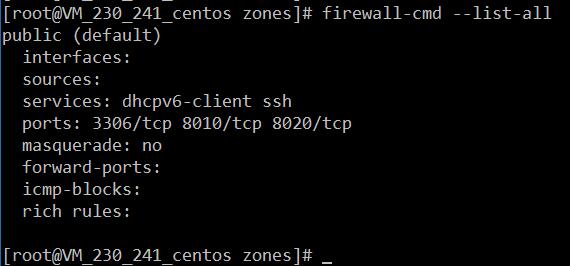
四、CentOS切换为iptables防火墙
切换到iptables首先应该关掉默认的firewalld,然后安装iptables服务。
1、关闭firewall:
service firewalld stop

systemctl disable firewalld.service #禁止firewall开机启动
2、安装iptables防火墙
yum install iptables-services #安装3、编辑iptables防火墙配置
vi /etc/sysconfig/iptables #编辑防火墙配置文件下边是一个完整的配置文件:
Firewall configuration written by system-config-firewall

Manual customization of this file is not recommended.

*filter

:INPUT ACCEPT [0:0]

:FORWARD ACCEPT [0:0]

:OUTPUT ACCEPT [0:0]

-A INPUT -m state --state ESTABLISHED,RELATED -j ACCEPT

-A INPUT -p icmp -j ACCEPT

-A INPUT -i lo -j ACCEPT

-A INPUT -m state --state NEW -m tcp -p tcp --dport 22 -j ACCEPT

-A INPUT -m state --state NEW -m tcp -p tcp --dport 80 -j ACCEPT

-A INPUT -m state --state NEW -m tcp -p tcp --dport 3306 -j ACCEPT

-A INPUT -j REJECT --reject-with icmp-host-prohibited

-A FORWARD -j REJECT --reject-with icmp-host-prohibited

COMMIT
:wq! #保存退出
service iptables start #开启

systemctl enable iptables.service #设置防火墙开机启动
CentOS 7中firewall防火墙详解和配置以及切换为iptables防火墙的更多相关文章
- CentOS 7.4中firewall防火墙详解和配置以及切换为iptables防火墙
转载:https://blog.csdn.net/xlgen157387/article/details/52672988 一.firewall介绍 CentOS 7中防火墙是一个非常的强大的功能,在 ...
- CentOS 7中firewall防火墙详解和配置以及切换为iptables防火墙--转载
最近在linux(这里用到的是Centos7的64位版本)安装nginx时,在开放80端口时用iptables设置端口 和重启服务发现提示未找到文件,在网络上收集查找后发现在Centos7中iptab ...
- CentOS7中firewall防火墙详解和配置,.xml服务配置详解
修改防火墙配置文件之前,需要对之前防火墙做好备份 重启防火墙后,需要确认防火墙状态和防火墙规则是否加载,若重启失败或规则加载失败,则所有请求都会被防火墙 1. firewall-cmd --state ...
- docker centos 镜像中安装python36详解!生成centos+python36的基础镜像
获取centos镜像docker pull centos:7.4.1708 启动并进入centos的容器docker run -i –t centos /bin/bash下载安装python编译环境依 ...
- centos/linux alternatives与update-alternatives详解与软件版本切换
update-alternatives是linux系统中专门维护系统命令链接符的工具,通过它可以很方便的设置系统默认使用哪个命令.哪个软件版本,比如,我们在系统中同时安装了open jdk和sun j ...
- 【转】centos关机与重启命令详解
连接:http://blog.csdn.net/jiangzhengdong/article/details/8036594 Linux centos关机与重启命令详解与实战 Linux centos ...
- centos关机与重启命令详解
Linux centos关机与重启命令详解与实战 Linux centos重启命令: 1.reboot 普通重启 2.shutdown -r now 立刻重启(root用户使用) 3.shutdo ...
- php中关于引用(&)详解
php中关于引用(&)详解 php的引用(就是在变量或者函数.对象等前面加上&符号) 在PHP 中引用的意思是:不同的变量名访问同一个变量内容. 与C语言中的指针是有差别的.C语言中的 ...
- JavaScript正则表达式详解(二)JavaScript中正则表达式函数详解
二.JavaScript中正则表达式函数详解(exec, test, match, replace, search, split) 1.使用正则表达式的方法去匹配查找字符串 1.1. exec方法详解 ...
随机推荐
- windwos::mutex
线程同步的方式和机制 临界区.互斥区.事件.信号量四种方式 临界区(Critical Section).互斥量(Mutex).信号量(Semaphore).事件(Event)的区别 1.临界区:通过对 ...
- Mysql的基本语句
Mysql的基本语句 1.查询当前数据库所有表名: -- 方案一: show tables; --方案二:jeesite为数据库 select table_name from information_ ...
- PHP 验证码:扭曲+粘连+变形
一,绪论 由于项目需要,需要加强目前的验证码,我们参照的对象是支付宝. 基于PHP CodeIgniter 框架,代码放置在下面的路径下. /application/libraries 二,主要代码 ...
- 2018-2019-1 20189218《Linux内核原理与分析》第八周作业
编译链接的过程 编译就是把文本形式源代码翻译为机器语言形式的目标文件过程. 链接是把目标文件.操作系统的启动代码和用到的库文件进行组织最终形成可执行代码的过程. 对于GCC来说,编译源代码并最终形成可 ...
- 20145204《网络对抗》MAL后门原理与实践
20145204<网络对抗>MAL后门原理与实践 实践内容说明 (1)使用netcat获取主机操作Shell,cron启动 (1分) (2)使用socat获取主机操作Shell, 任务计划 ...
- noip杂题题解
这道题没有什么可说的,先统计,然后几次快排,答案就出来了 Code(整齐但不简洁的代码) #include<iostream> #include<cstdio> #includ ...
- JAVA I/O(五)多线程网络Socket和ServerSocket
上篇文章介绍了Socket和ServerSocket简单使用和源码,服务器端会对每个客户端请求创建一个线程,为使服务器端能同时处理多个客户端请求,可以采用多线程的方式.本文仅对实例进行简单记录,如下. ...
- Python3基础 str partition 以参数字符串切分字符串,只切分为三部分
Python : 3.7.0 OS : Ubuntu 18.04.1 LTS IDE : PyCharm 2018.2.4 Conda ...
- keepalived主从及双主配置
高可用有2中方式. 1.Nginx+keepalived 主从配置 这种方案,使用一个vip地址,前端使用2台机器,一台做主,一台做备,但同时只有一台机器工作,另一台备份机器在主机器不出现故障的时候, ...
- 第五章 消息摘要算法--MAC
注意:本节内容主要参考自<Java加密与解密的艺术(第2版)>第6章“验证数据完整性--消息摘要算法” 5.1.mac(又称为Hmac) 原理:在md与sha系列算法的基础上加入了密钥,是 ...