Gitlab CI-1.Gitlab部署
参考文档:
- GitLab Documentation:https://docs.gitlab.com/ce/
- Installation and Configuration using omnibus package:https://docs.gitlab.com/omnibus/README.html#installation-and-configuration-using-omnibus-package
- Configuration of your jobs with .gitlab-ci.yml:https://docs.gitlab.com/ce/ci/yaml/README.html
- Gitlab Community Edition 镜像:https://mirrors.tuna.tsinghua.edu.cn/help/gitlab-ce/
- Gitlab Runner:https://docs.gitlab.com/runner/
- GitLab Continuous Integration:https://docs.gitlab.com/ce/ci/
- 基于OpenSSL自建CA和颁发SSL证书:http://seanlook.com/2015/01/18/openssl-self-sign-ca/
一.环境
1. 环境规划
|
Hostname |
IP |
Service |
Remark |
|
gitlab |
172.30.200.55 |
gitlab 11.1.2 |
ps:disable selinux; remove firewalld, instead of iptables; configure ntp; aliyun repo; update openssl and so on. |
|
gitlab-runner |
172.30.200.56 |
gitlab-runner 11.1.0 docker 1.12.6 |
2. 设置iptables
# gitlab通过nginx对外提供portal服务,提前打开默认的tcp80与443端口;

# gitlan-runner主机的iptables可暂不处理

[root@gitlab ~]# vim /etc/sysconfig/iptables

-A INPUT -p tcp -m state --state NEW -m tcp --dport 80 -j ACCEPT

-A INPUT -p tcp -m state --state NEW -m tcp --dport 443 -j ACCEPT

[root@gitlab ~]# service iptables restart
3. 自签名CA证书
基于https通信,验证环境采用自签名的ca证书,以下操作在ca服务器上操作。
1)配置openssl.cnf
# 主要设置部分默认选项,生成csr请求文件时可避免收工输入;

# 涉及[ req_distinguished_name ] section,修改/新增部分用红色字体标识

[root@gitlab ~]# vim /etc/pki/tls/openssl.cnf

[ req_distinguished_name ]

countryName                     = Country Name (2 letter code)

countryName_default             = CN

countryName_min                 = 2

countryName_max                 = 2

stateOrProvinceName             = State or Province Name (full name)

stateOrProvinceName_default     = Sichuan

localityName                    = Locality Name (eg, city)

localityName_default            = Chengdu

0.organizationName              = Organization Name (eg, company)

0.organizationName_default      = Netonline

# we can do this but it is not needed normally :-)

#1.organizationName             = Second Organization Name (eg, company)

#1.organizationName_default     = World Wide Web Pty Ltd

organizationalUnitName          = Organizational Unit Name (eg, section)

organizationalUnitName_default  = Cloud-Team

commonName                      = Common Name (eg, your name or your server\'s hostname)

commonName_max                  = 64

# 新增,可对*.netonline.com进行签名;default为不设置,可对所有域名签名

commonName_default              = *.netonline.com

emailAddress                    = Email Address

emailAddress_max                = 64

# SET-ex3                       = SET extension number
2)创建初始文件
# 对服务器证书进行签名时需要初始文件;

# 默认需要创建在/etc/pki/CA/目录下

[root@gitlab ~]# touch /etc/pki/CA/index.txt /etc/pki/CA/serial

[root@gitlab ~]# echo "01" >> /etc/pki/CA/serial
3)自签名根证书
生成根秘钥
# CA根秘钥,.key文件(或xx-key.pem)

[root@gitlab ~]# openssl genrsa -out /etc/pki/CA/private/ca.key 2048

生成根证书请求文件
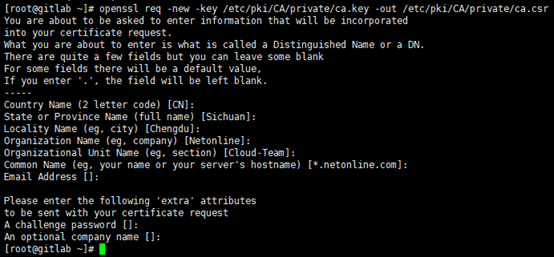
# CA根证书请求,.csr文件;

# 在openssl.cnf中已有默认配置,一路回车即可,这里暂不设置email与证书请求密码

[root@gitlab ~]# openssl req -new -key /etc/pki/CA/private/ca.key -out /etc/pki/CA/private/ca.csr
生成根证书
# CA根证书,.crt文件(或xx-crt.pem);

# -days 3650:设置根证书有效时间,单位:day

# 生成根证书与根证书请求文件可合并执行,如:openssl req -new -x509 -key /path/to/ca.key -out /path/to/ca.crt

[root@gitlab ~]# openssl req -x509 -days 3650 -in /etc/pki/CA/private/ca.csr -key /etc/pki/CA/private/ca.key -out /etc/pki/CA/private/ca.crt
本地客户端导入根证书
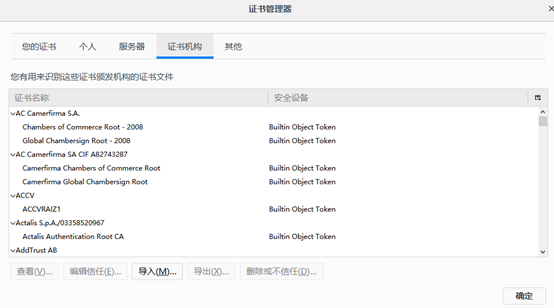
(1). 自签名的根证书需要导入至本地客户端(firefox 57.0.2):工具-->选项-->隐私与安全-->证书-->查看证书-->证书机构-->导入,如下:
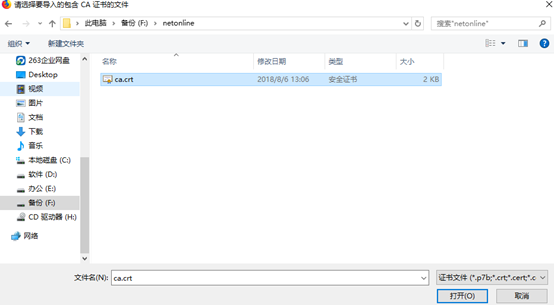
(2). 导入生成的自签名根证书,如下:
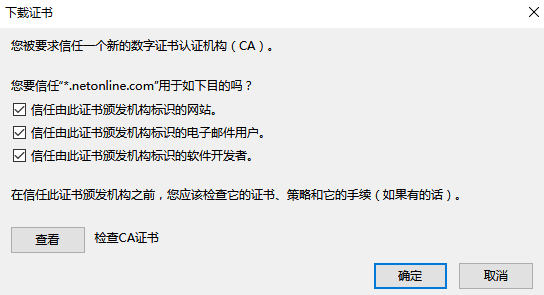
(3). 信任根证书认证机构(选项后期可调整,这里先全选),如下:
(4). 自签名的根证书安装完成后,可查看(根据"Organization Name"排序),如下:

4)服务器证书
服务器证书秘钥
# server端秘钥(.key或.pem)与证书需要放置在web服务器特性位置,这里暂放在/root/ssl/目录

[root@gitlab ~]# mkdir -p /root/ssl

[root@gitlab ~]# openssl genrsa -out /root/ssl/gitlab.netonline.com.key 2048

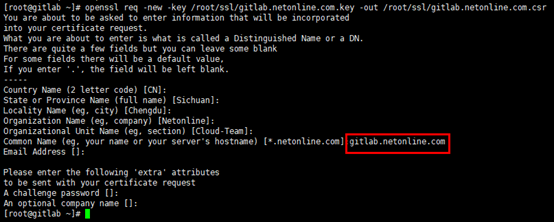
服务器证书请求文件
# Common Name:匹配web服务器的ip/domain/hostname等,因CA根证书已经确定了后缀,这里后缀需要保持一致

[root@gitlab ~]# openssl req -new -key /root/ssl/gitlab.netonline.com.key -out /root/ssl/gitlab.netonline.com.csr
服务器证书
# 采用CA根证书签名,生成server端证书(.crt或.pem);

# 签署证书时会校验/etc/pki/tls/openssl.cnf文件中[ policy_match ]定义的匹配项,如有强制匹配或必填项不符合要求,会有相应报错

[root@gitlab ~]# openssl ca -in /root/ssl/gitlab.netonline.com.csr -out /root/ssl/gitlab.netonline.com.crt -cert /etc/pki/CA/private/ca.crt -keyfile /etc/pki/CA/private/ca.key

二.Gitlab
1. 安装gitlab-ce
1)安装gitlab-repo
# 使用国内镜像源,安装gitlab-ce版本

[root@gitlab ~]# vim /etc/yum.repos.d/gitlab-ce.repo

[gitlab-ce]

name=Gitlab CE Repository

baseurl=https://mirrors.tuna.tsinghua.edu.cn/gitlab-ce/yum/el$releasever/

gpgcheck=0

enabled=1
2)安装gitlab-ce
[root@gitlab ~]# yum makecache

[root@gitlab ~]# yum install gitlab-ce -y
2. 配置gitlab.rb
# 以下只列出配置文件的修改部分(附参数所在行数)

[root@gitlab ~]# vim /etc/gitlab/gitlab.rb

# gitlab默认不采用https

 external_url 'https://gitlab.netonline.com'

# 默认情况下,启用https后,服务器不在监听tcp80端口

 nginx['redirect_http_to_https'] = true

# 如果采用https,默认从/etc/gitlab/ssl/目录下加载服务器证书与秘钥;

# 注意将生成服务器证书与秘钥复制或移动到相应目录;

# 后期如果只是变更证书,但gitlab.rb文件未变更,命令”gitlab-ctl reconfigure”对已启动的gitlab-nginx服务无效,可采用命令”gitlab-ctl hup nginx”使gitlab-nginx重载证书

 nginx['ssl_certificate'] = "/etc/gitlab/ssl/gitlab.netonline.com.crt"

 nginx['ssl_certificate_key'] = "/etc/gitlab/ssl/gitlab.netonline.com.key"
3. 移动服务器证书与秘钥文件
[root@gitlab ~]# mkdir -p /etc/gitlab/ssl

[root@gitlab ~]# cp /root/ssl/gitlab.netonline.com.crt /etc/gitlab/ssl/

[root@gitlab ~]# cp /root/ssl/gitlab.netonline.com.key /etc/gitlab/ssl/
4. 启动gitlab
# 通过yum一键安装的gitlab,gitlab.rb配置完成后,通过命令”gitlab-ctl reconfigure”,各组件按既定组合方式完成配置并启动服务
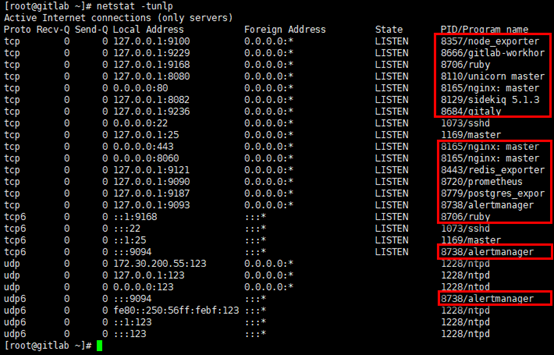
[root@gitlab ~]# gitlab-ctl reconfigure

# 监听端口

[root@gitlab ~]# netstat -tunlp
5. 访问gitlab
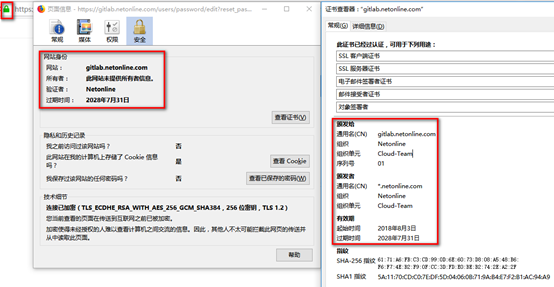
通过本地客户端访问gitlab web服务(提前绑定hosts):https://gitlab.netonline.com
(1). 首次登陆,账号root,密码重新配置;

(2). 网站已被自签名的ca证书机构验证,网址前端显示为安全连接;
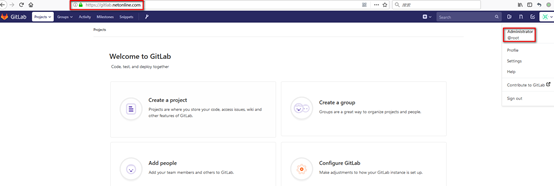
(3). 使用root账号与刚确定的密码登陆gitlab首页,如下:
6. 建立repository
流程同github,以下做简单演示。
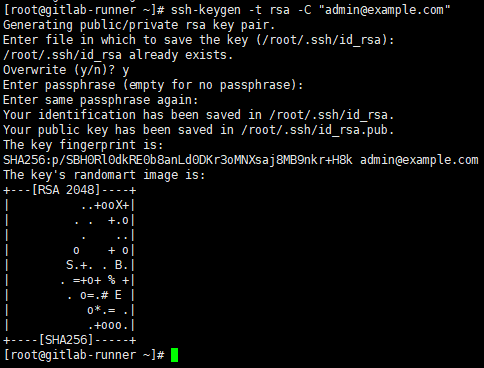
1)设置ssh keys
生成ssh keys
# 在本地生成ssh keys;

# -C: -C comment,可选项,这里采用gitlab默认地址(账号-->Settings-->emails);

# 生成的id_rsa与id_rsa.pub默认在~/.ssh目录

[root@gitlab-runner ~]# ssh-keygen -t rsa -C admin@example.com
设置ssh keys
登陆gitlab,账号-->Settings-->SSH Keys,在"Key"对话框中粘帖~/.ssh/id_rsa.pub的内容,"Add key"即可(title部分自动补全),如下:

2)建立repository
同github,登陆gitlab首页,点击"Create a proiect",填写"Project name",设置"Visibility Level","Initialize repository with a README"项可选,点击"Create project"即可,如下:

3)连接远程repository
# 建立本地repository目录

[root@gitlab-runner ~]# mkdir -p ~/gitlab

[root@gitlab-runner ~]# cd ~/gitlab/

# 必须在本地repository目录中初始化,初始化后再目录中生成.git目录,跟踪管理版本信息等

[root@gitlab-runner gitlab]# git init

# 配置全局访问参数,默认配置的全局参数在~/.gitconfig文件中记录

[root@gitlab-runner gitlab]# git config --global user.email "admin@example.com"

[root@gitlab-runner gitlab]# git config --global user.name "root"

# 关联远程repository(关联不同于连接),注意:关联并非连接;

# origin是默认的远程repository名字;

# 远程repository地址从gitlab的具体project页获取

[root@gitlab-runner gitlab]# git remote add origin git@gitlab.netonline.com:root/gitlab.git

# 版本合并,远程本地master分支版本归一

[root@gitlab-runner gitlab]# git pull git@gitlab.netonline.com:root/gitlab.git master
Gitlab CI-1.Gitlab部署的更多相关文章
- .Net Core自动化部署系列(三):使用GitLab CI/CD 自动部署Api到Docker
之前写过使用Jenkins实现自动化部署,最近正好没事研究了下GitLab的自动化部署,顺便记录一下. 使用GitLab部署我们需要准备两件事,第一个起码你得有个GitLab,自己搭建或者使用官方的都 ...
- GitLab CI/CD 自动化部署入门
前言:因为找了B站内推,测试开发,正好知道内部使用GitLab做自动化测试,所以简单学了一下,有错误的地方请指正. 入门 初始化 cp: 无法获取'/root/node-v12.9.0-linux-x ...
- 在 Kubernetes 上安装 Gitlab CI Runner Gitlab CI 基本概念以及 Runner 的安装
简介 从 Gitlab 8.0 开始,Gitlab CI 就已经集成在 Gitlab 中,我们只要在项目中添加一个.gitlab-ci.yml文件,然后添加一个Runner,即可进行持续集成.在介绍 ...
- Gitlab CI 自动部署 asp.net core web api 到Docker容器
为什么要写这个? 在一个系统长大的过程中会经历不断重构升级来满足商业的需求,而一个严谨的商业系统需要高效.稳定.可扩展,有时候还不得不考虑成本的问题.我希望能找到比较完整的开源解决方案来解决持续集成. ...
- 手把手详解持续集成之GitLab CI/CD
一.环境准备 首先需要有一台 GitLab 服务器,然后需要有个项目:这里示例项目以 Spring Boot 项目为例,然后最好有一台专门用来 Build 的机器,实际生产中如果 Build 任务不频 ...
- GitLab CI/CD 进行持续集成
简介 从 GitLab 8.0 开始,GitLab CI 就已经集成在 GitLab 中,我们只要在项目中添加一个 .gitlab-ci.yml 文件,然后添加一个 Runner,即可进行持续集成. ...
- Git Hooks、GitLab CI持续集成以及使用Jenkins实现自动化任务
Git Hooks.GitLab CI持续集成以及使用Jenkins实现自动化任务 前言 在一个共享项目(或者说多人协同开发的项目)的开发过程中,为有效确保团队成员编码风格的统一,确保部署方式的统一, ...
- [转] 基于Gitlab CI搭建持续集成环境
[From] https://blog.csdn.net/wGL3k77y9fR1k61T1aS/article/details/78798577 前言 本文是在12月12号迅雷@赵兵在前端早读课第三 ...
- 用 GitLab CI 进行持续集成
简介 从 GitLab 8.0 开始,GitLab CI 就已经集成在 GitLab 中,我们只要在项目中添加一个 .gitlab-ci.yml 文件,然后添加一个 Runner,即可进行持续集成. ...
- 【持续集成】GitLab CI + Docker 实现持续集成
GitLab CI + Docker 实现持续集成 一.持续集成(Continuous Integration, CI)的基本概念 概述 在传统软件的开发中,代码的集成工作通常是在所有人都将工作完成后 ...
随机推荐
- Docker实战(十)之分布式处理与大数据平台
分布式系统和大数据处理平台是目前业界关注的热门技术. 1.RabbitMQ RabbitMQ是一个支持AMQP的开源消息队列实现,由Erlang编写,因以高性能.高可用以及可伸缩性出名.它支持多种客户 ...
- 多线程之并发容器ConcurrentHashMap(JDK1.6)
简介 ConcurrentHashMap 是 util.concurrent 包的重要成员.本文将结合 Java 内存模型,分析 JDK 源代码,探索 ConcurrentHashMap 高并发的具体 ...
- 集合之Stack
在Java中Stack类表示后进先出(LIFO)的对象堆栈.栈是一种非常常见的数据结构,它采用典型的先进后出的操作方式完成的.每一个栈都包含一个栈顶,每次出栈是将栈顶的数据取出,如下: Stack通过 ...
- openstack placement 组件作用理解
例如,一个资源提供者可以是一个计算节点,共享存储池,或一个IP分配池.placement服务跟踪每个供应商的库存和使用情况.例如,在一个计算节点创建一个实例的可消费资源如计算节点的资源提供者的CPU和 ...
- beta冲刺后续讨论
目录 组员:胡绪佩 组员:何家伟 组员:黄鸿杰 组员: 翟丹丹 组员:周政演 组员:胡青元 组员:庄卉 组员:刘恺琳 组员:何宇恒 组员:刘一好 组员:葛家灿 组员:胡绪佩 总结 通过这次的Beta版 ...
- 升序排列的数组中是否存在A[i]=i
#include<stdio.h> void equal(int a[],int N) { int i; ;i<N;i++) { if(i<a[i]) { printf(&qu ...
- AWR报告中Top 10 Foreground Events存在”reliable message”等待事件的处理办法
操作系统版本:HP-UNIX B.11.31 数据库版本:11.2.0.4 RAC (一) 问题概要 (1)在AWR报告的Top 10 Foreground Events中发现reliable mes ...
- index range scan,index fast full scan,index skip scan发生的条件
源链接:https://blog.csdn.net/robinson1988/article/details/4980611 index range scan(索引范围扫描): 1.对于unique ...
- C++学习第一天(helloword)
C++编译过程 #include <iostream> //iostream 提供了一个叫命名空间的东西,标准的命名空间是std 包含了有关输入输出语句的函数 // input&^ ...
- pdf转中文txt
最近项目需要实现根据关键字搜索pdf内容,实现思路就是提取pdf文本,然后进行索引. 工具上选择: IText 4.16之后采用agpl License,不能用作商用,而且转换中文会有乱码问题, pd ...