SharpZipLib 文件/文件夹压缩
一、ZipFile
ZipFile类用于选择文件或文件夹进行压缩生成压缩包。
常用属性:
| 属性 | 说明 |
| Count | 文件数目(注意是在ComitUpdat之后才有) |
| Password | 压缩包密码 |
| Size | 压缩包占用空间大小 |
| Name | 压缩包名称,默认输出是文件路径 |
| ZipEntry | 压缩包里的文件,通过索引[]访问 |
其常用方法如下:
| 方法 | 说明 |
| Add | 添加要进行压缩的文件 |
| AddDirectory | 添加文件夹(不会压缩文件夹里的文件) |
| Delete | 删除文件或文件夹 |
| BeginUpdate | 开始修改压缩包 |
| CommitUpdate | 提交修改 |
| SetComment | 添加注释 |
示例1(创建压缩文件):
  using (ZipFile zip = ZipFile.Create(@"D:\test.zip"))

    {

          zip.BeginUpdate();
      zip.SetComment("这是我的压缩包");

          zip.Add(@"D:\1.txt");       //添加一个文件

          zip.AddDirectory(@"D:\2");  //添加一个文件夹(这个方法不会压缩文件夹里的文件)

          zip.Add(@"D:\2\2.txt");     //添加文件夹里的文件

          zip.CommitUpdate();

     }
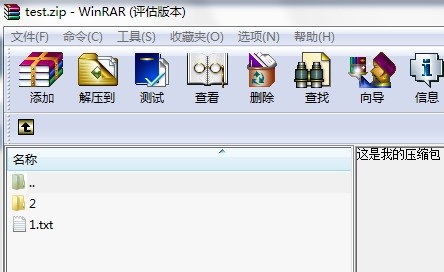
这样生成的压缩包是包含子文件夹,子文件夹也是包含子文件的。
其中,注释如下:

示例2:修改压缩包
  using (ZipFile zip = new ZipFile(@"D:\test.zip"))

      {

          zip.BeginUpdate();

          zip.Add(@"D:\2.txt");

          zip.CommitUpdate();

      }
留意这个示例和上面的有什么不同,上面的是Create方法创建的ZipFile对象,而这里是直接读。因此,如果压缩包里面有文件,则不会改动原来的压缩文件,而是往会里面添加一个。这样就相当于压缩包的修改,而上面是压缩包的创建。
示例3:读取压缩包里的文件:
  using (ZipFile zip = new ZipFile(@"D:\test.zip"))

      {

          foreach (ZipEntry z in zip)

          {

              Console.WriteLine(z);

          }

          ZipEntry z1 = zip[];

          Console.WriteLine(z1.Name);

     }
二、FastZip
这个类就两个方法:
| 方法 | 说明 |
| CreateZip | 压缩目录 |
| ExtractZip | 解压缩目录 |
1、FastZip用于快速压缩目录,示例如下:
//快速压缩目录,包括目录下的所有文件

(new FastZip()).CreateZip(@"D:\test.zip", @"D:\test\", true, "");
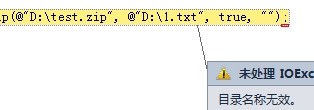
这个是递归压缩的。但是局限性就是只能压缩文件夹。
否则报如下错误:

2、快速解压缩目录
//快速解压

(new FastZip()).ExtractZip(@"D:\test.zip", @"D:\解压目录\", "");
三、ZipOutputStream与ZipEntry
- ZipOutputStream:相当于一个压缩包;
- ZipEntry:相当于压缩包里的一个文件;
以上两个类是SharpZipLib的主类,最耐玩的就是这两个类。
ZipOutputStream常用属性:
| 属性 | 说明 |
| IsFinished | ZipOutputStream是否已结束 |
ZipOutputStream常用方法:
| 方法 | 说明 |
| CloseEntry | 关闭入口,关闭之后不允许再对ZipOutputStream进行操作 |
| Finish | 结束写入 |
| GetLevel | 读取压缩等级 |
| PutNextEntry | 往ZipOutputStream里写入一个ZipEntry |
| SetComment | 压缩包的注释 |
| SetLevel | 设置压缩等级,等级越高文件越小 |
| Write | 写入文件内容 |
使用ZipOutputStream创建一个压缩包并往里面写入一个文件的示例:
        static void Main(string[] args)

        {

            using (ZipOutputStream s = new ZipOutputStream(File.Create(@"D:\123.zip")))

            {

                s.SetLevel();  //设置压缩等级,等级越高压缩效果越明显,但占用CPU也会更多using (FileStream fs = File.OpenRead(@"D:\1.txt"))

                {

                    byte[] buffer = new byte[ * ];  //缓冲区,每次操作大小

                    ZipEntry entry = new ZipEntry(Path.GetFileName(@"改名.txt"));     //创建压缩包内的文件

                    entry.DateTime = DateTime.Now;  //文件创建时间

                    s.PutNextEntry(entry);          //将文件写入压缩包

                    int sourceBytes;

                    do

                    {

                        sourceBytes = fs.Read(buffer, , buffer.Length);    //读取文件内容(1次读4M,写4M)

                        s.Write(buffer, , sourceBytes);                    //将文件内容写入压缩相应的文件

                    } while (sourceBytes > );

                }

                s.CloseEntry();

            }

            Console.ReadKey();

        }
以上示例仅仅能够压缩文件,要压缩文件夹就要使用递归的方式,循环子目录并压缩子目录里的文件。
示例2:文件夹压缩,保持原文件夹架构:
    class Program

    {

        static void Main(string[] args)

        {

            string Source = @"D:\test";

            string TartgetFile = @"D:\test.zip";

            Directory.CreateDirectory(Path.GetDirectoryName(TartgetFile));

            using (ZipOutputStream s = new ZipOutputStream(File.Create(TartgetFile)))

            {

                s.SetLevel();

                Compress(Source, s);

                s.Finish();

                s.Close();

            }

            Console.ReadKey();

        }

        /// <summary>

        /// 压缩

        /// </summary>

        /// <param name="source">源目录</param>

        /// <param name="s">ZipOutputStream对象</param>

        public static void Compress(string source, ZipOutputStream s)

        {

            string[] filenames = Directory.GetFileSystemEntries(source);

            foreach (string file in filenames)

            {

                if (Directory.Exists(file))

                {

                    Compress(file, s);  //递归压缩子文件夹

                }

                else

                {

                    using (FileStream fs = File.OpenRead(file))

                    {

                        byte[] buffer = new byte[ * ];

                        ZipEntry entry = new ZipEntry(file.Replace(Path.GetPathRoot(file),""));     //此处去掉盘符,如D:\123\1.txt 去掉D:

                        entry.DateTime = DateTime.Now;

                        s.PutNextEntry(entry);

                        int sourceBytes;

                        do

                        {

                            sourceBytes = fs.Read(buffer, , buffer.Length);

                            s.Write(buffer, , sourceBytes);

                        } while (sourceBytes > );

                    }

                }

            }

        }

    }
附上解压缩方法:
        /// <summary>

        /// 解压缩

        /// </summary>

        /// <param name="sourceFile">源文件</param>

        /// <param name="targetPath">目标路经</param>

        public bool Decompress(string sourceFile, string targetPath)

        {

            if (!File.Exists(sourceFile))

            {

                throw new FileNotFoundException(string.Format("未能找到文件 '{0}' ", sourceFile));

            }

            if (!Directory.Exists(targetPath))

            {

                Directory.CreateDirectory(targetPath);

            }

            using (ZipInputStream s = new ZipInputStream(File.OpenRead(sourceFile)))

            {

                ZipEntry theEntry;

                while ((theEntry = s.GetNextEntry()) != null)

                {

                    string directorName = Path.Combine(targetPath, Path.GetDirectoryName(theEntry.Name));

                    string fileName = Path.Combine(directorName, Path.GetFileName(theEntry.Name));

                    // 创建目录

                    if (directorName.Length > )

                    {

                        Directory.CreateDirectory(directorName);

                    }

                    if (fileName != string.Empty)

                    {

                        using (FileStream streamWriter = File.Create(fileName))

                        {

                            int size = ;

                            byte[] data = new byte[  * ];

                            while (true)

                            {

                                size = s.Read(data, , data.Length);

                                if (size > )

                                {

                                    streamWriter.Write(data, , size);

                                }

                                else break;

                            }

                        }

                    }

                }

            }

            return true;

        }
ZipEntry就没什么好说的了,都是一些属性,指示一下,实际用到的很少。
框架地址:http://www.icsharpcode.net/OpenSource/SharpZipLib/Download.aspx
SharpZipLib 文件/文件夹压缩的更多相关文章
- C# 文件/文件夹压缩
一.ZipFile ZipFile类用于选择文件或文件夹进行压缩生成压缩包. 常用属性: 属性 说明 Count 文件数目(注意是在ComitUpdat之后才有) Password 压缩包密码 Siz ...
- C# 文件/文件夹压缩解压缩
项目上用到的,随手做个记录,哈哈. 直接上代码: using System; using System.Data; using System.Configuration; using System.C ...
- C# - WinFrm应用程序调用SharpZipLib实现文件的压缩和解压缩
前言 本篇主要记录:VS2019 WinFrm桌面应用程序调用SharpZipLib,实现文件的简单压缩和解压缩功能. SharpZipLib 开源地址戳这里. 准备工作 搭建WinFrm前台界面 添 ...
- C#文件或文件夹压缩和解压
C#文件或文件夹压缩和解压方法有很多,本文通过使用ICSharpCode.SharpZipLib.dll来进行压缩解压 1.新建一个winform项目,选择项目右键 管理NuGet程序包,搜索ICSh ...
- SharpZipLib 文件/文件夹 过滤
这里就不说压缩/解压了.网上教程太多. 主要说一下,解压时,如何过滤某些文件/文件夹 参考地址:https://github.com/icsharpcode/SharpZipLib/wiki/Fast ...
- 【C#公共帮助类】WinRarHelper帮助类,实现文件或文件夹压缩和解压,实战干货
关于本文档的说明 本文档使用WinRAR方式来进行简单的压缩和解压动作,纯干货,实际项目这种压缩方式用的少一点,一般我会使用第三方的压缩dll来实现,就如同我上一个压缩类博客,压缩的是zip文件htt ...
- 使用SharpZipLib实现文件压缩、解压
接口 public interface IUnZip { /// <summary> /// 功能:解压zip格式的文件. /// </summary> /// <par ...
- 在C#中利用SharpZipLib进行文件的压缩和解压缩收藏
我在做项目的时候需要将文件进行压缩和解压缩,于是就从http://www.icsharpcode.net(http://www.icsharpcode.net/OpenSource/SharpZipL ...
- linux压缩文件(夹) zip uzip命令的用法
压缩文件(夹) # 压缩列举的文件,格式如下: zip 压缩包名称 文件1 文件2 文件3 ... # 压缩test.txt, a.out文件,并取名为abc.zip $ zip abc.zip te ...
随机推荐
- 李洪强iOS经典面试题138-Block
李洪强iOS经典面试题138-Block Block Block底层原理实现 首先我们来看四个函数 void test1() { int a = 10; void (^block)() = ^{ ...
- First day in 阿里
周五上午10点半的飞机,为了便宜选了CA的空客320的飞机,结果体验很差.飞机涂了层风骚的粉紫色,机内较旧,也很小,经过所谓的头等舱简直惨不忍睹.对比起去年飞去北京乘的波音真是没法比,波音上每个人都有 ...
- ArcGIS初步 系列视频教程
本人才疏学浅,但鉴于较少的ArcGIS10以上版本的学习视频,所以利用业余时间做了这么个业余的视频系列教程,本随笔提供在线观看地址与720P原版下载地址. 1认识ArcGIS 优酷在线地址 (优酷清 ...
- tomcat 设置根目录访问
from http://nj-apple-tree.iteye.com/blog/1635953 1,设置跟路径时,三种方式 在Tomcat默认安装后,tomcat的主目录是webapps/root目 ...
- 1055. The World's Richest (25)
Forbes magazine publishes every year its list of billionaires based on the annual ranking of the wor ...
- JCreator的配置
1.在Configure(配置)菜单上选择Options(选项),将弹出对话框. 2.在Option对话框中选择左侧JDK Profile,选择右侧JDK version 1.x.x.. ,点击Edi ...
- php全面获取url地址栏及各种参数
<?php echo $_SERVER['HTTP_HOST']."<br>";//获取域名或主机地址 echo $_SERVER["SERVER_PO ...
- Python一般错误
1. IndentationError: unindent does not match any outer indentation level 格式对齐的问题.Python对空格和Tab有严格区别
- 使用花生壳6.5客户端FTP设置
1.打开FTP客户端—选项—参数选择 2.设置为主动模式(PORT) 3.连接FTP服务器 4.FTP连接成功
- response的outputStream输出数据的问题
package cn.itcast.response; import java.io.IOException; import java.io.OutputStream; import java.io. ...
