WPF界面设计技巧(8)—自制山寨版CheckListBox
原文:WPF界面设计技巧(8)—自制山寨版CheckListBox
近年来IT市场山寨横行啊,我们今天也来发扬一下山寨精神,搞个自制的CheckListBox出来。
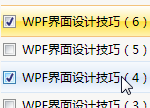
喏,CheckListBox 就是下面这玩意啦:
为什么要搞它?我们是山寨耶,说搞谁就搞谁!
我也不知道为什么,WPF里没有提供 CheckListBox 控件,但凭借WPF强大的外观定制能力,我们可以轻松的创制一个自己的 CheckListBox 。
CheckListBox 的基本功能其实和 ListBox 没有太大出入,只要将普通的ListBox 的选择模式设为多选,它就能基本实现 CheckListBox 的功用了,只不过从用户角度来说,它的使用方式不如 CheckListBox 看起来那么明确而已。
我们接下来就仅仅采用外观修改的方法,将 ListBox 与 CheckBox 拼插,打造出无敌山寨版 CheckListBox 。
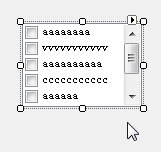
首先在窗体设计器中建立一个ListBox,并为之填入一些内容项:
然后我们把第四讲时的列表样式代码COPY到App.xaml里去:
Code

             <!--ListBox样式-->

            <Style TargetType="ListBox">

                <Setter Property="BorderBrush" Value="#BDD4F1"/>

                <Setter Property="BorderThickness" Value="1"/>

                <Setter Property="Background" Value="#F8F7F5"/>

                <Setter Property="ScrollViewer.HorizontalScrollBarVisibility" Value="Hidden"/>

                <Setter Property="ScrollViewer.VerticalScrollBarVisibility" Value="Auto"/>

                <Setter Property="ScrollViewer.CanContentScroll" Value="true"/>

                <Setter Property="VerticalContentAlignment" Value="Center"/>

            </Style>

            <!--ListBoxItem样式-->

            <Style TargetType="ListBoxItem">

                <Setter Property="Foreground" Value="#B5BABF"/>

                <Setter Property="OverridesDefaultStyle" Value="True"/>

                <Setter Property="Height" Value="24"/>

                <Setter Property="Template">

                    <Setter.Value>

                        <ControlTemplate TargetType="ListBoxItem">

                            <Border Name="back" BorderBrush="#F8F7F5" BorderThickness="0,1,0,1">

                                <Border.Background>

                                    <LinearGradientBrush StartPoint="0,0" EndPoint="0,1">

                                        <GradientBrush.GradientStops>

                                            <GradientStopCollection>

                                                <GradientStop Color="#F8F7F5" Offset="0.0"/>

                                                <GradientStop Color="#F8F7F5" Offset="0.5"/>

                                                <GradientStop Color="#F8F7F5" Offset="0.51"/>

                                                <GradientStop Color="#F8F7F5" Offset="1"/>

                                            </GradientStopCollection>

                                        </GradientBrush.GradientStops>

                                    </LinearGradientBrush>

                                </Border.Background>

                                <ContentPresenter Margin="2" VerticalAlignment="Center"/>

                            </Border>

                            <ControlTemplate.Triggers>

                                <Trigger Property="IsSelected" Value="True">

                                    <Trigger.EnterActions>

                                        <BeginStoryboard>

                                            <Storyboard>

                                                <DoubleAnimation To="32" Duration="0:0:0.3" Storyboard.TargetProperty="Height"/>

                                                <ColorAnimation To="#F3C37C" Duration="0:0:0.2" Storyboard.TargetName="back" Storyboard.TargetProperty="(Border.BorderBrush).(SolidColorBrush.Color)" />

                                                <ColorAnimation To="#952B00" Duration="0:0:0.2" Storyboard.TargetProperty="(ListBoxItem.Foreground).(SolidColorBrush.Color)" />

                                                <ColorAnimation To="#FFF" Duration="0:0:0.2" Storyboard.TargetName="back" Storyboard.TargetProperty="(Border.Background).(LinearGradientBrush.GradientStops)[0].(GradientStop.Color)" />

                                                <ColorAnimation To="#FFEF99" Duration="0:0:0.2" Storyboard.TargetName="back" Storyboard.TargetProperty="(Border.Background).(LinearGradientBrush.GradientStops)[1].(GradientStop.Color)" />

                                                <ColorAnimation To="#FFE13F" Duration="0:0:0.2" Storyboard.TargetName="back" Storyboard.TargetProperty="(Border.Background).(LinearGradientBrush.GradientStops)[2].(GradientStop.Color)" />

                                                <ColorAnimation To="#FFF3B0" Duration="0:0:0.2" Storyboard.TargetName="back" Storyboard.TargetProperty="(Border.Background).(LinearGradientBrush.GradientStops)[3].(GradientStop.Color)" />

                                            </Storyboard>

                                        </BeginStoryboard>

                                    </Trigger.EnterActions>

                                    <Trigger.ExitActions>

                                        <BeginStoryboard>

                                            <Storyboard>

                                                <DoubleAnimation BeginTime="0:0:0.4" Duration="0:0:0.2" Storyboard.TargetProperty="Height"/>

                                                <ColorAnimation Duration="0:0:0.2" Storyboard.TargetName="back" Storyboard.TargetProperty="(Border.BorderBrush).(SolidColorBrush.Color)" />

                                                <ColorAnimation Duration="0:0:0.2" Storyboard.TargetProperty="(ListBoxItem.Foreground).(SolidColorBrush.Color)" />

                                                <ColorAnimation Duration="0:0:0.2" Storyboard.TargetName="back" Storyboard.TargetProperty="(Border.Background).(LinearGradientBrush.GradientStops)[0].(GradientStop.Color)" />

                                                <ColorAnimation Duration="0:0:0.2" Storyboard.TargetName="back" Storyboard.TargetProperty="(Border.Background).(LinearGradientBrush.GradientStops)[1].(GradientStop.Color)" />

                                                <ColorAnimation Duration="0:0:0.2" Storyboard.TargetName="back" Storyboard.TargetProperty="(Border.Background).(LinearGradientBrush.GradientStops)[2].(GradientStop.Color)" />

                                                <ColorAnimation Duration="0:0:0.2" Storyboard.TargetName="back" Storyboard.TargetProperty="(Border.Background).(LinearGradientBrush.GradientStops)[3].(GradientStop.Color)" />

                                            </Storyboard>

                                        </BeginStoryboard>

                                    </Trigger.ExitActions>

                                </Trigger>

                                <Trigger Property="IsMouseOver" Value="True">

                                    <Trigger.EnterActions>

                                        <BeginStoryboard>

                                            <Storyboard>

                                                <ColorAnimation To="#D8E6F5" Duration="0:0:0.2" Storyboard.TargetName="back" Storyboard.TargetProperty="(Border.BorderBrush).(SolidColorBrush.Color)" />

                                                <ColorAnimation To="#617A98" Duration="0:0:0.2" Storyboard.TargetProperty="(ListBoxItem.Foreground).(SolidColorBrush.Color)" />

                                                <ColorAnimation To="#F6F9FD" Duration="0:0:0.2" Storyboard.TargetName="back" Storyboard.TargetProperty="(Border.Background).(LinearGradientBrush.GradientStops)[0].(GradientStop.Color)" />

                                                <ColorAnimation To="#E0EBF7" Duration="0:0:0.2" Storyboard.TargetName="back" Storyboard.TargetProperty="(Border.Background).(LinearGradientBrush.GradientStops)[1].(GradientStop.Color)" />

                                                <ColorAnimation To="#D7E5F6" Duration="0:0:0.2" Storyboard.TargetName="back" Storyboard.TargetProperty="(Border.Background).(LinearGradientBrush.GradientStops)[2].(GradientStop.Color)" />

                                                <ColorAnimation To="#F6F9FD" Duration="0:0:0.2" Storyboard.TargetName="back" Storyboard.TargetProperty="(Border.Background).(LinearGradientBrush.GradientStops)[3].(GradientStop.Color)" />

                                            </Storyboard>

                                        </BeginStoryboard>

                                    </Trigger.EnterActions>

                                    <Trigger.ExitActions>

                                        <BeginStoryboard>

                                            <Storyboard>

                                                <ColorAnimation Duration="0:0:0.2" Storyboard.TargetName="back" Storyboard.TargetProperty="(Border.BorderBrush).(SolidColorBrush.Color)" />

                                                <ColorAnimation Duration="0:0:0.2" Storyboard.TargetProperty="(ListBoxItem.Foreground).(SolidColorBrush.Color)" />

                                                <ColorAnimation Duration="0:0:0.2" Storyboard.TargetName="back" Storyboard.TargetProperty="(Border.Background).(LinearGradientBrush.GradientStops)[0].(GradientStop.Color)" />

                                                <ColorAnimation Duration="0:0:0.2" Storyboard.TargetName="back" Storyboard.TargetProperty="(Border.Background).(LinearGradientBrush.GradientStops)[1].(GradientStop.Color)" />

                                                <ColorAnimation Duration="0:0:0.2" Storyboard.TargetName="back" Storyboard.TargetProperty="(Border.Background).(LinearGradientBrush.GradientStops)[2].(GradientStop.Color)" />

                                                <ColorAnimation Duration="0:0:0.2" Storyboard.TargetName="back" Storyboard.TargetProperty="(Border.Background).(LinearGradientBrush.GradientStops)[3].(GradientStop.Color)" />

                                            </Storyboard>

                                        </BeginStoryboard>

                                    </Trigger.ExitActions>

                                </Trigger>

                            </ControlTemplate.Triggers>

                        </ControlTemplate>

                    </Setter.Value>

                </Setter>

            </Style>
修改 ContentPresenter 元素处的代码,用一个 CheckBox 将其包起来:
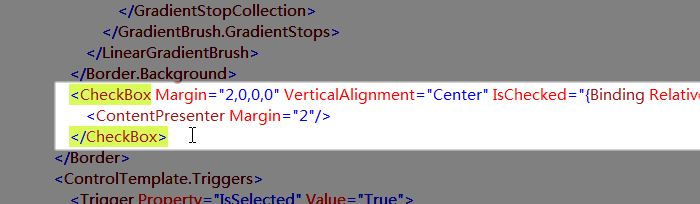
<CheckBox Margin="2,0,0,0" VerticalAlignment="Center" IsChecked="{Binding RelativeSource={RelativeSource TemplatedParent},Path=IsSelected,Mode=TwoWay}">

      <ContentPresenter Margin="2"/>

    </CheckBox>
从上面的代码我们可以看到,CheckBox 的 IsChecked 属性双向绑定到了列表项的 IsSelected 属性上,这时勾选 CheckBox 就会使列表项被选中,反之亦然,这就是模拟 CheckListBox 的技术核心所在。
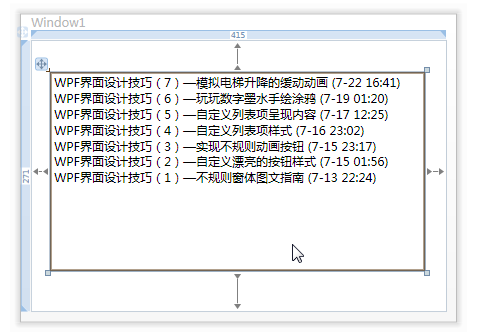
现在我们的界面是这个样子了:

再完成最后一步,修改 ListBox 的选取模式为多选:

OK,运行一下就是这样了:

简直和真的一样!
如何通过代码获取选定的项呢?这样就可以了:listBox1.SelectedItems
再附送一个小经验:当你程序运行后,在窗体的“Initialized”事件中自动从配置文件读取到数据,并将之绑定到 ListBox 后,想要将其默认设为全选的话,应当在窗体的“ContentRendered”事件中执行全选命令“listBox1.SelectAll()”,在“Loaded”、“Initialized”等事件中执行均无效,推测可能是控件载入到绑定数据之间会存在一定延迟。
最后是广告:本大寨主征押寨夫人数名,名额无限,先到为大。
WPF界面设计技巧(8)—自制山寨版CheckListBox的更多相关文章
- WPF界面设计技巧(11)-认知流文档 & 小议WPF的野心
原文:WPF界面设计技巧(11)-认知流文档 & 小议WPF的野心 流文档是WPF中的一种独特的文档承载格式,它的书写和呈现方式都很像HTML,它也几乎具备了HTML的绝大多数优势,并提供了更 ...
- WPF界面设计技巧(10)-样式的继承
原文:WPF界面设计技巧(10)-样式的继承 PS:现在我的MailMail完工了,进入内测阶段了,终于可以腾出手来写写教程了哈,关于MailMail的介绍及内测程序索取:http://www.cnb ...
- WPF界面设计技巧(9)—使用UI自动化布局
原文:WPF界面设计技巧(9)-使用UI自动化布局 最近一直没时间更新这系列文章,因为我一直在埋头编写我的第一个WPF应用程序:MailMail 今天开始编写附属的加密/解密工具,对UI自动化布局有些 ...
- WPF界面设计技巧(7)—模拟电梯升降的缓动动画
原文:WPF界面设计技巧(7)-模拟电梯升降的缓动动画 如同Flash一样,WPF的亮点之一也在于其擅于表现平滑的动画效果,但以移动动画来说,仅凭简单的起始位置.目标位置,所产生的动画仍会非常生硬,这 ...
- WPF界面设计技巧(6)—玩玩数字墨水手绘涂鸦
原文:WPF界面设计技巧(6)-玩玩数字墨水手绘涂鸦 想让你的程序支持鼠标及手写笔涂鸦吗?只要敲入“<InkCanvas/>”这几个字符,你就会领悟什么叫“很好很强大”,今天我们来做一个手 ...
- WPF界面设计技巧(5)—自定义列表项呈现内容
原文:WPF界面设计技巧(5)-自定义列表项呈现内容 接续上次的程序,稍微改动一下原有样式,并添加一个数据模板,我们就可以达成下面这样的显示功能: 鼠标悬停于文件列表项上,会在工具提示中显示图像缩略图 ...
- WPF界面设计技巧(4)—自定义列表项样式
原文:WPF界面设计技巧(4)-自定义列表项样式 有前面修改按钮样式的基础,我们可以尝试来定制一个即好看又好用的 ListBox ,今天先来讲“好看”部分. 打开 Microsoft Visual S ...
- WPF界面设计技巧(3)—实现不规则动画按钮
原文:WPF界面设计技巧(3)-实现不规则动画按钮 发布了定义WPF按钮的教程后,有朋友问能否实现不规则形状的按钮,今天我们就来讲一下不规则按钮的制作. 不规则按钮的做法实际上和先前我们做不规则窗体的 ...
- WPF界面设计技巧(2)—自定义漂亮的按钮样式
原文:WPF界面设计技巧(2)-自定义漂亮的按钮样式 上次做了个很酷的不规则窗体,这次我们来弄点好看的按钮出来,此次将采用纯代码来设计按钮样式,不需要 Microsoft Expression Des ...
随机推荐
- Linux-C语言中gettimeofday()函数的使用方法(转载)
1.简介: 在C语言中可以使用函数gettimeofday()函数来得到时间.它的精度可以达到微妙 2.函数原型: #include<sys/time.h> int gettimeofda ...
- 综述-如何克服HTML5的“性工能”障碍
http://ask.dcloud.net.cn/docs HTML5自出现以来,几经风雨,虽看似很有前途,但实际使用问题太多,DCloud为此踩了无数坑.但我们从未放弃,我们加入了W3C,发起了 H ...
- Salt Stack 官方文档翻译 - 一个想做dba的sa - 博客频道 - CSDN.NET
OSNIT_百度百科 Salt Stack 官方文档翻译 - 一个想做dba的sa - 博客频道 - CSDN.NET Salt Stack 官方文档翻译 分类: 自动运维 2013-04-02 11 ...
- 【deep learning学习笔记】注释yusugomori的LR代码 --- LogisticRegression.cpp
模型实现代码,关键是train函数和predict函数,都很容易. #include <iostream> #include <string> #include <mat ...
- iphone关于单倍图和二倍图(导航 背景 变高)
同学们and朋友们大家好!今天我想说一下关于@2x二倍图的知识,以我所知所见所闻来讲述我的理解! 别看关于这么点小知识,有很多初学者在这个上面常会犯错误,以下是我的理解: 用二倍图是为了适配iphon ...
- 多校第五场 归并排序+暴力矩阵乘+模拟+java大数&记忆化递归
HDU 4911 Inversion 考点:归并排序 思路:这题呀比赛的时候忘了知道能够用归并排序算出逆序数,可是忘了归并排序的实质了.然后不会做-- 由于看到题上说是相邻的两个数才干交换的时候.感觉 ...
- jsonp和事件发布监听
模拟jsonp var id = 0; function JSONP(url,param,cb){ var callbackName = "json_" + id++; var a ...
- 与众不同 windows phone (33) - Communication(通信)之源特定组播 SSM(Source Specific Multicast)
原文:与众不同 windows phone (33) - Communication(通信)之源特定组播 SSM(Source Specific Multicast) [索引页][源码下载] 与众不同 ...
- [计算机基础]关于实体( Entity )和模型( Model )
实体与模型的浅析 在日常开发过程中经常看到Entity,Model,DataModel,它们之间到底有什么异同?下面是我个人的一些理解. 一.Entity,Model,它们是什么? 维基百科描述: 实 ...
- 如何隐藏 QLPreviewController 的 Action 按钮?
在 iOS 6 以前,可以在 present QLPreviewController 之后使用以下代码: [previewController.navigationItem setRightBarBu ...