搭建持续集成单元测试平台(Jenkins+Ant+Java+Junit+SVN)
一、环境准备
- Jenkins:
- 到官网下载jenkins.war包:http://jenkins-ci.org/
- 安装方法有两种:
- 把下载下来的jenkins.war包放到文件夹下,如C:\jenkins,然后打开命令行窗口并进到该目录下,执行java -jar jenkens.war命令,当提示:“Jenkins is fully up and running”时,表示启动成功,这时在浏览器窗口输入:http://localhost:8080/ 就可到jenkins的首页。
- 如果有tomcat,把jenkins.war包放在tomcat的webapps文件夹下,启动tomcat时会自动启动jenkins,这时通过http://localhost:8080/jenkins就 可以访问jenkins的首页了。
- ANT:
下载ant并配置ANT_HOME,官网:http://ant.apache.org/。
3、Junit:
下载junit.jar包,没用过的可参考:http://blog.csdn.net/lengyuhong/article/details/5815017
4、SVN:
1、用本地硬盘当SVN仓库:http://wenku.baidu.com/view/12b02f6a011ca300a6c39081.html
2、SVN服务器搭建和使用:http://www.cnblogs.com/xiaobaihome/tag/SVN/ (推荐用此种方法,后面有原因)
二、项目代码:
环境准备好了之后就可开始写代码、单元测试案例以及ANT用来构建的build.xml文件,这些内容在上一篇ANT task之Junit、JunitReport有讲过,这里不细讲:
1、Java代码:
package com.glen.he;

public class ComplexCalculation {

    public int Division(int a,int b){

        return (a/b);

    }

    public int Multiply(int a,int b){

        return (a*b);

    }

}
ComplexCalculation.java
package com.glen.he;

public class SimpleCalculation {

    public int Add(int a,int b){

        return (a+b);

    }

    public int Subtration(int a,int b){

        return(a-b);

    }

}
SimpleCalculation.java
2、单元测试代码:
package com.glen.he;

import com.glen.he.ComplexCalculation;

import static org.junit.Assert.*;

import org.junit.Test;

public class ComplexCalculationTest {

    ComplexCalculation cc = new ComplexCalculation();

    @Test

    public void DivisionTest() {

        int c = cc.Division(100, 5);

        assertEquals(20, c);

    }

    @Test

    public void MultiplyTest() {

        int c = cc.Multiply(100, 5);

        assertEquals(500, c);

    }

}
ComplexCalculationTest.java
package com.glen.he;

import com.glen.he.SimpleCalculation;

import static org.junit.Assert.*;

import org.junit.Test;

public class SimpleCalculationTest {

    SimpleCalculation sc = new SimpleCalculation();

    @Test

    public void AddTest() {

        int c = sc.Add(3, 5);

        assertEquals(8, c);

    }

    @Test

    public void SubtrationTest() {

        int c = sc.Subtration(20, 5);

        assertEquals(15, c);

    }

}
SimpleCalculationTest.java
3、build.xml
<?xml version="1.0" encoding="UTF-8"?>

<project name="AntDemo" default="junit" basedir=".">

    <!-- =================================================================== -->

    <!-- 变量设置  -->

    <!-- =================================================================== -->

    <!-- 源代码src路径 -->

    <property name="src.path" value="src/java"/>

    <!-- 单元测试代码路径 -->

    <property name="test.path" value="src/test"/>

    <!-- 编译文件class路径 -->

    <property name="build.path" value="build"/>

    <!-- jar包路径 -->

    <property name="dist.path" value="dist"/>

    <!-- lib包路径 -->

    <property name="lib.path" value="lib"/>

    <!-- 生成报告junit4.xml路径 -->

    <property name="report.path" value="report"/>

    <!-- =================================================================== -->

    <!-- 设置classpath -->

    <!-- =================================================================== -->

    <path id="compile.path">

        <fileset dir="${lib.path}">

            <include name="**/*.jar"/>

        </fileset>

        <pathelement path="${build.path}"/>

    </path>

    <!-- 初始化 -->

    <target name="init">

        <mkdir dir="${build.path}"/>

        <mkdir dir="${report.path}"/>

        <mkdir dir="${dist.path}"/>

    </target>

    <!-- =================================================================== -->

    <!-- 清除历史编译class -->

    <!-- =================================================================== -->

    <target name="clean" description="clean">

        <delete dir="${build.path}"/>

        <delete dir="${report.path}"/>

        <delete dir="${dist.path}"/>

    </target>

    <!-- =================================================================== -->

    <!-- 编译测试文件,初始化目录 -->

    <!-- =================================================================== -->

    <target name="compile" depends="init">

        <javac srcdir="${src.path}" destdir="${build.path}"  classpathref="compile.path" includeantruntime="true"/>

        <javac srcdir="${test.path}" destdir="${build.path}"  classpathref="compile.path" includeantruntime="true"/>

    </target>

    <!-- =================================================================== -->

    <!-- 执行测试案例 -->

    <!-- =================================================================== -->

    <target name="junit" depends="compile">

        <junit printsummary="true" fork="true">

             <formatter type="xml" usefile="true"/>

             <classpath refid="compile.path"/>

            <batchtest fork="on" todir="${report.path}" haltonfailure="no">

                <fileset dir="${build.path}">

                    <include name="**/*Test.class"/>

                </fileset>

            </batchtest>

         </junit>

     </target>

    <target name="junit-report" depends="junit">

        <!-- 产生单元测试报表文档 -->

        <junitreport todir="${report.path}">

            <fileset dir="${report.path}">

                <include name="TEST-*.xml" />

            </fileset>

            <report format="frames" todir="${report.path}" />

        </junitreport>

    </target>

    <target name="make-jar" depends="compile" description="make jar file">

          <jar jarfile="${dist.path}/AntDemo.jar">

               <fileset dir="${build.path}">

                <!--除去test文件-->

                <exclude name="**/*Test.class"/>

               </fileset>

          </jar>

     </target>

</project>
build.xml
三、配置Jenkins:
PS:Jenkins可以通过master/slave来支持分布式的job运行,本文运行在master,即Jenkins所在的机器。
1、打开jenkins首页,新建一个job,输入Item名称,选择 构建一个自由风格的软件项目,点击"OK" 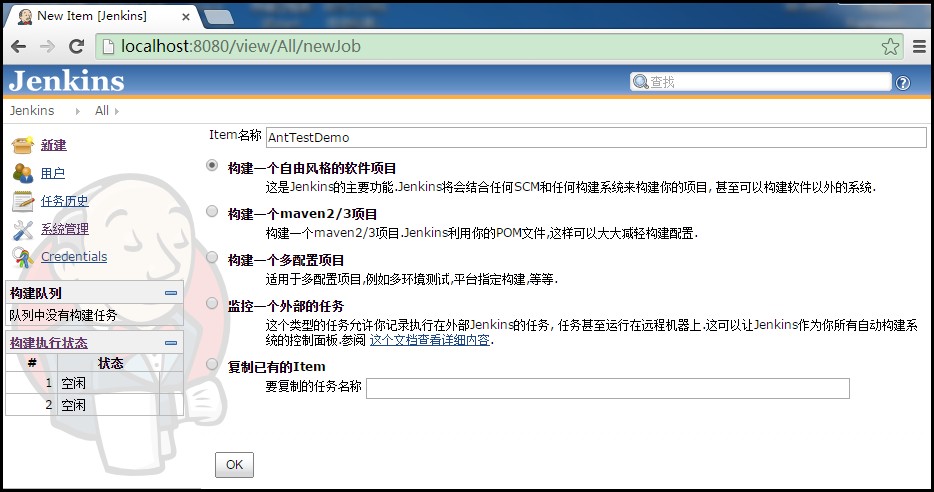
2、在 源码管理 那里,选择Subversion,在Repository URL后面,输入你的SVN地址。

PS:Repository URL使用本地磁盘当仓库这种方法后来我在其它机器上试验时,发现老是报错:svn: E180001: Unable to open an ra_local session to URL。一时没有找到解决办法,大家如果也碰到此问题,可以搭建SVN服务器来管理源代码,我试了,挺好使的。
3、在 构建 那里也可以有两种做法:
I、选择Execute Windows batch command,在输入框输入如下命令(这里我选择的是这个方法):
set path=C:\ANT_HOME\Apache-Ant-1.7.0\bin;path 把ant的安装目录添加到path
ant junit 执行junit task 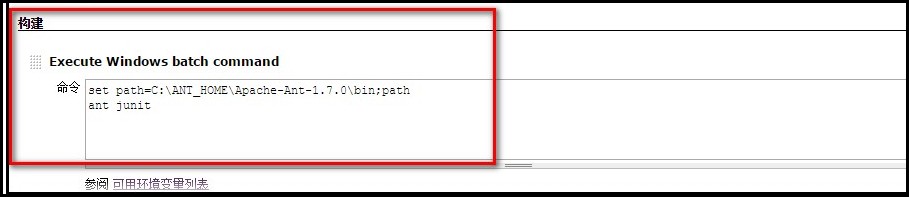
II、方法I比较麻烦,如果我们设置好了ANT_HOME,可以选择Invoke Ant,然后在targets里面指定我们build.xml里的task name。 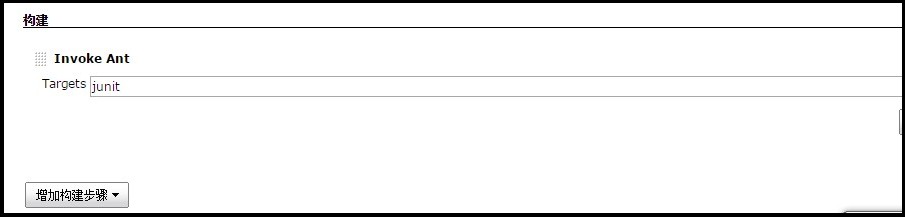
4、点击保存,然后选择立即构建,执行结果: 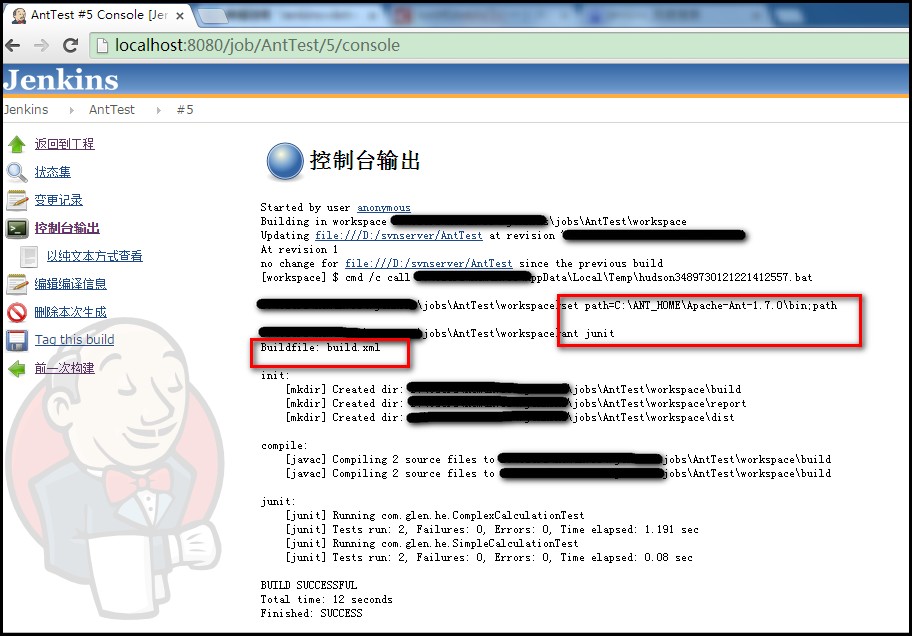
参考资料:
http://hi.baidu.com/janice515/item/3272fe9b99eb4cc8b6253101
http://blog.csdn.net/lengyuhong/article/details/5828770
搭建持续集成单元测试平台(Jenkins+Ant+Java+Junit+SVN)的更多相关文章
- jmeter --- 搭建持续集成接口测试平台(Jenkins+Ant+Jmeter)
jmeter --- 搭建持续集成接口测试平台(Jenkins+Ant+Jmeter) 一.环境准备: 1.JDK:http://www.oracle.com/technetwork/java/jav ...
- 搭建持续集成接口测试平台(Jenkins+Ant+Jmeter)
一.环境准备: 1.JDK:http://www.oracle.com/technetwork/java/javase/downloads/index.html 2.Jmeter:http://jme ...
- 【jmeter】搭建持续集成接口测试平台(Jenkins+Ant+Jmeter)
一.环境准备: 1.JDK:http://www.oracle.com/technetwork/java/javase/downloads/index.html 2.Jmeter:http://jme ...
- 搭建持续集成接口测试平台(jenkins+ant+jmeter)
一.环境准备: 1.JDK:http://www.oracle.com/technetwork/java/javase/downloads/index.html 2.Jmeter:http://jme ...
- 【iOS】Jenkins Gitlab持续集成打包平台搭建
Jenkins Gitlab持续集成打包平台搭建 SkySeraph July. 18th 2016 Email:skyseraph00@163.com 更多精彩请直接访问SkySeraph个人站点: ...
- Jenkins Gitlab持续集成打包平台搭建
http://www.cnblogs.com/skyseraph/p/5695021.html 1. 相关概念 Jenkins Jenkins,一个用Java编写的开源的持续集成工具,提供了软件开发的 ...
- 使用 Jenkins 搭建 iOS/Android 持续集成打包平台【转】
背景描述 根据项目需求,现要在团队内部搭建一个统一的打包平台,实现对iOS和Android项目的打包.而且为了方便团队内部的测试包分发,希望在打包完成后能生成一个二维码,体验用户(产品.运营.测试等人 ...
- Jmeter+Ant+Jenkins搭建持续集成的接口测试框架
https://my.oschina.net/hellotest/blog/516079 摘要: 一个系统通常有多个接口,软件的生命周期中,我们会不断的去优化老的接口和开发新的接口,那么在这个过程中, ...
- Jenkins 快速搭建持续集成环境
持续集成概述 什么是持续集成 随着软件开发复杂度的不断提高,团队开发成员间如何更好地协同工作以确保软件开发的质量已经慢慢成为开发过程中不可回避的问题.尤其是近些年来,敏捷(Agile) 在软件工程领域 ...
随机推荐
- Subversion detected an unsupported working copy version
关于这个错误:Subversion detected an unsupported working copy version while checking the status of 'XXXX'. ...
- SpringUtils
import org.springframework.beans.BeansException; import org.springframework.context.ApplicationConte ...
- 关于UIImageView的显示问题——居中显示或者截取图片的中间部分显示
我们都知道在ios中,每一个UIImageView都有他的frame大小,但是如果图片的大小和这个frame的大小不符合的时候会怎么样呢?在默认情况,图片会被压缩或者拉伸以填满整个区域. 通过查看UI ...
- UIProgressView 详解
自定义progressView 包括背景图片和进度条的图片以及进度条的高度. //进度条 UIProgressView *aProgressView = [[UIProgressView allo ...
- #ifdef #else #endif 的用法
预处理就是在进行编译的第一遍词法扫描和语法分析之前所作的工作.说白了,就是对源文件进行编译前,先对预处理部分进行处理,然后对处理后的代码进行编译.这样做的好处是,经过处理后的代码,将会变的很精短. 关 ...
- Sales Order ORA-04062 FRM-40815 in EBS R12.2.4
[oracle@ebs ~]$ su - oracle [oracle@ebs ~]$ source /u01/install/VISION/fs1/EBSapps/appl/APPSEBSDB_eb ...
- Swift - 用CATransform3DMakeRotation实现翻页效果
Swift - 用CATransform3DMakeRotation实现翻页效果 效果 源码 https://github.com/YouXianMing/Swift-Animations // // ...
- 详细解读Volley(三)—— ImageLoader & NetworkImageView
ImageLoader是一个加载网络图片的封装类,其内部还是由ImageRequest来实现的.但因为源码中没有提供磁盘缓存的设置,所以咱们还需要去源码中进行修改,让我们可以更加自如的设定是否进行磁盘 ...
- C# byte[]和文件FileStream相互转化
, pReadByte.Length); } catch { return false; ...
- 安卓之上传文件,即HTTP提交表单
获取文件: public void Init() { noScrollgridview = (GridView) findViewById(R.id.noScrollgridvie ...