
spring boot 尚桂谷学习笔记09 数据访问
springboot 与数据库访问
jdbc, mybatis, spring data jpa,
1.jdbc原生访问
新建项目 使用 springboot 快速构建工具 选中 web 组件 sql 选中 jdbc mysql
生成 pom.xml 文件依赖如下:
    <dependencies>

        <dependency>

            <groupId>org.springframework.boot</groupId>

            <artifactId>spring-boot-starter-jdbc</artifactId>

        </dependency>

        <dependency>

            <groupId>org.springframework.boot</groupId>

            <artifactId>spring-boot-starter-web</artifactId>

        </dependency>

        <dependency>

            <groupId>mysql</groupId>

            <artifactId>mysql-connector-java</artifactId>

            <scope>runtime</scope>

        </dependency>

        <dependency>

            <groupId>org.springframework.boot</groupId>

            <artifactId>spring-boot-starter-test</artifactId>

            <scope>test</scope>

        </dependency>

    </dependencies>
使用数据库只需要简单的配置:application.yml
spring:

  datasource:

    password: 101022li

    username: root

    url: jdbc:mysql://192.168.10.129:3306/jdbc

    driver-class-name: com.mysql.jdbc.Driver
使用test 可以进行测试:
@Test

public void contextLoads() throws Exception{

    System.out.println(dataSource.getClass());

    Connection connection =  dataSource.getConnection();

    System.out.println(connection);

    connection.close();

}
打印结果:
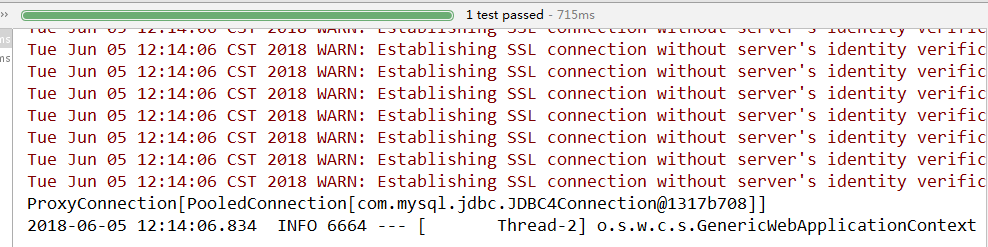
默认使用 org.apache.tomcat.jdbc.pool.DataSource作为数据源
数据源的相关配置都在 DataSourceProperties里面
自动装配原理:org.springframework.boot.autoconfigure.jdbc
1. 参考DataSourceConfiguration 根据配置创建数据源 默认使用tomcat链接池 可以使用 spring.datasource.type 指定自定义的数据源类型
2.springboot 默认可以支持:
org.apache.tomcat.jdbc.pool.DataSource
HikariDataSource
BasicDataSource
3.自定义数据源
  @ConditionalOnMissingBean({DataSource.class})

    @ConditionalOnProperty(

        name = {"spring.datasource.type"}

    )

    static class Generic {

        Generic() {

        }

        @Bean

        public DataSource dataSource(DataSourceProperties properties) {
       // 使用 DataSourceBuilder 创建数据源 利用反射响应type 数据源 并且绑定相关属性

            return properties.initializeDataSourceBuilder().build();

        }

    }
4. DataSourceInitializer
实现 ApplicationListener 监听
作用:
1)runSchemaScripts() :方法运行建表语句
2)runDataScripts() : 运行插入数据的sql 语句
默认只需要将文件按规则命名:
创建表的sql : schema-*.sql
数据操作sql : data-*.sql
eg:
创建 department.sql 文件 并且放置于 resource文件夹下:
DROP TABLE IF EXISTS `department`;

CREATE TABLE `department` (

  `id` int(10) NOT NULL,

  `departmentName` char(25) DEFAULT NULL,

  PRIMARY KEY (`id`)

) ENGINE=InnoDB DEFAULT CHARSET=utf8mb4 COLLATE=utf8mb4_0900_ai_ci;
在 yum 配置文件下加入
spring:

  datasource:

    password: 101022li

    username: root

    url: jdbc:mysql://192.168.10.129:3306/jdbc

    driver-class-name: com.mysql.jdbc.Driver

    schema:

      - classpath:department.sql
重新启动项目 则会自动执行指定的sql 文件
5)自动配置了jdbctemplate 操作数据库, (JdbcTemplateAutoConfiguration 有数据源的情况下自动创建一个jdbctemplate)
eg: 创建一个 HelloController.java 并且进行访问, 接收返回数据
package com.lixuchun.springboot06.controller;

import org.springframework.beans.factory.annotation.Autowired;

import org.springframework.jdbc.core.JdbcTemplate;

import org.springframework.stereotype.Controller;

import org.springframework.web.bind.annotation.GetMapping;

import org.springframework.web.bind.annotation.ResponseBody;

import java.util.List;

import java.util.Map;

@Controller

public class HelloController {

    @Autowired
   // 有数据源 系统自动封装template 自动获取就可以

    JdbcTemplate jdbcTemplate;


    @ResponseBody

    @GetMapping("/query")

    public Map<String, Object> map() {

        List<Map<String, Object>> depList = jdbcTemplate.queryForList("SELECT * FROM department");

        return depList.get(0);

    }

}
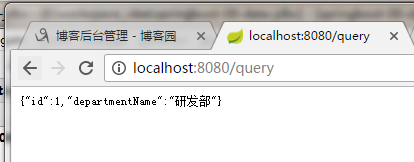
输出结果:
2. 整合Druid数据源
pom 文件引入 druid 数据源
<!-- 引入自定义的数据源 -->

<dependency>

    <groupId>com.alibaba</groupId>

    <artifactId>druid</artifactId>

    <version>1.1.8</version>

</dependency>
yum文件 进行修改, 此时的yum文件配置是不好用的 必须单独写一个durid的配置类将数据参数加载金数据源
spring:

  datasource:

    password: 101022li

    username: root

    url: jdbc:mysql://192.168.10.129:3306/jdbc

    driver-class-name: com.mysql.jdbc.Driver

#    schema:

#      - classpath:department.sql

    type: com.alibaba.druid.pool.DruidDataSource

    initialSize: 5

    minIdle: 5

    maxActive: 5

    maxWait: 60000

    timeBetweenEvictionRunsMillis: 60000

    minEvictableIdletimeMillis: 300000

    validationQuery: SELECT 1 FROM DUAL

    testWhileIDle: true

    testOnBorrow: false

    testOnReturn: false

    poolPreparedStatements: true

# 配置监控系统拦截的filters 去掉后监控界面sql无法统计 wall 用于防火墙

    filters: stat,wall,log4j

#   maxPoolPreparedStatmentPerConnectionSize: 20

#   useGlobalB
新建一个数据源配置类:
package com.lixuchun.springboot06.Config;

import com.alibaba.druid.pool.DruidDataSource;

import com.alibaba.druid.support.http.StatViewServlet;

import com.alibaba.druid.support.http.WebStatFilter;

import org.springframework.boot.context.properties.ConfigurationProperties;

import org.springframework.boot.web.servlet.FilterRegistrationBean;

import org.springframework.boot.web.servlet.ServletRegistrationBean;

import org.springframework.context.annotation.Bean;

import org.springframework.context.annotation.Configuration;

import javax.servlet.ServletRegistration;

import javax.sql.DataSource;

import java.util.Arrays;

import java.util.HashMap;

import java.util.Map;

@Configuration

public class DruidConfig {

    // yum 配置文件中的配置和 注释类进行绑定, spring.datasource 下属性与数据源属性进行全部绑定

    @ConfigurationProperties(prefix = "spring.datasource")

    @Bean

    public DataSource druid() {

        return new DruidDataSource();

    }

    // 配置一个Druid 的监控,可以对数据库操作进行监控

    // 1 配置一个管理后台的servlet

    @Bean

    public ServletRegistrationBean statViewServlet() {

        ServletRegistrationBean bean = new ServletRegistrationBean(new StatViewServlet(), "/druid/*");

        Map<String , String> initParam = new HashMap<>();

        initParam.put("loginUsername", "admin");

        initParam.put("loginPassword", "123456");

        // initParam.put("allow", ""); // 默认允许所有访问

        // initParam.put("deny", "192.168.10."); 不允许访问

        bean.setInitParameters(initParam);

        return bean;

    }

    // 2 配置一个监控的filter

    @Bean

    public FilterRegistrationBean webStatFilter() {

        FilterRegistrationBean bean = new FilterRegistrationBean();

        bean.setFilter(new WebStatFilter());

        Map<String , String> initParam = new HashMap<>();

        initParam.put("exclusions", "*.js,*.css,/druid/*");

        bean.setInitParameters(initParam);

        bean.setUrlPatterns(Arrays.asList("/*"));

        return bean;

    }

}
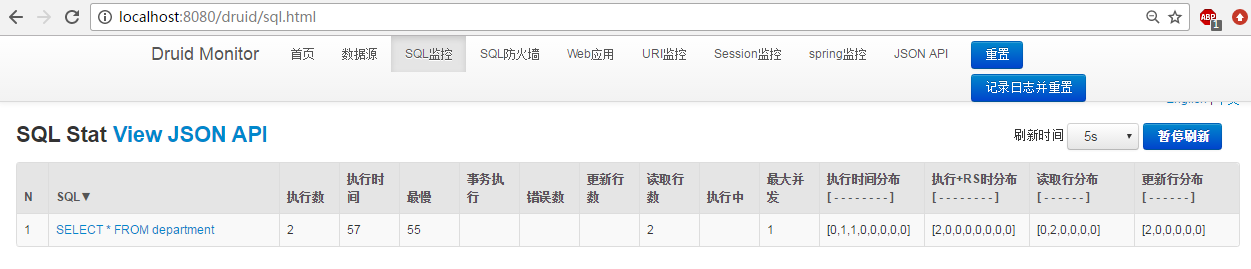
然后启动项目对 数据库进行操作 druid数据源监控后台进行观察
监控后台url : localhost:8080/durid

执行 sql 可以在sql监控中进行监控
spring boot 尚桂谷学习笔记09 数据访问的更多相关文章
- spring boot 尚桂谷学习笔记10 数据访问02 mybatis
数据访问 mybatis 创建一个 springboot 工程,模块选择 sql 中 mysql(数据驱动), jdbc(自动配置数据源), mybatis Web模块中选择 web pom 引入: ...
- spring boot 尚桂谷学习笔记11 数据访问03 JPA
整合JPA SpringData 程序数据交互结构图 (springdata jpa 默认使用 hibernate 进行封装) 使用之后就关注于 SpringData 不用再花多经历关注具体各个交互框 ...
- spring boot 尚桂谷学习笔记07 嵌入式容器 ---Web
------配置嵌入式servlet容器------ springboot 默认使用的是嵌入的Servlet(tomcat)容器 问题? 1)如何定制修改Servlet容器的相关配置: 1.修改和se ...
- spring boot 尚桂谷学习笔记04 ---Web开始
------web开发------ 1.创建spring boot 应用 选中我们需要的模块 2.spring boot 已经默认将这些场景配置好了 @EnableAutoConfiguration ...
- spring boot 尚桂谷学习笔记05 ---Web
------web 开发登录功能------ 修改login.html文件:注意加粗部分为 msg 字符串不为空时候 才进行显示 <!DOCTYPE html> <!-- saved ...
- spring boot 尚桂谷学习笔记08 Docker ---Web
------Docker------ 简介:Docker是一个开元的应用容器引擎,性能非常高 已经安装好的软件打包成一个镜像放到服务器中运行镜像 MySQL容器,Redis容器...... Docke ...
- spring boot 尚桂谷学习笔记06 异常处理 ---Web
------错误处理机制------ 默认效果 1 返回一个默认的错误页面 浏览器发送请求的请求头:优先接收 text/html 数据 客户端则默认响应json数据 : accept 没有说明返回什么 ...
- springboot 尚桂谷学习笔记03
------spring boot 与日志------ 日志框架: 市面上的日志框架: jul jcl jboss-logging logback log4j log4j2 ...... 左边一个门面 ...
- 初次搭建spring boot 项目(实验楼-学习笔记)
首先说一下springboot 的优点: 使用Spring Initializr可以在几秒钟就配置好一个Spring Boot应用. 对大量的框架都可以无缝集成,基本不需要配置或者很少的配置就可以运行 ...
随机推荐
- LeetCode #657. Robot Return to Origin 机器人能否返回原点
https://leetcode-cn.com/problems/robot-return-to-origin/ 设置 flagUD 记录机器人相对于原点在纵向上的最终位置 flagRL 记录机器人相 ...
- CGAffineTransform 图像处理类
CGAffineTransform 介绍 概述 CGAffineTransform是一个用于处理形变的类,其可以改变控件的平移.缩放.旋转等,其坐标系统采用的是二维坐标系,即向右为x轴正方向,向下为y ...
- sq - 压缩一个排过序的单词列表 unsq - 解压一个排过序的单词列表
总览 (SYNOPSIS) sq < infile > outfile unsq < infile > outfile 描述 (DESCRIPTION) sq 压缩 一个 排过 ...
- Sass--调用混合宏
在 Sass 中通过 @mixin 关键词声明了一个混合宏,那么在实际调用中,其匹配了一个关键词“@include”来调用声明好的混合宏.例如在你的样式中定义了一个圆角的混合宏“border-radi ...
- selenium原理(以百度搜索为例)
1.首先导入 Selenium(webdriver)相关模块2.调用 Selenium 的浏览器驱动,获取浏览器句柄(driver)并启动浏览器.3.通过句柄访问百度 URL.4.通过句柄操作页面元素 ...
- No enclosing instance of type TestGson is accessible. Must qualify the allocation with an enclosing instance of type TestGson (e.g. x.new A() where x is an instance of TestGson).
main方法中实例化内部类报错: public class TestGson { public static void main(String[] args) { Gson gson=new Gson ...
- python学习笔记(五)文件操作和集合
文件基本操作: 现有文件file.txt f=open('file.txt','r')#以只读方式打开一个文件,获取文件的句柄,如果是读的话,r可以不写,默认就是只读:文件不存在时,会报错 first ...
- springboot实战(汪云飞)学习-1-2
java EE开发的颠覆者 spring boot 实战 随书学习-1 接上一篇,Java配置的学习(还是上一篇的项目中,添加新的包和代码): java配置是spring4.x推荐的配置方式,可以完全 ...
- STM32时钟设置
一.使用外部时钟,并设置为72MHz void SetSysClockToHSE(void) { ErrorStatus HSEStartUpStatus; /* SYSCLK, HCLK, PCLK ...
- 网络体系应用层之DNS系统
1.概述 域名系统 DNS 是因特网使用的命名系统,用来把便于人们使用的机器名字(即域名)转换为 ip 地址. 用户与因特网上某个主机通信时,必须要知道对方的 ip 地址,然而用户很难记住长达32位二 ...