Spring Cloud 入门教程(五): Ribbon实现客户端的负载均衡
接上节,假如我们的Hello world服务的访问量剧增,用一个服务已经无法承载, 我们可以把Hello World服务做成一个集群。
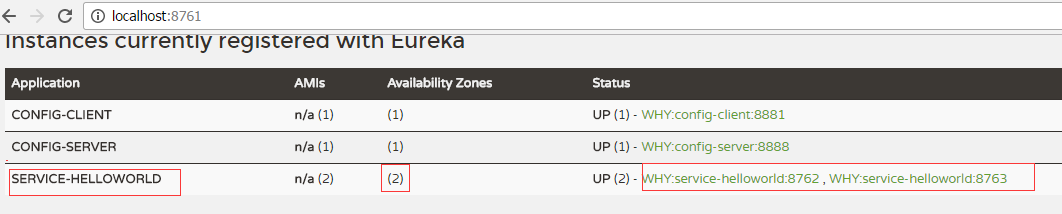
很简单,我们只需要复制Hello world服务,同时将原来的端口8762修改为8763。然后启动这两个Spring Boot应用, 就可以得到两个Hello World服务。这两个Hello world都注册到了eureka服务中心。这时候再访问http://localhost:8761, 可以看到两个hello world服务已经注册。(服务与注册参见Spring Cloud 入门教程(一): 服务注册)。
1. 客户端的负载均衡
负载均衡可分为服务端负载均衡和客户端负载均衡,服务端负载均衡完全由服务器处理,客户端不需要做任何事情。而客户端负载均衡技术,客户端需要维护一组服务器引用,每次客户端向服务端发请求的时候,会根据算法主动选中一个服务节点。常用的负载均衡算法有: Round Robbin, Random,Hash,StaticWeighted等。
Spring 提供两辆种服务调度方式:Ribbon+restful和Feign。Ribbon就是一个基于客户端的负载均衡器, Ribbon提供了很多在HTTP和TCP客户端之上的控制.
Feign内部也已经使用了Ribbon, 所以只要使用了@FeignClient注解,那么这一章的内容也都是适用的。
下面就看看如何Spring Cloud如何用Ribbon来实现两个Hello World服务的负载均衡。以下是Spring cloud的ribbon客户端负载均衡架构图。
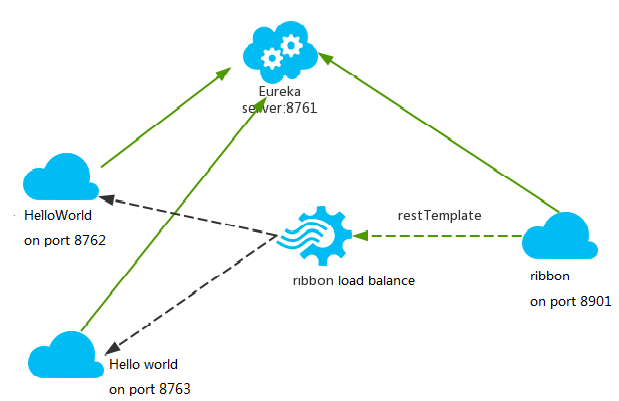
hello world服务和ribbon均注册到服务中心
service-hi工程跑了两个副本,端口分别为8762,8763,分别向服务注册中心注册, 当sercvice-ribbon通过restTemplate调用service-Hellowworld的接口时,利用用ribbon进行负载均衡,会轮流的调用处于两个不同端口的Hello world服务
2. 创建一个Ribbon服务
1) 创建一个maven工程,取名叫service-ribbon, pom.xml文件如下:
 <project xmlns="http://maven.apache.org/POM/4.0.0" xmlns:xsi="http://www.w3.org/2001/XMLSchema-instance" xsi:schemaLocation="http://maven.apache.org/POM/4.0.0 http://maven.apache.org/xsd/maven-4.0.0.xsd">

     <modelVersion>4.0.0</modelVersion>

     <groupId>com.chry</groupId>

     <artifactId>springcloud.helloworld.ribbon.service</artifactId>

     <version>0.0.1-SNAPSHOT</version>

     <packaging>jar</packaging>

     <name>springcloud.helloworld.ribbon.service</name>

     <description>Demo project for Spring Cloud Ribbon</description>

     <parent>

         <groupId>org.springframework.boot</groupId>

         <artifactId>spring-boot-starter-parent</artifactId>

         <version>1.5.3.RELEASE</version>

         <relativePath/> <!-- lookup parent from repository -->

     </parent>

     <properties>

         <project.build.sourceEncoding>UTF-8</project.build.sourceEncoding>

         <project.reporting.outputEncoding>UTF-8</project.reporting.outputEncoding>

         <java.version>1.8</java.version>

     </properties>

     <dependencies>

         <dependency>

             <groupId>org.springframework.cloud</groupId>

             <artifactId>spring-cloud-starter-eureka</artifactId>

         </dependency>

         <dependency>

             <groupId>org.springframework.cloud</groupId>

             <artifactId>spring-cloud-starter-ribbon</artifactId>

         </dependency>

         <dependency>

             <groupId>org.springframework.boot</groupId>

             <artifactId>spring-boot-starter-web</artifactId>

         </dependency>

         <dependency>

             <groupId>org.springframework.boot</groupId>

             <artifactId>spring-boot-starter-test</artifactId>

             <scope>test</scope>

         </dependency>

     </dependencies>

     <dependencyManagement>

         <dependencies>

             <dependency>

                 <groupId>org.springframework.cloud</groupId>

                 <artifactId>spring-cloud-dependencies</artifactId>

                 <version>Dalston.RC1</version>

                 <type>pom</type>

                 <scope>import</scope>

             </dependency>

         </dependencies>

     </dependencyManagement>

     <build>

         <plugins>

             <plugin>

                 <groupId>org.springframework.boot</groupId>

                 <artifactId>spring-boot-maven-plugin</artifactId>

             </plugin>

         </plugins>

     </build>

     <repositories>

         <repository>

             <id>spring-milestones</id>

             <name>Spring Milestones</name>

             <url>https://repo.spring.io/milestone</url>

             <snapshots>

                 <enabled>false</enabled>

             </snapshots>

         </repository>

     </repositories>

 </project>
pom.xml
2). 创建主类ServiceRibbonApplication
 package springcloud.helloworld.ribbon.service;

 import org.springframework.boot.SpringApplication;

 import org.springframework.boot.autoconfigure.SpringBootApplication;

 import org.springframework.cloud.client.discovery.EnableDiscoveryClient;

 import org.springframework.cloud.client.loadbalancer.LoadBalanced;

 import org.springframework.context.annotation.Bean;

 import org.springframework.web.client.RestTemplate;

 @SpringBootApplication

 @EnableDiscoveryClient

 public class ServiceRibbonApplication {

     public static void main(String[] args) {

         SpringApplication.run(ServiceRibbonApplication.class, args);

     }

     @Bean

     @LoadBalanced

     RestTemplate restTemplate() {

         return new RestTemplate();

     }

 }
@EnableDiscoveryClient向服务中心注册,并且注册了一个叫restTemplate的bean。
@ LoadBalanced注册表明,这个restRemplate是需要做负载均衡的。
3). 创建获取一个获取Hello内容的service类
 package springcloud.helloworld.ribbon.client;

 import org.springframework.beans.factory.annotation.Autowired;

 import org.springframework.stereotype.Service;

 import org.springframework.web.client.RestTemplate;

 @Service

 public class HelloService {

     @Autowired RestTemplate restTemplate;

     public String getHelloContent() {

         return restTemplate.getForObject("http://SERVICE-HELLOWORLD/",String.class);

     }

 }
这里关键代码就是, restTemplate.getForObject方法会通过ribbon负载均衡机制, 自动选择一个Hello word服务,
这里的URL是“http://SERVICE-HELLOWORLD/",其中的SERVICE-HELLOWORLD是Hello world服务的名字,而注册到服务中心的有两个SERVICE-HELLOWORLD。 所以,这个调用本质是ribbon-service作为客户端根据负载均衡算法自主选择了一个作为服务端的SERVICE-HELLOWORLD服务。然后再访问选中的SERVICE-HELLOWORLD来执行真正的Hello world调用。
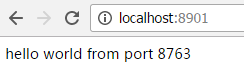
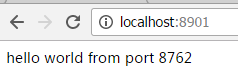
3. 启动ribbon-service应用,我们就可以访问http://localhost:8901/, 然后每次刷新可以看到以下两种结果交替出现,表明实际调用的是在不同端口的不同的SERVICE-HELLOWORLD。
上一篇:Spring Cloud 入门教程(四): 分布式环境下自动发现配置服务
下一篇:Spring Cloud 入门教程(六): 用声明式REST客户端Feign调用远端HTTP服务
参考: http://blog.csdn.net/forezp/article/details/69788938
Spring Cloud 入门教程(五): Ribbon实现客户端的负载均衡的更多相关文章
- Spring Cloud 入门教程(六): 用声明式REST客户端Feign调用远端HTTP服务
首先简单解释一下什么是声明式实现? 要做一件事, 需要知道三个要素,where, what, how.即在哪里( where)用什么办法(how)做什么(what).什么时候做(when)我们纳入ho ...
- Spring Cloud 入门教程(四): 分布式环境下自动发现配置服务
前一章, 我们的Hello world应用服务,通过配置服务器Config Server获取到了我们配置的hello信息“hello world”. 但自己的配置文件中必须配置config serve ...
- Spring Cloud入门教程(二):客户端负载均衡(Ribbon)
对于大型应用系统负载均衡(LB:Load Balancing)是首要被解决一个问题.在微服务之前LB方案主要是集中式负载均衡方案,在服务消费者和服务提供者之间又一个独立的LB,LB通常是专门的硬件,如 ...
- Spring Cloud 入门教程(七): 熔断机制 -- 断路器
对断路器模式不太清楚的话,可以参看另一篇博文:断路器(Curcuit Breaker)模式,下面直接介绍Spring Cloud的断路器如何使用. SpringCloud Netflix实现了断路器库 ...
- Spring Cloud 入门教程(八): 断路器指标数据监控Hystrix Dashboard 和 Turbine
1. Hystrix Dashboard (断路器:hystrix 仪表盘) Hystrix一个很重要的功能是,可以通过HystrixCommand收集相关数据指标. Hystrix Dashboa ...
- Spring Cloud 入门教程(九): 路由网关zuul
在微服务架构中,需要几个关键的组件,服务注册与发现.服务消费.负载均衡.断路器.智能路由.配置管理等,由这几个组件可以组建一个简单的微服务架构.客户端的请求首先经过负载均衡(zuul.Ngnix),再 ...
- Spring Cloud 入门教程 - 搭建配置中心服务
简介 Spring Cloud 提供了一个部署微服务的平台,包括了微服务中常见的组件:配置中心服务, API网关,断路器,服务注册与发现,分布式追溯,OAuth2,消费者驱动合约等.我们不必先知道每个 ...
- Spring Cloud 入门教程(十):和RabbitMQ的整合 -- 消息总线Spring Cloud Netflix Bus
在本教程第三讲Spring Cloud 入门教程(三): 配置自动刷新中,通过POST方式向客户端发送/refresh请求, 可以让客户端获取到配置的最新变化.但试想一下, 在分布式系统中,如果存在很 ...
- Spring Cloud 入门教程(二): 配置管理
使用Config Server,您可以在所有环境中管理应用程序的外部属性.客户端和服务器上的概念映射与Spring Environment和PropertySource抽象相同,因此它们与Spring ...
随机推荐
- 移动端web页面开发常用的头部标签设置
在移动端web页面开发中,我们常需要设置各种头部标签以帮助浏览器更好的解析页面,将页面完美呈现,这里列出了工作中常用的各种头部标签,以备查询. viewport <meta name=" ...
- [20170703]从备份集取出spfile转化为pfile.txt
[20170703]从备份集取出spfile转化为pfile.txt --//上个星期的事情,要从备份集里面取出看看spfile文件某个参数当时的情况,结果尝试命令老是出错,做一个记录.--//最后选 ...
- sql server 运维时CPU,内存,操作系统等信息查询(用sql语句)
我们只要用到数据库,一般会遇到数据库运维方面的事情,需要我们寻找原因,有很多是关乎处理器(CPU).内存(Memory).磁盘(Disk)以及操作系统的,这时我们就需要查询他们的一些设置和内容,下面讲 ...
- Sql 查询结果 根据某个字段值 变更另外一个字段值 case when
SELECT CASE THEN '*******' ELSE Plate END AS Plate, CarType FROM Cars;
- pkg-config 用法
在进行使用fuse 2.9写程序的时候,遇到了pkg-config 命令和 .pc 文件.本篇博客就具体说明一下pkg-config 命令是什么? 我们首先看一下: gcc -Wall hello.c ...
- .NET MVC 后台接受base64的上传图片
#region 配合前端的多张图片上传 #region 上传图片方法 /// <summary> /// 接口方法 /// </summary> /// <param n ...
- apache 80端口占用问题
今天安装mongodb后发现apache无法启动 命令行 services.msc 打开服务 在服务里启动Apache2a服务,报错误码1 网上查有很多情况都报的1 可以通过命令行下 执行apach ...
- ghostscript远程代码执行漏洞复现
这两天网上ghostscript又又有漏洞信息了,但是没有poc,于是找找资料把今年8月21日的那个验证下 1.关于ghostscript Ghostscript是一套建基于Adobe.PostScr ...
- Alpha版本 - 用户反馈
Alpha版本 - 用户反馈 使用情况 (前天发出了内测apk给身边的人小范围使用,到目前共有31名用户使用过产品) 新增用户数: 用户事件数: Bug反馈 登录/注册出现"无响应" ...
- JAVA获取本机IP和Mac地址
在项目中,时常需要获取本机的Ip或是Mac地址,进行身份和权限验证,本文就是通过java代码获取ip和Mac. package com.svse.query;import java.net.In ...