
Spring Cloud 入门教程(二): 配置管理
使用Config Server,您可以在所有环境中管理应用程序的外部属性。客户端和服务器上的概念映射与Spring Environment和PropertySource抽象相同,因此它们与Spring应用程序非常契合,但可以与任何以任何语言运行的应用程序一起使用。随着应用程序通过从开发人员到测试和生产的部署流程,您可以管理这些环境之间的配置,并确定应用程序具有迁移时需要运行的一切。服务器存储后端的默认实现使用git,因此它轻松支持标签版本的配置环境,以及可以访问用于管理内容的各种工具。很容易添加替代实现,并使用Spring配置将其插入
以上是Spring Cloud官网对配置服务的描述, 简单阐述一下我的理解。比如我们要搭建一个网站,需要配置数据库连接,指定数据库服务器的IP地址,数据库名称,用户名和口令等信息。通常的方法, 我们可以在一个配置文件中定义这些信息,或者开发一个页面专门配置这些东西。只有一个web服务器的时候, 很方便。
但假如需要搭建同多台服务器时,当然可以每台服务器做同样配置,但维护和同步会很麻烦。我理解的配置服务至少有两种不同场景:
1). 多个客户使用同一配置: 比如,多台服务器组成的集群,假如后端使用同一数据库,那么每台服务器都是用相同的配置。
2). 不同客户使用不同的配置: 比如典型的场景是,开发,测试,生产使用相同的系统,但使用不同的数据库
如果有个统一的根本配置,是不是就很方便,一个可行的办法是,把这些配置文件放到一个共享存储(比如网络共享盘)中。这样只需要在共享存储修改一个或多个配置文件就可以了。但共享文件的方式受到具体布署环境的限制,很多时候很难达到多台Web服务器共享同一个存储硬盘。
共享盘的缺点是资源定位比较困难,Spring Cloud的解决方案是, 将这些配置文件放到版本管理服务器里面,Spring Cloud缺省配置使用GIT中。所有Web服务均从GIT中获取这些配置文件。由于GIT服务器与具体Web服务器之间不需要共享存储, 只要网络可达就行,从而可以实现Web服务于配置信息的存放位置的解耦。
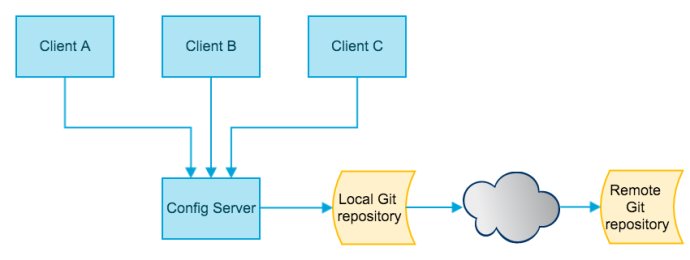
Spring Cloud统一控制应用和GIT服务的交互,应用只需要按照Spring Cloud的规范配置GIT的URL即可。 使用GIT后,场景2和场景1的区别仅仅是,场景2中不同的client使用不同版本的配置文件,但应用但访问的文件看起来是会是同一个。Spring Cloud的配置服务结构入下图
下面我们继续上一节的例子Spring Cloud 入门之一. 服务注册 继续展开, 让“Hello World”从配置文件helloworld.properties读出,内容格式如下
hello=Hello World
其中关键字hello的值“Hello World”,就是我们要输出的内容。
一. 创建config Server
1. 创建Config Server, maven工程里面配置spring-cloud-config-server
<dependency>

        <groupId>org.springframework.cloud</groupId>

        <artifactId>spring-cloud-config-server</artifactId>

</dependency>
完整配置如下:
 <?xml version="1.0" encoding="UTF-8"?>

 <project xmlns="http://maven.apache.org/POM/4.0.0" xmlns:xsi="http://www.w3.org/2001/XMLSchema-instance"

     xsi:schemaLocation="http://maven.apache.org/POM/4.0.0 http://maven.apache.org/xsd/maven-4.0.0.xsd">

   <modelVersion>4.0.0</modelVersion>

   <groupId>com.chry</groupId>

   <artifactId>springcloud.helloworld.config.server</artifactId>

   <version>0.0.1-SNAPSHOT</version>

   <packaging>jar</packaging>

   <name>helloworld.config.server</name>

   <description>Demo Config Server</description>

     <parent>

         <groupId>org.springframework.boot</groupId>

         <artifactId>spring-boot-starter-parent</artifactId>

         <version>1.5.3.RELEASE</version>

         <relativePath/> <!-- lookup parent from repository -->

     </parent>

     <properties>

         <project.build.sourceEncoding>UTF-8</project.build.sourceEncoding>

         <project.reporting.outputEncoding>UTF-8</project.reporting.outputEncoding>

         <java.version>1.8</java.version>

     </properties>

     <dependencies>

         <!--eureka server -->

         <dependency>

             <groupId>org.springframework.cloud</groupId>

             <artifactId>spring-cloud-starter-eureka</artifactId>

         </dependency>

         <dependency>

             <groupId>org.springframework.cloud</groupId>

             <artifactId>spring-cloud-starter-eureka-server</artifactId>

         </dependency>

         <dependency>

             <groupId>org.springframework.cloud</groupId>

             <artifactId>spring-cloud-config-server</artifactId>

         </dependency>

         <!-- spring boot test-->

         <dependency>

             <groupId>org.springframework.boot</groupId>

             <artifactId>spring-boot-starter-test</artifactId>

             <scope>test</scope>

         </dependency>

     </dependencies>

     <dependencyManagement>

         <dependencies>

             <dependency>

                 <groupId>org.springframework.cloud</groupId>

                 <artifactId>spring-cloud-dependencies</artifactId>

                 <version>Dalston.RC1</version>

                 <type>pom</type>

                 <scope>import</scope>

             </dependency>

         </dependencies>

     </dependencyManagement>

     <build>

         <plugins>

             <plugin>

                 <groupId>org.springframework.boot</groupId>

                 <artifactId>spring-boot-maven-plugin</artifactId>

             </plugin>

         </plugins>

     </build>

     <repositories>

         <repository>

             <id>spring-milestones</id>

             <name>Spring Milestones</name>

             <url>https://repo.spring.io/milestone</url>

             <snapshots>

                 <enabled>false</enabled>

             </snapshots>

         </repository>

     </repositories>

 </project>
pom.xml
2. 创建Config Server,它也是一个Spring Boot应用,@EnableConfigServer注解说明了一个Config Server。同样我们使用@EnableEurekaClient将它注册到服务中心。
 package springcloud.helloworld.config.server;

 import org.springframework.boot.SpringApplication;

 import org.springframework.boot.autoconfigure.SpringBootApplication;

 import org.springframework.cloud.config.server.EnableConfigServer;

 import org.springframework.cloud.netflix.eureka.server.EnableEurekaServer;

 @EnableEurekaServer

 @EnableConfigServer

 @SpringBootApplication

 public class ConfigServerApplication {

     public static void main(String[] args) {

         SpringApplication.run(ConfigServerApplication.class, args);

     }

 }
3. Config server的配置文件appication.yml , 注意配置文件的url是GIT服务器的仓库地址, searchPaths配置文件所在的文件夹在仓库中的路径, 在server端不需要指定具体配置文件名, 因为具体的配置文件是什么有应用(也就是client)决定。
eureka:

  client:

    serviceUrl:

      defaultZone: http://localhost:8761/eureka/

server:

  port: 8888

spring:

  cloud:

    config:

      server:

        git:

          uri: https://git.oschina.net/chrywhy/test

          searchPaths: spring-cloud/helloworldConfig

  application:

    name: config-server
4. 启动config server后,访问http://localhost:8888/abc/xyz, 可见如下响应。这个是输出是并没有包括具体配置文件的内容, 这个响应说明,config server可以正常访问我们配置在application.yml中的GIT服务
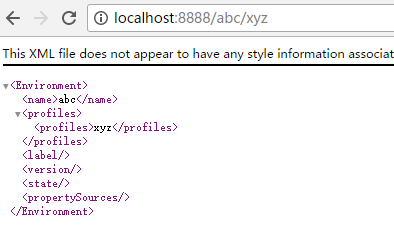
这个URL是啥意思, 需要解释一下。我们从输出就可以看到 abc 就是application的名字,xyz是profile的名字, 注意这里的abc, xyz均是随便输入的名字, 并不需要真实存在,config server这个REST接口返回的只是应用名为abc, profile名为xyz时,GIT配置环境的结构。
config server提供的REST接口,Spring Cloud官方文档提供了几个可选URL可以是如下几个:
- /{application}/{profile}[/{label}]
- /{application}-{profile}.yml
- /{label}/{application}-{profile}.yml
- /{application}-{profile}.properties
- /{label}/{application}-{profile}.properties
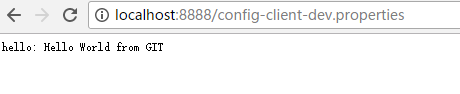
比如 第三个格式,如果我们在GIT版本库中有一个配置文件 spring-cloud/helloworldConfig/config-client-dev.properties. 那么访问http://localhost:8888/config-client-dev.properties就可以显示配置文件内容。这个例子中, application的名字是"config-client"(也是下面我们即将创建的client), profile名字是dev, 文件后缀是.properties
本例由于配置了eureka服务中心,所以这个config server作为一个eureka client注册到了 eureka server中, 可以从http://localhost:8761看到我们启动的config server, 如果不需要注册到服务中心, 也可把这个配置去掉
二. 创建config client
1. 创建maven工程, pom.xml如下:
 <?xml version="1.0" encoding="UTF-8"?>

 <project xmlns="http://maven.apache.org/POM/4.0.0" xmlns:xsi="http://www.w3.org/2001/XMLSchema-instance" xsi:schemaLocation="http://maven.apache.org/POM/4.0.0 http://maven.apache.org/xsd/maven-4.0.0.xsd">

     <modelVersion>4.0.0</modelVersion>

     <groupId>com.chry</groupId>

     <artifactId>Springcloud.helloworld.config.client</artifactId>

     <version>0.0.1-SNAPSHOT</version>

     <name>Springcloud.helloworld.config.client</name>

     <packaging>jar</packaging>

     <description>Demo Spring Config Client</description>

     <parent>

         <groupId>org.springframework.boot</groupId>

         <artifactId>spring-boot-starter-parent</artifactId>

         <version>1.5.3.RELEASE</version>

         <relativePath/> <!-- lookup parent from repository -->

     </parent>

     <properties>

         <project.build.sourceEncoding>UTF-8</project.build.sourceEncoding>

         <project.reporting.outputEncoding>UTF-8</project.reporting.outputEncoding>

         <java.version>1.8</java.version>

     </properties>

     <dependencies>

         <dependency>

             <groupId>org.springframework.cloud</groupId>

             <artifactId>spring-cloud-starter-eureka</artifactId>

         </dependency>

         <dependency>

             <groupId>org.springframework.boot</groupId>

             <artifactId>spring-boot-starter-web</artifactId>

         </dependency>

         <dependency>

             <groupId>org.springframework.cloud</groupId>

             <artifactId>spring-cloud-starter-config</artifactId>

         </dependency>

         <dependency>

             <groupId>org.springframework.boot</groupId>

             <artifactId>spring-boot-starter-test</artifactId>

             <scope>test</scope>

         </dependency>

     </dependencies>

     <dependencyManagement>

         <dependencies>

             <dependency>

                 <groupId>org.springframework.cloud</groupId>

                 <artifactId>spring-cloud-dependencies</artifactId>

                 <version>Dalston.RC1</version>

                 <type>pom</type>

                 <scope>import</scope>

             </dependency>

         </dependencies>

     </dependencyManagement>

     <build>

         <plugins>

             <plugin>

                 <groupId>org.springframework.boot</groupId>

                 <artifactId>spring-boot-maven-plugin</artifactId>

             </plugin>

         </plugins>

     </build>

     <repositories>

         <repository>

             <id>spring-milestones</id>

             <name>Spring Milestones</name>

             <url>https://repo.spring.io/milestone</url>

             <snapshots>

                 <enabled>false</enabled>

             </snapshots>

         </repository>

     </repositories>

 </project>
pom.xml
2. 创建一个spring boot应用作为client
 package springcloud.helloworld.config.client;

 import org.springframework.beans.factory.annotation.Value;

 import org.springframework.boot.SpringApplication;

 import org.springframework.boot.autoconfigure.SpringBootApplication;

 import org.springframework.web.bind.annotation.RequestMapping;

 import org.springframework.web.bind.annotation.RestController;

 @SpringBootApplication

 @RestController

 public class ConfigClientApplication {

     public static void main(String[] args) {

         SpringApplication.run(ConfigClientApplication.class, args);

     }

     @Value("${hello}")

     String hello;

     @RequestMapping(value = "/hello")

     public String hello(){

         return hello;

     }

 }
这个应用非常简单,就是从Config Server中获取配置项hello的值,Client Server向Config Server提交REST请求后,Config Server将访问GIT服务器,并将取得的配置项hello的值返回给client.
3. Config client需要一个应用配置文件, 定义config Server的URL,以及要访问的GIT具体分支。这个配置文件是bootstrap.yml (或者bootstrap.properties)
 spring:

   application:

     name: config-client

   cloud:

     config:

       label: master

       profile: dev

       uri: http://localhost:8888/

 server:

   port: 8881
这个配置定义了应用的名字是config-client(这就是将要用于组装前面Config Server一节中题到的application), profile采用dev, GIT分支用master。url是config server的地址。那么问题来了,我们似乎没定义配置文件名, 那配置文件名是什么呢? 这点又体现了约定优于配置的思路, 这里Spring Cloud约定, 应用的配置文件名以如下方式组成:{application}-{profile}.properties(或者{application}-{profile}.yml)。比如我们这个应用的配置文件就是config-client-dev.properties. 所以只需要在GIT的中创建配置文件spring-cloud/helloworldConfig/config-client-dev.properties就可以了, 内容如下:
hello=Hello World from GIT
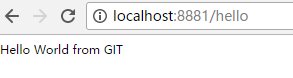
4. 启动config-client应用后, 可以访问http://locahost/8881/hello, 可以看到,应用本身并没有直接配置hello的具体内容, 也没指定具体配置文件,所欲这些都由spring cloud框架提交给config server了。
5. 配置的更新
至此,spring cloud的配置管理简单示例已经完成,但client 不能自动感知服务端的变化。 比如,我们修改了GIT中的文件内容,但无论如何刷新client端的页面,都不能反映配置的变化。下一节介绍Spring Cloud的配置自动更新机制
上一篇: Spring Cloud 入门教程(一): 服务注册
下一篇:Spring Cloud 入门教程(三): 配置自动刷新
Spring Cloud 入门教程(二): 配置管理的更多相关文章
- Spring Cloud入门教程(二):客户端负载均衡(Ribbon)
对于大型应用系统负载均衡(LB:Load Balancing)是首要被解决一个问题.在微服务之前LB方案主要是集中式负载均衡方案,在服务消费者和服务提供者之间又一个独立的LB,LB通常是专门的硬件,如 ...
- Spring Cloud 入门教程(二): 服务消费者(rest+ribbon)
在上一篇文章,讲了服务的注册和发现.在微服务架构中,业务都会被拆分成一个独立的服务,服务与服务的通讯是基于http restful的.Spring cloud有两种服务调用方式,一种是ribbon+r ...
- Spring Cloud 入门教程(三): 配置自动刷新
之前讲的配置管理, 只有在应用启动时会读取到GIT的内容, 之后只要应用不重启,GIT中文件的修改,应用无法感知, 即使重启Config Server也不行. 比如上一单元(Spring Cloud ...
- Spring Cloud 入门教程(一): 服务注册
1. 什么是Spring Cloud? Spring提供了一系列工具,可以帮助开发人员迅速搭建分布式系统中的公共组件(比如:配置管理,服务发现,断路器,智能路由,微代理,控制总线,一次性令牌,全局锁 ...
- Spring Cloud 入门教程(九): 路由网关zuul
在微服务架构中,需要几个关键的组件,服务注册与发现.服务消费.负载均衡.断路器.智能路由.配置管理等,由这几个组件可以组建一个简单的微服务架构.客户端的请求首先经过负载均衡(zuul.Ngnix),再 ...
- Spring Cloud 入门教程 - 搭建配置中心服务
简介 Spring Cloud 提供了一个部署微服务的平台,包括了微服务中常见的组件:配置中心服务, API网关,断路器,服务注册与发现,分布式追溯,OAuth2,消费者驱动合约等.我们不必先知道每个 ...
- Spring Cloud 入门教程(七): 熔断机制 -- 断路器
对断路器模式不太清楚的话,可以参看另一篇博文:断路器(Curcuit Breaker)模式,下面直接介绍Spring Cloud的断路器如何使用. SpringCloud Netflix实现了断路器库 ...
- Spring Cloud 入门教程(六): 用声明式REST客户端Feign调用远端HTTP服务
首先简单解释一下什么是声明式实现? 要做一件事, 需要知道三个要素,where, what, how.即在哪里( where)用什么办法(how)做什么(what).什么时候做(when)我们纳入ho ...
- Spring Cloud 入门教程(八): 断路器指标数据监控Hystrix Dashboard 和 Turbine
1. Hystrix Dashboard (断路器:hystrix 仪表盘) Hystrix一个很重要的功能是,可以通过HystrixCommand收集相关数据指标. Hystrix Dashboa ...
随机推荐
- An Example of How Oracle Works
Oracle是怎么工作的,摘自Oracle 9i的官方文档 The following example describes the most basic level of operations tha ...
- P4890 Never·island(dp)
P4890 Never·island 求门开的最小时间,其实也就是求门关的最大时间. 坐标这么大....显然坐标要离散化 离散化排序后,我们发现x轴被这些点划分成若干条线段$(l,r)$,并且有4种情 ...
- 02: pycharm远程linux开发和调试代码
1.1 配置远程linux主机信息 参考博客:https://www.cnblogs.com/lei0213/p/7898301.html 1) 选择Tools--Deployment--Config ...
- FileZilla连接腾讯云Centos7
现在需要使用ftp快速上传资料去云机备份, 于是想到FileZilla. 生成密匙文件 登录腾讯云--ssh密匙 FileZilla Client 导入密匙文件 填写登录信息 连接 另外记得开放22端 ...
- 嵌入式 Linux 对内存的直接读写(devmem)
https://blog.csdn.net/xy010902100449/article/details/47028497[摘要] 在Linux开发中着实用到的调试工具并不是很多.devmem的方式是 ...
- JavaScript事件监听以及addEventListener参数分析
事件监听 在Javascript中事件的监听是用来对某些操作做出反应的方法.例如监听一个按钮的pressdown, 或者获取鼠标左键按下时候鼠标的位置.这些都需要使用监听来完成.监听的函数很简单:ad ...
- Bootstrap3基础 form-group 输入框之间出现间隔
内容 参数 OS Windows 10 x64 browser Firefox 65.0.2 framework Bootstrap 3.3.7 editor ...
- Vue学习【第四篇】:Vue 之webpack打包工具的使用
什么是webpack webpack是一个模块打包工具.用vue项目来举例:浏览器它是只认识js,不认识vue的.而我们写的代码后缀大多是.vue的,在每个.vue文件中都可能html.js.css甚 ...
- Materialize和Material Design Lite的区别
Material Design Lite是google官方库,Materialize是第三方 Material Design Lite不依赖jquery,Materialize依赖jquery Mat ...
- (转)开源项目miaosha(下)
石墨文档:https://shimo.im/docs/2XlwliBQAYsKCHbq/ (二期)20.开源秒杀项目miaosha解读(下) [课程20]jmeter.xmind81.5KB [课程2 ...