一步一步学Silverlight 2系列(11):数据绑定
概念
Silverlight 2 Beta 1版本发布了,无论从Runtime还是Tools都给我们带来了很多的惊喜,如支持框架语言Visual Basic, Visual C#, IronRuby, Ironpython,对JSON、Web Service、WCF以及Sockets的支持等一系列新的特性。《一步一步学Silverlight 2系列》文章带您快速进入Silverlight 2开发。
本文为系列文章第十一篇,主要介绍Silverlight 2中的数据绑定。
数据绑定模式
在Silverlight 2中,支持三种模式的数据绑定。
1.OneTime:一次绑定,在绑定创建时使用源数据更新目标,适用于只显示数据而不进行数据的更新。
2.OneWay:单向绑定,在绑定创建时或者源数据发生变化时更新到目标,适用于显示变化的数据。
3.TwoWay:双向绑定,在任何时候都可以同时更新源数据和目标。
Jesse Liberty举的例子非常的形象,使用Silverlight开发一个在线书店,显示书籍的书名、作者等信息,使用OneTime模式,这些数据一般不会发生变化的;显示价格信息时使用OneWay模式,因为管理员可能会在一天内调整价格;显示书籍的剩余数量时用TwoWay模式,数量随着用户的订购会随时发生变化,即目标和源数据都要进行更新。
简单数据绑定
在本示例中我们将做一个简单的数据绑定,用来显示用户信息,XAML如下:
<Grid x:Name="LayoutRoot" Background="#46461F">

    <Grid.RowDefinitions>

        <RowDefinition Height="160"></RowDefinition>

        <RowDefinition Height="40"></RowDefinition>

        <RowDefinition Height="40"></RowDefinition>

    </Grid.RowDefinitions>

    <Grid.ColumnDefinitions>

        <ColumnDefinition Width="150"></ColumnDefinition>

        <ColumnDefinition Width="*"></ColumnDefinition>

    </Grid.ColumnDefinitions>

    <Image Source="terrylee.jpg" Width="78" Height="100"

           HorizontalAlignment="Left" Grid.Row="0" Grid.Column="1"/>

    <TextBlock Foreground="White" FontSize="18" Text="姓名:"

               Grid.Row="1" Grid.Column="0" HorizontalAlignment="Right"/>

    <TextBlock x:Name="lblName" Foreground="White" FontSize="18"

               Grid.Row="1" Grid.Column="1" HorizontalAlignment="Left"/>

    <TextBlock Foreground="White" FontSize="18" Text="位置:"

               Grid.Row="2" Grid.Column="0" HorizontalAlignment="Right"/>

    <TextBlock x:Name="lblAddress" Foreground="White" FontSize="18"

               Grid.Row="2" Grid.Column="1" HorizontalAlignment="Left"/>

</Grid>
添加一个简单User类,它具有Name和Address两个属性:
public class User

{

    public string Name { get; set; }

    public string Address { get; set; }

}
使用绑定句法{Binding Property}进行数据绑定,注意下面的两个TextBlock控件Text属性:
<Grid x:Name="LayoutRoot" Background="#46461F">

    <Grid.RowDefinitions>

        <RowDefinition Height="160"></RowDefinition>

        <RowDefinition Height="40"></RowDefinition>

        <RowDefinition Height="40"></RowDefinition>

    </Grid.RowDefinitions>

    <Grid.ColumnDefinitions>

        <ColumnDefinition Width="150"></ColumnDefinition>

        <ColumnDefinition Width="*"></ColumnDefinition>

    </Grid.ColumnDefinitions>

    <Image Source="terrylee.jpg" Width="78" Height="100"

       HorizontalAlignment="Left" Grid.Row="0" Grid.Column="1"/>

    <TextBlock Foreground="White" FontSize="18" Text="姓名:"

           Grid.Row="1" Grid.Column="0" HorizontalAlignment="Right"/>

    <TextBlock x:Name="lblName" Foreground="White" FontSize="18"

               Grid.Row="1" Grid.Column="1" HorizontalAlignment="Left"

               Text="{Binding Name}"/>

    <TextBlock Foreground="White" FontSize="18" Text="位置:"

               Grid.Row="2" Grid.Column="0" HorizontalAlignment="Right"/>

    <TextBlock x:Name="lblAddress" Foreground="White" FontSize="18"

               Grid.Row="2" Grid.Column="1" HorizontalAlignment="Left"

               Text="{Binding Address}"/>

</Grid>
指定数据源,注意这里是创建一个User的实例并赋值后,把user实例绑定到了TextBlock的DataContext上,而不是向之前我们所做的示例中那样,直接指定Text属性:
private void UserControl_Loaded(object sender, RoutedEventArgs e)

{

    User user = new User();

    user.Name = "TerryLee";

    user.Address = "中国 天津";

    lblName.DataContext = user;

    lblAddress.DataContext = user;

}
运行示例后,可以看到:
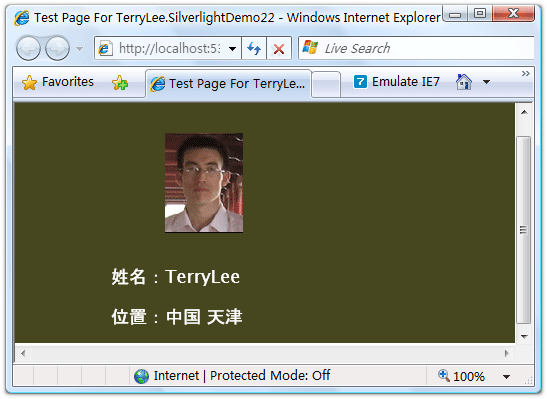
上面这种数据绑定模式,只是显示数据而不对数据做任何修改,默认的绑定模式是一次绑定OneTime。
单向绑定示例
如果需要在数据源发生变化时能够通知UI进行相应的更新,即使用单向绑定OneWay或者双向绑定TwoWay,则业务实体需要实现接口INotifyPropertyChanged。在本示例中,我们加上一个更新按钮,当单击按钮时更新user实例的属性值,会看到界面上的数据也会发生变化。
修改一下User类,使其实现INotifyPropertyChanged接口。
public class User : INotifyPropertyChanged

{

    public event PropertyChangedEventHandler PropertyChanged;

    private string _name;

    public string Name

    {

        get { return _name; }

        set

        {

            _name = value;

            if(PropertyChanged != null)

            {

                PropertyChanged(this, new PropertyChangedEventArgs("Name"));

            }

        }

    }

    private string _address;

    public string Address

    {

        get { return _address; }

        set

        {

            _address = value;

            if (PropertyChanged != null)

            {

                PropertyChanged(this, new PropertyChangedEventArgs("Address"));

            }

        }

    }

}
修改数据绑定模式,使用单向绑定OneWay模式,如{Binding Address, Mode=OneWay}
<Grid x:Name="LayoutRoot" Background="#46461F">

    <Grid.RowDefinitions>

        <RowDefinition Height="160"></RowDefinition>

        <RowDefinition Height="40"></RowDefinition>

        <RowDefinition Height="40"></RowDefinition>

    </Grid.RowDefinitions>

    <Grid.ColumnDefinitions>

        <ColumnDefinition Width="150"></ColumnDefinition>

        <ColumnDefinition Width="*"></ColumnDefinition>

    </Grid.ColumnDefinitions>

    <Image Source="terrylee.jpg" Width="78" Height="100"

       HorizontalAlignment="Left" Grid.Row="0" Grid.Column="1"/>

    <Button x:Name="btnUpdate" Width="100" Height="40"

            Content="Update" Click="btnUpdate_Click"/>

    <TextBlock Foreground="White" FontSize="18" Text="姓名:"

           Grid.Row="1" Grid.Column="0" HorizontalAlignment="Right"/>

    <TextBlock x:Name="lblName" Foreground="White" FontSize="18"

               Grid.Row="1" Grid.Column="1" HorizontalAlignment="Left"

               Text="{Binding Name, Mode=OneWay}"/>

    <TextBlock Foreground="White" FontSize="18" Text="位置:"

               Grid.Row="2" Grid.Column="0" HorizontalAlignment="Right"/>

    <TextBlock x:Name="lblAddress" Foreground="White" FontSize="18"

               Grid.Row="2" Grid.Column="1" HorizontalAlignment="Left"

               Text="{Binding Address, Mode=OneWay}"/>

</Grid>
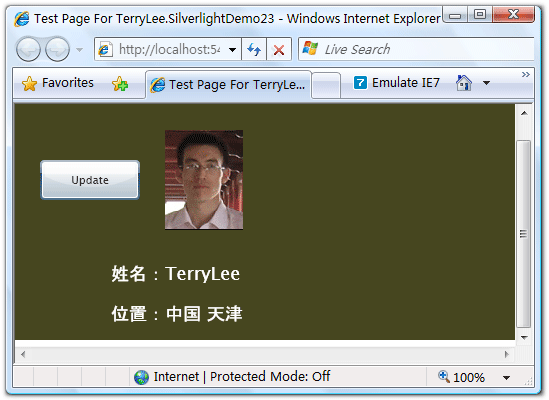
编写事件处理程序,为了演示把user声明为一个全局的,并在按钮的单击事件中修改其属性值:
public partial class Page : UserControl
{
public Page()
{
InitializeComponent();
}
User user;
private void UserControl_Loaded(object sender, RoutedEventArgs e)
{
user = new User();
user.Name = "TerryLee";
user.Address = "中国 天津"; lblName.DataContext = user;
lblAddress.DataContext = user;
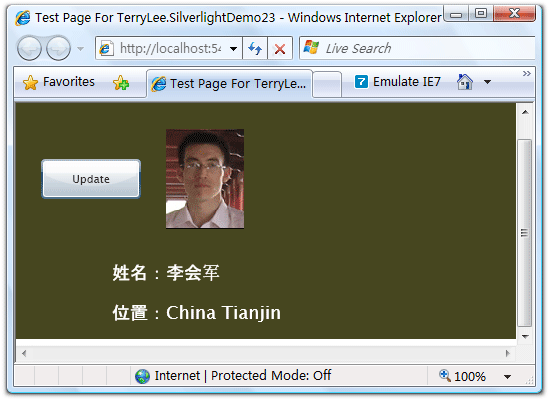
} private void btnUpdate_Click(object sender, RoutedEventArgs e)
{
user.Name = "李会军";
user.Address = "China Tianjin";
}
}
运行后如下所示:
单击Update按钮后:
绑定到列表
下面再看一个绑定到列表的简单例子,一般都会使用DataGrid或者ListBox来进行列表数据的显示。下面的示例我们显示一个文章列表:
<Grid Background="#46461F">

    <Grid.RowDefinitions>

        <RowDefinition Height="40"></RowDefinition>

        <RowDefinition Height="*"></RowDefinition>

    </Grid.RowDefinitions>

    <Grid.ColumnDefinitions>

        <ColumnDefinition></ColumnDefinition>

    </Grid.ColumnDefinitions>

    <Border Grid.Row="0" Grid.Column="0" CornerRadius="15"

            Width="240" Height="36" Background="Orange"

            Margin="20 0 0 0" HorizontalAlignment="Left">

        <TextBlock Text="文章列表" Foreground="White"

                   HorizontalAlignment="Left" VerticalAlignment="Center"

                   Margin="20 0 0 0"></TextBlock>

    </Border>

    <ListBox x:Name="PostList" Grid.Column="0" Grid.Row="1"

             Margin="40 10 10 10"

             HorizontalContentAlignment="Left" VerticalContentAlignment="Bottom"

             ItemsSource="{Binding Posts}">

    </ListBox>

</Grid>
编写一个简单的业务类:
public class Blog

{

    public List<String> Posts { get; set; }

}
初始化集合数据并进行绑定
private void UserControl_Loaded(object sender, RoutedEventArgs e)

{

    Blog blog = new Blog();

    blog.Posts = new List<String>

    {

        "一步一步学Silverlight 2系列(10):使用用户控件",

        "一步一步学Silverlight 2系列(9):使用控件模板",

        "一步一步学Silverlight 2系列(8):使用样式封装控件观感",

        "一步一步学Silverlight 2系列(7):全屏模式支持"

    };

    PostList.DataContext = blog;

}
最终运行的结果如下所示:

当然我们也可以使用ListBox的ItemsSource属性进行绑定,
结束语
本文简单介绍了Silverlight 2中的数据绑定,你可以从这里下载文章示例代码。
出处:http://terrylee.cnblogs.com
本文版权归作者和博客园共有,欢迎转载,但未经作者同意必须保留此段声明,且在文章页面明显位置给出原文连接,否则保留追究法律责任的权利。
一步一步学Silverlight 2系列(11):数据绑定的更多相关文章
- 一步一步学Silverlight 2系列文章
概述 由TerryLee编写的<Silverlight 2完美征程>一书,已经上市,在该系列文章的基础上补充了大量的内容,敬请关注.官方网站:http://www.dotneteye.cn ...
- 一步一步学Silverlight 2系列(32):图形图像综合实例—“功夫之王”剧照播放
概述 Silverlight 2 Beta 1版本发布了,无论从Runtime还是Tools都给我们带来了很多的惊喜,如支持框架语言Visual Basic, Visual C#, IronRuby, ...
- 一步一步学Silverlight 2系列(31):图形图像综合实例—实现水中倒影效果
概述 Silverlight 2 Beta 1版本发布了,无论从Runtime还是Tools都给我们带来了很多的惊喜,如支持框架语言Visual Basic, Visual C#, IronRuby, ...
- 一步一步学Silverlight 2系列(30):使用Transform实现更炫的效果(下)
概述 Silverlight 2 Beta 1版本发布了,无论从Runtime还是Tools都给我们带来了很多的惊喜,如支持框架语言Visual Basic, Visual C#, IronRuby, ...
- 一步一步学Silverlight 2系列(29):使用Transform实现更炫的效果(上)
概述 Silverlight 2 Beta 1版本发布了,无论从Runtime还是Tools都给我们带来了很多的惊喜,如支持框架语言Visual Basic, Visual C#, IronRuby, ...
- 一步一步学Silverlight 2系列(28):图片处理
概述 Silverlight 2 Beta 1版本发布了,无论从Runtime还是Tools都给我们带来了很多的惊喜,如支持框架语言Visual Basic, Visual C#, IronRuby, ...
- 一步一步学Silverlight 2系列(27):使用Brush进行填充
概述 Silverlight 2 Beta 1版本发布了,无论从Runtime还是Tools都给我们带来了很多的惊喜,如支持框架语言Visual Basic, Visual C#, IronRuby, ...
- 一步一步学Silverlight 2系列(26):基本图形
概述 Silverlight 2 Beta 1版本发布了,无论从Runtime还是Tools都给我们带来了很多的惊喜,如支持框架语言Visual Basic, Visual C#, IronRuby, ...
- 一步一步学Silverlight 2系列(25):综合实例之Live Search
概述 Silverlight 2 Beta 1版本发布了,无论从Runtime还是Tools都给我们带来了很多的惊喜,如支持框架语言Visual Basic, Visual C#, IronRuby, ...
- 一步一步学Silverlight 2系列(24):与浏览器交互相关辅助方法
概述 Silverlight 2 Beta 1版本发布了,无论从Runtime还是Tools都给我们带来了很多的惊喜,如支持框架语言Visual Basic, Visual C#, IronRuby, ...
随机推荐
- 集合-LinkList
参考:http://www.cnblogs.com/skywang12345/p/3308807.html Consumer.class 消费者接口 参考:https://www.jianshu. ...
- Linux 下 GCC 编译共享库控制导出函数的方法
通过一些实际项目的开发,发现这样一个现象,在 Windows 下可以通过指定 __declspec(dllexport) 定义来控制 DLL(动态链接库)中哪些函数可以导出,暴露给其他程序链接使用,哪 ...
- Java集合——遍历集合元素并修改
Java集合——遍历集合元素并修改 摘要:本文主要总结了遍历集合的方式,以及在遍历时修改集合要注意的问题. 遍历Collection 对List和Set的遍历,有四种方式,下面以ArrayList为例 ...
- spark学习常用的操作
首先,使用 ScalaIDE 或 IDEA 创建 Scala 的 Maven 工程.需要用到 spark-core,spark-sql,spark-streaming 的 jar 包,pom 文件如下 ...
- MySql 初始化权限脚本
刚装好MySql后无法用客户端工具连接,通过命令行登录后,运行下面的脚本: GRANT ALL PRIVILEGES ON *.* TO 'root'@'%' IDENTIFIED BY 'y ...
- 深入GCD(五):资源竞争
概述我将分四步来带大家研究研究程序的并发计算.第一步是基本的串行程序,然后使用GCD把它并行计算化.如果你想顺着步骤来尝试这些程序的话,可以下载源码.注意,别运行imagegcd2.m,这是个反面教材 ...
- 用C++实现约瑟夫环的问题
约瑟夫问题是个有名的问题:N个人围成一圈.从第一个開始报数,第M个将被杀掉,最后剩下一个,其余人都将被杀掉. 比如N=6,M=5.被杀掉的人的序号为5,4,6.2.3.最后剩下1号. 假定在圈子里前K ...
- leetcode最长递增子序列问题
题目描写叙述: 给定一个数组,删除最少的元素,保证剩下的元素是递增有序的. 分析: 题目的意思是删除最少的元素.保证剩下的元素是递增有序的,事实上换一种方式想,就是寻找最长的递增有序序列.解法有非常多 ...
- HDU oj 开门人与关门人
题目地址:http://acm.hdu.edu.cn/showproblem.php?pid=1234 #include<stdio.h> #include<string.h> ...
- python 字符串前缀
普通字符串 一般字符串都是已unicode编码,且和C类似,可以使用\来转义,比如 a = "test\ntest" print(a) 输出 test test 前面加r 在字符串 ...