spring 5.x 系列第9篇 —— 整合mongodb (xml配置方式)
源码Gitub地址:https://github.com/heibaiying/spring-samples-for-all
一、说明
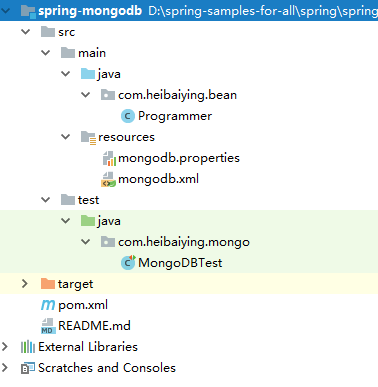
1.1 项目结构说明
配置文件位于resources下,项目以单元测试的方式进行测试。
1.2 依赖说明
除了spring的基本依赖外,需要导入mongodb整合依赖包
 <!--spring mongodb 整合依赖-->
<dependency>
    <groupId>org.springframework.data</groupId>
    <artifactId>spring-data-mongodb</artifactId>
    <version>2.1.3.RELEASE</version>
</dependency>
二、spring mongodb
2.1 新建配置文件
mongo.host=192.168.200.228
mongo.port=27017
# 数据库名称. 默认是'db'.
mongo.dbname=database
# 每个主机允许的连接数
mongo.connectionsPerHost=10
# 线程队列数,它和上面connectionsPerHost值相乘的结果就是线程队列最大值。如果连接线程排满了队列就会抛出异常
mongo.threadsAllowedToBlockForConnectionMultiplier=5
# 连接超时的毫秒 0是默认值且无限大。
mongo.connectTimeout=1000
# 最大等待连接的线程阻塞时间 默认是120000 ms (2 minutes).
mongo.maxWaitTime=1500
# 保持活动标志,控制是否有套接字保持活动超时 官方默认为true 且不建议禁用
mongo.socketKeepAlive=true
# 用于群集心跳的连接的套接字超时。
mongo.socketTimeout=1500
2.2 整合配置
<?xml version="1.0" encoding="UTF-8"?>
<beans xmlns="http://www.springframework.org/schema/beans"
       xmlns:xsi="http://www.w3.org/2001/XMLSchema-instance"
       xmlns:context="http://www.springframework.org/schema/context"
       xmlns:mongo="http://www.springframework.org/schema/data/mongo"
       xsi:schemaLocation=
               "http://www.springframework.org/schema/context
          http://www.springframework.org/schema/context/spring-context.xsd
          http://www.springframework.org/schema/data/mongo http://www.springframework.org/schema/data/mongo/spring-mongo.xsd
          http://www.springframework.org/schema/beans
          http://www.springframework.org/schema/beans/spring-beans.xsd">

    <!--扫描配置文件-->
    <context:property-placeholder location="classpath:mongodb.properties"/>

    <!--定义用于访问MongoDB的MongoClient实例-->
    <mongo:mongo-client host="${mongo.host}" port="${mongo.port}">
        <mongo:client-options
                connections-per-host="${mongo.connectionsPerHost}"
                threads-allowed-to-block-for-connection-multiplier="${mongo.threadsAllowedToBlockForConnectionMultiplier}"
                connect-timeout="${mongo.connectTimeout}"
                max-wait-time="${mongo.maxWaitTime}"
                socket-keep-alive="${mongo.socketKeepAlive}"
                socket-timeout="${mongo.socketTimeout}"
        />
    </mongo:mongo-client>

    <!--定义用于连接到数据库的连接工厂-->
    <mongo:db-factory dbname="${mongo.dbname}" mongo-ref="mongoClient"/>

    <!--实际操作mongodb的template,在代码中注入-->
    <bean id="anotherMongoTemplate" class="org.springframework.data.mongodb.core.MongoTemplate">
        <constructor-arg name="mongoDbFactory" ref="mongoDbFactory"/>
    </bean>

</beans>
2.3 测试整合
/**
 * @author : heibaiying
 * @description : MongoDB 查询
 */
@RunWith(SpringRunner.class)
@ContextConfiguration(locations = "classpath:mongodb.xml")
public class MongoDBTest {

    @Autowired
    private MongoTemplate mongoTemplate;

    @Test
    public void insert() {
        // 单条插入
        mongoTemplate.insert(new Programmer("xiaoming", 12, 5000.21f, new Date()));
        List<Programmer> programmers = new ArrayList<Programmer>();
        // 批量插入
        programmers.add(new Programmer("xiaohong", 21, 52200.21f, new Date()));
        programmers.add(new Programmer("xiaolan", 34, 500.21f, new Date()));
        mongoTemplate.insert(programmers, Programmer.class);
    }

    // 条件查询
    @Test
    public void select() {
        Criteria criteria = new Criteria();
        criteria.andOperator(where("name").is("xiaohong"), where("age").is(21));
        Query query = new Query(criteria);
        Programmer one = mongoTemplate.findOne(query, Programmer.class);
        System.out.println(one);
    }

    // 更新数据
    @Test
    public void MUpdate() {
        UpdateResult updateResult = mongoTemplate.updateMulti(query(where("name").is("xiaoming")), update("age", 35), Programmer.class);
        System.out.println("更新记录数:" + updateResult.getModifiedCount());
    }

    // 删除指定数据
    @Test
    public void delete() {
        DeleteResult result = mongoTemplate.remove(query(where("name").is("xiaolan")), Programmer.class);
        System.out.println("影响记录数:" + result.getDeletedCount());
        System.out.println("是否成功:" + result.wasAcknowledged());
    }

}
附:源码Gitub地址:https://github.com/heibaiying/spring-samples-for-all
spring 5.x 系列第9篇 —— 整合mongodb (xml配置方式)的更多相关文章
- spring 5.x 系列第10篇 —— 整合mongodb (代码配置方式)
源码Gitub地址:https://github.com/heibaiying/spring-samples-for-all 一.说明 1.1 项目结构说明 配置文件位于com.heibaiying. ...
- spring 5.x 系列第13篇 —— 整合RabbitMQ (xml配置方式)
源码Gitub地址:https://github.com/heibaiying/spring-samples-for-all 一.说明 1.1 项目结构说明 本用例关于rabbitmq的整合提供简单消 ...
- spring 5.x 系列第11篇 —— 整合memcached (xml配置方式)
文章目录 一.说明 1.1 XMemcached客户端说明 1.2 项目结构说明 1.3 依赖说明 二.spring 整合 memcached 2.1 单机配置 2.2 集群配置 2.3 存储基本类型 ...
- spring 5.x 系列第17篇 —— 整合websocket (xml配置方式)
源码Gitub地址:https://github.com/heibaiying/spring-samples-for-all 一.说明 1.1 项目结构说明 项目模拟一个简单的群聊功能,为区分不同的聊 ...
- spring 5.x 系列第15篇 —— 整合dubbo (xml配置方式)
文章目录 一. 项目结构说明 二.项目依赖 三.公共模块(dubbo-common) 四. 服务提供者(dubbo-provider) 4.1 productService是服务的提供者( 商品数据用 ...
- spring 5.x 系列第1篇 —— springmvc基础 (xml配置方式)
文章目录 一.搭建hello spring工程 1.1 项目搭建 1.2 相关配置讲解 二.配置自定义拦截器 三.全局异常处理 四.参数绑定 4.1 参数绑定 4.2 关于日期格式转换的三种方法 五. ...
- spring 5.x 系列第14篇 —— 整合RabbitMQ (代码配置方式)
源码Gitub地址:https://github.com/heibaiying/spring-samples-for-all 一.说明 1.1 项目结构说明 本用例关于rabbitmq的整合提供简单消 ...
- spring 5.x 系列第12篇 —— 整合memcached (代码配置方式)
文章目录 一.说明 1.1 XMemcached客户端说明 1.2 项目结构说明 1.3 依赖说明 二.spring 整合 memcached 2.1 单机配置 2.2 集群配置 2.3 存储基本类型 ...
- spring 5.x 系列第18篇 —— 整合websocket (代码配置方式)
源码Gitub地址:https://github.com/heibaiying/spring-samples-for-all 一.说明 1.1 项目结构说明 项目模拟一个简单的群聊功能,为区分不同的聊 ...
随机推荐
- 在.net core 的webapi项目中将对象序列化成json
问题:vs2017 15.7.6创建一个基于.net core 2.1的webapi项目,默认生成的控制器继承自ControllerBase类 在此情况下无法使用Json()方法 将一个对象转成jso ...
- 向西项目管理工具Git一片
前言 Git 这个词相信大家并不陌生,做开发的童鞋们每天都离不开它.当然,假设你的项目中没实用到分布式,那么,你可能从未用过 Git,当然也可能没听过.只是,这不是重点,重点是这一篇文章,我们将一起谈 ...
- Android 调用系统分享文字、图片、文件,可直达微信、朋友圈、QQ、QQ空间、微博
原文:Android 调用系统分享文字.图片.文件,可直达微信.朋友圈.QQ.QQ空间.微博 兼容SDK 18以上的系统,直接调用系统分享功能,分享文本.图片.文件到第三方APP,如:微信.QQ.微博 ...
- poj 2763 Housewife Wind(树链拆分)
id=2763" target="_blank" style="">题目链接:poj 2763 Housewife Wind 题目大意:给定一棵 ...
- 使用Qt installer framework制作安装包(不知道是否适合Mac和Linux?)
一.介绍 使用Qt库开发的应用程序,一般有两种发布方式:(1)静态编译发布.这种方式使得程序在编译的时候会将Qt核心库全部编译到一个可执行文件中.其优势是简单单一,所有的依赖库都集中在一起,其缺点也很 ...
- 汉顺平html5课程分享:6小时制作经典的坦克大战!
记起自己去年參加的一次面试,在做过Java多年的面试官面前发挥的并不好,但他一听说我会html5,立刻眼睛发亮.无论不顾的想要和我签约.. .所以.如今为工作犯愁的朋友们,学好html5,绝对会为你找 ...
- 【C#/WPF】调节图像的HSL(色相、饱和度、明亮度)
原文:[C#/WPF]调节图像的HSL(色相.饱和度.明亮度) 先说概念: HSL是一种描述颜色的方式(其他颜色描述方式还有大家熟悉的RGB值).HSL三个字母分别表示图像的Hue色相.Saturat ...
- 一个Windows C++的线程类实现(封装API,形成一个类,但不完善。其实可以学习一下Delphi的TThread的写法)
Thread.h #ifndef __THREAD_H__ #define __THREAD_H__ #include <string> #include <windows.h& ...
- Android Camera2 拍照(四)——对焦模式
原文:Android Camera2 拍照(四)--对焦模式 本篇将重点介绍使用Camera2 API进行手动对焦的设置,以及在手动对焦与自动对焦模式之间切换. 一.手动对焦响应事件 首先我们要实现点 ...
- PHP 一致性Hash
一致性HASH 好久没有写文章了,最近忙着公司的事情,也一拖再拖.这篇一致性hash是很久之前就有的一篇算法,记录一下,这周写个基于该算法的Redis中间件. HASH算法的精髓就在于打散原本杂乱无序 ...