python爬虫--分布式爬虫
Scrapy-Redis分布式爬虫
介绍
scrapy-redis巧妙的利用redis 实现 request queue和 items queue,利用redis的set实现request的去重,将scrapy从单台机器扩展多台机器,实现较大规模的爬虫集群
scrapy-redis是基于redis的scrapy组件

• 分布式爬虫

	多个爬虫实例分享一个redis request队列,非常适合大范围多域名的爬虫集群

• 分布式后处理

	爬虫抓取到的items push到一个redis items队列,这就意味着可以开启多个items processes来处理抓取到的数据,比如存储到Mongodb、Mysql

• 基于scrapy即插即用组件

	Scheduler + Duplication Filter, Item Pipeline, Base Spiders.
scrapy-redis架构

• 调度器(Scheduler)
scrapy-redis调度器通过redis的set不重复的特性,实现了Duplication Filter去重(DupeFilter set存放爬取过的request)。

Spider新生成的request,将request的指纹到redis的DupeFilter set检查是否重复,并将不重复的request push写入redis的request队列。

调度器每次从redis的request队列里根据优先级pop出一个request, 将此request发给spider处理。
• Item Pipeline
将Spider爬取到的Item给scrapy-redis的Item Pipeline,将爬取到的Item存入redis的items队列。可以很方便的从items队列中提取item,从而实现items processes 集群
scrapy - redis安装与使用
安装scrapy-redis
之前已经装过scrapy了,这里直接装scrapy-redis
pip install scrapy-redis
使用scrapy-redis的example来修改
先从github上拿到scrapy-redis的example,然后将里面的example-project目录移到指定的地址
git clone https://github.com/rolando/scrapy-redis.git

cp -r scrapy-redis/example-project ./scrapy-youyuan
或者将整个项目下载回来scrapy-redis-master.zip解压后
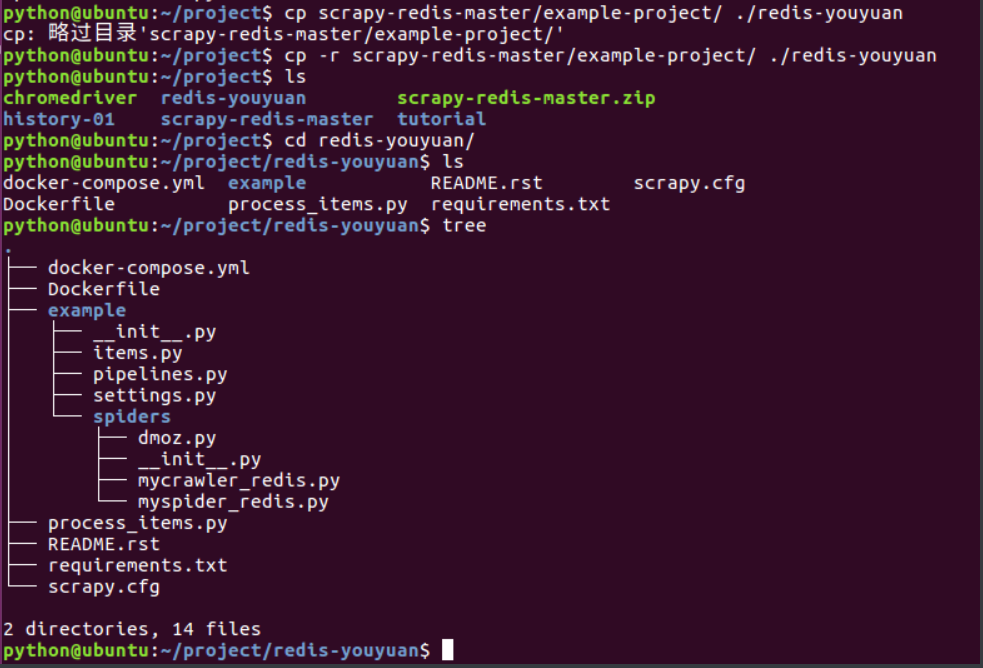
cp -r scrapy-redis-master/example-project/ ./redis-youyuan

cd redis-youyuan/
tree查看项目目录
修改settings.py
注意:settings里面的中文注释会报错,换成英文
# 指定使用scrapy-redis的Scheduler

SCHEDULER = "scrapy_redis.scheduler.Scheduler"

# 在redis中保持scrapy-redis用到的各个队列,从而允许暂停和暂停后恢复

SCHEDULER_PERSIST = True

# 指定排序爬取地址时使用的队列,默认是按照优先级排序

SCHEDULER_QUEUE_CLASS = 'scrapy_redis.queue.SpiderPriorityQueue'

# 可选的先进先出排序

# SCHEDULER_QUEUE_CLASS = 'scrapy_redis.queue.SpiderQueue'

# 可选的后进先出排序

# SCHEDULER_QUEUE_CLASS = 'scrapy_redis.queue.SpiderStack'

# 只在使用SpiderQueue或者SpiderStack是有效的参数,,指定爬虫关闭的最大空闲时间

SCHEDULER_IDLE_BEFORE_CLOSE = 10

# 指定RedisPipeline用以在redis中保存item

ITEM_PIPELINES = {

    'example.pipelines.ExamplePipeline': 300,

    'scrapy_redis.pipelines.RedisPipeline': 400

}

# 指定redis的连接参数

# REDIS_PASS是我自己加上的redis连接密码,需要简单修改scrapy-redis的源代码以支持使用密码连接redis

REDIS_HOST = '127.0.0.1'

REDIS_PORT = 6379

# Custom redis client parameters (i.e.: socket timeout, etc.)

REDIS_PARAMS  = {}

#REDIS_URL = 'redis://user:pass@hostname:9001'

#REDIS_PARAMS['password'] = 'itcast.cn'

LOG_LEVEL = 'DEBUG'

DUPEFILTER_CLASS = 'scrapy.dupefilters.RFPDupeFilter'

#The class used to detect and filter duplicate requests.

#The default (RFPDupeFilter) filters based on request fingerprint using the scrapy.utils.request.request_fingerprint function. In order to change the way duplicates are checked you could subclass RFPDupeFilter and override its request_fingerprint method. This method should accept scrapy Request object and return its fingerprint (a string).

#By default, RFPDupeFilter only logs the first duplicate request. Setting DUPEFILTER_DEBUG to True will make it log all duplicate requests.

DUPEFILTER_DEBUG =True

# Override the default request headers:

DEFAULT_REQUEST_HEADERS = {

    'Accept': 'text/html,application/xhtml+xml,application/xml;q=0.9,image/webp,*/*;q=0.8',

    'Accept-Language': 'zh-CN,zh;q=0.8',

    'Connection': 'keep-alive',

    'Accept-Encoding': 'gzip, deflate, sdch',

}
查看pipeline.py
from datetime import datetime

class ExamplePipeline(object):

    def process_item(self, item, spider):

        item["crawled"] = datetime.utcnow()

        item["spider"] = spider.name

        return item
流程
    - 概念:可以使用多台电脑组件一个分布式机群,让其执行同一组程序,对同一组网络资源进行联合爬取。

    - 原生的scrapy是无法实现分布式

        - 调度器无法被共享

        - 管道无法被共享

    - 基于scrapy+redis(scrapy&scrapy-redis组件)实现分布式

    - scrapy-redis组件作用:

        - 提供可被共享的管道和调度器

    - 环境安装:

        - pip install scrapy-redis

    - 编码流程:

        1.创建工程

        2.cd proName

        3.创建crawlspider的爬虫文件

        4.修改一下爬虫类:

            - 导包:from scrapy_redis.spiders import RedisCrawlSpider

            - 修改当前爬虫类的父类:RedisCrawlSpider

            - allowed_domains和start_urls删除

            - 添加一个新属性:redis_key = 'xxxx'可以被共享的调度器队列的名称

        5.修改配置settings.py

            - 指定管道

                ITEM_PIPELINES = {

                        'scrapy_redis.pipelines.RedisPipeline': 400

                    }

            - 指定调度器

                # 增加了一个去重容器类的配置, 作用使用Redis的set集合来存储请求的指纹数据, 从而实现请求去重的持久化

                DUPEFILTER_CLASS = "scrapy_redis.dupefilter.RFPDupeFilter"

                # 使用scrapy-redis组件自己的调度器

                SCHEDULER = "scrapy_redis.scheduler.Scheduler"

                # 配置调度器是否要持久化, 也就是当爬虫结束了, 要不要清空Redis中请求队列和去重指纹的set。如果是True, 就表示要持久化存储, 就不清空数据, 否则清空数据

                SCHEDULER_PERSIST = True

            - 指定redis数据库

                REDIS_HOST = 'redis服务的ip地址'

                REDIS_PORT = 6379

         6.配置redis数据库(redis.windows.conf)

            - 关闭默认绑定

                - 56Line:#bind 127.0.0.1

            - 关闭保护模式

                - 75line:protected-mode no

         7.启动redis服务(携带配置文件)和客户端

            - redis-server.exe redis.windows.conf

            - redis-cli

         8.执行工程

            - scrapy runspider spider.py

         9.将起始的url仍入到可以被共享的调度器的队列(sun)中

            - 在redis-cli中操作:lpush sun www.xxx.com

         10.redis:

            - xxx:items:存储的就是爬取到的数据
分布式爬取案例
爬虫程序
# -*- coding: utf-8 -*-

import scrapy

from scrapy.linkextractors import LinkExtractor

from scrapy.spiders import CrawlSpider, Rule

from scrapy_redis.spiders import RedisCrawlSpider

from fbs.items import FbsproItem

class FbsSpider(RedisCrawlSpider):

    name = 'fbs_obj'

    # allowed_domains = ['www.xxx.com']

    # start_urls = ['http://www.xxx.com/']

    redis_key = 'sun'#可以被共享的调度器队列的名称

    link = LinkExtractor(allow=r'type=4&page=\d+')

    rules = (

        Rule(link, callback='parse_item', follow=True),

    )

    print(123)

    def parse_item(self, response):

        tr_list = response.xpath('//*[@id="morelist"]/div/table[2]//tr/td/table//tr')

        for tr in tr_list:

            title = tr.xpath('./td[2]/a[2]/@title').extract_first()

            status = tr.xpath('./td[3]/span/text()').extract_first()

            item = FbsproItem()

            item['title'] = title

            item['status'] = status

            print(title)

            yield item
settings.py
# -*- coding: utf-8 -*-

# Scrapy settings for fbsPro project

#

# For simplicity, this file contains only settings considered important or

# commonly used. You can find more settings consulting the documentation:

#

#     https://docs.scrapy.org/en/latest/topics/settings.html

#     https://docs.scrapy.org/en/latest/topics/downloader-middleware.html

#     https://docs.scrapy.org/en/latest/topics/spider-middleware.html

BOT_NAME = 'fbs_obj'

SPIDER_MODULES = ['fbs_obj.spiders']

NEWSPIDER_MODULE = 'fbs_obj.spiders'

# Crawl responsibly by identifying yourself (and your website) on the user-agent

#USER_AGENT = 'fbsPro (+http://www.yourdomain.com)'

USER_AGENT = 'Mozilla/5.0 (Windows NT 10.0; Win64; x64) AppleWebKit/537.36 (KHTML, like Gecko) Chrome/78.0.3904.97 Safari/537.36'

# Obey robots.txt rules

ROBOTSTXT_OBEY = False

# Configure maximum concurrent requests performed by Scrapy (default: 16)

CONCURRENT_REQUESTS = 2

# Configure a delay for requests for the same website (default: 0)

# See https://docs.scrapy.org/en/latest/topics/settings.html#download-delay

# See also autothrottle settings and docs

#DOWNLOAD_DELAY = 3

# The download delay setting will honor only one of:

#CONCURRENT_REQUESTS_PER_DOMAIN = 16

#CONCURRENT_REQUESTS_PER_IP = 16

# Disable cookies (enabled by default)

#COOKIES_ENABLED = False

# Disable Telnet Console (enabled by default)

#TELNETCONSOLE_ENABLED = False

# Override the default request headers:

#DEFAULT_REQUEST_HEADERS = {

#   'Accept': 'text/html,application/xhtml+xml,application/xml;q=0.9,*/*;q=0.8',

#   'Accept-Language': 'en',

#}

# Enable or disable spider middlewares

# See https://docs.scrapy.org/en/latest/topics/spider-middleware.html

#SPIDER_MIDDLEWARES = {

#    'fbsPro.middlewares.FbsproSpiderMiddleware': 543,

#}

# Enable or disable downloader middlewares

# See https://docs.scrapy.org/en/latest/topics/downloader-middleware.html

#DOWNLOADER_MIDDLEWARES = {

#    'fbsPro.middlewares.FbsproDownloaderMiddleware': 543,

#}

# Enable or disable extensions

# See https://docs.scrapy.org/en/latest/topics/extensions.html

#EXTENSIONS = {

#    'scrapy.extensions.telnet.TelnetConsole': None,

#}

# Configure item pipelines

# See https://docs.scrapy.org/en/latest/topics/item-pipeline.html

#ITEM_PIPELINES = {

#    'fbsPro.pipelines.FbsproPipeline': 300,

#}

# Enable and configure the AutoThrottle extension (disabled by default)

# See https://docs.scrapy.org/en/latest/topics/autothrottle.html

#AUTOTHROTTLE_ENABLED = True

# The initial download delay

#AUTOTHROTTLE_START_DELAY = 5

# The maximum download delay to be set in case of high latencies

#AUTOTHROTTLE_MAX_DELAY = 60

# The average number of requests Scrapy should be sending in parallel to

# each remote server

#AUTOTHROTTLE_TARGET_CONCURRENCY = 1.0

# Enable showing throttling stats for every response received:

#AUTOTHROTTLE_DEBUG = False

# Enable and configure HTTP caching (disabled by default)

# See https://docs.scrapy.org/en/latest/topics/downloader-middleware.html#httpcache-middleware-settings

#HTTPCACHE_ENABLED = True

#HTTPCACHE_EXPIRATION_SECS = 0

#HTTPCACHE_DIR = 'httpcache'

#HTTPCACHE_IGNORE_HTTP_CODES = []

#HTTPCACHE_STORAGE = 'scrapy.extensions.httpcache.FilesystemCacheStorage'

#指定管道

ITEM_PIPELINES = {

    'scrapy_redis.pipelines.RedisPipeline': 400

}

#指定调度器

# 增加了一个去重容器类的配置, 作用使用Redis的set集合来存储请求的指纹数据, 从而实现请求去重的持久化

DUPEFILTER_CLASS = "scrapy_redis.dupefilter.RFPDupeFilter"

# 使用scrapy-redis组件自己的调度器

SCHEDULER = "scrapy_redis.scheduler.Scheduler"

# 配置调度器是否要持久化, 也就是当爬虫结束了, 要不要清空Redis中请求队列和去重指纹的set。如果是True, 就表示要持久化存储, 就不清空数据, 否则清空数据

SCHEDULER_PERSIST = True

#指定redis

REDIS_HOST = '192.168.16.119'

REDIS_PORT = 6379
item.py
import scrapy

class FbsproItem(scrapy.Item):

    # define the fields for your item here like:

    title = scrapy.Field()

    status = scrapy.Field()
python爬虫--分布式爬虫的更多相关文章
- Python简单分布式爬虫
分布式爬虫采用主从模式.主从模式是指由一台主机作为控制节点,负责管理所有运行网络爬虫的主机(url管理器,数据存储器,控制调度器),爬虫只需要从控制节点哪里接收任务,并把新生成任务提交给控制节点.此次 ...
- python的分布式爬虫框架
scrapy + celery: Scrapy原生不支持js渲染,需要单独下载[scrapy-splash](GitHub - scrapy-plugins/scrapy-splash: Scrapy ...
- 初探爬虫 ——《python 3 网络爬虫开发实践》读书笔记
零.背景 之前在 node.js 下写过一些爬虫,去做自己的私人网站和工具,但一直没有稍微深入的了解,借着此次公司的新项目,体系的学习下. 本文内容主要侧重介绍爬虫的概念.玩法.策略.不同工具的列举和 ...
- 爬虫--Scrapy-CrawlSpider&基于CrawlSpide的分布式爬虫
CrawlSpider 提问:如果想要通过爬虫程序去爬取”糗百“全站数据新闻数据的话,有几种实现方法? 方法一:基于Scrapy框架中的Spider的递归爬取进行实现(Request模块递归回调par ...
- Python分布式爬虫原理
转载 permike 原文 Python分布式爬虫原理 首先,我们先来看看,如果是人正常的行为,是如何获取网页内容的. (1)打开浏览器,输入URL,打开源网页 (2)选取我们想要的内容,包括标题,作 ...
- 基于Python,scrapy,redis的分布式爬虫实现框架
原文 http://www.xgezhang.com/python_scrapy_redis_crawler.html 爬虫技术,无论是在学术领域,还是在工程领域,都扮演者非常重要的角色.相比于其他 ...
- 纯手工打造简单分布式爬虫(Python)
前言 这次分享的文章是我<Python爬虫开发与项目实战>基础篇 第七章的内容,关于如何手工打造简单分布式爬虫 (如果大家对这本书感兴趣的话,可以看一下 试读样章),下面是文章的具体内容. ...
- python 全栈开发,Day140(RabbitMQ,基于scrapy-redis实现分布式爬虫)
一.RabbitMQ 队列 在生产者消费模型中,比如去餐馆吃饭的例子.生产者相当于厨师,队列相当于服务员,消费者就是你. 我们必须通过服务员,才能吃饭! 如果队列满了,队列会一直hold住.必须让消费 ...
- 第三百七十二节,Python分布式爬虫打造搜索引擎Scrapy精讲—scrapyd部署scrapy项目
第三百七十二节,Python分布式爬虫打造搜索引擎Scrapy精讲—scrapyd部署scrapy项目 scrapyd模块是专门用于部署scrapy项目的,可以部署和管理scrapy项目 下载地址:h ...
随机推荐
- PL真有意思(二):程序设计语言语法
前言 虽然标题是程序语言的语法,但是讲的是对词法和语法的解析,其实关于这个前面那个写编译器系列的描述会更清楚,有关语言语法的部分应该是穿插在整个设计当中的,也看语言设计者的心情了 和英语汉语这些自然语 ...
- HDFS之NameNode
NameNode&Secondary NameNode工作机制 1)第一阶段:namenode启动 (1)第一次启动namenode格式化后,创建fsimage和edits文件.如果不是第一次 ...
- SSM框架整合 详细步骤(备注) 附源码
整合思路 将工程的三层结构中的JavaBean分别使用Spring容器(通过XML方式)进行管理. 整合持久层mapper,包括数据源.会话工程及mapper代理对象的整合: 整合业务层Service ...
- 第三个视频作品《小白快速入门greenplum》上线了
1.场景描述 第三个视频作品出炉了,<小白快速入门greenplum>上线了,有需要的朋友可以直接点击链接观看.(如需购买,请通过本文链接购买) 2. 课程内容 课程地址:https:// ...
- es5设置属性不能修改
/*es5*/ { var Person ={ name:'es5', age:19 } Object.defineProperty(Person,'sex',{ writable:false, va ...
- 影响ES相关度算分的因素
相关性算分 指文档与查询语句间的相关度,通过倒排索引可以获取与查询语句相匹配的文档列表 如何将最符合用户查询需求的文档放到前列呢? 本质问题是一个排序的问题,排序的依据是相关性算分,确定倒排索引哪 ...
- Linux01机和Linux02机的切换 和秘钥的配置
先试一下 01机和02机是否可以切换成功 使用 ssh root@ip地址 输入密码 ifconfig查看ip是否正确 切换回01机 01机配置的秘钥 查看隐形文件 01机配置秘钥 输入 ssh-c ...
- Android ListView的header footer设置visibility gone不起作用
常用的ViewGroup,例如LinearLayout,在onMeasure方法内对每个child view执行measure前,会判断child view的visibility是否为gone.如果是 ...
- NSAttributedString可以强制转换为NSMutableAttributedString类型吗?下面这代码有什么问题 为什么报错
-(void)insetEmotion:(EmotionModel*)emotionModel{ if(emotionModel.code){ /** 在TextView中插入图片首选要知道光标的位置 ...
- Java学习笔记(面向对象上)
面向对象(上) 面向对象的特点:封装性(是面向对象的核心思想,将对象的属性和行为封装起来).继承性(主要描述类与类之间的关系,通过继承,可以在无需重新编写原有类的情况下,对原有类的功能进行扩展)和多态 ...