React Native 开发豆瓣评分(七)首页组件开发
首页内容拆分
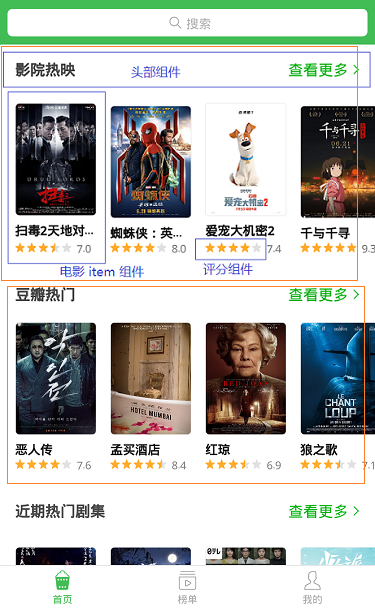
看效果图,首页由热门影院、豆瓣热门、热门影视等列表组成,每个列表又由头加横向滑动的 电影海报列表构成。
所以可以先把页面的电影海报、评分、列表头做成组件,然后在使用 ScrollView 将内容包裹即可构成首页。
开发头部组件
头部组件结构简单,唯一需要注意的就是点击查看更多的时候需要跳转页面,所有需要一个自定义事件,供页面使用。
在 src 目录创建 itemsHeader.js,内容如下:
import { Text, View, StyleSheet, TouchableWithoutFeedback } from 'react-native';

import PropTypes from 'prop-types';

import { px } from '../utils/device';

import Icon from 'react-native-vector-icons/AntDesign';

export default class ItemsHeader extends Component {

    constructor(props) {

        super(props);

    }

    static propTypes = {

        title: PropTypes.string,

        onPress: PropTypes.func

    }

    static defaultProps = {}

    render() {

        const { title, onPress } = this.props;

        return (

            <View style={styles.header}>

                <Text style={styles.title}>{title}</Text>

                <TouchableWithoutFeedback onPress={() => onPress && onPress()}>

                    <View style={styles.getMore}>

                        <Text style={styles.moreText}>查看更多</Text>

                        <Icon name='right' size={px(30)} color='#00b600'></Icon>

                    </View>

                </TouchableWithoutFeedback>

            </View>

        )

    }

}

const styles = StyleSheet.create({

    header: {

        height: px(90),

        width: px(750),

        paddingLeft: px(30),

        paddingRight: px(30),

        backgroundColor: '#ffffff',

        flexDirection: 'row',

        alignItems: 'center',

        justifyContent: 'space-between'

    },

    title: {

        fontSize: px(32),

        color: '#333',

        fontWeight: '600'

    },

    getMore: {

        flexDirection: 'row',

        alignItems: 'center',

    },

    moreText: {

        fontSize: px(28),

        marginLeft: px(30),

        color: '#00b600',

        marginRight: px(6)

    }

});
开发评分组件
评分组件需要考虑到星星大小、间距、颜色、数量,点击星星时改变星星的选中状态,并返回自定义事件 onPress 供调用者使用。
如果使用组件时调用了onPress,那么组件的值为可以改变,如果没有,那么组件应该为只读状态。
import React, { Component } from 'react';

import { Text, View, StyleSheet } from 'react-native';

import PropTypes from 'prop-types';

import { px } from '../utils/device';

import Icon from 'react-native-vector-icons/AntDesign';

export default class Rate extends Component {

    constructor(props) {

        super(props);

        this.state = {

            value: this.props.value

        }

    }

    componentWillReceiveProps(newProps) {

        const { value } = newProps;

        if (value !== this.state.value) {

            this.setState({

                value

            });

        }

    }

    static propTypes = {//如果使用组件时调用了onPress,那么组件默认为可以改变,如果没有,那么组件应该为只读

        value: PropTypes.number,

        size: PropTypes.number,

        margin: PropTypes.number,

        max: PropTypes.number,

        color: PropTypes.string,

        onPress: PropTypes.func

    }

    static defaultProps = {

        value: 0,

        size: 20,

        margin: 5,

        max: 5,

        color: '#00b600'

    }

    bindClick = (index) => {

        const { onPress } = this.props;

        if (!onPress) {

            return;

        }

        onPress(index + 1);

        this.setState({

            value: index + 1

        })

    }

    render() {

        const { size, margin, max, color, onPress } = this.props;

        const { value } = this.state;

        const defaultStars = [], activeStars = [];

        for (let i = 0; i < max; i++) {

            defaultStars.push(<Icon name='star' key={i} size={size} color='#ececec' onPress={() => this.bindClick(i)} style={{ marginRight: margin }}></Icon>)

        }

        for (let i = 0; i < value; i++) {

            activeStars.push(<Icon name='star' key={i} size={size} color={color} onPress={() => this.bindClick(i)} style={{ marginRight: margin }}></Icon>)

        }

        // 选中状态的星星的宽度

        const activeStarsWidth = (size + margin) * Math.floor(value) + size * (value - Math.floor(value));

        return (

            <View style={styles.rate}>

                <View style={[styles.stars, styles.active, { width: activeStarsWidth }]}>

                    {activeStars.map(item => item)}

                </View>

                <View style={styles.stars}>

                    {defaultStars.map(item => item)}

                </View>

            </View>

        )

    }

}

const styles = StyleSheet.create({

    rates: {

        flexDirection: 'row',

        position: 'relative'

    },

    stars: {

        flexDirection: 'row',

        alignItems: 'center',

        overflow: 'hidden',

        flexGrow: 0

    },

    active: {

        position: 'absolute',

        zIndex: 200,

        left: 0,

        top: 0

    }

});
开发电影海报组件
海报组件开发需要注意的是:
点击电影海报,跳转详情页面,跳转逻辑都是一样的,所以可以不用自定义事件的方式跳转,直接在组件里面调用 this.props.navigation.push 进行跳转。页面在 router 里注册后可以直接使用 this.props.navigation.push,但是组件不行。在组件中,想要使用 navigation 进行跳转,要么是使用自定义属性,将 navigation 传入组件,要么使用 react-navigation 提供的 withNavigation翻翻,withNavigation(component) 返回一个 render 函数,默认将 navigation 作出自定义属性传入组件。
有些海报图片背景纯白,和页面背景融合了,看不到边界,所以需要给他设置 border,由于 Image 组件不能设置 border,所以这里需要使用 ImageBackground 组件。
title 只能为一行,产出部分省略,需要加一个 numberOfLines={1} 的属性。
import React, { Component } from 'react';

import { Text, View, StyleSheet, ImageBackground, TouchableWithoutFeedback } from 'react-native';

import PropTypes from 'prop-types';

import { withNavigation } from 'react-navigation';

import { px } from '../utils/device';

import Rate from './rate';

class MoviesItem extends Component {

    constructor(props) {

        super(props);

    }

    static propTypes = {

        data: PropTypes.object

    }

    render() {

        const { data, navigation } = this.props;

        const { id, title, cover, rating, null_rating_reason } = data;

        return (

            <TouchableWithoutFeedback onPress={() => navigation.push('Detail', { id })}>

                <View style={styles.page}>

                    <ImageBackground source={{ uri: cover.url }} style={styles.img}></ImageBackground>

                    <Text style={styles.title} numberOfLines={1}>{title}</Text>

                    {rating ? (

                        <View style={styles.rate}>

                            <Rate value={rating.value / 2} size={px(20)} margin={px(4)} />

                            <Text style={styles.rateText}>{rating.value.toFixed(1)}</Text>

                        </View>

                    ) : (

                        <Text style={styles.rate}>{null_rating_reason}</Text>

                    )}

                </View>

            </TouchableWithoutFeedback>

        )

    }

}

export default withNavigation(MoviesItem);

const styles = StyleSheet.create({

    page: {

        width: px(160)

    },

    img: {

        width: px(160),

        height: px(224),

        overflow: 'hidden',

        borderRadius: px(8),

        borderWidth: 1,

        borderStyle: 'solid',

        borderColor: '#f8f8f8'

    },

    title: {

        fontSize: px(28),

        fontWeight: '600',

        color: '#333',

        marginTop: px(12),

        lineHeight: px(40)

    },

    rate: {

        flexDirection: 'row',

        alignItems: 'center'

    },

    rateText: {

        fontSize: px(24),

        color: '#999',

        marginLeft: px(6)

    }

});
使用

React Native 开发豆瓣评分(七)首页组件开发的更多相关文章
- Facebook新框架React Native,一套搞定App开发[转]
Facebook新框架React Native,一套搞定App开发 本文来自微信公众号“给产品经理讲技术”(pm_teacher),欢迎关注. 做为一名产品经理,你是否遇到过这样的窘境,“帮我把字体调 ...
- 基于React Native的Material Design风格的组件库 MRN
基于React Native的Material Design风格的组件库.(为了平台统一体验,目前只打算支持安卓) 官方网站 http://mrn.js.org/ Github https://git ...
- [RN] React Native 好用的时间线 组件
React Native 好用的时间线 组件 效果如下: 实现方法: 一.组件封装 CustomTimeLine.js "use strict"; import React, {C ...
- React Native 开发豆瓣评分(八)首页开发
首页完成效果展示: 一.开发占位图组件 在没有数据的时候使用占位图替代 items 的位置. 在 components 目录里创建 moviesItemPlaceholder.js import Re ...
- React Native 开发豆瓣评分(三)集成 Redux
什么是 redux redux 是一个用于管理 js 应用状态(state)的容器.比如组件 A 发生了变化,组件 B 要同时做出响应.常见的应用场景就是用户的登录退出操作:未登录状态,个人中心显示登 ...
- React Native 开发豆瓣评分(五)屏幕适配方案
前言 React Native 是以实际像素 dp 为单位的,这导致在不同分辨率的屏幕会有不一样的显示情况. 在原生 Android 中,可以根据不同的分辨率添加不同的样式目录,以解决不同分辨率的问题 ...
- React Native 开发豆瓣评分(四)集中管理 fetch 数据请求
豆瓣评分的API接口 接口是从网上查找的,看样子应该是微信小程序里面扣出来的(ua 里面有 wechatdevtools) 接口都需要设置apiKey(054022eaeae0b00e0fc068c0 ...
- React Native 开发豆瓣评分(二)路由配置
路由管理使用官方推荐的 React Navigation; 配置环境 安装相关依赖 yarn add react-navigation react-native-gesture-handler Lin ...
- React Native 开发豆瓣评分(一)环境搭建&配置模拟器
详细可参考 官方文档,这里进记录一些重要过程. 安装环境 下载 Android Studio 选择 Custom 进行安装: Android SDK Android SDK Platform Perf ...
随机推荐
- iOS逆向必备绝技之ipa重签名
一.重签名准备工作: 找到开发者证书和配置文件: 列出所有开发者证书文件: security find-identity -p codesigning -v 找一个开发环境配置文件生成entitlem ...
- 运维笔记--ubuntu系统卸载指定版本的python
1.卸载python3.5(指定相应的版本就可以,例:python2.7,下同) sudo apt-get remove --purge python3.5 2.完全卸载python3.5及其依赖软件 ...
- 如何用 Go 实现热重启
热重启 热重启(Zero Downtime),指新老进程无缝切换,在替换过程中可保持对 client 的服务. 原理 父进程监听重启信号 在收到重启信号后,父进程调用 fork ,同时传递 socke ...
- 为什么JDK代码这样写?final ReentrantLock takeLock = this.takeLock
在CopyOnWriteArrayList的源码中有一个细节值得学习,就是在addIfAbsent方法中ReentrantLock的用法,先是将一个这个成员变量this.lock重新赋值给一个局部变量 ...
- matlab学习笔记12_3串联结构体,按属性创建含有元胞数组的结构体,filenames,isfield,isstruct,orderfields
一起来学matlab-matlab学习笔记12 12_3 结构体 串联结构体,按属性创建含有元胞数组的结构体,filenames,isfield,isstruct,orderfields 觉得有用的话 ...
- Redist的主从配置
Redis的主从复制一般用来在线备份和读写分离,提高服务器的负载能力.主数据库主要进行写操作,而从数据库负责读操作. 主从的配置: 主节点: [root@master ~]# grep -v -E & ...
- 双写mq后碰到没有消费问题记录
上周双写mq后碰到遇到个问题,mq双写的一台机器有produce,另一台一直没有,但是有的那台机器没有消费者,导致另一个服务 一直没有可以消费的mq.原因是 mq在双写初始化配置的时候两个类文件重复了 ...
- 使用 Alibaba 的 Homebrew 镜像源进行加速
使用 Alibaba 的 Homebrew 镜像源进行加速 平时我们执行 brew 命令安装软件的时候,跟以下 3 个仓库地址有关: brew.git homebrew-core.git homebr ...
- Mac下进入MySQL命令行
/usr/local/MySQL/bin/mysql -u root -p 其中,root为数据库用户名
- VM无法正常使用桥接模式获取IP上网
问题: 有时候会遇到VM使用桥接模式时无法正常获取IP的情况 原因: 初步怀疑是因为你的电脑是双网卡 解决方法: 这时候,就需要修改VM的虚拟网络编辑器的配置 解决步骤: 编辑->虚拟网络编辑器 ...