ActiveMQ2
非持久的Topic消息示例
对于非持久的Topic消息的发送
基本跟前面发送队列信息是一样的,只是把创建Destination的地方,由创建队列替换成创建Topic,例如:
Destination destination = session.createTopic("MyTopic");
对于非持久的Topic消息的接收
1:必须要接收方在线,然后客户端再发送信息,接收方才能接收到消息
2:同样把创建Destination的地方,由创建队列替换成创建Topic,例如:
Destination destination = session.createTopic("MyTopic");
3:由于不知道客户端发送多少信息,因此改成while循环的方式了,例如:
Message message = consumer.receive();

while(message!=null) {

  TextMessage txtMsg = (TextMessage)message;

  System.out.println("收到消 息:" + txtMsg.getText());

  message = consumer.receive(1000L);

}
消息的生产者:
public class NoPersistenceSender {

    //默认连接用户名

    private static final String USERNAME = ActiveMQConnection.DEFAULT_USER;

    //默认连接密码

    private static final String PASSWORD = ActiveMQConnection.DEFAULT_PASSWORD;

    //默认连接地址

    private static final String BROKEURL = "tcp://192.168.0.129:61616";

    //发送的消息数量

    private static final int SENDNUM = 10;

    public static void main(String[] args) {

        //连接工厂

        ConnectionFactory connectionFactory;

        //连接

        Connection connection = null;

        //会话 接受或者发送消息的线程

        Session session;

        //消息的目的地

        Destination destination;

        //消息生产者

        MessageProducer messageProducer;

        //实例化连接工厂(连接到ActiveMQ服务器)

        connectionFactory = new ActiveMQConnectionFactory(NoPersistenceSender.USERNAME,

                NoPersistenceSender.PASSWORD, NoPersistenceSender.BROKEURL);

        try {

            //通过连接工厂获取连接

            connection = connectionFactory.createConnection();

            //启动连接

            connection.start();

            //创建session

            session = connection.createSession(Boolean.TRUE, Session.AUTO_ACKNOWLEDGE);

            //创建一个名称为MyTopic的消息队列(生产者生成的消息放在哪)

            destination = session.createTopic("MyTopic");

            //创建消息生产者

            messageProducer = session.createProducer(destination);

            //发送消息

            sendMessage(session, messageProducer);

            session.commit();

        } catch (Exception e) {

            e.printStackTrace();

        } finally {

            if (connection != null) {

                try {

                    connection.close();

                } catch (JMSException e) {

                    e.printStackTrace();

                }

            }

        }

    }

    /**

     * 发送消息

     *

     * @param session

     * @param messageProducer 消息生产者

     * @throws Exception

     */

    public static void sendMessage(Session session, MessageProducer messageProducer) throws Exception {

        for (int i = 0; i < NoPersistenceSender.SENDNUM; i++) {

            //创建一条文本消息

            TextMessage message = session.createTextMessage("ActiveMQ 发送消息" + i);

            System.out.println("发送消息:Activemq 发送消息" + i);

            //通过消息生产者发出消息

            messageProducer.send(message);

        }

    }

}
消息的消费者:
public class NoPersistenceReceiver {

    //默认连接用户名

    private static final String USERNAME = ActiveMQConnection.DEFAULT_USER;

    //默认连接密码

    private static final String PASSWORD = ActiveMQConnection.DEFAULT_PASSWORD;

    //默认连接地址

    private static final String BROKEURL = "tcp://192.168.0.129:61616";

    public static void main(String[] args) {

        ConnectionFactory connectionFactory;//连接工厂

        Connection connection = null;//连接

        Session session;//会话 接受或者发送消息的线程

        Destination destination;//消息的目的地

        MessageConsumer messageConsumer;//消息的消费者

        //实例化连接工厂(连接到ActiveMQ服务器)

        connectionFactory = new ActiveMQConnectionFactory(NoPersistenceReceiver.USERNAME,

                NoPersistenceReceiver.PASSWORD, NoPersistenceReceiver.BROKEURL);

        try {

            //通过连接工厂获取连接

            connection = connectionFactory.createConnection();

            //启动连接

            connection.start();

            //创建session

            session = connection.createSession(Boolean.TRUE, Session.AUTO_ACKNOWLEDGE);

            //生产者将消息发送到MyTopic,所以消费者要到MyTopic去取

            destination = session.createTopic("MyTopic");

            //创建消息消费者

            messageConsumer = session.createConsumer(destination);

            //Message message = messageConsumer.receive();

            //while (message != null) {

                //TextMessage txtMsg = (TextMessage) message;

                //System.out.println("收到消息:" + txtMsg.getText());

                //message = messageConsumer.receive(1000L);

                //session.commit();

            //}

            Message message = messageConsumer.receive();

            while (message != null) {

                TextMessage txtMsg = (TextMessage) message;

                System.out.println("收到消 息:" + txtMsg.getText());

                //没这句有错

                message = messageConsumer.receive(1000L);

            }

            session.commit();

            session.close();

            connection.close();

        } catch (JMSException e) {

            e.printStackTrace();

        }

    }

}
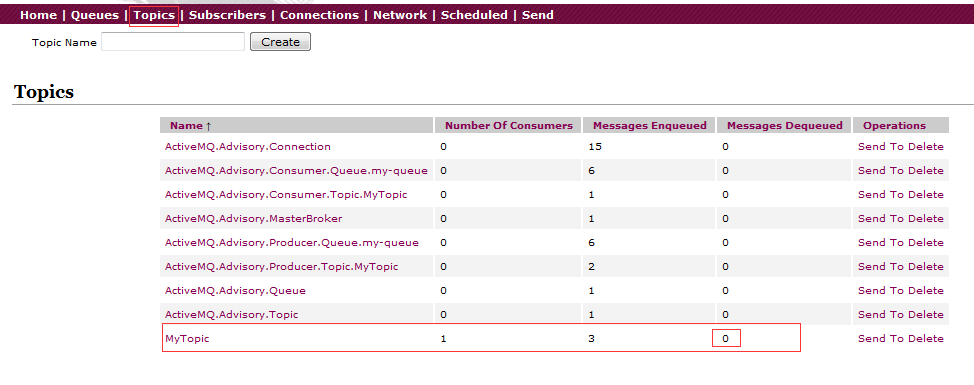
首先运行运行生产者(消费者处于费运行状态),然后运行消费者:
此时再次运行一下生产者(消费者处于开启状态)
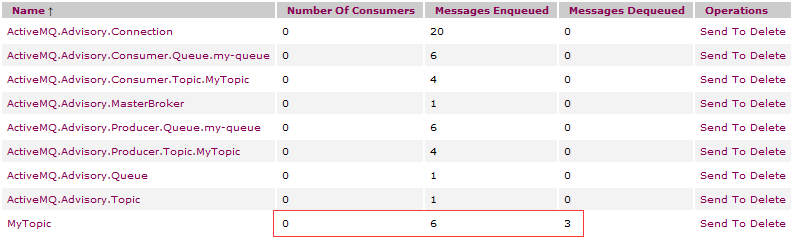
结论:必须要接收方在线,然后客户端再发送信息,接收方才能接收到消息
持久的Topic消息示例
对于持久的Topic消息的发送
1:要用持久化订阅,发送消息者要用 DeliveryMode.PERSISTENT 模式发现,在连接之前设定
2:一定要设置完成后,再start 这个 connection
对于持久的Topic消息的接收
1:需要在连接上设置消费者id,用来识别消费者
2:需要创建TopicSubscriber来订阅
3:要设置好了过后再start 这个 connection
4:一定要先运行一次,等于向消息服务中间件注册这个消费者,然后再运行客户端发送信息,这个时候,
无论消费者是否在线,都会接收到,不在线的话,下次连接的时候,会把没有收过的消息都接收下来
生产者:
public class PersistenceSender {

    //默认连接用户名

    private static final String USERNAME = ActiveMQConnection.DEFAULT_USER;

    //默认连接密码

    private static final String PASSWORD = ActiveMQConnection.DEFAULT_PASSWORD;

    //默认连接地址

    private static final String BROKEURL = "tcp://192.168.0.129:61616";

    //发送的消息数量

    private static final int SENDNUM = 10;

    public static void main(String[] args) {

        //连接工厂

        ConnectionFactory connectionFactory;

        //连接

        Connection connection = null;

        //会话 接受或者发送消息的线程

        Session session;

        //消息的目的地

        Destination destination;

        //消息生产者

        MessageProducer messageProducer;

        //实例化连接工厂(连接到ActiveMQ服务器)

        connectionFactory = new ActiveMQConnectionFactory(PersistenceSender.USERNAME,

                PersistenceSender.PASSWORD, PersistenceSender.BROKEURL);

        try {

            //通过连接工厂获取连接

            connection = connectionFactory.createConnection();

            //创建session

            session = connection.createSession(Boolean.TRUE, Session.AUTO_ACKNOWLEDGE);

            //创建一个名称为MyTopic的消息队列(生产者生成的消息放在哪)

            destination = session.createTopic("MyTopic1");

            //创建消息生产者

            messageProducer = session.createProducer(destination);

            messageProducer.setDeliveryMode(DeliveryMode.PERSISTENT);

            //启动连接

            connection.start();

            //发送消息

            sendMessage(session, messageProducer);

            session.commit();

        } catch (Exception e) {

            e.printStackTrace();

        } finally {

            if (connection != null) {

                try {

                    connection.close();

                } catch (JMSException e) {

                    e.printStackTrace();

                }

            }

        }

    }

    /**

     * 发送消息

     *

     * @param session

     * @param messageProducer 消息生产者

     * @throws Exception

     */

    public static void sendMessage(Session session, MessageProducer messageProducer) throws Exception {

        for (int i = 0; i < PersistenceSender.SENDNUM; i++) {

            //创建一条文本消息

            TextMessage message = session.createTextMessage("ActiveMQ 发送消息" + i);

            System.out.println("发送消息:Activemq 发送消息" + i);

            //通过消息生产者发出消息

            messageProducer.send(message);

        }

    }

}
消费者:
public class PersistenceReceiver {

    //默认连接用户名

    private static final String USERNAME = ActiveMQConnection.DEFAULT_USER;

    //默认连接密码

    private static final String PASSWORD = ActiveMQConnection.DEFAULT_PASSWORD;

    //默认连接地址

    private static final String BROKEURL = "tcp://192.168.0.129:61616";

    public static void main(String[] args) {

        ConnectionFactory connectionFactory;//连接工厂

        Connection connection = null;//连接

        Session session;//会话 接受或者发送消息的线程

        Topic topic;//消息的目的地

        //实例化连接工厂(连接到ActiveMQ服务器)

        connectionFactory = new ActiveMQConnectionFactory(PersistenceReceiver.USERNAME,

                PersistenceReceiver.PASSWORD, PersistenceReceiver.BROKEURL);

        try {

            //通过连接工厂获取连接

            connection = connectionFactory.createConnection();

            connection.setClientID("winner_0715");

            //创建session

            session = connection.createSession(Boolean.TRUE, Session.AUTO_ACKNOWLEDGE);

            //生产者将消息发送到MyTopic,所以消费者要到MyTopic去取

            topic = session.createTopic("MyTopic1");

            //创建消息消费者

            TopicSubscriber consumer = session.createDurableSubscriber(topic, "t1");

            //启动连接

            connection.start();

            Message message = consumer.receive();

            while (message != null) {

                TextMessage txtMsg = (TextMessage) message;

                System.out.println("收到消 息:" + txtMsg.getText());

                //没这句有错

                message = consumer.receive(1000L);

            }

            session.commit();

            session.close();

            connection.close();

        } catch (JMSException e) {

            e.printStackTrace();

        }

    }

}
消费者需要先运行一次,注册~
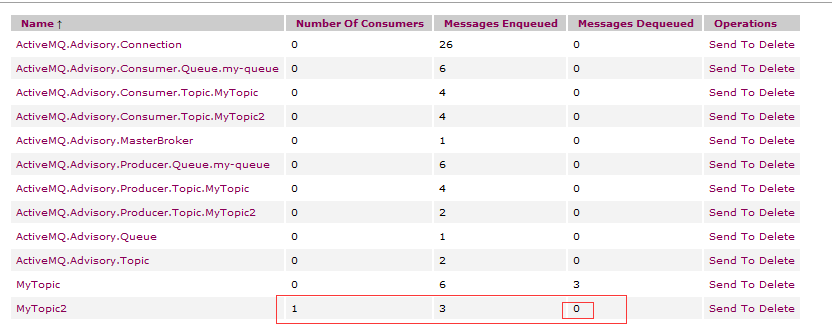
因为是持久消息,所以还会有别的订阅者,所以是0
关于持久化和非持久化消息
持久化消息
这是 ActiveMQ 的默认传送模式,此模式保证这些消息只被传送一次和成 功使用一次。对于这些消息,可靠性是优先考虑的因素。可靠性的另一个重要方面是确保持久性消
息传送至目标后,消息服务在向消费者传送它们之前不会丢失这些消息。这意味着在持久性消息传送至目标时,消息服务将其放入持久性数据存储。如果消息服务由于某种原因导致失败,它可以恢复此消息并将此消息传送至相应的消费者。虽然这样增加了消息传送的开销,但却增加了可靠性。
非持久化消息
保证这些消息最多被传送一次。对于这些消息,可靠性并非主要的考虑因素。 此模式并不要求持久性的数据存储,也不保证消息服务由于某种原因导致失败后消息不会丢失。 有两种方法指定传送模式:
1.使用setDeliveryMode 方法,这样所有的消息都采用此传送模式; 如:
producer.setDeliveryMode(DeliveryMode.NON_PERSISTENT);
2.使用send 方法为每一条消息设置传送模式
ActiveMQ2的更多相关文章
- activeMq-2 高可用以及集群搭建
Activemq 的集群方法可以有多种实现方式,我们这里使用zookeeper来实现 要搭建集群,请确保已经搭建好zookeeper环境.这里不再演示. 基本原理: 使用ZooKeeper(集群)注册 ...
- ActiveMQ笔记(4):搭建Broker集群(cluster)
上一篇介绍了基于Networks of Borkers的2节点HA方案,这一篇继续来折腾Networks of Brokers,当应用规模日渐增长时,2节点的broker可能仍然抗不住访问压力,这时候 ...
- ActiveMQ笔记(3):基于Networks of Brokers的HA方案
上一篇介绍了基于ZK的ActiveMQ HA方案,虽然理解起来比较容易,但是有二个不足: 1) 占用的节点数过多,1个zk集群至少3个节点,1个activemq集群也至少得3个节点,但其实正常运行时 ...
- ActiveMQ笔记(2):基于ZooKeeper的HA方案
activemq官网给出了3种master/slave的HA方案,详见:http://activemq.apache.org/masterslave.html,基于共享文件目录,db,zookeepe ...
- ActiveMQ启动多个broker
具体步骤如下: 1.把activemq目录下的conf文件复制一份,叫做conf2, 命令: cp -r conf conf2 2.修改conf2目录下的activemq.xml文件 a.修改brok ...
- ActiveMQ: 搭建Broker集群(cluster)
上一篇介绍了基于Networks of Borkers的2节点HA方案,这一篇继续来折腾Networks of Brokers,当应用规模日渐增长时,2节点的broker可能仍然抗不住访问压力,这时候 ...
- ActiveMQ主从配置
这种方式有个问题,activemq1有消息没消费完但是突然宕机,虽然程序会自动连到activemq2.但是activemq1的消息只有等机器恢复后才会被消费. 1.启动:我这里使用的是apache-a ...
- 基于Networks of Brokers的HA方案
上一篇介绍了基于ZK的ActiveMQ HA方案,虽然理解起来比较容易,但是有二个不足: 1) 占用的节点数过多,1个zk集群至少3个节点,1个activemq集群也至少得3个节点,但其实正常运行时 ...
- ActiveMQ系列之四:用ActiveMQ构建应用
Broker:相当于一个ActiveMQ服务器实例 命令行启动参数示例如下: 1:activemq start :使用默认的activemq.xml来启动 2:activemq start xbean ...
随机推荐
- scala安装
一:在官网下载相应的版本http://www.scala-lang.org/download/2.10.6.html 二,在linux中解压下载下来的scala包 三:配置环境变量 export ...
- 【Java EE 学习 16 下】【dbutils的使用方法】
一.为什么要使用dbutils 使用dbutils可以极大程度的简化代码书写,使得开发进度更快,效率更高 二.dbutils下载地址 http://commons.apache.org/proper/ ...
- RabbitMQ的几种典型使用场景
RabbitMQ主页:https://www.rabbitmq.com/ AMQP AMQP协议是一个高级抽象层消息通信协议,RabbitMQ是AMQP协议的实现.它主要包括以下组件: 1.Serve ...
- 高性能PHP框架thinkphp5.0.0 Beta发布-为API开发而设计
ThinkPHP V5.——为API开发而设计的高性能框架 ThinkPHP5..0版本是一个颠覆和重构版本,采用全新的架构思想,引入了很多的PHP新特性,优化了核心,减少了依赖,实现了真正的惰性加载 ...
- Struts2 回顾总结
1.第一个Struts2入门案例 1.找jar包 Struts2-core xwork-core ognl javasist freemarker commons-lang commons-io co ...
- 自动生成V字型
<!DOCTYPE html><html> <head> <meta charset="UTF-8"> <title>& ...
- python 线程之 threading(四)
python 线程之 threading(三) http://www.cnblogs.com/someoneHan/p/6213100.html中对Event做了简单的介绍. 但是如果线程打算一遍一遍 ...
- windows查看端口占用情况
1,查看指定端口被哪个进程占用. >netstat -ano|findstr 8008 TCP 127.0.0.1:8083 0.0.0.0:0 ...
- 关于MFi认证你所必须要知道的事情
MFiLogo 前面我写了一篇文章<iOS App连接外设的几种方式>,其中EAP和NCM是都需要做MFi认证.对于苹果的MFI认证,对iOS开发的同学来说其实是一个比较陌生并且繁琐的to ...
- 将公司的主要项目从eclipse迁移到android studio for mac环境(2)
1.将eclipse 的 代码迁移到android studio的过程中,现在已经有了一个未优化版本能够在android studio使用,这时候,只需要将已优化版本的代码中的libs res s ...