LNMP分离式部署实例[转]
很多人在练习部署LNMP环境的时候,大都数是部署在同一个虚拟机上面的。但是实际工作中,我们一般都是分离部署的。
今天我就用3台虚拟机,部署下LNMP环境。以供参考!
网络拓扑图:

首先准备3台虚拟机:
nginx:192.168.1.214
php:192.168.1.202
mysql:192.168.1.217
首先安装ngix(192.168.1.214):
|
1
2
3
4
5
6
7
8
9
10
11
12
13
|
#解决依赖 yum install -y gcc,openssl-devel,pcre-devel,zilb-devel pcre-devel #关闭防火墙和修改selinux service iptables stop chkconfig iptables off sed -i's#SELINUX=enforcing#SELINUX=disabled#g' /etc/selinux/config |
|
1
2
3
4
5
6
7
8
9
10
11
12
13
14
15
16
17
18
19
20
21
22
23
24
25
26
|
#添加一个nginx用户 [root@nginx ~]# groupadd -g 108 -r nginx [root@nginx ~]# useradd -u 108 -r -g 108 nginx [root@nginx ~]# tar zxvf nginx-1.6.0.tar.gz [root@nginx ~]# cd nginx-1.6.0 [root@nginx ~]# ./configure --prefix=/usr/local/ --sbin-path=/usr/sbin/nginx/ --conf-path=/etc/nginx/nginx.conf/ --error-log-path=/var/log/nginx/error.log/ --http-log-path=/var/log/nginx/access.log/ --pid-path=/var/run/nginx/nginx.pid/ --lock-path=/var/lock/nginx.lock/ --user=nginx/ --group=nginx/ --with-http_ssl_module/ --with-http_flv_module/ --with-http_stub_status_module/ --with-http_gzip_static_module/ --http-client-body-temp-path=/var/tmp/nginx/client/ --http-proxy-temp-path=/var/tmp/nginx/proxy/ --http-fastcgi-temp-path=/var/tmp/nginx/fcgi/ --http-uwsgi-temp-path=/var/tmp/nginx/uwsgi/ --http-scgi-temp-path=/var/tmp/nginx/scgi/ --with-pcre make && make install |
nginx启动脚本:
|
1
2
3
4
5
6
7
8
9
10
11
12
13
14
15
16
17
18
19
20
21
22
23
24
25
26
27
28
29
30
31
32
33
34
35
36
37
38
39
40
41
42
43
44
45
46
47
48
49
50
51
52
53
54
55
56
57
58
59
60
61
62
63
64
65
66
67
68
69
70
71
72
73
74
75
76
77
78
79
80
81
82
83
84
85
86
87
88
89
90
91
92
93
94
95
96
97
98
99
|
[root@nginx ~]# cat /etc/init.d/nginx#!/bin/sh # config: /etc/nginx/nginx.conf # config: /etc/sysconfig/nginx # pidfile: /var/run/nginx.pid # Check that networking is up. [ "$NETWORKING" = "no" ] && exit 0 nginx="/usr/sbin/nginx" prog=$(basename $nginx) NGINX_CONF_FILE="/etc/nginx/nginx.conf" [ -f /etc/sysconfig/nginx ] && . /etc/sysconfig/nginx lockfile=/var/lock/subsys/nginx make_dirs() { # make required directories user=`nginx -V 2>&1 | grep "configure arguments:" | sed 's/[^*]*--user=\([^ ]*\).*/\1/g' -` options=`$nginx -V 2>&1 | grep 'configure arguments:'` for opt in $options; do if [ `echo $opt | grep '.*-temp-path'` ]; then value=`echo $opt | cut -d "=" -f 2` if [ ! -d "$value" ]; then # echo "creating" $value mkdir -p $value && chown -R $user $value fi fi done } start() { [ -x $nginx ] || exit 5 [ -f $NGINX_CONF_FILE ] || exit 6 make_dirs echo -n $"Starting $prog: " daemon $nginx -c $NGINX_CONF_FILE retval=$? echo [ $retval -eq 0 ] && touch $lockfile return $retval } stop() { echo -n $"Stopping $prog: " killproc $prog -QUIT retval=$? echo [ $retval -eq 0 ] && rm -f $lockfile return $retval } restart() { configtest || return $? stop sleep 1 start } reload() { configtest || return $? echo -n $"Reloading $prog: " killproc $nginx -HUP RETVAL=$? echo } force_reload() { restart } configtest() { $nginx -t -c $NGINX_CONF_FILE } rh_status() { status $prog } rh_status_q() { rh_status >/dev/null 2>&1 } case "$1" in start) rh_status_q && exit 0 $1 ;; stop) rh_status_q || exit 0 $1 ;; restart|configtest) $1 ;; reload) rh_status_q || exit 7 $1 ;; force-reload) force_reload ;; status) rh_status ;; condrestart|try-restart) rh_status_q || exit 0 ;; *) echo $"Usage: $0 {start|stop|status|restart|condrestart|try-restart|reload|force-reload|configtest}" exit 2 esac |
添加执行权限:
|
1
2
3
4
5
6
7
8
9
10
11
12
13
|
[root@nginx ~]# chmod +x /etc/init.d/nginx#添加脚本到开机启动项[root@nginx ~]# chkconfig --add nginx[root@nginx ~]# chkconfig nginx on [root@nginx ~]# chkconfig nginx --list nginx 0:关闭 1:关闭 2:启用 3:启用 4:启用 5:启用 6:关闭#启动nginx[root@nginx ~]# service nginx start正在启动 nginx: [确定]#查看端口是否正常[root@nginx ~]# netstat -ntlp | grep :80tcp 0 0 0.0.0.0:80 0.0.0.0:* LISTEN 3889/nginx# Nginx安装与配置完毕 |
#安装MySQL(192.168.1.217)
#注意:这里是直接解压MySQL的
|
1
2
3
4
|
#添加MySQL用户[root@localhost ~]#groupadd -r mysql[root@localhost ~]#useradd -r -g mysql -s[root@localhost ~]#/sbin/nologin mysql |
|
1
2
3
4
5
6
7
|
#解压到指定路径[root@localhost ~]#tar xf mysql-5.5.33-linux2.6-x86_64.tar.gz -C /usr/local/[root@localhost ~]#cd /usr/local/[root@localhost ~]#ln -sv /usr/local/mysql-5.5.33-linux2.6-x86_64/ /usr/local/mysql`/usr/local/mysql' -> `/usr/local/mysql-5.5.33-linux2.6-x86_64/'[root@localhost ~]#cd mysql[root@localhost ~]#chown -R root.mysql * |
|
1
2
3
4
5
6
|
#初始化数据库;并指定其用户和data目录scripts/mysql_install_db --user=mysql--datadir=/Mysql/datals /Mysql/data/lost+found mysql mysql-bin.000001 mysql-bin.000002 mysql-bin.index performance_schema test |
|
1
2
3
4
5
6
7
8
9
10
11
12
13
14
15
16
17
18
19
20
21
|
#没有报错并生成以上文件即可cp support-files/my-large.cnf /etc/my.cnf 配置一个配置文件vi /etc/my.cnf 更改已下配置选项;具体选项根据自己需要配置# The MySQL server[mysqld]port = 3306socket = /tmp/mysql.sockskip-external-lockingkey_buffer_size = 256Mmax_allowed_packet = 1Mtable_open_cache = 256sort_buffer_size = 1Mread_buffer_size = 1Mread_rnd_buffer_size = 4Mmyisam_sort_buffer_size = 64Mthread_cache_size = 8query_cache_size= 16M# Try number of CPU's*2 forthread_concurrencythread_concurrency = 4datadir = /Mysql/data 新增一行 |
|
1
2
3
4
5
6
7
8
9
10
11
12
|
#提供一个服务脚本cp support-files/mysql.server/etc/rc.d/init.d/mysqldchmod +x /etc/rc.d/init.d/mysqldchkconfig --add mysqldchkconfig mysqld onchkconfig --list mysqldmysqld 0:off 1:off 2:on 3:on 4:on 5:on 6:offservice mysqld startStartingMySQL... [ OK ] |
|
1
2
3
4
5
6
|
#用mysql命令启动成功后错误信息vi /etc/profile.d/mysql.shexport PATH=/usr/local/mysql/bin:$PATHln -sv /usr/local/mysql/include/ /usr/include/mysql`/usr/include/mysql' ->`/usr/local/mysql/include/'vi /etc/man.config |
|
1
2
3
4
5
6
7
8
9
|
定位到MANPATHMANPATH /usr/manMANPATH /usr/share/manMANPATH /usr/local/manMANPATH /usr/local/share/manMANPATH /usr/X11R6/manMANPATH /usr/local/mysql/man #添加一行echo /usr/local/mysql/lib/ >/etc/ld.so.conf.d/mysql.conf |
#若是想要编译安装MySQL可以参考我之前的文章:
http://liangey.blog.51cto.com/9097868/1626945
安装PHP
|
1
|
yum install zlib libxml libjpegfreetype gd curl libiconv zlib-devel libxml2-devel libjpeg-devel freetype-devellibpng-devel gd-devel curl-devel libmcrypt-devel libxslt* bzip2* -y |
|
1
2
3
4
5
6
7
8
9
10
11
|
#添加nginx用户useradd nginx #安装libiconv-1.14库tar zxvf libiconv-1.14.tar.gz cd libiconv-1.14./configure --prefix=/usr/local/libiconvecho $?make echo $?make installecho $? |
|
1
2
3
4
5
6
|
#安装libmcrypt-2.5.8.tar.gz库tar zxvflibmcrypt-2.5.8.tar.gzcd libmcrypt-2.5.8./configuremakemake install |
|
1
2
3
4
5
6
|
#安装mhash-0.9.9.9tar zxvf mhash-0.9.9.9.tar.gzcd mhash-0.9.9.9./configuremakemake install |
|
1
2
3
4
5
6
7
|
#安装mcrypttar zxvf mcrypt-2.6.8.tar.gzcd mcrypt-2.6.8/sbin/ldconfig./configureLD_LIBRARY_PATH=/usr/local/libmakemake install |
|
1
2
3
4
5
6
7
8
9
10
11
12
13
14
15
16
17
18
19
20
21
22
23
24
25
26
27
28
29
30
31
32
33
34
35
36
37
38
39
|
tar zxvf php-5.3.27.tar.gzcd php-5.3.27./configure--prefix=/application/php5.3.27 --with-mysqli=mysqlnd /--with-pdo-mysql=mysqlnd/--with-iconv-dir=/usr/local/libiconv /--with-freetype-dir /--with-jpeg-dir/--with-png-dir /--with-zlib /--with-libxml-dir=/usr/ --enable-xml /--disable-rpath/--enable-safe-mode/ --enable-bcmath/ --enable-shmop /--enable-sysvsem/--enable-inline-optimization /--with-curl /--with-curlwrappers /--enable-mbregex/--enable-fpm /--enable-mbstring /--with-mcrypt /--with-gd /--enable-gd-native-ttf/--with-openssl /--with-mhash /--enable-pcntl /--enable-sockets/ --with-xmlrpc/--enable-zip /--enable-soap/--enable-short-tags /--enable-zend-multibyte /--enable-static /--with-xsl/--enable-ftpmake && make install |
|
1
2
3
|
#若make出错/home/tools/php-5.3.27/sapi/cli/php:error while loading shared libraries: libmysqlclient.so.18: cannot open sharedobject file: No such file or directorymake: *** [ext/phar/phar.php] 错误 127 |
|
1
2
3
4
5
|
#解决方法ln -s/application/mysql/lib/libmysqlclient.so.18 /usr/lib64/makemake installln -s /application/php5.3.27//application/php |
|
1
2
3
4
5
6
7
8
9
|
#配置PHPcp php.ini-production /application/php/lib/php.inicd /application/php/etc/vim php-fpm.conf#修改如下:user = nginxgroup = nginxlisten = 192.168.1.202:9000 |
|
1
2
3
4
|
#启动php-fpm /etc/init.d/php-fpm start netstat -lntup|grep 9000tcp 0 0 192.168.1.202:9000 0.0.0.0:* LISTEN 1422/php-fpm |
#整合Nginx和PHP
#这里是在Nginx(192.168.1.214)下操作:
|
1
2
3
4
5
6
7
8
9
10
11
12
|
vim /etc/nginx/nginx.conf location / { root /www; #更改目录 index index.php index.html index.htm; #添加一个index.php } location ~ \.php$ { root /www;#更改目录 fastcgi_pass 192.168.1.202:9000; #这里为PHP服务器的地址 fastcgi_index index.php; fastcgi_param SCRIPT_FILENAME /scripts$fastcgi_script_name; include fastcgi_params; } |
|
1
2
3
|
vim /etc/nginx/fastcgi_params#添加以下这行:fastcgi_param SCRIPT_FILENAME $document_root$fastcgi_script_name; |
|
1
2
3
4
5
6
7
8
|
#创建一个/www目录,并且创建一个test.php文件 mkdir /www chown nginx:nginx /www/ cd /www vim test.php <?php phpinfo(); ?> |
#注意:这里先不要重启nginx
#以下操作是在PHP:192.168.1.202中进行
|
1
2
3
4
5
6
7
|
mdkir /wwwchown -R nginx:nginx /www/cd /www/vim test.php<?phpphpinfo();?> |
|
1
2
|
#重启php-fpm/etc/init.d/php-fpm restart |
|
1
2
|
#在nginx中重启nginx服务 /etc/init.d/nginx restart |
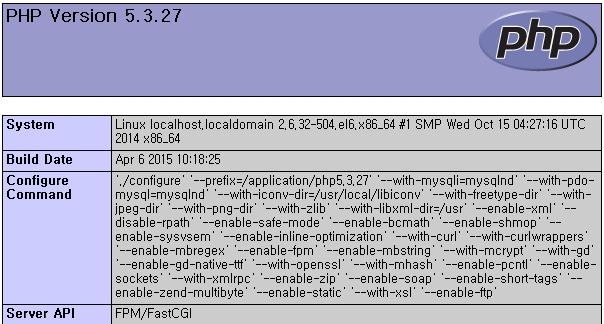
在浏览器中输入:192.168.1.214/test.php
出现以下页面,证明nginx和php整合成功了!
#最后是创建一个wordpress站点
|
1
2
3
4
5
6
7
8
|
创建站点,首先我们的nginx必须要跟MySQL是互通的。现在我们先在MySQL下授权nginx这台服务器能够访问数据库:#这里是在MySQL(192.168.1.217)下操作的:mysql -uroot -proot 登陆数据库#创建一个数据库mysql> create database wp;mysql> use wp;mysql> grant all privileges on wp.* to 'wpuser'@'192.168.1.%' identified by '123456';mysql> flush privileges; |
|
1
2
3
|
#在nginx的/www目录下面解压wordpress-4.1-zh_CN.tar.gz [root@localhost www]#tar zxvf wordpress-4.1-zh_CN.tar.gz [root@localhost www]#cp -r wordpress/* . |
|
1
2
3
4
|
#在php的/www目录下面解压wordpress-4.1-zh_CN.tar.gz [root@localhost www]#tar zxvf wordpress-4.1-zh_CN.tar.gz [root@localhost www]#cp -r wordpress/* . |
|
1
2
3
4
|
#重启nginx服务和php-fpm服务 /etc/init.d/nginx restart /etc/init.d/php-fpm restart |
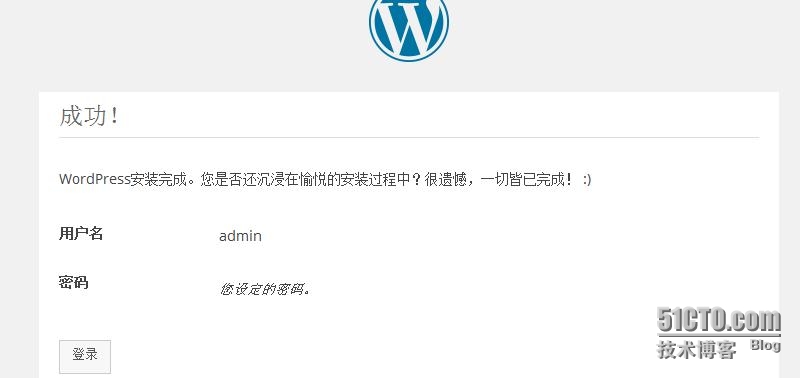
#浏览器中输入:192.168.1.214,会出现设置的页面


本文出自 “9527” 博客,请务必保留此出处http://liangey.blog.51cto.com/9097868/1630038
LNMP分离式部署实例[转]的更多相关文章
- Linux系统——LNMP分离式部署
#### 安装nginx ```[root@localhost ~]# tar xf nginx-1.10.2.tar.gz -C /usr/src/[root@localhost ~]# cd /u ...
- LNMP分离式部署
#### LNMP组合工作流程 在LNMP组合工作时,首先是用户通过浏览器输入域名请求Nginx Web服务,如果请求是静态资源,则由Nginx解析返回给用户:如果是动态请求(.php结尾),那么Ng ...
- 企业级LNMP分离式部署
安装MySQL数据库 安装步骤介绍 本例采用MySQL二进制安装包进行安装演示 (1) 创建mysql用户的账号 [root@mysql ~]# groupadd mysql [root@my ...
- Solr 4.0 部署实例教程
Solr 4.0 部署实例教程 Solr 4.0的入门基础教程,先说一点部署之后肯定会有人用solrj,solr 4.0好像添加了不少东西,其中CommonsHttpSolrServer这个类改名为H ...
- SQL Server 2008 数据库镜像部署实例之三 配置见证服务器
SQL Server 2008 数据库镜像部署实例之三 配置见证服务器 前面已经完成了镜像数据库的配置,并进行那个了故障转移测试.接下来将部署见证服务器,实现自动故障转移. 一.关于见证服务器 1.若 ...
- SQL Server 2008 数据库镜像部署实例之二 配置镜像,实施手动故障转移
SQL Server 2008 数据库镜像部署实例之二 配置镜像,实施手动故障转移 上一篇文章已经为配置镜像数据库做好了准备,接下来就要进入真正的配置阶段 一.在镜像数据库服务器上设置安全性并启动数据 ...
- SQL Server 2008 数据库镜像部署实例之一 数据库准备
SQL Server 2008 数据库镜像部署实例之一 数据库准备 一.目标 利用Sql Server 2008 enterprise X64,建立异步(高性能)镜像数据库,同时建立见证服务器实现自动 ...
- LNMP架构部署
第1章 部署LNMP架构步骤 1.1 ①部署Linux系统(OK) 基本优化完成(ip地址设置 yum源更新 字符集设置) 安全优化完成(iptables关闭 selinux关闭 /tmp/ 1777 ...
- Puppet基于Master/Agent模式实现LNMP平台部署
前言 随着IT行业的迅猛发展,传统的运维方式靠大量人力比较吃力,运维人员面对日益增长的服务器和运维工作,不得不把很多重复的.繁琐的工作利用自动化处理.前期我们介绍了运维自动化工具ansible的简单应 ...
随机推荐
- PHP 7中利用OpenSSL代替Mcrypt加解密的方法详解
php7.1发布后新特性吸引了不少PHPer,大家都在讨论新特性带来的好处与便利.但是从php7.0 升级到 php7.1 废弃(过时)了一个在过去普遍应用的扩展(mcrypt扩展).官方提供了相应的 ...
- Logistic Regression--逻辑回归算法汇总**
http://www.cnblogs.com/biyeymyhjob/archive/2012/07/18/2595410.html 转自别处 有很多与此类似的文章 也不知道谁是原创 因原文由少于错 ...
- AI 也开源:50 大开源 AI 项目 (转)
这些开源AI项目专注于机器学习.深度学习.神经网络及其他应用场合. 自IT界早期以来,研制出能像人类那样“思考”的机器一直是研究人员的一大目标.在过去几年,计算机科学家们在人工智能(AI)领域已取得了 ...
- Intellij idea断点 Debugger slow: Method breakpoints my dramatically slow down debugging
不知道点到哪里了,IDEA调试特别卡,而且总是如下提示, Debugger slow: Method breakpoints my dramatically slow down debugging 意 ...
- SQL Server 多条查询结果组合
假如存在下面这张表users: 1.通过sql语句返回总人数.男生总数和女生总数 select count(1) '总人数', (select count(1) from users u2 where ...
- Javascript中变量函数申明优先级
先理解这句话: “函数会首先被提升,然后才是变量”,代码并不是你写的顺序那样执行的. F12把下面的代码粘贴到控制台执行一下: var getName = function () { console. ...
- 【nodejs】理想论坛帖子下载爬虫1.07 使用request模块后稳定多了
在1.06版本时,访问网页采用的时http.request,但调用次数多以后就问题来了. 寻找别的方案时看到了https://cnodejs.org/topic/53142ef833dbcb076d0 ...
- Git 常用命令 思维导图(转)
Git 是一个很强大的分布式版本控制系统.它不但适用于管理大型开源软件的源代码,管理私人的文档和源代码也有很多优势. 本来想着只把最有用.最常用的 Git 命令记下来,但是总觉得这个也挺有用.那个也用 ...
- Rust 的安装和使用举例
一.环境 二.安装 $curl -sSf https://static.rust-lang.org/rustup.sh | sh Welcome to Rust. This script will d ...
- jQuery 操作 radio、select、checkbox
<script type="text/javascript"> $(function () { 一.radio 1.获取选中值,三种方法都可以: $('input:ra ...