家庭版记账本app进度之关于android界面布局的相关学习
1、线性布局(linearlayout)是一种让视图水平或垂直线性排列的布局线性布局使用<LinearLayout>标签进行配置对应代码中的类是android.widget.LinearLayout线性布局分为水平和垂直两种方向
线性布局的常用属性如下:
android:orientation 表示布局方向
取值vertical表示垂直布局
取值horizontal表示水平布局
android:gravity 表示视图的对齐方式内容包括:top、bottom、left、right、center_vertical、center_horizontal、center可以使用|分隔填写多个值
布局中的视图可以使用如下属性
android:layout_gravity 表示单个视图的对齐方式
android:layout_weight 表示单个视图所在大小的比重当layout_weight为0时,视图大小由自身确定当layout_weight大于0时,视图在线性布局方向上根据比重拉伸
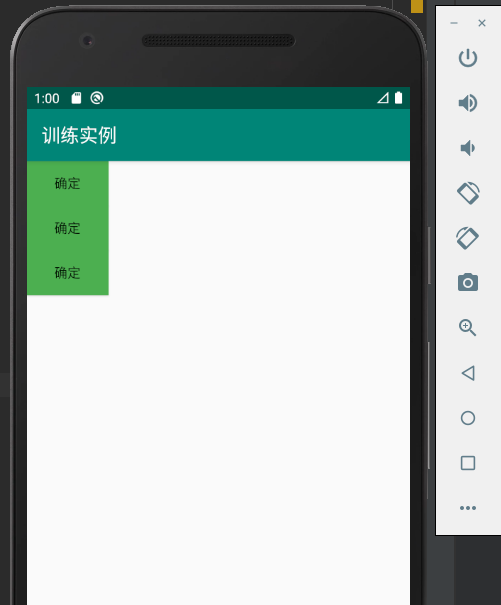
所编写的一个实例代码如下:
activity_main.xml
<?xml version="1.0" encoding="utf-8"?>

<LinearLayout xmlns:android="http://schemas.android.com/apk/res/android"

    xmlns:app="http://schemas.android.com/apk/res-auto"

    xmlns:tools="http://schemas.android.com/tools"

    android:layout_width="match_parent"

    android:layout_height="match_parent"

    android:orientation="vertical"

    tools:context=".MainActivity" >

    <Button

        android:id="@+id/btnOk"

        android:layout_width="wrap_content"

        android:layout_height="wrap_content"

        android:background="#4CAF50"

        android:text="@string/btn_ok" />

    <Button

        android:id="@+id/btnOk2"

        android:layout_width="wrap_content"

        android:layout_height="wrap_content"

        android:background="#4CAF50"

        android:text="@string/btn_ok" />

    <Button

        android:id="@+id/btnOk3"

        android:layout_width="wrap_content"

        android:layout_height="wrap_content"

        android:background="#4CAF50"

        android:text="@string/btn_ok" />

</LinearLayout>
具体的实验结果如下:
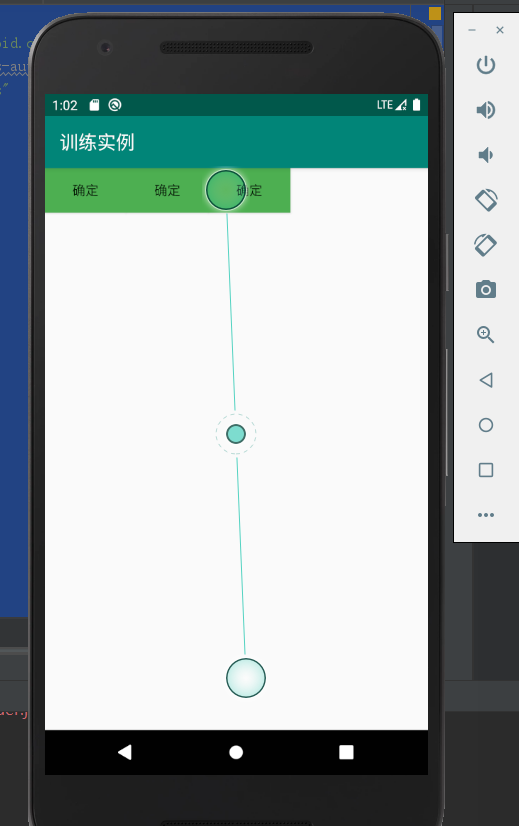
当修改相应的布局方式时候
activity_main.xml
<?xml version="1.0" encoding="utf-8"?>

<LinearLayout xmlns:android="http://schemas.android.com/apk/res/android"

    xmlns:app="http://schemas.android.com/apk/res-auto"

    xmlns:tools="http://schemas.android.com/tools"

    android:layout_width="match_parent"

    android:layout_height="match_parent"

    android:orientation="horizontal"

    tools:context=".MainActivity" >

    <Button

        android:id="@+id/btnOk"

        android:layout_width="wrap_content"

        android:layout_height="wrap_content"

        android:background="#4CAF50"

        android:text="@string/btn_ok" />

    <Button

        android:id="@+id/btnOk2"

        android:layout_width="wrap_content"

        android:layout_height="wrap_content"

        android:background="#4CAF50"

        android:text="@string/btn_ok" />

    <Button

        android:id="@+id/btnOk3"

        android:layout_width="wrap_content"

        android:layout_height="wrap_content"

        android:background="#4CAF50"

        android:text="@string/btn_ok" />

</LinearLayout>
实验的结果如下:
2、对于相对布局:
相对布局是一种通过设置相对位置进行的布局相对布局使用<RelativeLayout>标签进行配置对应代码中的类是android.widget.RelativeLayout布局中的视图通过设置相互间的相对位置进行排列相对的排列位置相对的对齐方式
相对布局内视图可用的常用属性如下:
与位置相关的属性
android:layout_above 表示在目标组件之上
android:layout_below 表示在目标组件之下
android:layout_toLeftOf 表示在目标组件的左边
android:layout_toRightOf 表示在目标组件的右边
与对齐相关的属性
android:alignBaseLine 表示与目标组件的基线对齐
android:alignBottom 表示与目标组件的底边对齐
android:alignTop 表示与目标组件的顶边对齐
android:alignLeft 表示与目标组件的左边对齐
android:alignRight 表示与目标组件的右边对齐
android:layout_centerHorizontal 表示在相对布局容器内水平居中
android:layout_centerVertical 表示在相对布局容器内垂直居中
对应的代码实例如下:
activity_main.xml
<?xml version="1.0" encoding="utf-8"?>

<RelativeLayout xmlns:android="http://schemas.android.com/apk/res/android"

    xmlns:app="http://schemas.android.com/apk/res-auto"

    xmlns:tools="http://schemas.android.com/tools"

    android:layout_width="match_parent"

    android:layout_height="match_parent"

    android:orientation="horizontal"

    tools:context=".MainActivity" >

    <Button

        android:id="@+id/btnOk"

        android:layout_width="wrap_content"

        android:layout_height="wrap_content"

        android:layout_centerInParent="true"

        android:background="#4CAF50"

        android:text="按钮1" />

    <Button

        android:id="@+id/btnOk2"

        android:layout_width="wrap_content"

        android:layout_height="wrap_content"

        android:layout_alignParentLeft="true"

        android:layout_alignParentTop="true"

        android:background="#4CAF50"

        android:text="按钮2" />

    <Button

        android:id="@+id/btnOk3"

        android:layout_width="wrap_content"

        android:layout_height="wrap_content"

        android:layout_below="@id/btnOk"

        android:layout_toRightOf="@id/btnOk"

        android:background="#4CAF50"

        android:text="按钮3"

         />

    <Button

        android:id="@+id/btnOk4"

        android:layout_width="wrap_content"

        android:layout_height="wrap_content"

        android:layout_below="@id/btnOk"

        android:layout_toLeftOf="@id/btnOk"

        android:background="#4CAF50"

        android:text="按钮4" />

    <Button

        android:id="@+id/btnOk5"

        android:layout_width="wrap_content"

        android:layout_height="wrap_content"

        android:layout_above="@id/btnOk"

        android:layout_toRightOf="@id/btnOk"

        android:background="#4CAF50"

        android:text="按钮5" />

    <Button

        android:id="@+id/btnOk6"

        android:layout_width="wrap_content"

        android:layout_height="wrap_content"

        android:layout_above="@id/btnOk"

        android:layout_toLeftOf="@id/btnOk"

        android:background="#4CAF50"

        android:text="按钮6" />

    <Button

        android:id="@+id/btnOk7"

        android:layout_width="wrap_content"

        android:layout_height="wrap_content"

        android:layout_above="@id/btnOk6"

        android:layout_toRightOf="@id/btnOk6"

        android:background="#4CAF50"

        android:text="按钮7" />

</RelativeLayout>
实验结果如下:
相关的会用到的知识点相关内容如下:
3、表格布局(TableLayout)
表格布局是一种行列方式排列视图的布局使用<TableLayout>和<TableRow>标签进行配置对应的类是android.widget.TableLayout一对<TableRow>标签包含着一行中显示的视图
表格布局的常用属性
android:stretchColumns 用于指定可以被拉伸的列
可以被拉伸的列在屏幕还有空白区域时被拉伸充满
列通过0开始的索引值表示
多个列之间用逗号隔开
android:shrinkColumns 用于指定可以被压缩的列
当屏幕不够用时,列被压缩直到完全显示
android:collapseColumns 用于表示可以被完全折叠的列
表格布局内视图可用的常用属性如下:
android:layout_column 指定列索引号
由于有些行可能列数量不全,这时候需要给列指定索引号
相应的实例代码如下:
activity_main.xml
<?xml version="1.0" encoding="utf-8"?>

<TableLayout xmlns:android="http://schemas.android.com/apk/res/android"

    xmlns:app="http://schemas.android.com/apk/res-auto"

    xmlns:tools="http://schemas.android.com/tools"

    android:layout_width="match_parent"

    android:layout_height="match_parent"

    android:layout_gravity="center_horizontal"

    android:layout_margin="10dp"

    tools:context=".MainActivity">

    <TableLayout

        android:layout_width="match_parent"

        android:layout_height="wrap_content">

        <TableRow>

            <TextView

                android:text="姓名:"

                android:layout_weight="1"/>

            <TextView android:text="学号:"

                android:layout_weight="1"/>

            <TextView android:text="生日:"

                android:layout_weight="1"/>

        </TableRow>

        <TableRow>

            <EditText android:text="输入姓名"

                android:layout_weight="1"/>

            <EditText android:text="输入学号"

                android:layout_weight="1"/>

            <EditText android:text="输入生日"

                android:layout_weight="1"/>

        </TableRow>

    </TableLayout>

    <TableRow>

        <TextView android:text="电话:" />

        <TextView android:text="地址:" />

    </TableRow>

    <TableRow>

        <EditText android:text="请输入电话:"/>

        <EditText android:text="请输入地址"/>

    </TableRow>

    <Button android:text="确定信息"

        />

</TableLayout>
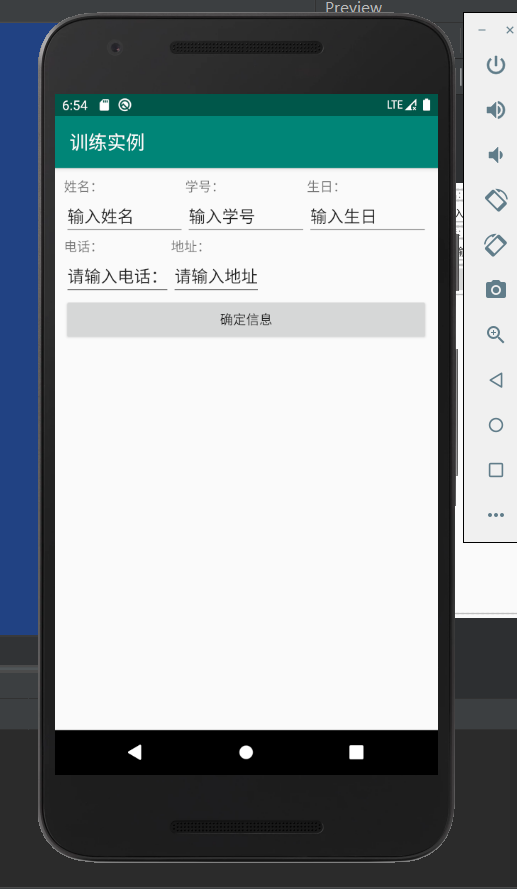
对应的实验结果如下:
现在基本掌握的就是这三种布局格式。
家庭版记账本app进度之关于android界面布局的相关学习的更多相关文章
- 家庭版记账本app进度之关于listview显示账单,并为其添加点击事件
这个主要学习是关于listview的学习. 怎样去自定义adapter,以及使用.自己创建文件,还有就是为listview的每一个子控件添加点击事件. 在整个过程中收获到的知识点如下: 一.对于数据库 ...
- 家庭版记账本app进度之对于按钮的点击事件以及线性布局以及(alertdialog)等相关内容的应用测试
通过线性布局,制作出连个按钮还有文本输入框以及嘴上放的标题文本进行信息的相关显示,完后最后的信息的输入,之后在屏幕的的下方进行显示 当点击第一个按钮的时候,在下方就会简单的出现你自己刚刚输入的相关信息 ...
- 家庭版记账本app进度之编辑框组件
<EditText>中设置提示信息是用到的语句是android:hint来进行提示语句的书写. android:inputType可以将此编辑框设置为输入密码的编辑框(现实的是小黑点) a ...
- 家庭版记账本app开发完成
经过这几天关于android的相关学习,对于家庭版记账本app以及开发结束. 实现的功能为:用户的注册.登录.添加支出账单.添加收入账单.显示所有的该用户的账单情况(收入和支出).生产图表(直观的显示 ...
- 家庭版记账本app开发进度相关界面的规划
总的app界面包括四个页面,页面可以来回滑动.设计的时候就和微信的四个页面类似. 由于没有找到合适的图标进行替换,在此仍应用微信对应的四个图标. 总的四个页面是: 1.增加收入或者支出的小账单.当点击 ...
- 家庭记账本app进度之android中AlertDialog的相关应用以及对日期时间的相关操作(应用alertdialog使用的谈话框)
对于AlertDialog的相关知识: 1.创建构造器AlertDialog.Builder的对象: 2.通过构造器对象调用setTitle.setMessage.setIcon等方法构造对话框 ...
- 家庭版记账本app开发进度。开发到现在整个app只剩下关于图表的设计了,具体功能如下
首先说一下自己的功能: 实现了用户的登录和注册.添加收入记账和添加支出记账.粗略显示每条账单基本情况.通过点击每条账单来显示具体的情况, 之后就是退出当前用户的操作. 具体的页面情况如下: 这就是整个 ...
- 家庭版记账本app开发之关于(数据库查找出数据)圆饼图的生成
这次完成的主要的怎样从数据库中调出数据.之后通过相关的数据,生成想要的圆饼图.以方便用户更加直观的看见关于账本的基本情况. 在圆饼图生成中用到了一些外部资源 具体的import如下: import c ...
- 家庭记账本app进度之对于登录和注册两个界面点击按钮的相互跳转
这次主要完成了两个两个android页面之间的跳转.从登录页面点击注册就会跳转到注册页面.在注册页面点击返回登录,这样就可以返回到登录界面.主要是这样的操作.其中遇到了一个困难主要是当点击按钮的时候, ...
随机推荐
- R自带数据集
向量 euro #欧元汇率,长度为11,每个元素都有命名landmasses #48个陆地的面积,每个都有命名precip #长度为70的命名向量rivers #北美141条河流长 ...
- vue中的$props、$attrs和$listeners研究 [包装iview组件]
$props:当前组件接收到的 props 对象.Vue 实例代理了对其 props 对象属性的访问. $attrs:包含了父作用域中不作为 prop 被识别 (且获取) 的特性绑定 (class 和 ...
- How to do error checking in CUDA(如何在CUDA里做错误检查)
https://codeyarns.com/2011/03/02/how-to-do-error-checking-in-cuda/ Error checks in CUDA code can hel ...
- 【Weiss】【第03章】练习3.12:单链表倒置
[练习3.12] a.编写一个非递归过程以O(N)时间反转单链表. b.使用常数附加空间编写一个过程以O(N)时间反转单链表. Answer: 这题的b貌似没啥意义,在a小题里直接用头插法,不断地将头 ...
- 《Python学习手册 第五版》 -第17章 作用域
上一章的是函数的基础,因为函数在运用过程中,是可以嵌套的,函数中是会涉及到变量的,为了明确各自变量的使用范围,系统是有一套规则或者原则的,这就是作用域的概念 本章重点内容 1.作用域:作用域的概念 2 ...
- 三万字、91道MySQL面试题。 附PDF
文末领取面试题 高清PDF 数据库基础知识 1. 为什么要使用数据库 数据保存在内存 优点:存取速度快 缺点:数据不能永久保存 数据保存在文件 优点:数据永久保存 缺点:1)速度比内存操作慢,频繁的I ...
- settings插拔式源码
创建一个文件夹notify __init__.py import settings import importlib def send_all(content): for path_str in se ...
- 动态规划-TSP问题-最短超级串
2020-03-03 22:55:08 问题描述: 给定一个字符串数组 A,找到以 A 中每个字符串作为子字符串的最短字符串. 我们可以假设 A 中没有字符串是 A 中另一个字符串的子字符串. 示例 ...
- 计网-ping服务命令与ICMP协议
目录 一.IP协议的助手 —— ICMP 协议(网络层协议) 二.ping —— 查询报文类型的使用 三.traceroute —— 差错报文类型的使用 参考:从Wireshark抓包软件角度理解PI ...
- BFS与DFS常考算法整理
BFS与DFS常考算法整理 Preface BFS(Breath-First Search,广度优先搜索)与DFS(Depth-First Search,深度优先搜索)是两种针对树与图数据结构的遍历或 ...