Pointer-network的tensorflow实现-1
pointer-network是最近seq2seq比较火的一个分支,在基于深度学习的阅读理解,摘要系统中都被广泛应用。
感兴趣的可以阅读原paper 推荐阅读
https://medium.com/@devnag/pointer-networks-in-tensorflow-with-sample-code-14645063f264
这个思路也是比较简单
就是解码的预测限定在输入的位置上
这在很多地方有用
比如考虑机器翻译的大词典问题,词汇太多了很多词是长尾的,词向量训练是不充分的,那么seq2seq翻译的时候很难翻译出这些词
另外专名什么的
很多是可以copy到
解码输出的
另外考虑文本摘要,很多时候就是要copy输入原文中的词,特别是长尾专名
更好的方式是copy而不是generate
网络上有一些pointer-network的实现,比较推荐
https://github.com/ikostrikov/TensorFlow-Pointer-Networks
这个作为入门示例比较好,使用简单的static rnn 实现更好理解,当然 dynamic速度更快,但是从学习角度
先实现static更好一些。
Dynamic rnn的 pointer network实现
https://github.com/devsisters/pointer-network-tensorflow
这里对static rnn实现的做了一个拷贝并做了小修改,改正了其中的一些问题
参见
https://github.com/chenghuige/hasky/tree/master/applications/pointer-network/static
这个小程序对应的应用是输入一个序列
比如,输出排序结果
我们的构造数据
python dataset.py
EncoderInputs: [array([[ 0.74840968]]), array([[ 0.70166106]]), array([[ 0.67414996]]), array([[ 0.9014052]]), array([[ 0.72811645]])]
DecoderInputs: [array([[ 0.]]), array([[ 0.67414996]]), array([[ 0.70166106]]), array([[ 0.72811645]]), array([[ 0.74840968]]), array([[ 0.9014052]])]
TargetLabels: [array([[ 3.]]), array([[ 2.]]), array([[ 5.]]), array([[ 1.]]), array([[ 4.]]), array([[ 0.]])]
训练过程中的eval展示:
2017-06-07 22:35:52 0:28:19 eval_step: 111300 eval_metrics:
['eval_loss:0.070', 'correct_predict_ratio:0.844']
label--: [ 2 6 1 4 9 7 10 8 5 3 0]
predict: [ 2 6 1 4 9 7 10 8 5 3 0]
label--: [ 1 6 2 5 8 3 9 4 10 7 0]
predict: [ 1 6 2 5 3 3 9 4 10 7 0]
大概是这样
第一个我们认为是预测完全正确了,
第二个预测不完全正确
原程序最主要的问题是 Feed_prev 设置为True的时候 原始代码有问题的 因为inp使用的是decoder_input这是不正确的因为
预测的时候其实是没有decoder_input输入的,原代码预测的时候decoder input强制copy/feed了encoder_input
这在逻辑是是有问题的。 实验效果也证明修改成训练也使用encoder_input来生成inp效果好很多。
那么关于feed_prev我们知道在预测的时候是必须设置为True的因为,预测的时候没有decoder_input我们的下一个输出依赖
上一个预测的输出。
训练的时候我们是用decoder_input序列训练(feed_prev==False)还是也使用自身预测产生的结果进行下一步预测feed_prev==True呢
参考tensorflow官网的说明
In the above invocation, we set feed_previous to False. This means that the decoder will use decoder_inputstensors as provided. If we set feed_previous to True, the decoder would only use the first element of decoder_inputs. All other tensors from this list would be ignored, and instead the previous output of the decoder would be used. This is used for decoding translations in our translation model, but it can also be used during training, to make the model more robust to its own mistakes, similar to Bengio et al., 2015 (pdf).
来自 <https://www.tensorflow.org/tutorials/seq2seq>
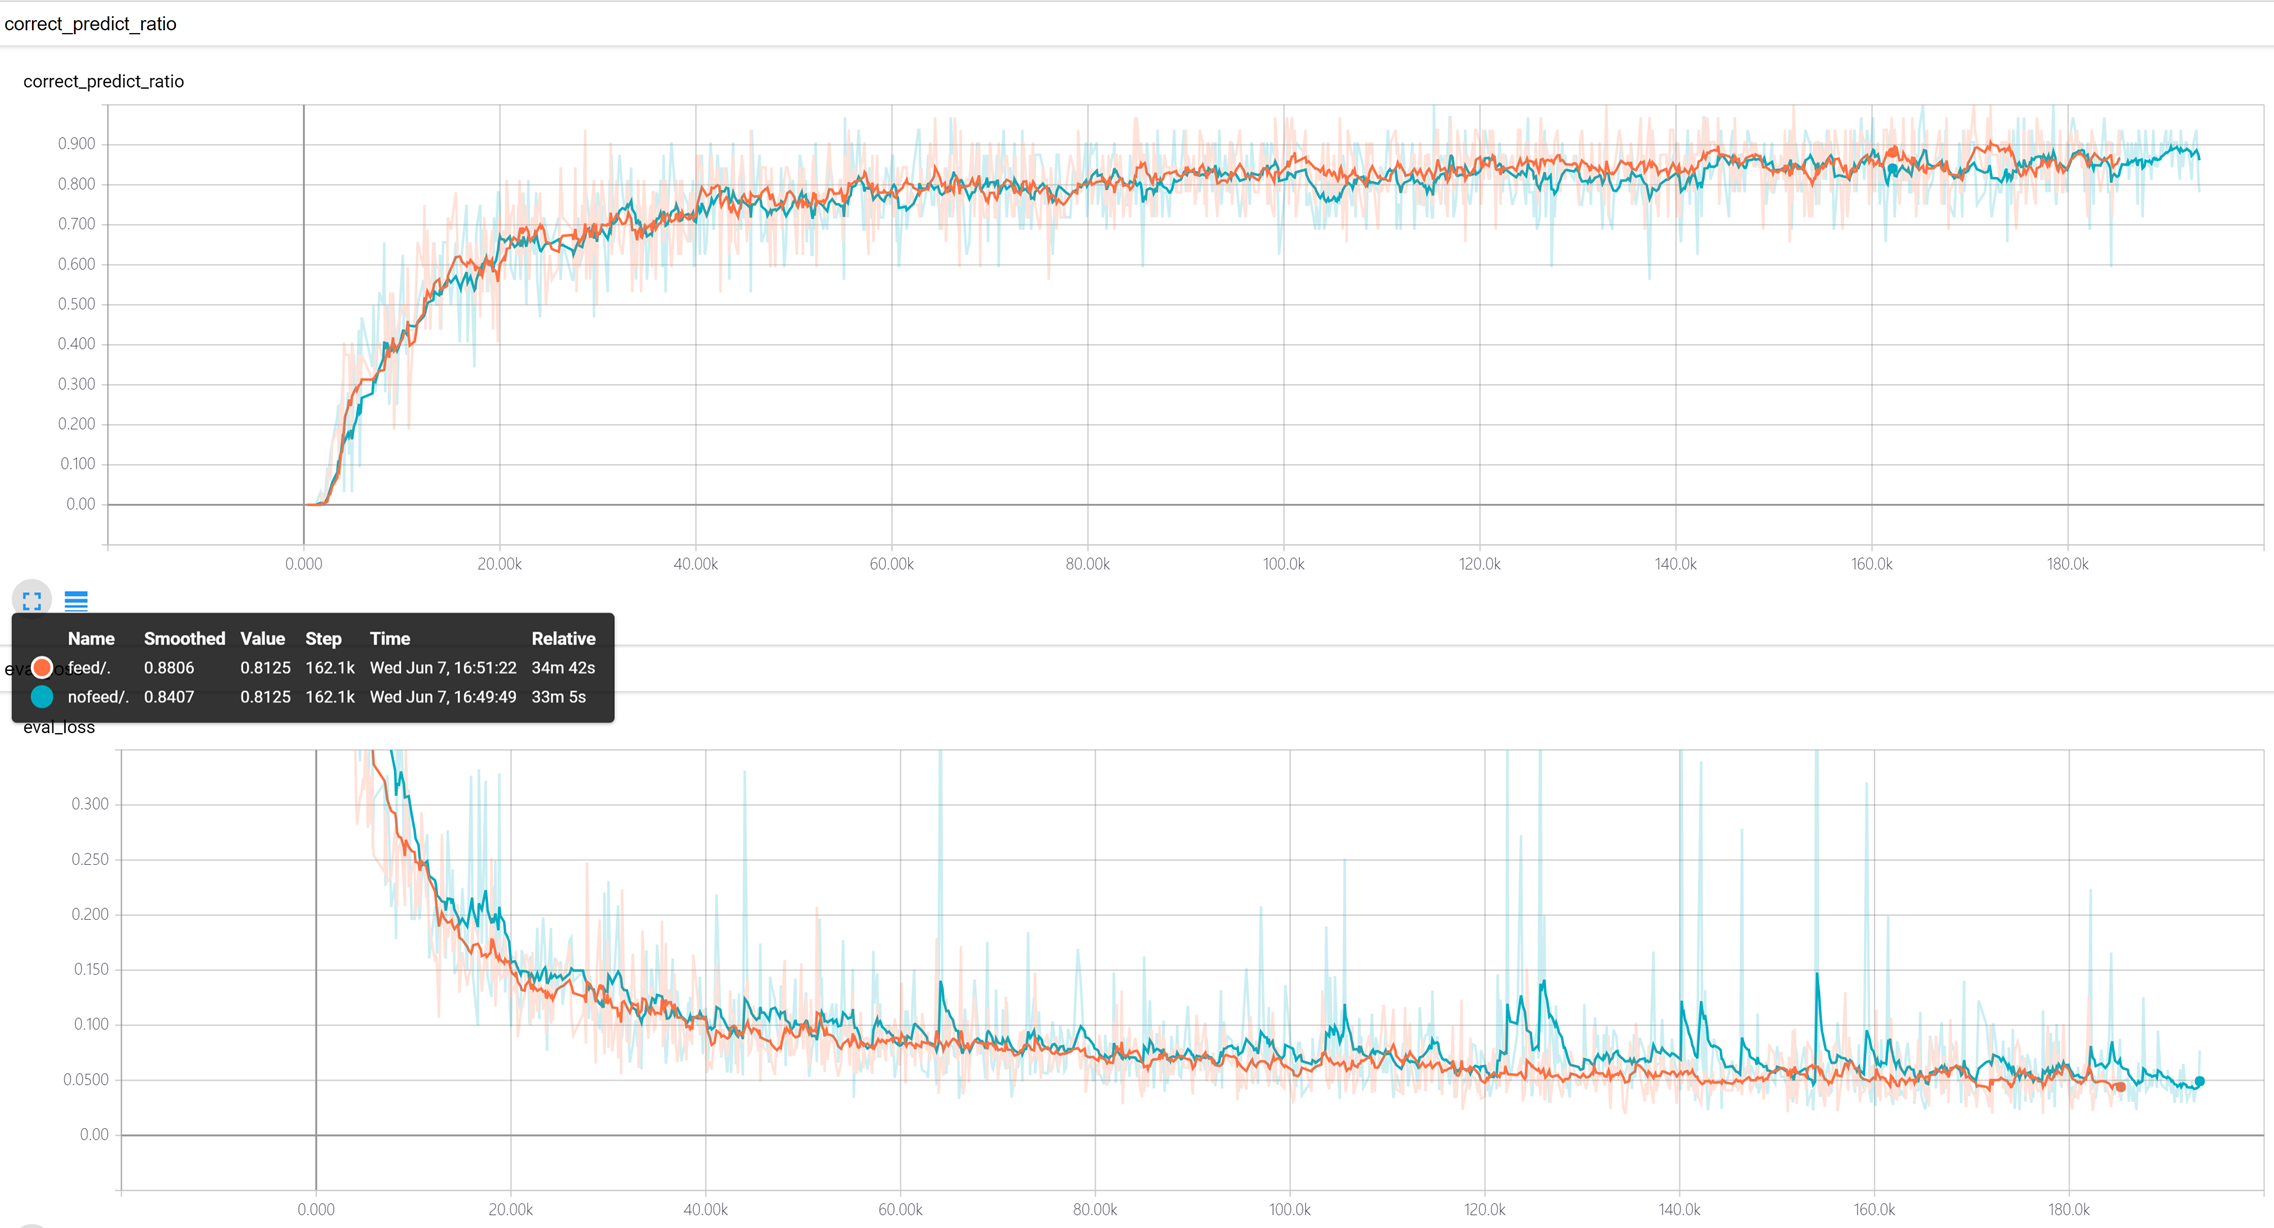
这里使用
train.sh
和
train-no-feed-prev.sh
做了对比实验
训练时候使用feed_prev==True效果稍好(红色) 特别是稳定性方差小一些
Pointer-network的tensorflow实现-1的更多相关文章
- Convolutional Neural Network in TensorFlow
翻译自Build a Convolutional Neural Network using Estimators TensorFlow的layer模块提供了一个轻松构建神经网络的高端API,它提供了创 ...
- (转)The Road to TensorFlow
Stephen Smith's Blog All things Sage 300… The Road to TensorFlow – Part 7: Finally Some Code leave a ...
- TensorFlow简易学习[3]:实现神经网络
TensorFlow本身是分布式机器学习框架,所以是基于深度学习的,前一篇TensorFlow简易学习[2]:实现线性回归对只一般算法的举例只是为说明TensorFlow的广泛性.本文将通过示例Ten ...
- TensorFlow tutorial
代码示例来自https://github.com/aymericdamien/TensorFlow-Examples tensorflow先定义运算图,在run的时候才会进行真正的运算. run之前需 ...
- 5个最好的TensorFlow网络课程
1. Introduction to TensorFlow for Artificial Intelligence, Machine Learning and Deep Learning This c ...
- Recurrent Neural Network[Content]
下面的RNN,LSTM,GRU模型图来自这里 简单的综述 1. RNN 图1.1 标准RNN模型的结构 2. BiRNN 3. LSTM 图3.1 LSTM模型的结构 4. Clockwork RNN ...
- 改善深层神经网络-week3编程题(Tensorflow 实现手势识别 )
TensorFlow Tutorial Initialize variables Start your own session Train algorithms Implement a Neural ...
- Convolutional Neural Network-week1编程题(TensorFlow实现手势数字识别)
1. TensorFlow model import math import numpy as np import h5py import matplotlib.pyplot as plt impor ...
- 吴恩达课后习题第二课第三周:TensorFlow Introduction
目录 第二课第三周:TensorFlow Introduction Introduction to TensorFlow 1 - Packages 1.1 - Checking TensorFlow ...
随机推荐
- Jupyter Notebook 快捷键和技巧
Jupyter Notebook 有两种键盘输入模式. 编辑模式,允许你往单元中键入代码或文本,这时的单元框线是绿色的. 命令模式,键盘输入运行程序命令:这时的单元框线是蓝色. 命令模式 ...
- 将Django部署到Linux
https://cloud.tencent.com/developer/labs/lab/10372
- bzoj 1008
记得取模时对答案的处理 #include<bits/stdc++.h> #define ll long long using namespace std; ; ll qpow(ll a,l ...
- websocket 的客户端 websocket-sharp
事实上, websocket-sharp 也包括服务端的实现, 还有 HTTP Authentication 的功能 http://sta.github.io/websocket-sharp/ h ...
- SpringBoot(十二):springboot2.0.2写测试用例
导入maven依赖: <dependency> <groupId>junit</groupId> <artifactId>junit</artif ...
- EAS开发之挂菜单
一:以管理员账号登录 二:挂菜单 点击菜单栏"系统"——客户化菜单编辑——选中上级目录——点击 新建——命名.键入唯一编码,把ui.java类的全路径,拷贝到 ...
- CentOS 7.2编译安装PHP7
原文: https://typecodes.com/web/centos7compilephp7.html?utm_source=tuicool&utm_medium=referralPHP官 ...
- [rook] rook的控制流
以下是rook为一个pod准备可用块存储的过程: 1. rook operator运行,并且在k8s每台机器上运行一个rook agent的pod: 2. 用户创建一个pvc,并指定storagecl ...
- 斐讯K1 K2 开启Telnet
官方V21.4.5.5前的ROM,直接打开下边这个链接就直接开telnet了,然后就可以随便搞了 http://192.168.2.1/goform/gra_NTPSyncWithLocal?text ...
- prometheus杂碎
一个监控及告警的系统,内含一个TSDB(时序数据库).在我而言是一个数采程序 重要成员分三块 exploter:实际是外部接口,让各个程序实现这个接口,供普罗米修斯定时从此接口中取数 alert:告警 ...