abp(net core)+easyui+efcore实现仓储管理系统——使用 WEBAPI实现CURD (十二)
abp(net core)+easyui+efcore实现仓储管理系统目录
abp(net core)+easyui+efcore实现仓储管理系统——ABP总体介绍(一)
abp(net core)+easyui+efcore实现仓储管理系统——解决方案介绍(二)
abp(net core)+easyui+efcore实现仓储管理系统——领域层创建实体(三)
abp(net core)+easyui+efcore实现仓储管理系统——定义仓储并实现 (四)
abp(net core)+easyui+efcore实现仓储管理系统——创建应用服务(五)
abp(net core)+easyui+efcore实现仓储管理系统——展现层实现增删改查之控制器(六)
abp(net core)+easyui+efcore实现仓储管理系统——展现层实现增删改查之列表视图(七)
abp(net core)+easyui+efcore实现仓储管理系统——展现层实现增删改查之增删改视图(八)
abp(net core)+easyui+efcore实现仓储管理系统——展现层实现增删改查之菜单与测试(九)
abp(net core)+easyui+efcore实现仓储管理系统——使用 WEBAPI实现CURD (十一)
上接(abp(net core)+easyui+efcore实现仓储管理系统——使用 WEBAPI实现CURD (十一)),在这一篇文章中我们创建服务接口与服务实现类,并创建控制器类。
二、定义应用服务接口需要用到的分页类
为了在进行查询时使用, PagedSupplierResultRequestDto被用来将模块数据传递到基础设施层.
1. 在Visual Studio 2017的“解决方案资源管理器”中,右键单击“ABP.TPLMS.Application”项目,在弹出菜单中选择“添加” > “新建文件夹”,并重命名为“Suppliers”
2. 使用鼠标右键单击我们刚才创建的“Suppliers”文件夹,在弹出菜单中选择“添加” > “新建文件夹”,并重命名为“Dto”。
3.右键单击“Dto”文件夹,然后选择“添加” > “类”。 将类命名为 PagedSupplierResultRequestDto,然后选择“添加”。代码如下。
using Abp.Application.Services.Dto;

using System;

using System.Collections.Generic;

using System.Text;

namespace ABP.TPLMS.Supplier.Dto

{

     public class PagedSupplierResultRequestDto : PagedResultRequestDto

    {

        public string Keyword { get; set; }

     }

}
4.右键单击“Dto”文件夹,然后选择“添加” > “类”。 将类命名为 SupplierDto,然后选择“添加”。代码如下。
using Abp.Application.Services.Dto;

using Abp.AutoMapper;

using ABP.TPLMS.Entitys;

using System;

using System.Collections.Generic;

using System.Text;

namespace ABP.TPLMS.Suppliers.Dto

{

    [AutoMapFrom(typeof(Supplier))]

    public class SupplierDto : EntityDto<int>

    {

        public string Address { get; set; }

        public string Name { get; set; }

        public string Email { get; set; }

        public string Code { get; set; }

        public int Sex { get; set; }

        public string LinkName { get; set; }

        public int Status { get; set; }

        public string Tel { get; set; }

        public string Mobile { get; set; }

        public DateTime CreationTime { get; set; }

    }

}
5.右键单击“Dto”文件夹,然后选择“添加” > “类”。 将类命名为 CreateUpdateSupplierDto,然后选择“添加”。代码如下。
using Abp.Application.Services.Dto;

using Abp.AutoMapper;

using ABP.TPLMS.Entitys;

using System;

using System.Collections.Generic;

using System.ComponentModel.DataAnnotations;

using System.Text;

namespace ABP.TPLMS.Suppliers.Dto

{

    [AutoMapTo(typeof(Supplier))]

    public  class CreateUpdateSupplierDto : EntityDto<int>

    {

        public const int MaxLength = ;

        [StringLength(MaxLength)]

        public string Address { get; set; }

        [Required]

        [StringLength(MaxLength)]

        public string Name { get; set; }

        [Required]

        [StringLength(MaxLength)]

        public string Email { get; set; }

        [Required]

        [StringLength()]

        public string Code { get; set; }

        public int Sex { get; set; }

        [StringLength(MaxLength)]

        public string LinkName { get; set; }

        public int Status { get; set; }

        [Required]

        [StringLength(MaxLength)]

        public string Tel { get; set; }

        [StringLength(MaxLength)]

        public string Mobile { get; set; }

    }

}
三、定义ISupplierAppService接口
6. 在Visual Studio 2017的“解决方案资源管理器”中,鼠标右键单击“Suppliers”文件夹,然后选择“添加” > “新建项”,在弹出对话框中选择“接口”。为应用服务定义一个名为 ISupplierAppService 的接口。代码如下。
using Abp.Application.Services;

using ABP.TPLMS.Suppliers.Dto;

using System;

using System.Collections.Generic;

using System.Text;

namespace ABP.TPLMS.Suppliers

{

    public interface ISupplierAppService : IAsyncCrudAppService<//定义了CRUD方法

             SupplierDto, //用来展示供应商

             int, //Supplier实体的主键

             PagedSupplierResultRequestDto, //获取供应商的时候用于分页

             CreateUpdateSupplierDto, //用于创建供应商

             CreateUpdateSupplierDto> //用于更新供应商

    {

    }

}
四、实现ISupplierAppService
7.在Visual Studio 2017的“解决方案资源管理器”中,右键单击“Suppliers”文件夹,然后选择“添加” > “新建项”,在弹出对话框中选择“类”。为应用服务定义一个名为 SupplierAppService 的服务类。代码如下。
using Abp.Application.Services;

using Abp.Domain.Repositories;

using ABP.TPLMS.Entitys;

using ABP.TPLMS.Suppliers.Dto;

using System;

using System.Collections.Generic;

using System.Text;

namespace ABP.TPLMS.Suppliers

{

   public class SupplierAppService :AsyncCrudAppService<Supplier, SupplierDto, int, PagedSupplierResultRequestDto,

                            CreateUpdateSupplierDto, CreateUpdateSupplierDto>,ISupplierAppService

    {

        public SupplierAppService(IRepository<Supplier, int> repository)

            : base(repository)

    {

    }

        public override Task<SupplierDto> Create(CreateUpdateSupplierDto input)

        {

            var sin = input;

            return base.Create(input);

        }

    }

}
五 创建SupplierController继承自TPLMSControllerBase
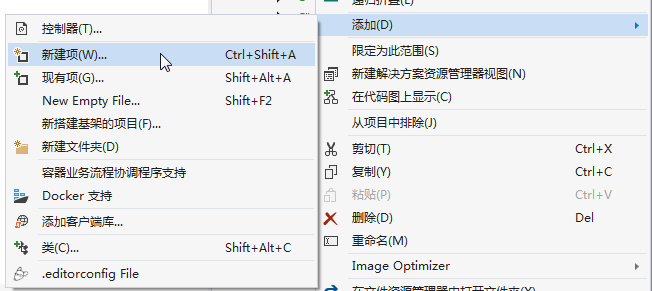
1. 在Visual Studio 2017的“解决方案资源管理器”中,右键单击在领域层“ABP.TPLMS.Web.Mvc”项目中的Controller目录。 选择“添加” > “新建项…”。如下图。
2. 在弹出对话框“添加新项-ABP.TPLMS.Web.Mvc”中选择“控制器类”,然后在名称输入框中输入“SupplierController”,然后点击“添加”按钮。如下图。

3.在SupplierController.cs文件中输入如下代码,通过构造函数注入对应用服务的依赖。
using System;

using System.Collections.Generic;

using System.Linq;

using System.Threading.Tasks;

using Abp.Application.Services.Dto;

using Abp.AspNetCore.Mvc.Authorization;

using Abp.Runtime.Validation;

using ABP.TPLMS.Controllers;

using ABP.TPLMS.Suppliers;

using ABP.TPLMS.Suppliers.Dto;

using ABP.TPLMS.Web.Models.Supplier;

using Microsoft.AspNetCore.Mvc;

using Microsoft.EntityFrameworkCore;

namespace ABP.TPLMS.Web.Controllers

{

    [AbpMvcAuthorize]

    public class SupplierController : TPLMSControllerBase

    {

        const int MaxNum= ;

        // GET: /<controller>/

        public async Task<IActionResult> Index()

        {

            var module = (await _supplierAppService.GetAll(new PagedSupplierResultRequestDto { MaxResultCount = MaxNum })).Items;
           // Paging not implemented yet

            SupplierDto cuModule = module.First();

            var model = new SupplierListViewModel

            {

                Supplier = cuModule,

                Suppliers=module

            };

            return View(model);

        }

        private readonly ISupplierAppService _supplierAppService;

        public SupplierController(ISupplierAppService supplierAppService)

        {

            _supplierAppService = supplierAppService;

        }

        public async Task<ActionResult> EditSupplierModal(int moduleId)

        {

            var module = await _supplierAppService.Get(new EntityDto<int>(moduleId));

            CreateUpdateSupplierDto cuSupplier = AutoMapper.Mapper.Map<CreateUpdateSupplierDto>(module);

            var model = new EditSupplierModalViewModel

            {

                Supplier = cuSupplier

            };

            return View("_EditSupplierModal", model);

        }

    }

}
abp(net core)+easyui+efcore实现仓储管理系统——使用 WEBAPI实现CURD (十二)的更多相关文章
- abp(net core)+easyui+efcore实现仓储管理系统——使用 WEBAPI实现CURD (十四)
abp(net core)+easyui+efcore实现仓储管理系统目录 abp(net core)+easyui+efcore实现仓储管理系统——ABP总体介绍(一) abp(net core)+ ...
- abp(net core)+easyui+efcore实现仓储管理系统——使用 WEBAPI实现CURD (十五)
core)+easyui+efcore实现仓储管理系统目录 abp(net core)+easyui+efcore实现仓储管理系统——ABP总体介绍(一) abp(net core)+easyui+e ...
- abp(net core)+easyui+efcore实现仓储管理系统——使用 WEBAPI实现CURD (十三)
abp(net core)+easyui+efcore实现仓储管理系统目录 abp(net core)+easyui+efcore实现仓储管理系统——ABP总体介绍(一) abp(net core)+ ...
- abp(net core)+easyui+efcore实现仓储管理系统——入库管理之六(四十二)
abp(net core)+easyui+efcore实现仓储管理系统目录 abp(net core)+easyui+efcore实现仓储管理系统——ABP总体介绍(一) abp(net core)+ ...
- abp(net core)+easyui+efcore实现仓储管理系统——出库管理之三(五十二)
abp(net core)+easyui+efcore实现仓储管理系统目录 abp(net core)+easyui+efcore实现仓储管理系统--ABP总体介绍(一) abp(net core)+ ...
- abp(net core)+easyui+efcore实现仓储管理系统——使用 WEBAPI实现CURD (十一)
abp(net core)+easyui+efcore实现仓储管理系统目录 abp(net core)+easyui+efcore实现仓储管理系统——ABP总体介绍(一) abp(net core)+ ...
- abp(net core)+easyui+efcore实现仓储管理系统——入库管理之四(四十)
abp(net core)+easyui+efcore实现仓储管理系统目录 abp(net core)+easyui+efcore实现仓储管理系统——ABP总体介绍(一) abp(net core)+ ...
- abp(net core)+easyui+efcore实现仓储管理系统——入库管理之八(四十四)
abp(net core)+easyui+efcore实现仓储管理系统目录 abp(net core)+easyui+efcore实现仓储管理系统——ABP总体介绍(一) abp(net core)+ ...
- abp(net core)+easyui+efcore实现仓储管理系统——出库管理之一(四十九)
abp(net core)+easyui+efcore实现仓储管理系统目录 abp(net core)+easyui+efcore实现仓储管理系统——ABP总体介绍(一) abp(net core)+ ...
随机推荐
- Programming In Lua 第八章
1, 也就是说,lua虽然会把代码预编译成中间码,以提高运行速度.但其会在程序运行过程中需要编译器,所以其仍然是解释型语言.loadfile会加载一个文件并将其编译成中间码,并返回一个函数. 2, 3 ...
- throw 与 throws的比较
说实话,今天在公司的实习,确确实实编号被严重打脸了,说真的,自己的基础功不扎实,希望慢慢弥补吧! 抛出异常有三种形式,一是throw,一个throws,还有一种系统自动抛异常,下面它们之间的异同. 一 ...
- iOS中 分类(category)与扩展(Extension)的区别?
1.分类(category)的作用 (1).作用:可以在不修改原来类的基础上,为一个类扩展方法.(2).最主要的用法:给系统自带的类扩展方法. 2.分类中能写点啥? (1).分类中只能添加“方法”,不 ...
- CDH 5.15.2 离线安装
一.前置准备 1. 基础信息 1.1 机器 机器名 服务 hadoop1 主节点 hadoop2 data.task hadoop3 data.task 1.2 服务版本 服务 版本 cdh 5.15 ...
- c++学习书籍推荐《C++编程思想第二卷》下载
百度云及其他网盘下载地址:点我 编辑推荐 <C++编程思想>(第2卷)是惟一一本如此清晰地阐述如何重新思考以面向对象方法构造程序的书籍.<C++编程思想>(第2卷)介绍实用的编 ...
- Event StoryLine Corpus 论文阅读
Event StoryLine Corpus 论文阅读 本文是对 Caselli T, Vossen P. The event storyline corpus: A new benchmark fo ...
- Json串排序
最近遇到个很烦人的问题.我现在做的业务有一部分是把之前app服务端的.net接口转译java接口.但是有些之前的接口,一个接口干上十几件事情,返回的json串长达五六几百行.着实看的就让人头大.但是如 ...
- 学习2:总结# 1.while # 2.字符串格式化 # 3.运算符 # 4.编码初始
目录 1.while循环 -- 死循环 2.字符串格式化: 3.运算符 4.编码 1.while循环 -- 死循环 while 条件: 循环体 打断死循环: break -- 终止当前循环 改变条件 ...
- Java编程思想:NIO知识点
import java.io.*; import java.nio.*; import java.nio.channels.FileChannel; import java.nio.charset.C ...
- [记录]python的简单协程框架(回调+时间循环+select)
# -*- coding: utf-8 -*- # @Time : 2018/12/15 18:55 # @File : coroutine.py #一个简单的 Coroutine 框架 import ...