
abp(net core)+easyui+efcore实现仓储管理系统——使用 WEBAPI实现CURD (十一)
abp(net core)+easyui+efcore实现仓储管理系统目录
abp(net core)+easyui+efcore实现仓储管理系统——ABP总体介绍(一)
abp(net core)+easyui+efcore实现仓储管理系统——解决方案介绍(二)
abp(net core)+easyui+efcore实现仓储管理系统——领域层创建实体(三)
abp(net core)+easyui+efcore实现仓储管理系统——定义仓储并实现 (四)
abp(net core)+easyui+efcore实现仓储管理系统——创建应用服务(五)
abp(net core)+easyui+efcore实现仓储管理系统——展现层实现增删改查之控制器(六)
abp(net core)+easyui+efcore实现仓储管理系统——展现层实现增删改查之列表视图(七)
abp(net core)+easyui+efcore实现仓储管理系统——展现层实现增删改查之增删改视图(八)
abp(net core)+easyui+efcore实现仓储管理系统——展现层实现增删改查之菜单与测试(九)
abp(net core)+easyui+efcore实现仓储管理系统——多语言(十)
通过abp(net core)+easyui+efcore实现仓储管理系统——展现层实现增删改查之控制器(六)至abp(net core)+easyui+efcore实现仓储管理系统——展现层实现增删改查之菜单与测试(九)四篇文章的学习,我们使用ASP.NET Core Mvc的常规的实现方式实现了对数据库的CURD操作。ABP有其默认的实现增删改查的方式。我们可以先看一下“ABP.TPLMS.Web.Mvc”项目中的“Views\Users”的相关代码,可以查看一下ABP默认是如何实现对用户信息的增删改查的。我们发现ABP中的用户信息的增删改查是通过继承 AsyncCrudAppService这个类来实现CURD操作,前端页面中通过javascript调用WEB API来实现增删改查。当然还有一个同步操作类CrudAppService,通过继承这个类来实现CURD的同步操作。对于这两个类的的区别在于AsyncCrudAppService是CrudAppService异步实现。ABP作为开发框架,通过以上两个基类实现了对于CRUD这种通用功能的一种解决方案。在接下来的几篇文章中,我们要通过继承 AsyncCrudAppService这个类来实现CURD操作,在前端通过调用WebAPI来实现对供应商信息的增删改查功能。
先来看一下AsyncCrudAppService与CrudAppService这两个类具体提供的功能。
首先,这两个类都继承自CrudAppServiceBase类。如图1,图2。
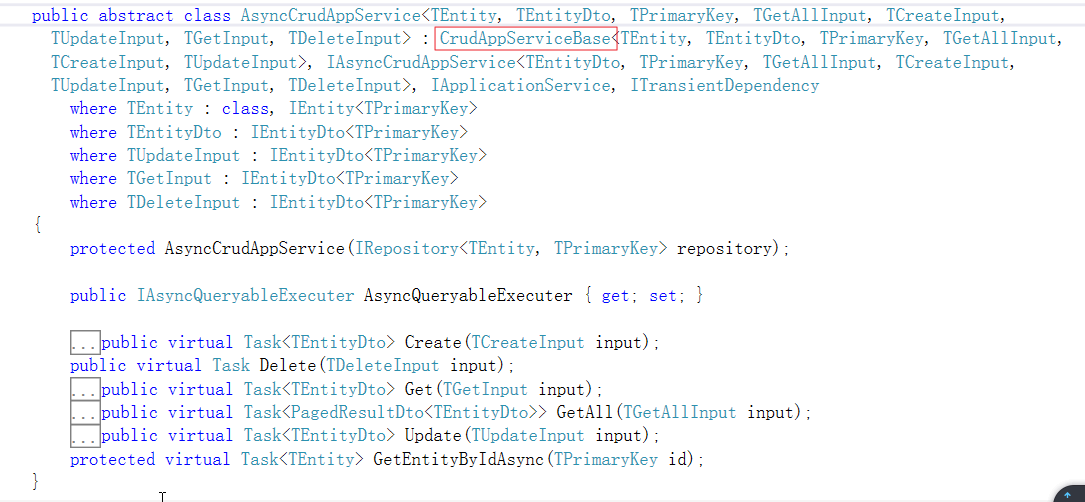
图1

图2
其次,这两个类都提供了Create、Delete、Update、Get、GetAll、GetEntityById方法。
第三,CrudAppServiceBase类提供了有关于权限(xxxPermissionName属性和CheckxxxPermission方法)的属性和方法,关于分页(ApplyPaging)的方法,关于排序(ApplySorting)方法,关于查询条件(CreateFilteredQuery)的方法,关于对象映射(MapToxxx)的方法。如下图。 
接下来我们来通过实现一个供应商信息的管理功能来学习一下这种方式实现增删改查功能。我会通过几篇文章来一步一步来实现这个供应商管理的功能。
一、创建Supplier实体
1. 在Visual Studio 2017的“解决方案资源管理器”中,右键单击“ABP.TPLMS.Core”项目的“Entitys”文件夹,在弹出菜单中选择“添加” --> “类”。 将类命名为 Supplier,然后选择“添加”。
2.创建Supplier类继承自Entity<int>,通过实现审计模块中的IHasCreationTime来实现保存创建时间。代码如下:
using Abp.Domain.Entities;

using Abp.Domain.Entities.Auditing;

using Abp.Timing;

using System;

using System.Collections.Generic;

using System.ComponentModel.DataAnnotations;

using System.Text;

namespace ABP.TPLMS.Entitys

{

    public class Supplier : Entity<int>, IHasCreationTime

    {

        public const int MaxLength = ;

        public Supplier()

        {

            this.Address = string.Empty;

            this.Name = string.Empty;

            this.Email = string.Empty;

            this.Code = string.Empty;

            this.Sex = ;

            this.LinkName = string.Empty;

            this.Status = ;

            this.Tel = string.Empty;

            this.Mobile = string.Empty;

                       this.UserId = ;

            CreationTime = Clock.Now;

        }

        [Required]

        [StringLength()]

        public string Code { get; set; }

        [Required]

        [StringLength(MaxLength)]

        public string Name { get; set; }

        [StringLength(MaxLength)]

        public string Address { get; set; }

        [Required]

        [StringLength(MaxLength)]

        public string Email { get; set; }

        [StringLength(MaxLength)]

        public string LinkName { get; set; }

        public int Sex { get; set; }

        [Required]

        [StringLength(MaxLength)]

        public string Tel { get; set; }

        [StringLength(MaxLength)]

        public string Mobile { get; set; }

        public int Status { get; set; }

        public int UserId { get; set; }

        public DateTime CreationTime { get; set; }

    }

}
3.定义好实体之后,我们去“ABP.TPLMS.EntityFrameworkCore”项目中的“TPLMSDbContext”类中定义实体对应的DbSet,以应用Code First 数据迁移。添加以下代码
using Microsoft.EntityFrameworkCore;

using Abp.Zero.EntityFrameworkCore;

using ABP.TPLMS.Authorization.Roles;

using ABP.TPLMS.Authorization.Users;

using ABP.TPLMS.MultiTenancy;

using ABP.TPLMS.Entitys;

namespace ABP.TPLMS.EntityFrameworkCore

{

    public class TPLMSDbContext : AbpZeroDbContext<Tenant, Role, User, TPLMSDbContext>

    {

        /* Define a DbSet for each entity of the application */

        public TPLMSDbContext(DbContextOptions<TPLMSDbContext> options)

            : base(options)

        {

        }

        public DbSet<Module> Modules { get; set; }

        public DbSet<Supplier> Suppliers { get; set; }

    }

}
4.从菜单中选择“工具->NuGet包管理器器—>程序包管理器控制台”菜单。
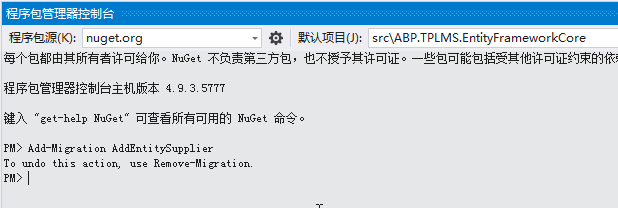
5. 在PMC中,默认项目选择EntityframeworkCore对应的项目后。输入以下命令:Add-Migration AddEntitySupplier,创建迁移。如下图。
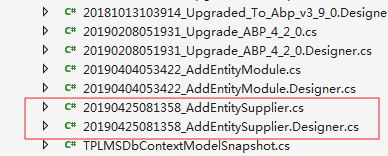
6. 在上面的命令执行完毕之后,创建成功后,会在Migrations文件夹下创建时间_AddEntitySupplier格式的类文件,这些代码是基于DbContext指定的模型。如下图。
7.在程序包管理器控制台,输入Update-Database,回车执行迁移。如下图。

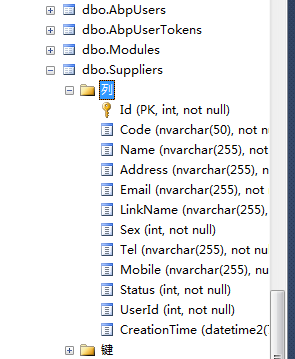
8.执行成功后,查看数据库,Suppliers表创建成功。
abp(net core)+easyui+efcore实现仓储管理系统——使用 WEBAPI实现CURD (十一)的更多相关文章
- abp(net core)+easyui+efcore实现仓储管理系统——使用 WEBAPI实现CURD (十二)
abp(net core)+easyui+efcore实现仓储管理系统目录 abp(net core)+easyui+efcore实现仓储管理系统——ABP总体介绍(一) abp(net core)+ ...
- abp(net core)+easyui+efcore实现仓储管理系统——使用 WEBAPI实现CURD (十三)
abp(net core)+easyui+efcore实现仓储管理系统目录 abp(net core)+easyui+efcore实现仓储管理系统——ABP总体介绍(一) abp(net core)+ ...
- abp(net core)+easyui+efcore实现仓储管理系统——使用 WEBAPI实现CURD (十四)
abp(net core)+easyui+efcore实现仓储管理系统目录 abp(net core)+easyui+efcore实现仓储管理系统——ABP总体介绍(一) abp(net core)+ ...
- abp(net core)+easyui+efcore实现仓储管理系统——使用 WEBAPI实现CURD (十五)
core)+easyui+efcore实现仓储管理系统目录 abp(net core)+easyui+efcore实现仓储管理系统——ABP总体介绍(一) abp(net core)+easyui+e ...
- abp(net core)+easyui+efcore实现仓储管理系统——入库管理之五(四十一)
abp(net core)+easyui+efcore实现仓储管理系统目录 abp(net core)+easyui+efcore实现仓储管理系统——ABP总体介绍(一) abp(net core)+ ...
- abp(net core)+easyui+efcore实现仓储管理系统——出库管理之三(五十一)
abp(net core)+easyui+efcore实现仓储管理系统目录 abp(net core)+easyui+efcore实现仓储管理系统--ABP总体介绍(一) abp(net core)+ ...
- abp(net core)+easyui+efcore实现仓储管理系统——菜单 (十六)
系统目录 abp(net core)+easyui+efcore实现仓储管理系统——ABP总体介绍(一) abp(net core)+easyui+efcore实现仓储管理系统——解决方案介绍(二) ...
- abp(net core)+easyui+efcore实现仓储管理系统——菜单-下(十七)
实现仓储管理系统目录 abp(net core)+easyui+efcore实现仓储管理系统——ABP总体介绍(一) abp(net core)+easyui+efcore实现仓储管理系统——解决方案 ...
- abp(net core)+easyui+efcore实现仓储管理系统——EasyUI前端页面框架 (十八)
目录 abp(net core)+easyui+efcore实现仓储管理系统——ABP总体介绍(一) abp(net core)+easyui+efcore实现仓储管理系统——解决方案介绍(二) ab ...
随机推荐
- JavaWEB路径总结
这篇文章是小编一直想写的一篇,主要是对web阶段中各个路径进行的一些总结,希望读者看过之后对于路径方面有一个清晰的认识.首先声明一点:世界上一切东西都是相对的,对于这点而言,相信大家并不陌生,从初中开 ...
- 在 Windows 中编译 Github 中的 GO 项目
1.相关软件与环境准备 1.1 GO 安装 下载地址,https://studygolang.com/dl,选择 Windows 版,本文安装到 D:\Go 1.2 LiteIDE 安装 下载地址,h ...
- Mybatis_three
延迟加载 实现多对一的延迟加载(association) 例如下面的:有很多个账户信息(招商\工商\农商)是属于一个用户人的 [需求] 查询账户(Account)信息并且关联查询用户(User)信息. ...
- python trojan development 3rd —— use python to creative a simple shell
前两篇文章的木马太被动,今天是通过socket和os来进行主动木马编写 有些s13,我真的搞不懂拿一些没过脑子的代码就放到网上去害人,骗流量,还某知名安全企业学院写的,真的服.我的代码自己运行过,很稳 ...
- 【实战】SpringBoot + KafKa
1.配置pom包 <dependency> <groupId>org.springframework.kafka</groupId> <artifactId& ...
- 最全java多线程总结3——了解阻塞队列和线程安全集合不
看了前两篇你肯定已经理解了 java 并发编程的低层构建.然而,在实际编程中,应该经可能的远离低层结构,毕竟太底层的东西用起来是比较容易出错的,特别是并发编程,既难以调试,也难以发现问题,我们还是 ...
- node.js的异步I/O、事件驱动、单线程
nodejs的特点总共有以下几点 异步I/O(非阻塞I/O) 事件驱动 单线程 擅长I/O密集型,不擅长CPU密集型 高并发 下面是一道很经典的面试题,描述了node的整体运行机制,相信很多人都碰到了 ...
- spring-boot-plus后台快速开发框架1.0.0.RELEASE发布了
spring-boot-plus spring-boot-plus是一套集成spring boot常用开发组件的后台快速开发框架 官网地址:springboot.plus GITHUB:https:/ ...
- Spring 入门程序
1.0 导包的时候要注意: 以上的第一个是.class文件 以上的第二个是文件的解释性页面. 以上的第三个是.java文件 2.0 配置文件需要导入依赖(有dtd 依赖,也有xsd依赖) ² 从be ...
- redux和react-redux做简单组件控制
这次我们用两种方式实现以下要求 1.三个组件 2.第一个组件有两个按钮 分别控制第二和第三个组件年龄和姓名的改变 3第二个组件展示姓名,第三个组件展示年龄 用到哪些插件 store redux 一 ...