
ASP.NET Core分布式项目实战(集成ASP.NETCore Identity)--学习笔记
任务24:集成ASP.NETCore Identity
之前在 Index 页面写了一个 strong 标签,需要加个判断再显示,不然为空没有错误的时候也会显示
@if (!ViewContext.ModelState.IsValid)

{

    <strong>Error""</strong>

    <div asp-validation-summary="All" class="danger"></div>

}
因为 asp-validation-summary 是 asp.net view 视图会自动控制,而 strong 不会,所以要显示标题需要添加一个判断,那么这里我们直接移除掉,当有错误信息的时候直接显示即可,这里作为上一节的补充
<div asp-validation-summary="All" class="danger"></div>
这一节主要把 Identity 加入进来
一开始我们把 startup 中的 Identity 注释掉了,只需要开启即可
添加包 IdentityServer4,IdentityServer4.AspNetIdentity,添加之后就可以把 AddTestUsers 移除掉,它就不会再用测试里面的 user,
Startup.cs
public void ConfigureServices(IServiceCollection services)

{

    services.AddDbContext<ApplicationDbContext>(options =>

    {

        options.UseSqlServer(Configuration.GetConnectionString("DefaultConnection"));

    });

    services.AddIdentity<ApplicationUser, ApplicationUserRole>()

        .AddEntityFrameworkStores<ApplicationDbContext>()

        .AddDefaultTokenProviders();

    services.AddIdentityServer()

            .AddDeveloperSigningCredential()

            .AddInMemoryClients(Config.GetClients())

            .AddInMemoryApiResources(Config.GetApiResource())

            .AddInMemoryIdentityResources(Config.GetIdentityResources())

            .AddAspNetIdentity<ApplicationUser>();

    //services.AddAuthentication(CookieAuthenticationDefaults.AuthenticationScheme)

    //    .AddCookie(options => {

    //        options.LoginPath = "/Account/Login";

    //    });

    //services.Configure<IdentityOptions>(options =>

    //{

    //    options.Password.RequireLowercase = true;

    //    options.Password.RequireNonAlphanumeric = true;

    //    options.Password.RequireUppercase = true;

    //    options.Password.RequiredLength = 12;

    //});

    services.AddScoped<ConsentService>();

    services.AddMvc();

}
接下来要到 AccountController 中切换回原先的登录逻辑
AccountController
private UserManager<ApplicationUser> _userManager;

private SignInManager<ApplicationUser> _signInManager;

private IIdentityServerInteractionService _interaction;

//private readonly TestUserStore _users;

//public AccountController(TestUserStore users)

//{

//    _users = users;

//}

public AccountController(UserManager<ApplicationUser> userManager,

    SignInManager<ApplicationUser> signInManager,

    IIdentityServerInteractionService interaction)

{

    _userManager = userManager;

    _signInManager = signInManager;

    _interaction = interaction;

}
接下来改造 AccountController 的 Register 方法,首先把 RegisterViewModel 的 UserName 改回为 Email
RegisterViewModel
public string Email { get; set; }

//public string UserName { get; set; }
AccountController
[HttpPost]

public async Task<IActionResult> Register(RegisterViewModel registerViewModel, string returnUrl  = null)

{

    if (ModelState.IsValid)

    {

        ViewData["ReturnUrl"] = returnUrl;

        var identityUser = new ApplicationUser

        {

            Email = registerViewModel.Email,

            UserName = registerViewModel.Email,

            NormalizedUserName = registerViewModel.Email,

        };

        var identityResult = await _userManager.CreateAsync(identityUser, registerViewModel.Password);

        if (identityResult.Succeeded)

        {

            await _signInManager.SignInAsync(identityUser, new AuthenticationProperties { IsPersistent = true });

            return RedirectToLoacl(returnUrl);

        }

        else

        {

            AddErrors(identityResult);

        }

    }

    return View();

}
接着改造 AccountController 的 Login 方法,首先把 LoginViewModel 的 UserName 也改回为 Email,并加上一个 RememberMe 字段
LoginViewModel
public string Email { get; set; }

//public string UserName { get; set; }

public bool RememberMe { get; set; }
调用 UserManager 的查找和登录的逻辑
AccountController
[HttpPost]

public async Task<IActionResult> Login(LoginViewModel loginViewModel,string returnUrl)

{

    if (ModelState.IsValid)

    {

        ViewData["ReturnUrl"] = returnUrl;

        var user = await _userManager.FindByEmailAsync(loginViewModel.Email);

        if (user == null)

        {

            ModelState.AddModelError(nameof(loginViewModel.Email), "Email not exists");

        }

        else

        {

            if (await _userManager.CheckPasswordAsync(user, loginViewModel.Password))

            {

                AuthenticationProperties props = null;

                if (loginViewModel.RememberMe)

                {

                    props = new AuthenticationProperties

                    {

                        IsPersistent = true,

                        ExpiresUtc = DateTimeOffset.UtcNow.Add(TimeSpan.FromMinutes(30)),

                    };

                }

                await _signInManager.SignInAsync(user, props);

                if (_interaction.IsValidReturnUrl(returnUrl))

                {

                    return Redirect(returnUrl);

                }

                return Redirect("~/");

            }

            ModelState.AddModelError(nameof(loginViewModel.Password), "Wrong Password");

        }

    }

    return View(loginViewModel);

}
还原 Logout 方法
Logout
public async Task<IActionResult> Logout()

{

    await _signInManager.SignOutAsync();

    //await HttpContext.SignOutAsync();

    return RedirectToAction("Index", "Home");

}
检查一下 view,将 Login.cshtml 里面的 UserName 修改为 Email,model 改为 LoginViewModel
Login.cshtml
@model LoginViewModel;
恢复 Program 中 EF 的初始化
Program
public static void Main(string[] args)

{

    BuildWebHost(args)

        .MigrateDbContext<ApplicationDbContext>((context, services) =>

        {

            new ApplicationDbContextSeed().SeedAsync(context, services)

            .Wait();

        })

        .Run();

}
启动程序之后会根据 appsettings.json 中的配置创建数据库
appsettings.json
"ConnectionStrings": {

"DefaultConnection": "Server=(localdb)\\mssqllocaldb;Database=aspnet-IdentitySample-CE9DD12E-9C3B-4072-8E38-6F33420849CB;Trusted_Connection=True;MultipleActiveResultSets=true"

}
编译启动程序,可以看到用户表有一条数据
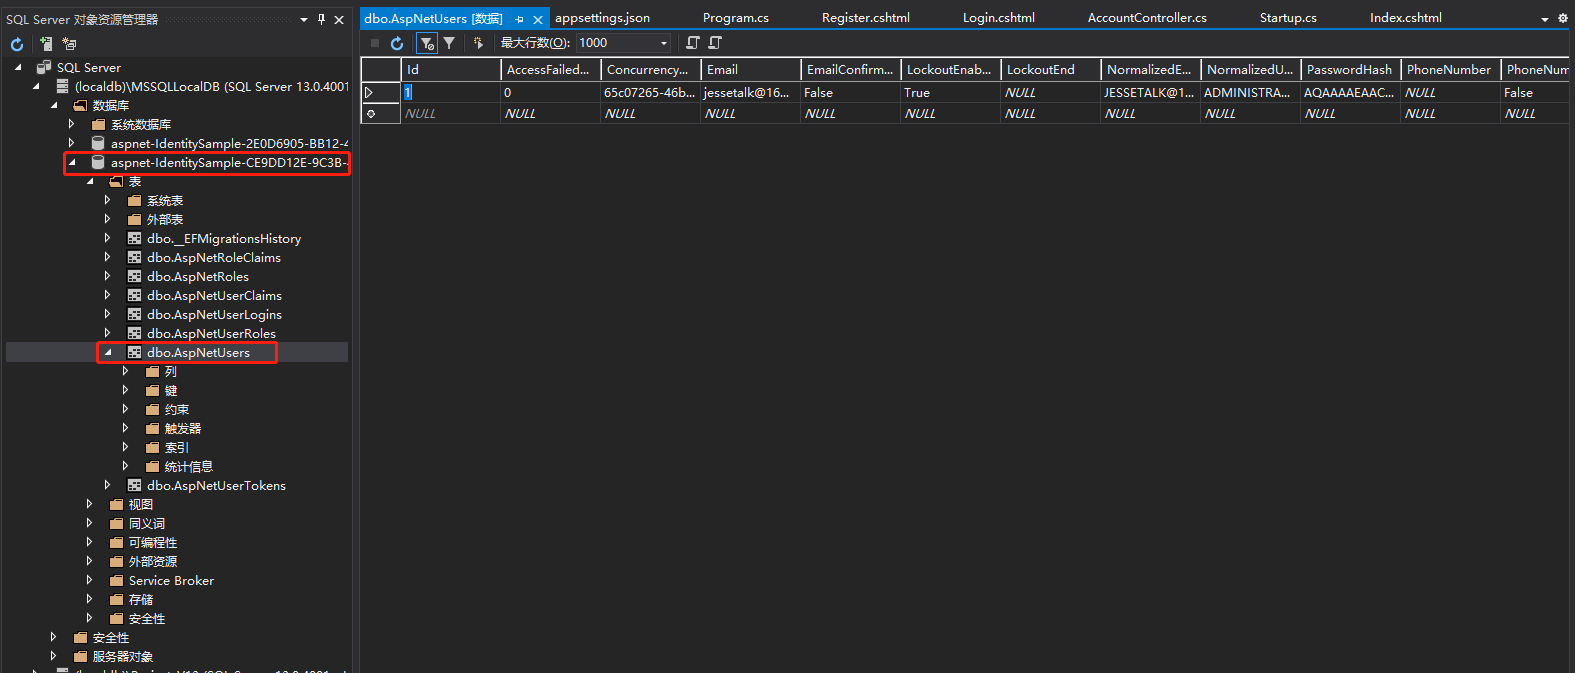
这条数据来自 ApplicationDbContextSeed
public class ApplicationDbContextSeed

{

    private UserManager<ApplicationUser> _userManager;

    public async Task SeedAsync(ApplicationDbContext context, IServiceProvider services)

    {

        if (!context.Users.Any())

        {

            _userManager = services.GetRequiredService<UserManager<ApplicationUser>>();

            var defaultUser = new ApplicationUser {

                UserName="Administrator",

                Email ="jessetalk@163.com",

                NormalizedUserName ="admin"

            };

            var result = await _userManager.CreateAsync(defaultUser, "Password$123");

            if (!result.Succeeded)

            {

                throw new Exception("初始默认用户失败");

            }

        }

    }

}
浏览器访问
http://localhost:5000/
使用邮箱登录

退出登录之后启动客户端,浏览器访问 5001 之后会跳转到 5000
http://localhost:5001/
输入邮箱和密码之后会来到 consent 页面
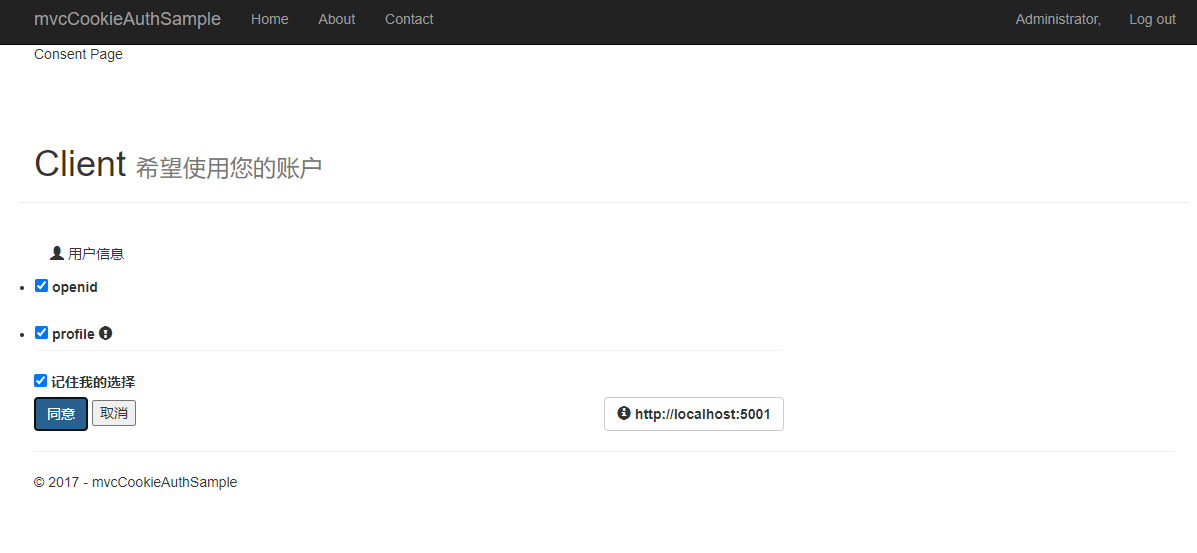
点击同意之后跳转到 MvcClient

点击 About 看到用户名是 Administrator,就是数据库里面的用户
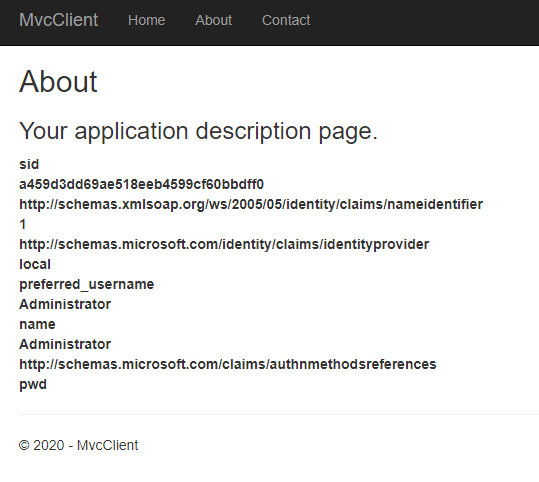
这就是我们把程序里面的 TestUserStore 替换为 Identity
课程链接
http://video.jessetalk.cn/course/explore


本作品采用知识共享署名-非商业性使用-相同方式共享 4.0 国际许可协议进行许可。
欢迎转载、使用、重新发布,但务必保留文章署名 郑子铭 (包含链接: http://www.cnblogs.com/MingsonZheng/ ),不得用于商业目的,基于本文修改后的作品务必以相同的许可发布。
如有任何疑问,请与我联系 (MingsonZheng@outlook.com) 。
ASP.NET Core分布式项目实战(集成ASP.NETCore Identity)--学习笔记的更多相关文章
- ASP.NET Core分布式项目实战
ASP.NET Core开发者成长路线图 asp.net core 官方文档 https://docs.microsoft.com/zh-cn/aspnet/core/getting-started/ ...
- 【笔记目录2】ASP.NET Core分布式项目实战
当前标签: ASP.NET Core分布式项目实战 共2页: 上一页 1 2 11.ClientCredential模式总结 GASA 2019-03-11 12:59 阅读:26 评论:0 10. ...
- 【笔记目录1】ASP.NET Core分布式项目实战
当前标签: ASP.NET Core分布式项目实战 共2页: 1 2 下一页 35.Docker安装Mysql挂载Host Volume GASA 2019-06-20 22:02 阅读:51 评论 ...
- ASP.NET Core分布式项目-2.oauth密码模式identity server4实现
源码下载 这里根据<ASP.NET Core分布式项目-1.IdentityServer4登录中心>的代码来继续更新oauth密码模式,这里的密码模式比上次的客户端模式更安全 在WebAp ...
- 【ASP.NET Core分布式项目实战】(三)整理IdentityServer4 MVC授权、Consent功能实现
本博客根据http://video.jessetalk.cn/my/course/5视频整理(内容可能会有部分,推荐看源视频学习) 前言 由于之前的博客都是基于其他的博客进行开发,现在重新整理一下方便 ...
- ASP.NET Core分布式项目实战-目录
前言 今年是2018年,发现已经有4年没有写博客了,在这4年的时光里,接触了很多的.NET技术,自己的技术也得到很大的进步.在这段时光里面很感谢张队长以及其他开发者一直对.NET Core开源社区做出 ...
- 【ASP.NET Core分布式项目实战】(一)IdentityServer4登录中心、oauth密码模式identity server4实现
本博客根据http://video.jessetalk.cn/my/course/5视频整理 资料 OAuth2 流程:http://www.ruanyifeng.com/blog/2014/05/o ...
- 【ASP.NET Core分布式项目实战】(五)Docker制作dotnet core控制台程序镜像
Docker制作dotnet core控制台程序镜像 基于dotnet SDK 新建控制台程序 mkdir /home/console cd /home/console dotnet new cons ...
- 【ASP.NET Core分布式项目实战】(六)Gitlab安装
Gitlab GitLab是由GitLabInc.开发,使用MIT许可证的基于网络的Git仓库管理工具,且具有wiki和issue跟踪功能.使用Git作为代码管理工具,并在此基础上搭建起来的web服务 ...
- 【ASP.NET Core分布式项目实战】(二)oauth2 + oidc 实现 server部分
本博客根据http://video.jessetalk.cn/my/course/5视频整理(内容可能会有部分,推荐看源视频学习) 资料 我们基于之前的MvcCookieAuthSample来做开发 ...
随机推荐
- 引入阿里在线图标(微信小程序)
https://www.bilibili.com/video/BV1WJ41197sD?p=49
- freeswitch-1.10.7 on centos7编译安装
概述 最近由于项目需求,老版本的fs已经不适用,特此升级了freeswitch的版本,使用当前最新的1.10.7版本编译安装. 环境 centos:CentOS release 7.0 (Final ...
- C#设计模式15——观察者模式的写法
是什么: 观察者模式是一种设计模式,它定义了对象之间的一种一对多的依赖关系,使得当一个对象状态发生改变时,它的所有依赖者都能够得到相应的通知并作出相应的反应.观察者模式也被称为发布-订阅模式. 为什么 ...
- mvn 编译异常:Fatal error compiling: 无效的标记: -parameters
错误信息: [ERROR] Failed to execute goal org.apache.maven.plugins:maven-compiler-plugin::compile (defaul ...
- 03-Tcl数学表达式及expr命令
3 Tcl书写表达式及expr命令 Tcl提供了有效的数学运算和逻辑运算功能.通过expr可以实现对数学表达式的分析和计算. 3.1 数学与逻辑运算符 运算符 说明 - + ~ ! 一元减(取负).一 ...
- HTTP 1.1响应码
HTTP 1.1响应码 响应码和信息 含义 HttpURLConnection 1XX 信息 100 Continue 服务器准备接受请求主体,客户端应当发送请求主体:这允许客户端在请求中发送大量数据 ...
- [转帖]mysql8.0 MySQL函数
PART1. MySQL函数介绍 函数表示对输入参数值返回一个具有特定关系的值,MySQL提供了大量丰富的函数,在进行数据库管理以及数据的查询和操作时将会经常用到各种函数.各类函数从功能方面主要分为数 ...
- [转帖]JVM系列之:再谈java中的safepoint
https://zhuanlan.zhihu.com/p/171625395 safepoint是什么 java程序里面有很多很多的java线程,每个java线程又有自己的stack,并且共享了hea ...
- [转帖]关于面试时HA(RAC)会问到的一些问题
1.什么是RAC(Real Application Cluster)? RAC(Real Application Cluster)是Oracle数据库的一种部署架构,它将多个数据库服务器连接在一起,共 ...
- [转帖]【TiDB】快速起步
1. 存储引擎的的功能 提供数据存储接口并持久化存储数据 2. LSM-tree 的特性 LSM-tree 结构本质上是一个用空间置换写入延迟,用顺序写入替换随机写入的数据结构 3. 数据库技术的发展 ...