Python Appium 滑动、点击等操作
Python Appium 滑动、点击等操作
1、手机滑动-swipe
# FileName : Tmall_App.py

# Author   : Adil

# DateTime : 2018/3/25 17:22

# SoftWare : PyCharm

from appium import  webdriver

caps = {}

caps['platformName'] = 'Android'

caps['platformVersion'] = '6.0'

caps['deviceName'] = 'N79SIV5PVCSODAQC'

caps['appPackage'] = 'com.tmall.wireless'

caps['appActivity'] = 'com.tmall.wireless.splash.TMSplashActivity'

#隐藏键盘

caps['unicodeKeyboard'] = True

caps['resetKeyboard'] = True

driver = webdriver.Remote('http://127.0.0.1:4723/wd/hub', caps)

driver.swipe()

if __name__ == '__main__':

    pass
查看源码
Ctrl + 鼠标右键点击 driver.swipe()
# convenience method added to Appium (NOT Selenium 3)

    def swipe(self, start_x, start_y, end_x, end_y, duration=None):

        """Swipe from one point to another point, for an optional duration.

        :Args:

         - start_x - x-coordinate at which to start

         - start_y - y-coordinate at which to start

         - end_x - x-coordinate at which to stop

         - end_y - y-coordinate at which to stop

         - duration - (optional) time to take the swipe, in ms.

        :Usage:

            driver.swipe(100, 100, 100, 400)

        """

        # `swipe` is something like press-wait-move_to-release, which the server

        # will translate into the correct action

        action = TouchAction(self)

        action \

            .press(x=start_x, y=start_y) \

            .wait(ms=duration) \

            .move_to(x=end_x, y=end_y) \

            .release()

        action.perform()

        return self
查看源码语法,起点和终点四个坐标参数。 手机屏幕从左上角开始为0,向右为x轴坐标,向下为y轴坐标。
duration是滑动屏幕持续的时间,时间越短速度越快。默认为None可不填,一般设置500-1000毫秒比较合适。
swipe(self, start_x, start_y, end_x, end_y, duration=None)

    Swipe from one point to another point, for an optional duration.

    从一个点滑动到另外一个点,duration是持续时间

    :Args:

    - start_x - 开始滑动的x坐标

    - start_y - 开始滑动的y坐标

    - end_x - 结束点x坐标

    - end_y - 结束点y坐标

    - duration - 持续时间,单位毫秒

    :Usage:

    driver.swipe(100, 100, 100, 400)
向下滑动实例
# FileName : Tmall_App.py

# Author   : Adil

# DateTime : 2018/3/25 17:22

# SoftWare : PyCharm

import time

from appium import  webdriver

caps = {}

caps['platformName'] = 'Android'

caps['platformVersion'] = '6.0'

caps['deviceName'] = 'N79SIV5PVCSODAQC'

caps['appPackage'] = 'com.tmall.wireless'

caps['appActivity'] = 'com.tmall.wireless.splash.TMSplashActivity'

#隐藏键盘

caps['unicodeKeyboard'] = True

caps['resetKeyboard'] = True

driver = webdriver.Remote('http://127.0.0.1:4723/wd/hub', caps)

# 获取屏幕的size

size = driver.get_window_size()

print(size)

# 获取屏幕宽度 width

width = size['width']

print(width)

# 获取屏幕高度 height

height = size['height']

print(height)

# 执行滑屏操作,向下(下拉)滑动

x1 = width*0.5

y1 = height*0.25

y2 = height*0.9

time.sleep(3)

print("滑动前")

driver.swipe(x1,y1,x1,y2)

print("滑动后")

# 增加滑动次数,滑动效果不明显,增加滑动次数

for i in range(5):

    print("第%d次滑屏"%i)

    time.sleep(3)

    driver.swipe(x1,y1,x1,y2)

time.sleep(3)

driver.quit()

if __name__ == '__main__':

    pass
封装滑动方法,代码如下:
# FileName : Tmall_App.py

# Author   : Adil

# DateTime : 2018/3/25 17:22

# SoftWare : PyCharm

import time

from appium import  webdriver

caps = {}

caps['platformName'] = 'Android'

caps['platformVersion'] = '6.0'

caps['deviceName'] = 'N79SIV5PVCSODAQC'

caps['appPackage'] = 'com.tmall.wireless'

caps['appActivity'] = 'com.tmall.wireless.splash.TMSplashActivity'

#隐藏键盘

caps['unicodeKeyboard'] = True

caps['resetKeyboard'] = True

driver = webdriver.Remote('http://127.0.0.1:4723/wd/hub', caps)

# 获取屏幕的size

size = driver.get_window_size()

print(size)

# 获取屏幕宽度 width

width = size['width']

print(width)

# 获取屏幕高度 height

height = size['height']

print(height)

# 执行滑屏操作,向下(下拉)滑动

x1 = width*0.5

y1 = height*0.25

y2 = height*0.8

time.sleep(3)

print("滑动前")

driver.swipe(x1,y1,x1,y2)

print("滑动后")

# 增加滑动次数,滑动效果不明显,增加滑动次数

for i in range(5):

    print("第%d次滑屏"%i)

    time.sleep(3)

    driver.swipe(x1,y1,x1,y2)

time.sleep(3)

# 封装滑动方法

def swipeUp(driver,n = 5):

    '''定义向上滑动方法'''

    print("定义向上滑动方法")

    x1 = width*0.5

    y1 = height*0.9

    y2 = height*0.25

    time.sleep(3)

    print("滑动前")

    for i in range(n):

        print("第%d次滑屏" % i)

        time.sleep(3)

        driver.swipe(x1, y1, x1, y2)

def swipeDown(driver,n = 5):

    '''定义向下滑动方法'''

    print("定义向下滑动方法")

    x1 = width*0.5

    y1 = height*0.25

    y2 = height*0.9

    time.sleep(3)

    print("滑动前")

    for i in range(n):

        print("第%d次滑屏" % i)

        time.sleep(3)

        driver.swipe(x1, y1, x1, y2)

def swipeLeft(driver,n = 5):

    '''定义向左滑动方法'''

    print("定义向左滑动方法")

    x1 = width*0.8

    x2 = width*0.2

    y1 = height*0.5

    time.sleep(3)

    print("滑动前")

    for i in range(n):

        print("第%d次滑屏" % i)

        time.sleep(3)

        driver.swipe(x1, y1, x2, y1)

def swipeRight(driver,n = 5):

    '''定义向右滑动方法'''

    print("定义向右滑动方法")

    x1 = width*0.2

    x2 = width*0.8

    y1 = height*0.5

    time.sleep(3)

    print("滑动前")

    for i in range(n):

        print("第%d次滑屏" % i)

        time.sleep(3)

        driver.swipe(x1, y1, x2, y1)

if __name__ == '__main__':

    swipeUp(driver)

    swipeDown(driver)

    swipeLeft(driver)

    swipeRight(driver)

    driver.quit()
2、点击手机屏幕坐标-tap
使用场景:有时候定位元素的时候,你使出了十八班武艺还是定位不到,怎么办呢?(面试经常会问)
那就拿出绝招:点元素所在位置的坐标
import time

from appium import  webdriver

caps = {}

caps['platformName'] = 'Android'

caps['platformVersion'] = '6.0'

caps['deviceName'] = 'N79SIV5PVCSODAQC'

caps['appPackage'] = 'com.tmall.wireless'

caps['appActivity'] = 'com.tmall.wireless.splash.TMSplashActivity'

#隐藏键盘

caps['unicodeKeyboard'] = True

caps['resetKeyboard'] = True

driver = webdriver.Remote('http://127.0.0.1:4723/wd/hub', caps)

driver.tap()
查看源码
Ctrl + 鼠标右键点击 driver.tap()
# convenience method added to Appium (NOT Selenium 3)

    def tap(self, positions, duration=None):

        """Taps on an particular place with up to five fingers, holding for a

        certain time

        :Args:

         - positions - an array of tuples representing the x/y coordinates of

         the fingers to tap. Length can be up to five.

         - duration - (optional) length of time to tap, in ms

        :Usage:

            driver.tap([(100, 20), (100, 60), (100, 100)], 500)

        """

        if len(positions) == 1:

            action = TouchAction(self)

            x = positions[0][0]

            y = positions[0][1]

            if duration:

                action.long_press(x=x, y=y, duration=duration).release()

            else:

                action.tap(x=x, y=y)

            action.perform()

        else:

            ma = MultiAction(self)

            for position in positions:

                x = position[0]

                y = position[1]

                action = TouchAction(self)

                if duration:

                    action.long_press(x=x, y=y, duration=duration).release()

                else:

                    action.press(x=x, y=y).release()

                ma.add(action)

            ma.perform()

        return self
tap是模拟手指点击,一般页面上元素
的语法有两个参数,第一个是positions,是list类型最多五个点,duration是持续时间,单位毫秒
tap(self, positions, duration=None):

    Taps on an particular place with up to five fingers, holding for a certain time

    模拟手指点击(最多五个手指),可设置按住时间长度(毫秒)

    :Args:

    - positions - list类型,里面对象是元组,最多五个。如:[(100, 20), (100, 60)]

    - duration - 持续时间,单位毫秒,如:500

    :Usage:

    driver.tap([(100, 20), (100, 60), (100, 100)], 500)
实际应用:坐标定位
如图:查看元素坐标,可以看到右侧bonds属性
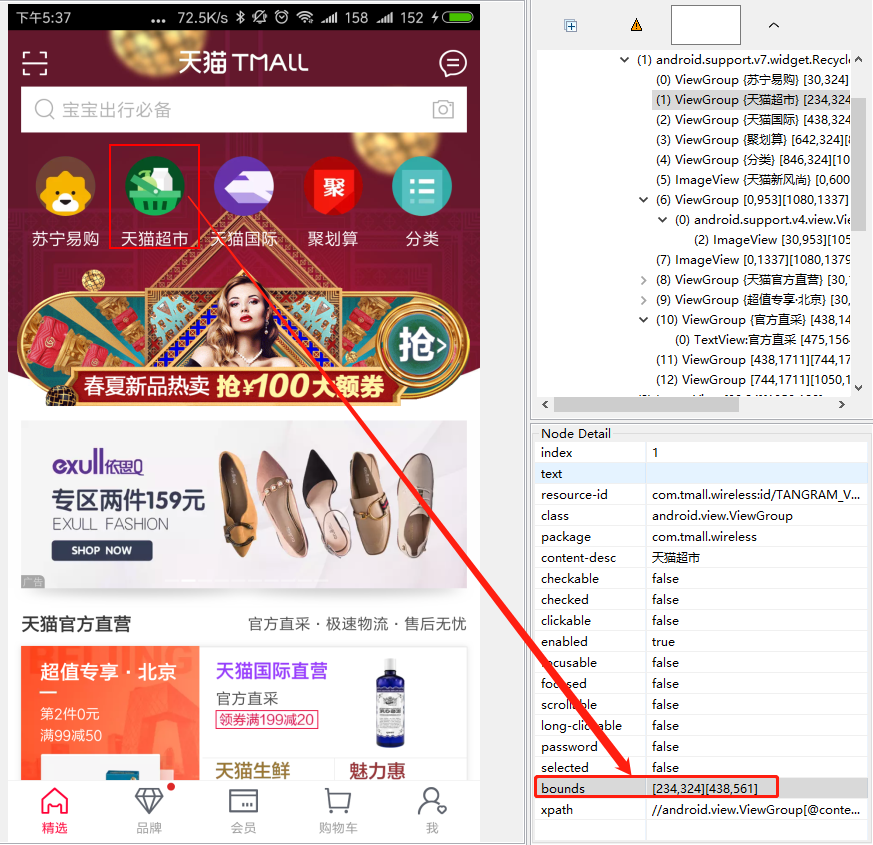
代码实例如下:
# FileName : Tamll_App_TapDemo.py

# Author   : Adil

# DateTime : 2018/3/26 17:44

# SoftWare : PyCharm

import time

from appium import  webdriver

caps = {}

caps['platformName'] = 'Android'

caps['platformVersion'] = '6.0'

caps['deviceName'] = 'N79SIV5PVCSODAQC'

caps['appPackage'] = 'com.tmall.wireless'

caps['appActivity'] = 'com.tmall.wireless.splash.TMSplashActivity'

#隐藏键盘

caps['unicodeKeyboard'] = True

caps['resetKeyboard'] = True

driver = webdriver.Remote('http://127.0.0.1:4723/wd/hub', caps)

# 操作元素坐标点击

# 天猫-天猫超市 坐标

def tapHit(driver):

    time.sleep(3)

    driver.tap([(234,324),(438,561)],500)

    time.sleep(2)

if __name__ == '__main__':

    tapHit(driver)

    time.sleep(15)

    driver.quit()
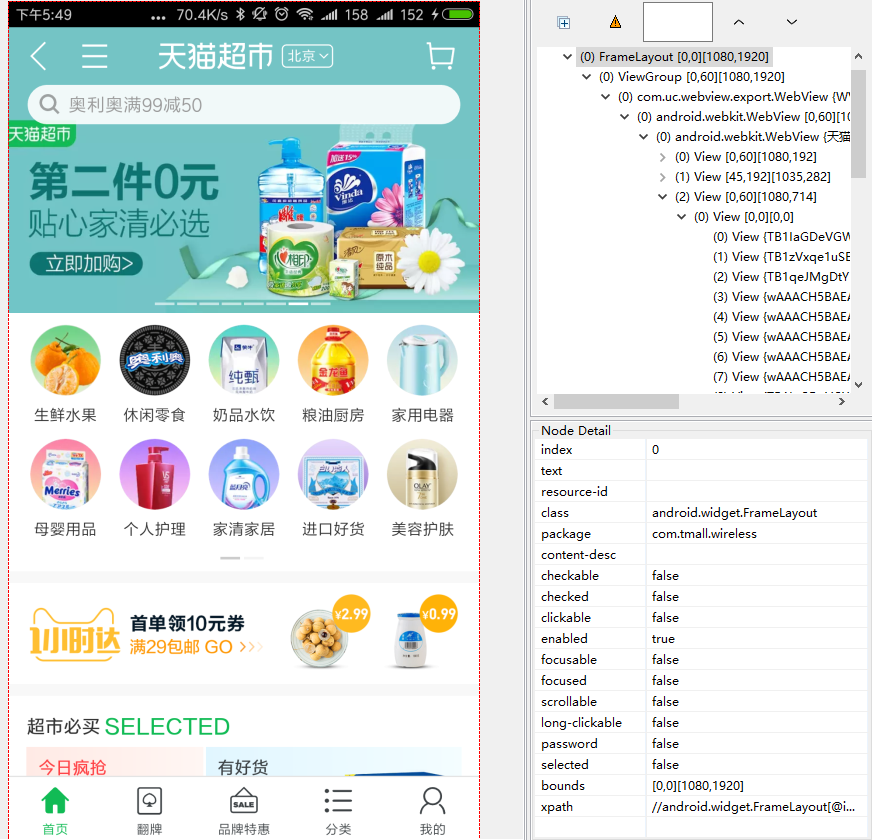
操作效果如下:
说明:
通过坐标定位是元素定位的下下下策,实在没办法才用这个,另外如果换了手机分辨率,这个坐标就不能写死了,得算出所在屏幕的比例。
Python Appium 滑动、点击等操作的更多相关文章
- python+appium模拟手机物理按键操作
一句代码:driver.keyevent() 括号里填入的是手机物理按键的数字代号 driver.press_keycode() 括号里填入的是键盘按键的数字代号 手机物理 ...
- Python+Appium自动化测试(10)-TouchAction类与MultiAction类(控件元素的滑动、拖动,九宫格解锁,手势操作等)
滑动屏幕方法swipe一般用于对页面进行上下左右滑动操作,但自动化过程中还会遇到其他情况,如对控件元素进行滑动.拖拽操作,九宫格解锁,手势操作,地图的放大与缩小等.这些需要针对控件元素的滑动操作,或者 ...
- Python + Appium 自动化操作微信入门看这一篇就够了
简介 Appium 是一个开源的自动化测试工具,支持 Android.iOS 平台上的原生应用,支持 Java.Python.PHP 等多种语言. Appium 封装了 Selenium,能够为用户提 ...
- appium滑动操作(向上、向下、向左、向右)
appium滑动操作(向上滑动.向下滑动.向左滑动.向右滑动) 测试app:今日头条apk 测试设备:夜游神模拟器 代码如下: 先用x.y获取当前的width和height def getSize() ...
- Python + Appium 环境搭建
---恢复内容开始--- Appium自动化公司内部测试培训1-环境搭建 课程目的 一.Python + Appium 环境搭建 课程内容 1 安装前准备工作 搭建环境所需要的安装文件已经下载好 ...
- Python +appium baseview
封装python+appium 的baseview模块 from selenium.webdriver.support.ui import WebDriverWait from time import ...
- Python+Appium自动化测试(15)-使用Android模拟器(详细)
做APP的UI自动化测试时,我们往往会使用真机跑自动化测试脚本,因为这样才是最真实的使用场景.但前期调试脚本的话,可以先使用模拟器,这样相对更加方便. 不推荐使用Android SDK里自带模拟器,太 ...
- python+appium运行提示找不到adb.exe “An unknown server-side error occurred while processing the command. Original error: Could not find 'adb.exe' in ["D:\\adt\\sdk;\\platform-tools\\adb.exe"”
自己踩过的坑,不记下来就会忘掉,忘了就会不断的重复踩坑!! 重来在一台电脑上搭建了python的环境,在运行的时候,提示找不到adb.exe,看到这个问题我在想是不是我的环境变量配置有问题,我就去改了 ...
- Python appium搭建app自动化测试环境
appium做app自动化测试,环境搭建是比较麻烦的. 也是很多初学者在学习app自动化之时,花很多时间都难跨越的坎. 但没有成功的环境,就没有办法继续后续的使用. 在app自动化测试当中,我们主要是 ...
随机推荐
- Solr基本操作
/update 使用/update进行索引维护,进入Solr管理界面SolrCore下的Document下: 我们进行更新操作可以用json和xml多种格式,这里以xml格式为例说明.先来看看界面上的 ...
- Kali系列之aircrack-ng wifi密码穷举
kali linux安全渗透 网卡:rtl8187 工具aircrack-ng 操作+ 查看无线网卡信息 ifconfig 或者 iwconfig 有个是wlan0的就是您的外置无线网卡 启动网卡监听 ...
- 监控mysql状态脚本
监控mysql状态, 发现宕后, 自动重启, 每秒检查一次. check.sh #!/bin/bash while [ true ]; do /bin/sleep 1 sh mysql_status. ...
- 基础_cifar10_序贯
今天的基础研究主要是在cifar10数据集上解决一下几个问题: 1.从头开始,从最简单的序贯开始,尝试model的构造: 2.要将模型打印出来.最好是能够打印出图片,否则也要summary; 3.尝试 ...
- 20145308 《网络对抗》 逆向及BOF基础实践 学习总结
20145308 <网络对抗> 逆向及BOF基础实践 学习总结 实践目的 通过两种方法,实现程序能够运行原本并不会被运行的代码 实践原理 利用foo函数的Bof漏洞,构造一个攻击输入字符串 ...
- 实习日记a
根据NPSaleAPI项目,学习了weUI 练习: <a href="javascript:;" class="weui_btn weui_btn_primary& ...
- gcc,g++
什么是gcc / g++ 首先说明:gcc 和 GCC 是两个不同的东西 GCC:GNU Compiler Collection(GUN 编译器集合),它可以编译C.C++.JAV.Fortran.P ...
- 《HTML与CSS 第一章 认识HTML》读书笔记
一.Web让广播明星黯然失色 要建立Web页面,需要创建用超文本标记语言(HyperText Markup Language,HTML)编写的文件,把它们放在一个Web服务器上 二.Web服务器能做什 ...
- eMMC之分区管理、总线协议和工作模式【转】
本文转载自:https://blog.csdn.net/u013686019/article/details/66472291 一.eMMC 简介 eMMC 是 embedded MultiMedia ...
- 推荐一个静态博客兼笔记的工具:WDTP
简介 WDTP(山湖录)不止是一款开源免费的GUI桌面单机版静态网站生成器和简单方便的前端开发工具,更是一款跨平台的集笔记.录音.个人知识管理.写作/创作.博客/网站内容与样式管理等功能于一体的多合一 ...