python之scrapy爬取jd和qq招聘信息
1、settings.py文件
# -*- coding: utf-8 -*-

# Scrapy settings for jd project

#

# For simplicity, this file contains only settings considered important or

# commonly used. You can find more settings consulting the documentation:

#

#     https://doc.scrapy.org/en/latest/topics/settings.html

#     https://doc.scrapy.org/en/latest/topics/downloader-middleware.html

#     https://doc.scrapy.org/en/latest/topics/spider-middleware.html

BOT_NAME = 'jd'

SPIDER_MODULES = ['jd.spiders']

NEWSPIDER_MODULE = 'jd.spiders'

LOG_LEVEL="WARNING"

LOG_FILE="./jingdong1.log"

# Crawl responsibly by identifying yourself (and your website) on the user-agent

#USER_AGENT = 'jd (+http://www.yourdomain.com)'

# Obey robots.txt rules

ROBOTSTXT_OBEY = True

# Configure maximum concurrent requests performed by Scrapy (default: 16)

#CONCURRENT_REQUESTS = 32

# Configure a delay for requests for the same website (default: 0)

# See https://doc.scrapy.org/en/latest/topics/settings.html#download-delay

# See also autothrottle settings and docs

#DOWNLOAD_DELAY = 3

# The download delay setting will honor only one of:

#CONCURRENT_REQUESTS_PER_DOMAIN = 16

#CONCURRENT_REQUESTS_PER_IP = 16

# Disable cookies (enabled by default)

#COOKIES_ENABLED = False

# Disable Telnet Console (enabled by default)

#TELNETCONSOLE_ENABLED = False

# Override the default request headers:

#DEFAULT_REQUEST_HEADERS = {

#   'Accept': 'text/html,application/xhtml+xml,application/xml;q=0.9,*/*;q=0.8',

#   'Accept-Language': 'en',

#}

# Enable or disable spider middlewares

# See https://doc.scrapy.org/en/latest/topics/spider-middleware.html

#SPIDER_MIDDLEWARES = {

#    'jd.middlewares.JdSpiderMiddleware': 543,

#}

# Enable or disable downloader middlewares

# See https://doc.scrapy.org/en/latest/topics/downloader-middleware.html

#DOWNLOADER_MIDDLEWARES = {

#    'jd.middlewares.JdDownloaderMiddleware': 543,

#}

# Enable or disable extensions

# See https://doc.scrapy.org/en/latest/topics/extensions.html

#EXTENSIONS = {

#    'scrapy.extensions.telnet.TelnetConsole': None,

#}

# Configure item pipelines

# See https://doc.scrapy.org/en/latest/topics/item-pipeline.html

#ITEM_PIPELINES = {

#    'jd.pipelines.JdPipeline': 300,

#}

# Enable and configure the AutoThrottle extension (disabled by default)

# See https://doc.scrapy.org/en/latest/topics/autothrottle.html

#AUTOTHROTTLE_ENABLED = True

# The initial download delay

#AUTOTHROTTLE_START_DELAY = 5

# The maximum download delay to be set in case of high latencies

#AUTOTHROTTLE_MAX_DELAY = 60

# The average number of requests Scrapy should be sending in parallel to

# each remote server

#AUTOTHROTTLE_TARGET_CONCURRENCY = 1.0

# Enable showing throttling stats for every response received:

#AUTOTHROTTLE_DEBUG = False

# Enable and configure HTTP caching (disabled by default)

# See https://doc.scrapy.org/en/latest/topics/downloader-middleware.html#httpcache-middleware-settings

#HTTPCACHE_ENABLED = True

#HTTPCACHE_EXPIRATION_SECS = 0

#HTTPCACHE_DIR = 'httpcache'

#HTTPCACHE_IGNORE_HTTP_CODES = []

#HTTPCACHE_STORAGE = 'scrapy.extensions.httpcache.FilesystemCacheStorage'
2、jingdong.py文件
# -*- coding: utf-8 -*-

import scrapy

import logging

import json

logger = logging.getLogger(__name__)

class JingdongSpider(scrapy.Spider):

    name = 'jingdong'

    allowed_domains = ['zhaopin.jd.com']

    start_urls = ['http://zhaopin.jd.com/web/job/job_list?page=1']

    pageNum = 1

    def parse(self, response):

        content  = response.body.decode()

        content = json.loads(content)

        ##########去除列表中字典集中的空值###########

        for i in range(len(content)):

            #list(content[i].keys()获取当前字典中的key

            for key in list(content[i].keys()): #content[i]为字典

                if not content[i].get(key):#content[i].get(key)根据key获取value

                    del content[i][key] #删除空值字典

        for i in range(len(content)):

            logging.warning(content[i])

        self.pageNum = self.pageNum+1

        if self.pageNum<=355:

            next_url = "http://zhaopin.jd.com/web/job/job_list?page="+str(self.pageNum)

            yield scrapy.Request(

                next_url,

                callback=self.parse

            )

        pass
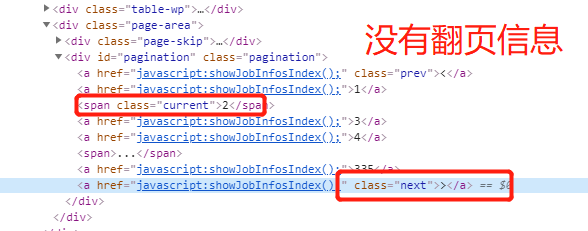
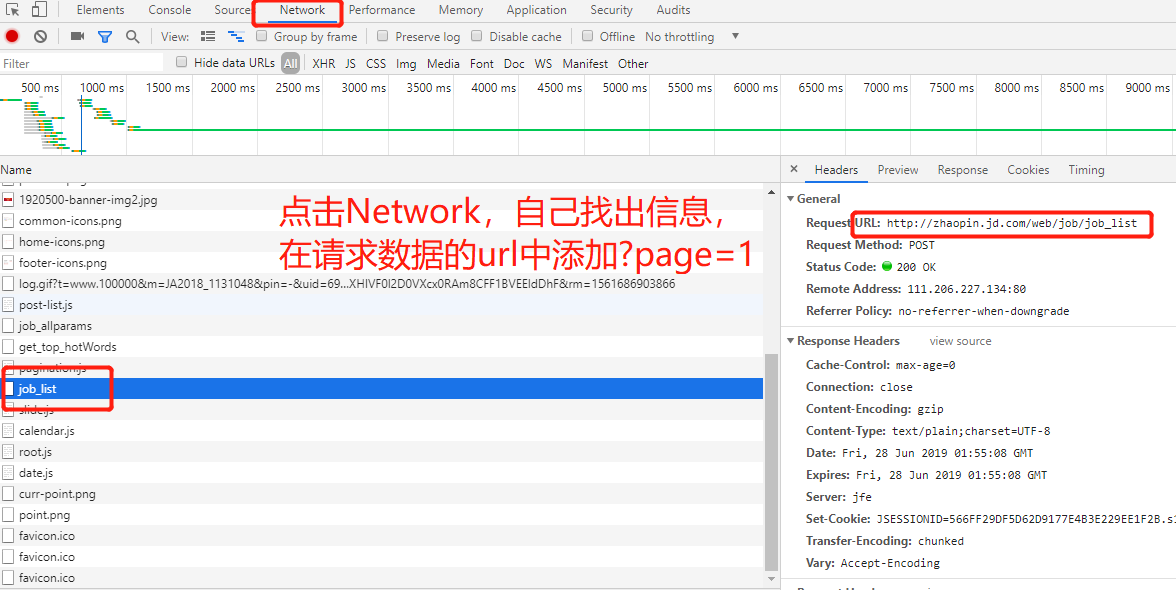
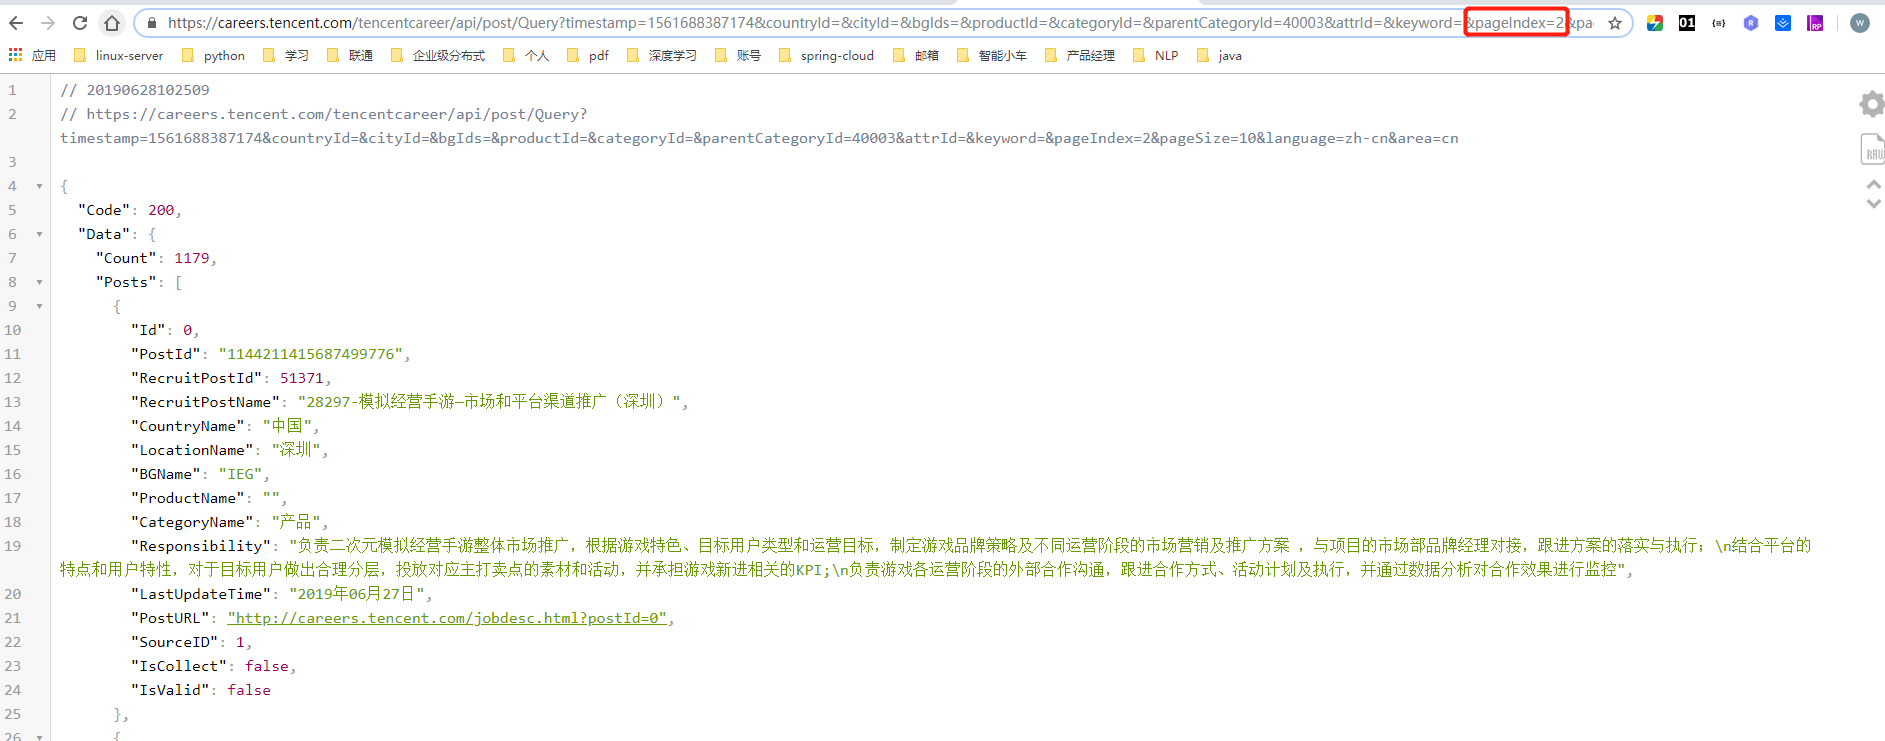
3、注意点,针对jingdong的招聘翻页是使用javascrapt,所以无法使用crawlscrapy进行自动翻页,但是我们再network中查看其获取数据的方法。
如:http://zhaopin.jd.com/web/job/job_list?page=2
#############jingdong可以了,那么试试tencent公司的招聘信息吧###############
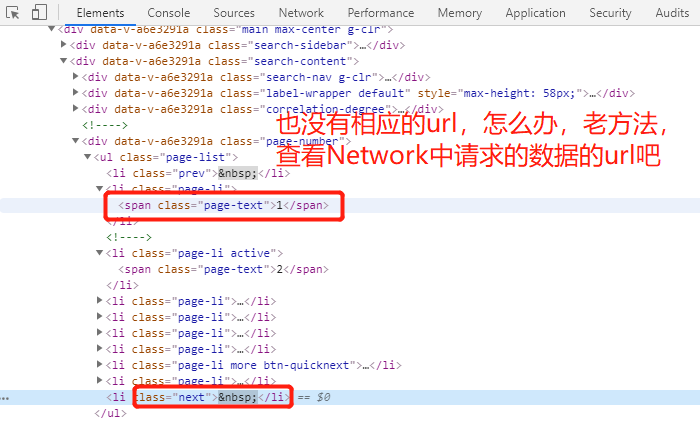
测试下吧!
结果知道了吧!!!!! 开始干活!!!!!!!!!!
1、settings.py
# -*- coding: utf-8 -*-

# Scrapy settings for tencent project

#

# For simplicity, this file contains only settings considered important or

# commonly used. You can find more settings consulting the documentation:

#

#     https://doc.scrapy.org/en/latest/topics/settings.html

#     https://doc.scrapy.org/en/latest/topics/downloader-middleware.html

#     https://doc.scrapy.org/en/latest/topics/spider-middleware.html

BOT_NAME = 'tencent'

SPIDER_MODULES = ['tencent.spiders']

NEWSPIDER_MODULE = 'tencent.spiders'

LOG_LEVEL="WARNING"

LOG_FILE="./qq.log"

# Crawl responsibly by identifying yourself (and your website) on the user-agent

USER_AGENT = 'Mozilla/5.0 (Windows NT 10.0; Win64; x64) AppleWebKit/537.36 (KHTML, like Gecko) Chrome/74.0.3729.131 Safari/537.36'

# Obey robots.txt rules

#ROBOTSTXT_OBEY = True

# Configure maximum concurrent requests performed by Scrapy (default: 16)

#CONCURRENT_REQUESTS = 32

# Configure a delay for requests for the same website (default: 0)

# See https://doc.scrapy.org/en/latest/topics/settings.html#download-delay

# See also autothrottle settings and docs

#DOWNLOAD_DELAY = 3

# The download delay setting will honor only one of:

#CONCURRENT_REQUESTS_PER_DOMAIN = 16

#CONCURRENT_REQUESTS_PER_IP = 16

# Disable cookies (enabled by default)

#COOKIES_ENABLED = False

# Disable Telnet Console (enabled by default)

#TELNETCONSOLE_ENABLED = False

# Override the default request headers:

#DEFAULT_REQUEST_HEADERS = {

#   'Accept': 'text/html,application/xhtml+xml,application/xml;q=0.9,*/*;q=0.8',

#   'Accept-Language': 'en',

#}

# Enable or disable spider middlewares

# See https://doc.scrapy.org/en/latest/topics/spider-middleware.html

#SPIDER_MIDDLEWARES = {

#    'tencent.middlewares.TencentSpiderMiddleware': 543,

#}

# Enable or disable downloader middlewares

# See https://doc.scrapy.org/en/latest/topics/downloader-middleware.html

#DOWNLOADER_MIDDLEWARES = {

#    'tencent.middlewares.TencentDownloaderMiddleware': 543,

#}

# Enable or disable extensions

# See https://doc.scrapy.org/en/latest/topics/extensions.html

#EXTENSIONS = {

#    'scrapy.extensions.telnet.TelnetConsole': None,

#}

# Configure item pipelines

# See https://doc.scrapy.org/en/latest/topics/item-pipeline.html

#ITEM_PIPELINES = {

#    'tencent.pipelines.TencentPipeline': 300,

#}

# Enable and configure the AutoThrottle extension (disabled by default)

# See https://doc.scrapy.org/en/latest/topics/autothrottle.html

#AUTOTHROTTLE_ENABLED = True

# The initial download delay

#AUTOTHROTTLE_START_DELAY = 5

# The maximum download delay to be set in case of high latencies

#AUTOTHROTTLE_MAX_DELAY = 60

# The average number of requests Scrapy should be sending in parallel to

# each remote server

#AUTOTHROTTLE_TARGET_CONCURRENCY = 1.0

# Enable showing throttling stats for every response received:

#AUTOTHROTTLE_DEBUG = False

# Enable and configure HTTP caching (disabled by default)

# See https://doc.scrapy.org/en/latest/topics/downloader-middleware.html#httpcache-middleware-settings

#HTTPCACHE_ENABLED = True

#HTTPCACHE_EXPIRATION_SECS = 0

#HTTPCACHE_DIR = 'httpcache'

#HTTPCACHE_IGNORE_HTTP_CODES = []

#HTTPCACHE_STORAGE = 'scrapy.extensions.httpcache.FilesystemCacheStorage'
2、mahuateng.py
# -*- coding: utf-8 -*-
import scrapy import json
import logging
class MahuatengSpider(scrapy.Spider):
name = 'mahuateng'
allowed_domains = ['careers.tencent.com']
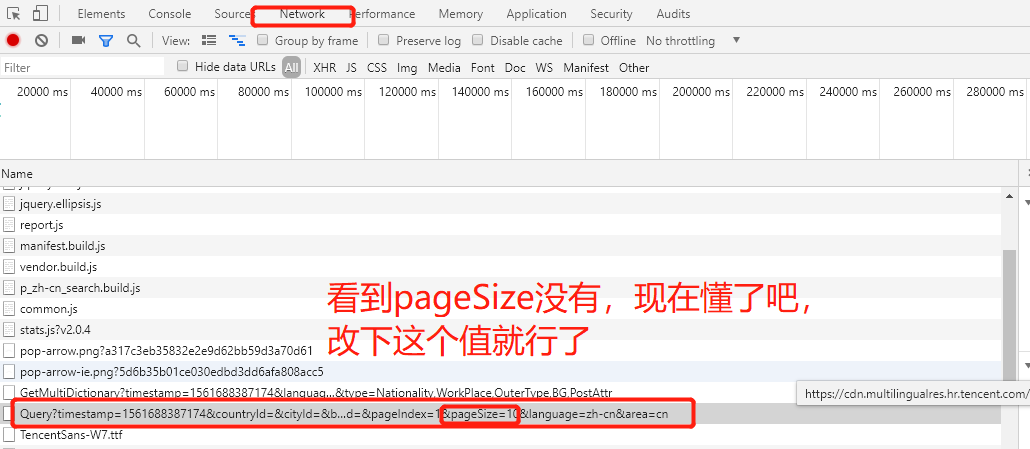
start_urls = ['https://careers.tencent.com/tencentcareer/api/post/Query?timestamp=1561688387174&countryId=&cityId=&bgIds=&productId=&categoryId=&parentCategoryId=40003&attrId=&keyword=&pageIndex=1&pageSize=10&language=zh-cn&area=cn']
pageNum = 1
def parse(self, response):
content = response.body.decode()
content = json.loads(content)
content=content['Data']['Posts']
#删除空字典
for con in content:
#print(con)
for key in list(con.keys()):
if not con.get(key):
del con[key]
#记录每一个岗位信息
for con in content:
logging.warning(con) #####翻页######
self.pageNum = self.pageNum+1
if self.pageNum<=118:
next_url = "https://careers.tencent.com/tencentcareer/api/post/Query?timestamp=1561688387174&countryId=&cityId=&bgIds=&productId=&categoryId=&parentCategoryId=40003&attrId=&keyword=&pageIndex="+str(self.pageNum)+"&pageSize=10&language=zh-cn&area=cn"
yield scrapy.Request(
next_url,
callback=self.parse
)
个人测试是可以的,你们的就看运气了,哈哈!
这些都是个人玩的,码的比较丑陋。
python之scrapy爬取jd和qq招聘信息的更多相关文章
- 利用scrapy爬取腾讯的招聘信息
利用scrapy框架抓取腾讯的招聘信息,爬取地址为:https://hr.tencent.com/position.php 抓取字段包括:招聘岗位,人数,工作地点,发布时间,及具体的工作要求和工作任务 ...
- python之scrapy爬取某集团招聘信息以及招聘详情
1.定义爬取的字段items.py # -*- coding: utf-8 -*- # Define here the models for your scraped items # # See do ...
- scrapy爬取全部知乎用户信息
# -*- coding: utf-8 -*- # scrapy爬取全部知乎用户信息 # 1:是否遵守robbots_txt协议改为False # 2: 加入爬取所需的headers: user-ag ...
- python之scrapy爬取jingdong招聘信息到mysql数据库
1.创建工程 scrapy startproject jd 2.创建项目 scrapy genspider jingdong 3.安装pymysql pip install pymysql 4.set ...
- Python爬虫从入门到放弃(十八)之 Scrapy爬取所有知乎用户信息(上)
爬取的思路 首先我们应该找到一个账号,这个账号被关注的人和关注的人都相对比较多的,就是下图中金字塔顶端的人,然后通过爬取这个账号的信息后,再爬取他关注的人和被关注的人的账号信息,然后爬取被关注人的账号 ...
- Python爬虫从入门到放弃(十九)之 Scrapy爬取所有知乎用户信息(下)
在上一篇文章中主要写了关于爬虫过程的分析,下面是代码的实现,完整代码在:https://github.com/pythonsite/spider items中的代码主要是我们要爬取的字段的定义 cla ...
- Python之爬虫(二十一) Scrapy爬取所有知乎用户信息(下)
在上一篇文章中主要写了关于爬虫过程的分析,下面是代码的实现,完整代码在:https://github.com/pythonsite/spider items中的代码主要是我们要爬取的字段的定义 cla ...
- Python之爬虫(二十) Scrapy爬取所有知乎用户信息(上)
爬取的思路 首先我们应该找到一个账号,这个账号被关注的人和关注的人都相对比较多的,就是下图中金字塔顶端的人,然后通过爬取这个账号的信息后,再爬取他关注的人和被关注的人的账号信息,然后爬取被关注人的账号 ...
- 使用 Scrapy 爬取去哪儿网景区信息
Scrapy 是一个使用 Python 语言开发,为了爬取网站数据,提取结构性数据而编写的应用框架,它用途广泛,比如:数据挖掘.监测和自动化测试.安装使用终端命令 pip install Scrapy ...
随机推荐
- ContextMenu菜单创建 上下文菜单的基本认识q
MainActivity.class public class MainActivity extends AppCompatActivity { @Override protected void on ...
- Caffe---Pycaffe 绘制loss和accuracy曲线
Caffe---Pycaffe 绘制loss和accuracy曲线 <Caffe自带工具包---绘制loss和accuracy曲线>:可以看出使用caffe自带的工具包绘制loss曲线和a ...
- java面试知识记录
1.数据库 (1)数据库优化 面试求职:数据库常见面试题(数据库优化思路) 数据库优化方案整理 (2)数据库的事务 MySQL——事务(Transaction)详解 MySQL 事务 2.设 ...
- linux基础_使用指令3
时间日期类 1.date指令 功能:显示当前日期 语法: date:显示当前时间 date +%Y:显示当前年份 date +%m:显示当前月份 date +%d:显示当前是哪一天 date &quo ...
- unity 用代码控制动画的播放的进度
https://answers.unity.com/questions/1225328/imported-animated-object-and-slider-tutorial.html using ...
- git + idea 配置 github设置ssh免登陆方式提交拉取代码
1.下载安装git,官网:https://git-scm.com/download/win 安装默认配置安装 git2.20版本地址百度网盘地址: 链接:https://pan.baidu.com/ ...
- JS数组的交集、并集、差集,数组去重,获取两个数组重复的元素,去除两个数组相同的元素
let arr1=[1,2,3,4,5,6] let arr2=[4,5,6,7,8,9] // 并集 数组去重 let RemoveSame=[...new Set([...arr1,...arr2 ...
- 一 、Linux基础命令及使用帮助
linux的哲学思想: 一切皆文件: 把几乎所有资源,包括硬件设备都组织为文件系统 由众多单一目的小程序组成:一个程序只实现一个功能,而且要做好 组合小程序完成复杂任务 尽量避免跟用户交互 目的:实现 ...
- 2016 NEERC, Northern Subregional Contest G.Gangsters in Central City(LCA)
G.Gangsters in Central City 题意:一棵树,节点1为根,是水源.水顺着边流至叶子.该树的每个叶子上有房子.有q个询问,一种为房子u被强盗入侵,另一种为强盗撤离房子u.对于每个 ...
- 1 - ImageNet Classification with Deep Convolutional Neural Network (阅读翻译)
ImageNet Classification with Deep Convolutional Neural Network 利用深度卷积神经网络进行ImageNet分类 Abstract We tr ...