【水滴石穿】MyFirstRNDemo
比较简单的项目
//index.js

/** @format */

import {AppRegistry} from 'react-native';

//默认创建的类

import App from './App';

//json

import {name as appName} from './app.json';

//FlatList类

import DWBFlatList from './DWBHomeFlatList'

import DWBTestVC from './DWBTestVC'

import DWBTButton from './DWBTButton'

// import DWBSwipeout from './DWBSwipeout'

import DWBNavVC from './DWBNavVC'

import DWBTouchableOpacity from './DWBTouchableOpacity'

import DWBSectionList from './DWBSectionList'

import DWBActionButton from './DWBActionButton'

//修改这里可以切换不同的类显示: => App

AppRegistry.registerComponent(appName, () => DWBFlatList);

// react-native关闭所有黄色警告,将这两句话加在index.js文件中,放在AppRegistry.registerComponent('App', () => App)之前。

console.ignoredYellowBox = ['Warning: BackAndroid is deprecated. Please use BackHandler instead.','source.uri should not be an empty string','Invalid props.style key'];

console.disableYellowBox = true // 关闭全部黄色警告
//DWBHomeFlatList.js
import React, { Component } from 'react';
import {
AppRegistry,
StyleSheet,
Text,
View,
FlatList,
TouchableOpacity, Button,
} from 'react-native';
// 初始化数据
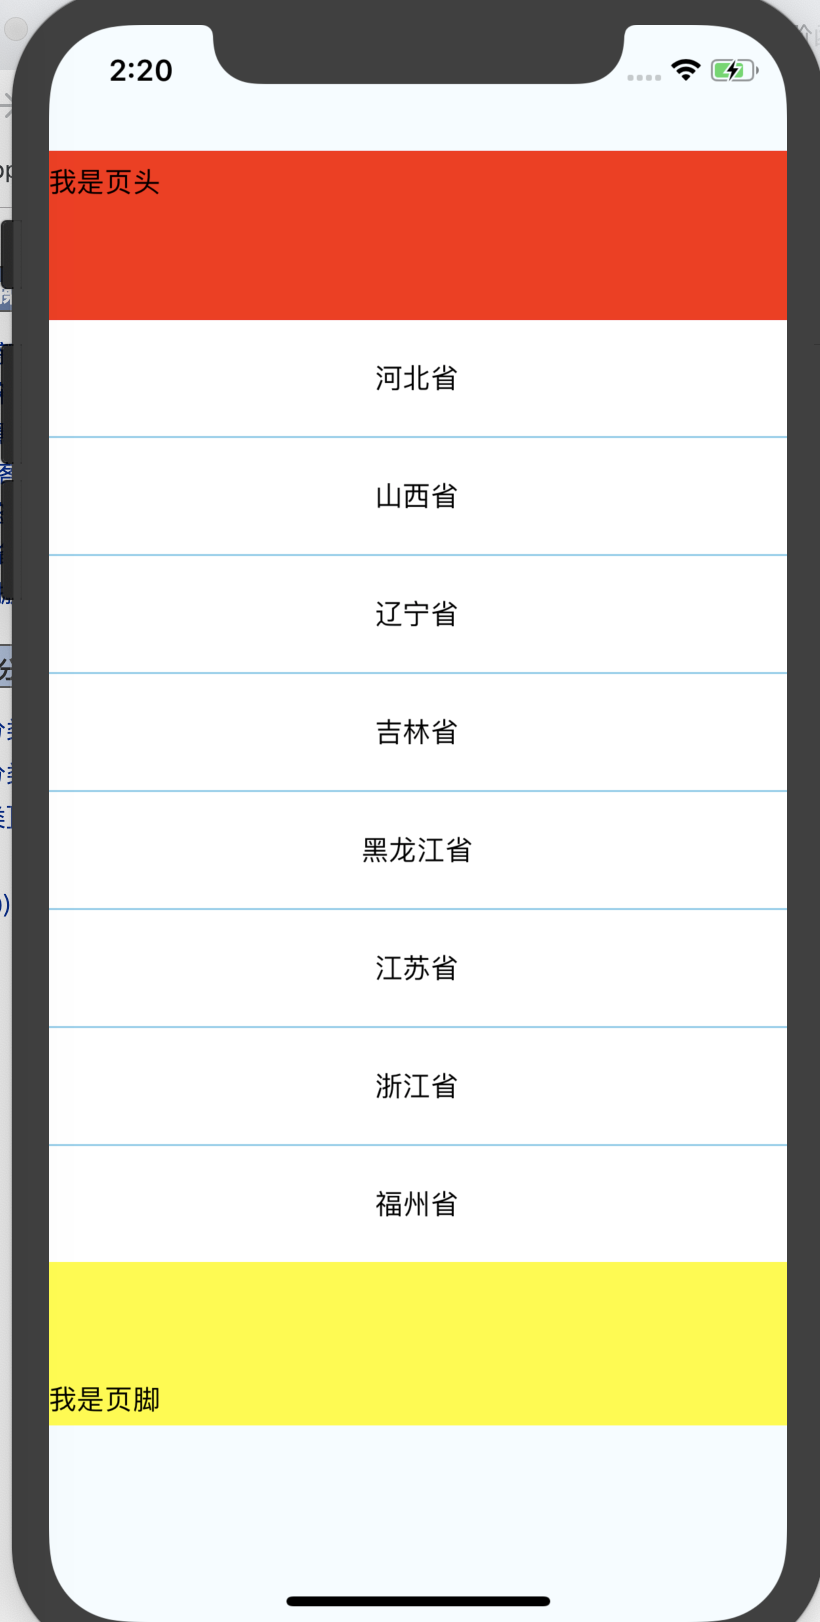
var Arr = [
{name:'河北省',},
{name:'山西省',},
{name:'辽宁省',},
{name:'吉林省',},
{name:'黑龙江省',},
{name:'江苏省',},
{name:'浙江省',},
{name:'福州省',}];
export default class MyFlatList extends Component {
render() {
//给数据追加一个key的字段,不然会有警告的,参数数组中的每一项,需要包含 key 值作为唯一标示
for (var i = 0; i < Arr.length; i++) {
Arr[i]['key'] = i;
}
return (
//初始化FlatList
<View style={styles.container}>
<FlatList style={styles.FlatListStyle}
data = {Arr}
ListHeaderComponent={this.ListHeaderComponent.bind(this)}
ListFooterComponent={this.ListFooterComponent.bind(this)}
renderItem={this.renderItemView.bind(this)}
//分割线组件
ItemSeparatorComponent={ItemDivideComponent}
>
</FlatList>
</View>
);
}
//列表的每一行
renderItemView({item,index}){
return(
<TouchableOpacity onPress={()=>{
this.Cellheader(item)}
}
>
<View style={{
backgroundColor:'#ffffff',//背景色
height:59,//view高度
justifyContent:'center',//内容上下居中
alignItems: 'center'//内容左右居中
}}>
<Text>{item.name}</Text>
</View>
</TouchableOpacity>
);
}
//点击每一行的对象
Cellheader(data){
alert(data.name);
}
//定义页头
ListHeaderComponent(){
return(
<View style={{height:140,backgroundColor:'red',justifyContent: 'center',}}>
<Text>我是页头</Text>
</View>
);
}
//定义页脚
ListFooterComponent(){
return(
<View style={{height:140,backgroundColor:'yellow',justifyContent: 'center',}}>
<Text>我是页脚</Text>
</View>
);
}
}
// //设置分割线
// renderSeparator(){
// return (
// <View style={{height: 1, backgroundColor: 'skyblue'}}></View>
// );
// };
class ItemDivideComponent extends Component {
render() {
return (
<View style={{height: 1, backgroundColor: 'skyblue'}}></View>
);
}
};
const styles = StyleSheet.create({
//控制器属性
container: {
flex: 1,
flexDirection: 'column',
justifyContent: 'space-between',
backgroundColor: '#F5FCFF',
},
//FlatList属性
FlatListStyle:{
backgroundColor:'#f6f6f6',
flex:1,
marginTop:64,
marginBottom: 100,
// width:300
}
});
//DWBActionButton.js

import React, { Component } from 'react';

import { StyleSheet, View,Text,Alert } from 'react-native';

import ButtonMy from 'apsl-react-native-button'

export default class ActionButton extends Component {

        render() {

        return (

            <View style={styles.ViewSyt}>

                <ButtonMy style={{backgroundColor: '#c771ec'}} onPress={()=>{

                    Alert.alert('我是一个button');

                }}>

                    <View style={styles.actionButtonIcon}>

                        <Text style={styles.actionButtonIcon}>我是一个button</Text>

                    </View>

                </ButtonMy>

            </View>

        );

    }

}

const styles = StyleSheet.create({

    ViewSyt:{

        flex:1,

        marginTop:100,

        fontSize: 20,

        height: 40,

        color: 'white',

    },

    actionButtonIcon: {

        fontSize: 20,

        height: 22,

        color: 'white',

    },

});
比较基础,=-=
【水滴石穿】MyFirstRNDemo的更多相关文章
- iOS 开发笔记 -- 各种细枝末节的知识(水滴石穿)
在此总结整理,遇到的各种的小问题: 1.通过从字典(数组)中取出的NSString的length==0 作为if的判断条件导致的carsh: 由于在字典中通过Key取出值之后直接做了length相关操 ...
- 【水滴石穿】react-native-book
先推荐一个学习的地址:https://ke.qq.com/webcourse/index.html#cid=203313&term_id=100240778&taid=12778558 ...
- 【水滴石穿】rnTest
其实就是一个小的demo,不过代码分的挺精巧的 先放地址:https://github.com/linchengzzz/rnTest 来看看效果 确实没有什么可以说的,不过代码部分还行 先入口文件 / ...
- 【水滴石穿】rn_statusbar
先放项目地址https://github.com/hezhii/rn_statusbar 来看一下效果 咩有感觉很怎么样,看代码 根入口文件 //index.js //看代码我们知道入口是app.js ...
- 【水滴石穿】react-native-ble-demo
项目的话,是想打开蓝牙,然后连接设备 点击已经连接的设备,我们会看到一些设备 不过我这边在开启蓝牙的时候报错了 先放作者的项目地址: https://github.com/hezhii/react-n ...
- 【水滴石穿】ReactNative-Redux-Thunk
老实说,运行出来的项目让人失望,毕竟我想看各种有趣的demo啊- 先放上源码地址:https://github.com/ludejun/ReactNative-Redux-Thunk 我们来一起看看代 ...
- 【水滴石穿】mobx-todos
我觉得代码在有些程序员手里,就好像是画笔,可以创造很多东西 不要觉得创意少就叫没有创意,每天进步一点点,世界更美好 首先源码地址为:https://github.com/byk04712/mobx-t ...
- 【水滴石穿】ReactNativeMobxFrame
项目地址如下:https://github.com/FTD-ZF/ReactNativeMobxFrame 应该可以说的是,项目也只是一个花架子,不过底部的tab稍微改变了 我们一起来看代码 //in ...
- 【水滴石穿】react-native-aze
说个题外话,早上打开电脑的时候,电脑变成彩色的了,锅是我曾经安装的一个chrome扩展,没有经过我的同意开启了 (也许是昨天迷迷糊糊开启了) 上午运行项目都不成功,还以为被黑客攻击了---然后下午就排 ...
随机推荐
- 第二章 Odoo 12开发之开发环境准备
在更深入了解 Odoo 开发之前,我们应配置好开发环境并学习相关的基础管理任务.本文中,我们将学习创建 Odoo 应用所需用到的工具和环境配置.这里采用 Ubuntu 系统来作为开发服务器实例的主机, ...
- Vue+jquery上拉加载
<ul> <li class="new-list" v-for="item in proarr"> <a :href=" ...
- Golang数据库操纵对IN语句的支持
一: 在实际的工程项目中,SQL通常使用预编译的形式进行执行操纵,可以有效的防止SQL注入的风险,提高编码的规范性.golang中使用sqlx进行sql查询的时候,在使用in语句在一个集合中查询的时候 ...
- 855. Exam Room
维护一个数据结构要满足:一个教室线性排列的座位 0 ... N-1 调用seat 入座一个距离最近学生最远的座位 调用leave x 离座一个位置为x的学生 由于N最多是 10e9 所以选择维护 学生 ...
- python-pygame安装教程
网上有很多关于python,pygame的安装教程.大都比较麻烦,下面为大家介绍一种非常简单的安装方法.(因为安装大都是新手教程写详细一些) python是32位 python是3.6 1 pip配置 ...
- Highcharts 饼图数值显示在图形上
1.引用js文件 <script type="text/javascript" src="http://cdn.hcharts.cn/jquery/jquery-1 ...
- loj2324 「清华集训 2017」小 Y 和二叉树
https://loj.ac/problem/2324 太智障,一开始以为中序遍历的第一个点一定是一个叶子,想了个贪心.然而,手算了一下,第一个点都过不了啊. input 5 2 3 4 1 3 3 ...
- 移动端canvas刮刮乐
<!DOCTYPE html> <html> <head> <meta charset="UTF-8"> <meta cont ...
- [转]js的垃圾回收机制
javascript具有自动垃圾收集机制,执行环境会负责管理代码执行过程中使用的内存.在编写javascript程序时,开发人员不用再关心内存使用问题,所需内存的分配以及无用内存的回收完全实现了自动管 ...
- js的剪贴板事件
定义 剪贴板操作包括剪切(cut).复制(copy)和粘贴(paste)这三个操作,快捷键分别是ctrl+x.ctrl+c.ctrl+v.当然也可以使用鼠标右键菜单进行操作 关于这3个操作共对应下列6 ...