SpringCloud的学习记录(1)
最近一段时间重新学习一边SpringCloud,这里简单记录一下。
我用的是IntelliJ IDEA开发工具, SpringBoot的版本是2.1.3.RELEASE。
1. 构建Maven项目
整个的SpringCloud的项目是在Maven项目中的,这个Maven只做容纳其他项目使用, 比如后面Fegin/Config/Zipkin等项目。
用IntelliJ IDEA工具, File->Project->spring Initializr, 然后点击next, 填写Group和Artifact等信息.
比如我填写的GroupId是com.xum, ArtifactId是demo, 然后next, 在这里我们什么也不选择,再次点击next,
最后选择存放位置,然后Finshed.
把生成pom.xml改成如下(因为这个只是做存放项目使用, 还要把这个src文件也删除了)
<?xml version="1.0" encoding="UTF-8"?>

<project xmlns="http://maven.apache.org/POM/4.0.0"

         xmlns:xsi="http://www.w3.org/2001/XMLSchema-instance"

         xsi:schemaLocation="http://maven.apache.org/POM/4.0.0 http://maven.apache.org/xsd/maven-4.0.0.xsd">

    <modelVersion>4.0.0</modelVersion>

    <groupId>com.xum</groupId>

    <artifactId>demo</artifactId>

    <version>1.0-SNAPSHOT</version>

</project>
2. 构建Eureka-Server项目
在我们生成的Demo项目上右键点击New->Module->spring Initializr, 然后next, 填写Group和Artifact等信息,
这里Artifact填写eurekaserver, 再次next, 如下图,
选择Web下的web和Cloud Discovery下的Eureka Server.
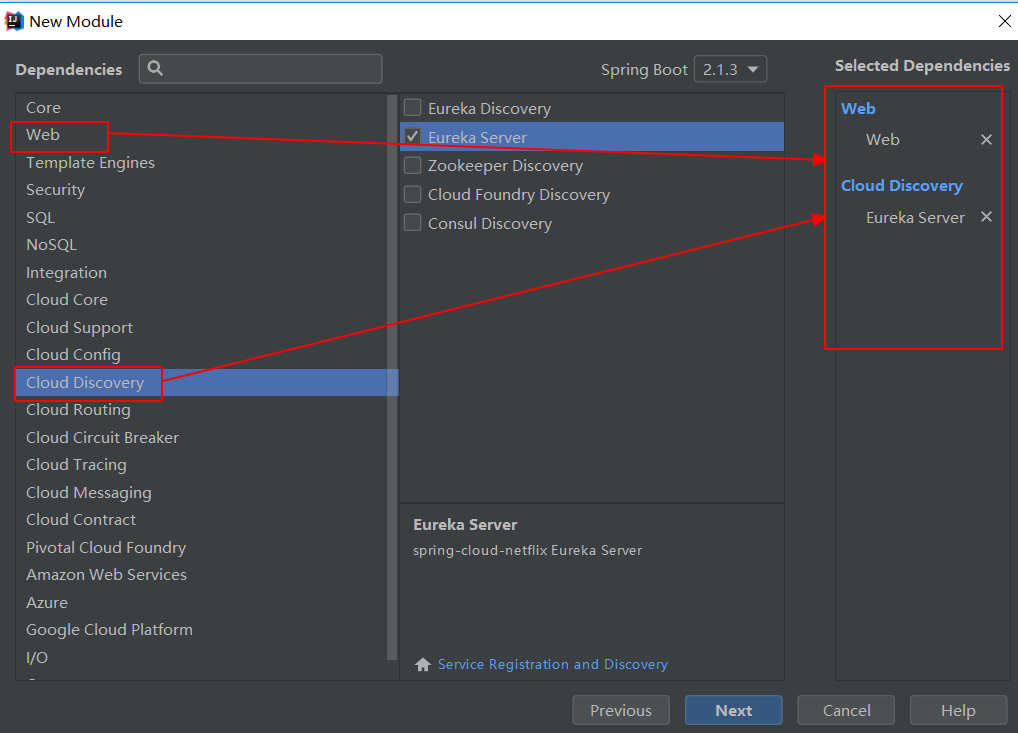
最后在Module Name中填写eureka-server.
生成的pom.xml文件如下
<?xml version="1.0" encoding="UTF-8"?>

<project xmlns="http://maven.apache.org/POM/4.0.0" xmlns:xsi="http://www.w3.org/2001/XMLSchema-instance"

         xsi:schemaLocation="http://maven.apache.org/POM/4.0.0 http://maven.apache.org/xsd/maven-4.0.0.xsd">

    <modelVersion>4.0.0</modelVersion>

    <parent>

        <groupId>org.springframework.boot</groupId>

        <artifactId>spring-boot-starter-parent</artifactId>

        <version>2.1.3.RELEASE</version>

        <relativePath/> <!-- lookup parent from repository -->

    </parent>

    <groupId>com.xum</groupId>

    <artifactId>eureka-server</artifactId>

    <version>0.0.1-SNAPSHOT</version>

    <name>eureka-server</name>

    <description>Demo project for Spring Boot</description>

    <properties>

        <project.build.sourceEncoding>UTF-8</project.build.sourceEncoding>

        <project.reporting.outputEncoding>UTF-8</project.reporting.outputEncoding>

        <java.version>1.8</java.version>

        <spring-cloud.version>Greenwich.RELEASE</spring-cloud.version>

    </properties>

    <dependencies>

        <dependency>

            <groupId>org.springframework.cloud</groupId>

            <artifactId>spring-cloud-starter-netflix-eureka-server</artifactId>

        </dependency>

        <dependency>

            <groupId>org.springframework.boot</groupId>

            <artifactId>spring-boot-starter-actuator</artifactId>

        </dependency>

        <dependency>

            <groupId>org.springframework.boot</groupId>

            <artifactId>spring-boot-starter-test</artifactId>

            <scope>test</scope>

        </dependency>

    </dependencies>

    <dependencyManagement>

        <dependencies>

            <dependency>

                <groupId>org.springframework.cloud</groupId>

                <artifactId>spring-cloud-dependencies</artifactId>

                <version>${spring-cloud.version}</version>

                <type>pom</type>

                <scope>import</scope>

            </dependency>

        </dependencies>

    </dependencyManagement>

    <build>

        <plugins>

            <plugin>

                <groupId>org.springframework.boot</groupId>

                <artifactId>spring-boot-maven-plugin</artifactId>

            </plugin>

        </plugins>

    </build>

    <repositories>

        <repository>

            <id>spring-milestones</id>

            <name>Spring Milestones</name>

            <url>https://repo.spring.io/milestone</url>

        </repository>

    </repositories>

</project>
然后在src->main->resources下新建application.yml文件,把其他的都删除, 内容如下
server:

  port: 8761

eureka:

  instance:

    hostname: localhost

  client:

    registerWithEureka: false

    fetchRegistry: false

    serviceUrl:

      defaultZone: http://${eureka.instance.hostname}:${server.port}/eureka/
最后在EurekaServerApplication 上面添加@EnableEurekaServer这个注解
package com.xum.eurekaserver;

import org.springframework.boot.SpringApplication;

import org.springframework.boot.autoconfigure.SpringBootApplication;

import org.springframework.cloud.netflix.eureka.server.EnableEurekaServer;

@EnableEurekaServer

@SpringBootApplication

public class EurekaServerApplication {

    public static void main(String[] args) {

        SpringApplication.run(EurekaServerApplication.class, args);

    }

}
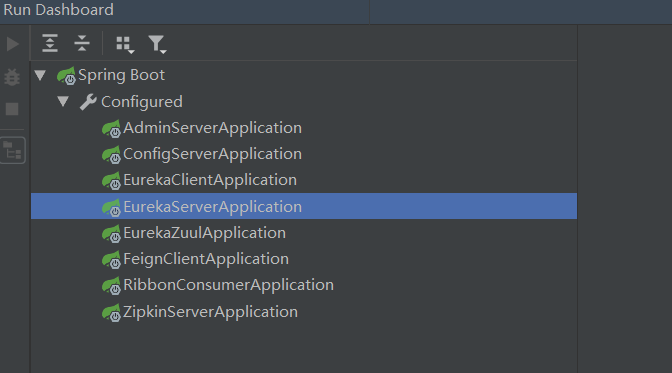
通过Run DashBoard运行eureka-server
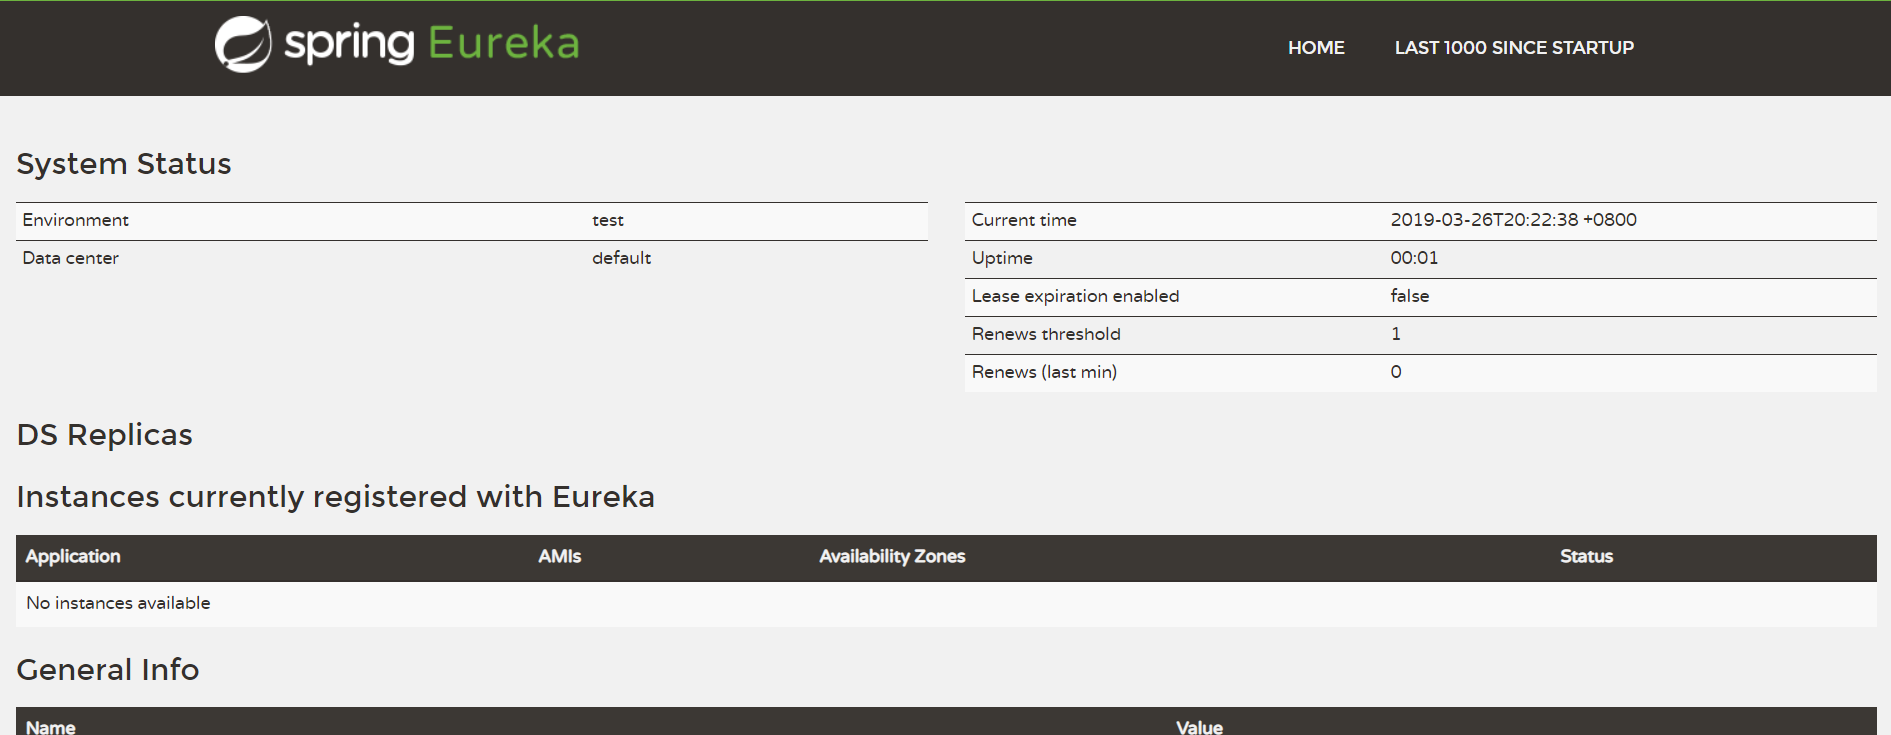
运行成功以后,用浏览器打开http://localhost:8761, 显示如下,说明eureka-server搭建成功.
下一节将如何构建eureka-client.
SpringCloud的学习记录(1)的更多相关文章
- SPRINGCLOUD 开发学习记录
一个简单的微服务系统:服务注册和发现,服务消费,负载均衡,断路器,智能路由,配置管理 服务注册中心: eureka是一个高可用组件,没有后端缓存,每一个实例注册后向注册中心发送心跳,默认情况下,eru ...
- SpringCloud的学习记录(8)
这一章节讲zipkin-server. 在我们生成的Demo项目上右键点击New->Module->spring Initializr, 然后next, 填写Group和Artifact等 ...
- SpringCloud的学习记录(7)
这一章节讲zuul的使用. 在我们生成的Demo项目上右键点击New->Module->spring Initializr, 然后next, 填写Group和Artifact等信息, 这里 ...
- SpringCloud的学习记录(6)
这一章节讲fegin的使用. 在我们生成的Demo项目上右键点击New->Module->spring Initializr, 然后next, 填写Group和Artifact等信息, 这 ...
- SpringCloud的学习记录(5)
这一章节讲如何使用ribbon和hystrix. 在我们生成的Demo项目上右键点击New->Module->spring Initializr, 然后next, 填写Group和Arti ...
- SpringCloud的学习记录(3)
这一章节讲搭建config-server的项目. 在我们生成的Demo项目上右键点击New->Module->spring Initializr, 然后next, 填写Group和Arti ...
- SpringCloud的学习记录(2)
这一章节主要讲如何搭建eureka-client项目. 在我们生成的Demo项目上右键点击New->Module->spring Initializr, 然后next, 填写Group和A ...
- SpringCloud的学习记录(4)
本篇基于上一篇写的, 在git上更改配置后, eureka-client如何更新. 我们只需要在配置文件中配置 spring-cloud-starter-bus-amqp; 这就是说我们需要装rabb ...
- SpringCloud基础教程学习记录
这个学习记录是学习自翟永超前辈的SpringCloud的基础教程. 自己写这个教程的目的主要是在于,想要更凝练总结一些其中的一些实用点,顺便做个汇总,这样自己在复习查看的时候更加方便,也能顺着自己的思 ...
随机推荐
- luogu3380 树套树之线段树套线段树
个人感觉可能是最不需要脑子写的方法 不过也不太好调 就是用一个普通的线段树维护这个序列,但是对于线段树的每一个区间,再开一个动态开点的权值线段树,里面存储这个区间所有元素值 单点修改只会涉及到log棵 ...
- Runtime常用的几个应用场景
Runtime常见的几个应用场景. Runtime常见应用场景 具体应用拦截系统自带的方法调用(Method Swizzling黑魔法) 实现给分类增加属性 实现字典的模型和自动转换 JSPatch替 ...
- Functions that return a function
javascript学习中,经常会遇到闭包的问题,然后闭包的很多例子中又会遇到很多返回函数的闭包的例子程序.因为对闭包的理解还不够透彻,然后对于Functions rerurn a function产 ...
- VS2010 简单ATL COM开发
http://blog.csdn.net/wangwenjing90/article/details/8771934#reply http://blog.csdn.net/wangwenjing90/ ...
- SprimgMVC学习笔记(一)—— SpringMVC入门
一.什么是 SpringMVC ? 在介绍什么是 SpringMVC 之前,我们先看看 Spring 的基本架构.如下图: 我们可以看到,在 Spring 的基本架构中,红色圈起来的 Spring W ...
- hdu6397 Character Encoding 隔板法+容斥原理+线性逆元方程
题目传送门 题意:给出n,m,k,用m个0到n-1的数字凑出k,问方案数,mod一个值. 题目思路: 首先如果去掉数字范围的限制,那么就是隔板法,先复习一下隔板法. ①k个相同的小球放入m个不同的盒子 ...
- Experimental Educational Round: VolBIT Formulas Blitz A
Description The HR manager was disappointed again. The last applicant failed the interview the same ...
- Java中的两个类:Desktop和SystemTray
在JDK6中 ,AWT新增加了两个类:Desktop和SystemTray,前者可以用来打开系统默认浏览器浏览指定的URL,打开系统默认邮件客户端给指定的邮箱发邮件,用默认应用程序打开或编辑文件(比如 ...
- STL-----c++标准模板
一.排序和检索 1.sort(v.begin,v.end) 2.lower_bound(v.begin,v.end,x)
- Java日志组件1---Jdk自带Logger(java.util.logging.Logger)
最近在看日志的一些东西,发现利用JDK自带的log也可以简单的实现日志的输出,将日志写入文件的过程记录如下: 1.新建LogUtil.Java( 里面写了几个静态方法,为log设置等级.添加log控制 ...