
一步一步学Silverlight 2系列(14):数据与通信之WCF
一步一步学Silverlight 2系列(14):数据与通信之WCF
概述
Silverlight 2 Beta 1版本发布了,无论从Runtime还是Tools都给我们带来了很多的惊喜,如支持框架语言Visual Basic, Visual C#, IronRuby, Ironpython,对JSON、Web Service、WCF以及Sockets的支持等一系列新的特性。《一步一步学Silverlight 2系列》文章将从Silverlight 2基础知识、数据与通信、自定义控件、动画、图形图像等几个方面带您快速进入Silverlight 2开发。
本文将简单介绍在Silverlight 2中如何与WCF进行通信。
简单示例
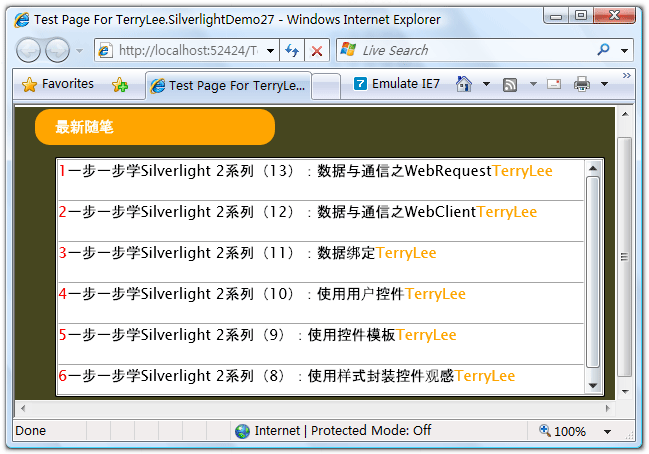
在本示例中,我们将通过WCF来获取一个最新随笔的列表,在Silverlight中显示出来,最终完后效果如下所示。
先定义一个数据契约:
[DataContract]

public class Post

{

    public Post(int id,string title,string author)

    {

        this.Id = id;

        this.Title = title;

        this.Author = author;

    }

    [DataMember]

    public int Id { get; set; }

    [DataMember]

    public string Title { get; set; }

    [DataMember]

    public string Author { get; set; }

}
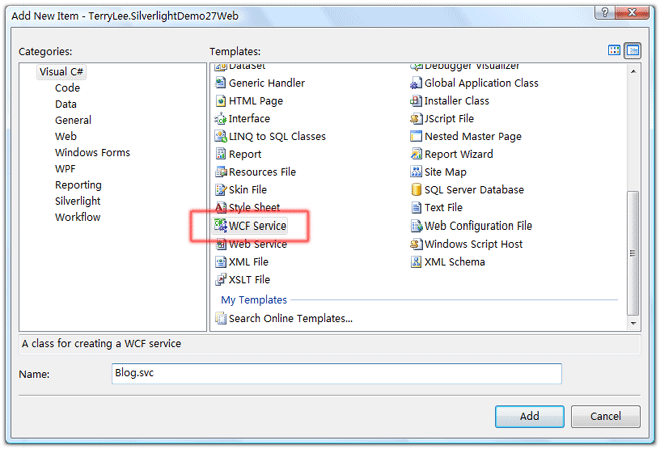
在Web项目中添加一个WCF Service文件,命名为Blog.svc
定义服务契约:
[ServiceContract]

public interface IBlog

{

    [OperationContract]

    Post[] GetPosts();

}
实现服务,这里可以是从数据库或者其他数据源读取,为了演示方便,我们直接初始化一个集合:
public class Blog : IBlog

{

    public Post[] GetPosts()

    {

        List<Post> posts = new List<Post>()

        {

            new Post(1,"一步一步学Silverlight 2系列(13):数据与通信之WebRequest","TerryLee"),

            new Post(2,"一步一步学Silverlight 2系列(12):数据与通信之WebClient","TerryLee"),

            new Post(3,"一步一步学Silverlight 2系列(11):数据绑定","TerryLee"),

            new Post(4,"一步一步学Silverlight 2系列(10):使用用户控件","TerryLee"),

            new Post(5,"一步一步学Silverlight 2系列(9):使用控件模板","TerryLee"),

            new Post(6,"一步一步学Silverlight 2系列(8):使用样式封装控件观感","TerryLee")

        };

        return posts.ToArray();

    }

}
修改Web.config中的服务配置,这里使用basicHttpBinding绑定,并且开启httpGetEnabled,以便后面我们可以在浏览器中查看服务:
<system.serviceModel>

    <behaviors>

        <serviceBehaviors>

            <behavior name="TerryLee.SilverlightDemo27Web.BlogBehavior">

                <serviceMetadata httpGetEnabled="true" />

                <serviceDebug includeExceptionDetailInFaults="false" />

            </behavior>

        </serviceBehaviors>

    </behaviors>

    <services>

        <service behaviorConfiguration="TerryLee.SilverlightDemo27Web.BlogBehavior"

            name="TerryLee.SilverlightDemo27Web.Blog">

            <endpoint address="" binding="basicHttpBinding" contract="TerryLee.SilverlightDemo27Web.IBlog">

            </endpoint>

        </service>

    </services>

</system.serviceModel>
设置一下Web应用程序的端口号为固定端口52424,在浏览器中输入http://localhost:52424/Blog.svc,看看服务是否正常:
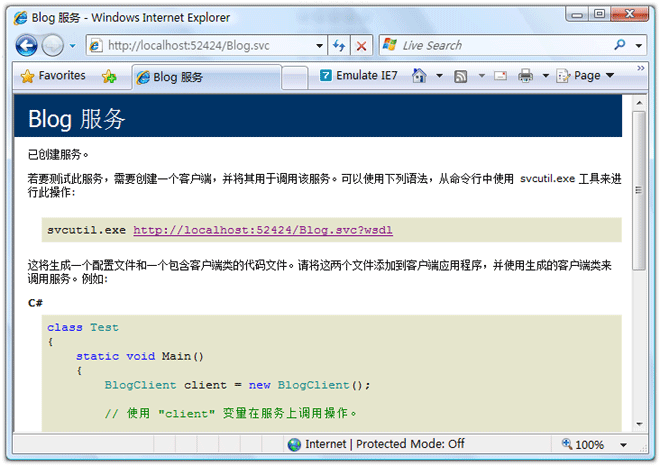
好了,现在服务端我们就实现完成了。现在编写界面展示部分,XAML如下:
<Grid Background="#46461F">

    <Grid.RowDefinitions>

        <RowDefinition Height="40"></RowDefinition>

        <RowDefinition Height="*"></RowDefinition>

    </Grid.RowDefinitions>

    <Grid.ColumnDefinitions>

        <ColumnDefinition></ColumnDefinition>

    </Grid.ColumnDefinitions>

    <Border Grid.Row="0" Grid.Column="0" CornerRadius="15"

            Width="240" Height="36" Background="Orange"

            Margin="20 0 0 0" HorizontalAlignment="Left">

        <TextBlock Text="最新随笔" Foreground="White"

                   HorizontalAlignment="Left" VerticalAlignment="Center"

                   Margin="20 0 0 0"></TextBlock>

    </Border>

    <ListBox x:Name="Posts" Grid.Row="1" Margin="40 10 10 10">

        <ListBox.ItemTemplate>

            <DataTemplate>

                <StackPanel Orientation="Horizontal">

                    <TextBlock Text="{Binding Id}" Height="40" Foreground="Red"></TextBlock>

                    <TextBlock Text="{Binding Title}" Height="40"></TextBlock>

                    <TextBlock Text="{Binding Author}" Height="40" Foreground="Orange"></TextBlock>

                </StackPanel>

            </DataTemplate>

        </ListBox.ItemTemplate>

    </ListBox>

</Grid>
在Silverlight项目中添加服务引用,输入地址http://localhost:52424/Blog.svc,输入命名空间BlogService。
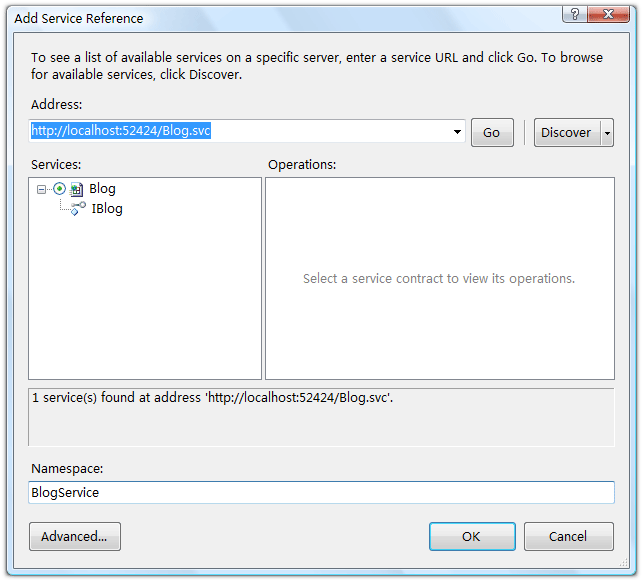
添加完成后,我们可以在对象浏览器中浏览一下生成的客户端对象:
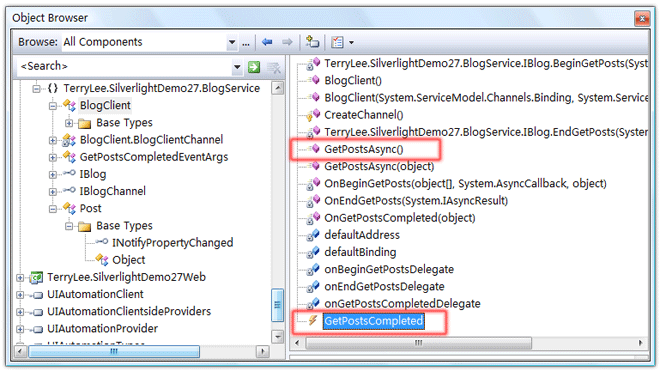
当然大家也可以手工去编写客户端的代码,请参考WCF的相关内容,这里不再赘述。下面编写调用服务并获取数据,这里仍然是采用异步模式,由于在WCF服务的配置中我们采取了BasicHttpBinding,客户端也要采用BasicHttpBinding。我们需要注册GetPostsCompleted事件处理方法,以便完成后回调,同时调用GetPostsAsync()方法获取数据。完整的代码如下所示:
public partial class Page : UserControl

{

    public Page()

    {

        InitializeComponent();

    }

    private void UserControl_Loaded(object sender, RoutedEventArgs e)

    {

        Binding binding = new BasicHttpBinding();

        EndpointAddress endPoint = new EndpointAddress(

                "http://localhost:52424/Blog.svc");

        BlogClient client = new BlogClient(binding, endPoint);

        client.GetPostsCompleted += new EventHandler<GetPostsCompletedEventArgs>(client_GetPostsCompleted);

        client.GetPostsAsync();

    }

    void client_GetPostsCompleted(object sender, GetPostsCompletedEventArgs e)

    {

        if (e.Error == null)

        {

            Posts.ItemsSource = e.Result;

        }

    }

}
至此,一个完整的在Silverlight 2中调用WCF的示例就完成了,运行后效果如下:
结束语
本文简单演示了在Silverlight 2中如何与WCF进行通信,你可以从这里下载示例代码。
出处:http://terrylee.cnblogs.com
本文版权归作者和博客园共有,欢迎转载,但未经作者同意必须保留此段声明,且在文章页面明显位置给出原文连接,否则保留追究法律责任的权利。
一步一步学Silverlight 2系列(14):数据与通信之WCF的更多相关文章
- 一步一步学Silverlight 2系列文章
概述 由TerryLee编写的<Silverlight 2完美征程>一书,已经上市,在该系列文章的基础上补充了大量的内容,敬请关注.官方网站:http://www.dotneteye.cn ...
- 一步一步学Silverlight 2系列(32):图形图像综合实例—“功夫之王”剧照播放
概述 Silverlight 2 Beta 1版本发布了,无论从Runtime还是Tools都给我们带来了很多的惊喜,如支持框架语言Visual Basic, Visual C#, IronRuby, ...
- 一步一步学Silverlight 2系列(31):图形图像综合实例—实现水中倒影效果
概述 Silverlight 2 Beta 1版本发布了,无论从Runtime还是Tools都给我们带来了很多的惊喜,如支持框架语言Visual Basic, Visual C#, IronRuby, ...
- 一步一步学Silverlight 2系列(30):使用Transform实现更炫的效果(下)
概述 Silverlight 2 Beta 1版本发布了,无论从Runtime还是Tools都给我们带来了很多的惊喜,如支持框架语言Visual Basic, Visual C#, IronRuby, ...
- 一步一步学Silverlight 2系列(29):使用Transform实现更炫的效果(上)
概述 Silverlight 2 Beta 1版本发布了,无论从Runtime还是Tools都给我们带来了很多的惊喜,如支持框架语言Visual Basic, Visual C#, IronRuby, ...
- 一步一步学Silverlight 2系列(28):图片处理
概述 Silverlight 2 Beta 1版本发布了,无论从Runtime还是Tools都给我们带来了很多的惊喜,如支持框架语言Visual Basic, Visual C#, IronRuby, ...
- 一步一步学Silverlight 2系列(27):使用Brush进行填充
概述 Silverlight 2 Beta 1版本发布了,无论从Runtime还是Tools都给我们带来了很多的惊喜,如支持框架语言Visual Basic, Visual C#, IronRuby, ...
- 一步一步学Silverlight 2系列(26):基本图形
概述 Silverlight 2 Beta 1版本发布了,无论从Runtime还是Tools都给我们带来了很多的惊喜,如支持框架语言Visual Basic, Visual C#, IronRuby, ...
- 一步一步学Silverlight 2系列(25):综合实例之Live Search
概述 Silverlight 2 Beta 1版本发布了,无论从Runtime还是Tools都给我们带来了很多的惊喜,如支持框架语言Visual Basic, Visual C#, IronRuby, ...
- 一步一步学Silverlight 2系列(24):与浏览器交互相关辅助方法
概述 Silverlight 2 Beta 1版本发布了,无论从Runtime还是Tools都给我们带来了很多的惊喜,如支持框架语言Visual Basic, Visual C#, IronRuby, ...
随机推荐
- 16.1114 模拟考试T1
1.正确答案 [题目描述] 小H与小Y刚刚参加完UOIP外卡组的初赛,就迫不及待的跑出考场对答案. “吔,我的答案和你都不一样!”,小Y说道,”我们去找神犇们问答案吧”. 外卡组试卷中共有m道判断题, ...
- 转 STL之vector的使用
http://www.cnblogs.com/caoshenghe/archive/2010/01/31/1660399.html 第一部分 使用入门 vector可用于代替C中的数组,或者MFC中的 ...
- 标准C程序设计七---21
Linux应用 编程深入 语言编程 标准C程序设计七---经典C11程序设计 以下内容为阅读: <标准C程序设计>(第7版) 作者 ...
- Android 之 下拉框(Spinner)的使用-转
下拉列表 Spinner. Spinner的使用,可以极大提高用户的体验性.当需要用户选择的时候,可以提供一个下拉列表将所有可选的项列出来.供用户选择. Demo如下,可以留作参考 一.使用数组作为数 ...
- golang-uuid
uuid第三方库可以在github上找,我在这使用的是:github.com/satori/go.uuid PS:不知道哪里原因,使用go mod 管理包,下载的包和github上的不是完全一样,也特 ...
- P1540 机器翻译(STL 链表)
题目背景 小晨的电脑上安装了一个机器翻译软件,他经常用这个软件来翻译英语文章. 题目描述 这个翻译软件的原理很简单,它只是从头到尾,依次将每个英文单词用对应的中文含义来替换.对于每个英文单词,软件会先 ...
- 转:C#并口热敏小票打印机打印位图
最近一直在研究并口小票打印机打印图片问题,这也是第一次和硬件打交道,不过还好,最终成功了. 这是DEMO的窗体: 下面是打印所需要调用的代码: class LptControl { private s ...
- http://www.yiibai.com/java8/java8_temporaladjusters.html
原文:http://www.yiibai.com/java8/java8_temporaladjusters.html TemporalAdjuster 是做日期数学计算.例如,要获得“本月第二个星期 ...
- 零基础学python-3.2 变量赋值
这一节我们来具体展开变量赋值 1.以下我们举各种赋值的样例 anInt=12 anFloat=2.2 anStr='string' aList=['a','a','a'] anArray=(1,2,3 ...
- 安卓自己定义View进阶-Canvas之绘制基本形状
Canvas之绘制基本形状 作者微博: @GcsSloop [本系列相关文章] 在上一篇自己定义View分类与流程中我们了解自己定义View相关的基本知识,只是,这些东西依然还是理论,并不能拿来(zh ...