安卓Design包下的TextInputLayout和FloatingActionButton的简单使用
终于介绍到Design包的最后的东西了。
也很简单,一个是TextInputLayout。
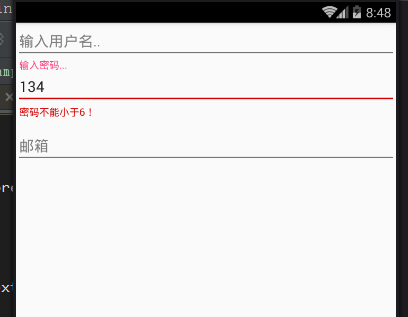
TextInputLayout作为一个父容器,包含一个新的EditText,可以给EditText添加意想不到的效果,特别在注册功能开发中,用处非常广泛。
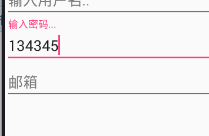
它可以直接提示输入错误,而不至于像以前一样总是点击按钮后才能检测出输入的错误,当有很多输出框的时候更是难以区分。。
并且还可以把hint 默认提示值放到上面去。
项目已经同步至:https://github.com/nanchen2251/CoordinatorLayout 包含了前面的demo代码
实现界面大概是这样的。
当你输入正确后是这样的。
实现代码也很简单。
添加一个监听焦点事件
  @Override

    protected void onCreate(Bundle savedInstanceState) {

        super.onCreate(savedInstanceState);

        setContentView(R.layout.activity_text_input);

        textInput = (TextInputLayout) findViewById(R.id.text_input_layout);

        textInput.getEditText().addTextChangedListener(this);

    }

    @Override

    public void beforeTextChanged(CharSequence s, int start, int count, int after) {

    }

    @Override

    public void onTextChanged(CharSequence s, int start, int before, int count) {

    }

    //完成

    @Override

    public void afterTextChanged(Editable s) {

        if(s.length()<6){

            textInput.setError("密码不能小于6!");

            textInput.setErrorEnabled(true);

        }else{

            textInput.setErrorEnabled(false);

        }

    }
XML文件中的定义
<?xml version="1.0" encoding="utf-8"?>

<LinearLayout

    xmlns:android="http://schemas.android.com/apk/res/android"

    xmlns:tools="http://schemas.android.com/tools"

    android:layout_width="match_parent"

    android:layout_height="match_parent"

    android:orientation="vertical"

    tools:context="com.example.nanchen.designcoodinatordemo.TextInputActivity">

    <EditText

        android:layout_width="match_parent"

        android:hint="输入用户名.."

        android:layout_height="wrap_content"/>

    <android.support.design.widget.TextInputLayout

        android:layout_width="match_parent"

        android:id="@+id/text_input_layout"

        android:layout_height="wrap_content">

        <EditText

            android:layout_width="match_parent"

            android:hint="输入密码..."

            android:layout_height="wrap_content"/>

    </android.support.design.widget.TextInputLayout>

    <android.support.design.widget.TextInputEditText

        android:layout_width="match_parent"

        android:layout_height="wrap_content"

        android:hint="邮箱"/>

</LinearLayout>
然后再来看一下FloatingActionButton。
其实它就是一个可以悬浮的Button,可以把它放在CoordinatorLayout的容器中并重写FloatingActionButton的Behavior可以达到想要的效果。
这里是下拉隐藏。
package com.example.nanchen.designcoodinatordemo;

import android.content.Context;

import android.support.design.widget.CoordinatorLayout;

import android.support.design.widget.FloatingActionButton;

import android.util.AttributeSet;

import android.view.View;

/**

 * 自定义Behavior

 * Created by 南尘 on 16-7-14.

 */

public class MyBehavior extends FloatingActionButton.Behavior {

    //写了这个构造方法才能在XML文件中直接指定

    public MyBehavior(Context context, AttributeSet attrs) {

        super();

    }

    @Override

    public boolean onStartNestedScroll(CoordinatorLayout coordinatorLayout, FloatingActionButton child, View directTargetChild, View target, int nestedScrollAxes) {

        return true;//返回true代表我们关心这个滚动事件

    }

    @Override

    public void onNestedPreScroll(CoordinatorLayout coordinatorLayout, FloatingActionButton child, View target, int dx, int dy, int[] consumed) {

        super.onNestedPreScroll(coordinatorLayout, child, target, dx, dy, consumed);

        if (dy < 0) {//向下滚动

//            ViewCompat.animate(child).scaleX(1).alpha(1).start();

            child.show();

        } else {//向上滚动

//            ViewCompat.animate(child).scaleX(0).alpha(0).start();

            child.hide();

        }

    }

}
FloatingActionButton是有show和hide显示和隐藏方法的。
具体图就不截了,本人做不来gif动图,略显尴尬,不过抽时间一定好好学学!
安卓Design包下的TextInputLayout和FloatingActionButton的简单使用的更多相关文章
- 安卓Design包之Toolbar控件的使用
转自:ToolBar的使用 ToolBar的出现是为了替换之前的ActionBar的各种不灵活使用方式,相反,ToolBar的使用变得非常灵活,因为它可以让我们自由往里面添加子控件.低版本要使用的话, ...
- 安卓Design包之TabLayout控件的使用
转自: 安卓Design包之TabLayout控件的简单使用 Google在2015的IO大会上,给我们带来了更加详细的Material Design设计规范,同时,也给我们带来了全新的Android ...
- 安卓Design包之TabLayout控件的简单使用
Google在2015的IO大会上,给我们带来了更加详细的Material Design设计规范,同时,也给我们带来了全新的Android Design Support Library,在这个supp ...
- 安卓Design包之AppBar和Toolbar的联用
前面讲了Design包的的CoordinatorLayout和SnackBar的混用,现在继续理解Design包的AppBar; AppBarLayout跟它的名字一样,把容器类的组件全部作为AppB ...
- 安卓Design包之超强控件CoordinatorLayout与SnackBar的简单使用
在前面的Design中,学习使用了TabLayout,NavigationView与DrawerLayout实现的神奇效果,今天就带来本次Design包中我认为最有意义的控件CoordinatorLa ...
- 安卓Design包之NavigationView结合DrawerLayout,toolbar的使用,FloatingActionButton
注意:使用前需要添加Design依赖包,使用toolbar时需要隐藏标题头 FloatingActionButton 悬浮按钮:FloatingActionButton是重写ImageView的,所有 ...
- 安卓Design包之CollapsingToolbarLayout(可折叠的工具栏布局)的简单使用
转自: CollapsingToolbarLayout的使用 注意:使用前需要添加Design依赖包,使用toolbar时需要隐藏标题头 CollapsingToolbarLayout作用是提供了一个 ...
- 安卓Design包之CoordinatorLayout配合AppBarLayout,ToolBar,TabLaout的使用
转载: CoordinatorLayout配合AppBarLayout,Toolbar和TabLayout的使用 控件的简单介绍: AppBarLayout:它是继承LinerLayout实现的一个V ...
- 使用Design包实现QQ动画侧滑效果和滑动菜单导航
Google在2015的IO大会上,给我们带来了更加详细的Material Design设计规范,同时,也给我们带来了全新的Android Design Support Library,在这个supp ...
随机推荐
- 如何用百度MIP快速搭建体验友好的移动页面
在读这篇文章之前,请确定你已经了解MIP定义及加速原理.如果不确定的话,可以到MIP官网了解. 改造前期准备和注意事项: 你可以选择直接将原先的移动站点直接改成MIP站,也可以单独再做一套MIP站点与 ...
- 微软.NET Core RC2正式发布,横跨所有平台
.NET官方博客宣布了<Announcing .NET Core RC2 and .NET Core SDK Preview 1>,正式如期发布了.NET Core RC2, 现在可以放心 ...
- C语言 · 薪水计算
问题描述 编写一个程序,计算员工的周薪.薪水的计算是以小时为单位,如果在一周的时间内,员工工作的时间不超过40 个小时,那么他/她的总收入等于工作时间乘以每小时的薪水.如果员工工作的时间在40 到50 ...
- 【SSM框架】Spring + Springmvc + Mybatis 基本框架搭建集成教程
本文将讲解SSM框架的基本搭建集成,并有一个简单demo案例 说明:1.本文暂未使用maven集成,jar包需要手动导入. 2.本文为基础教程,大神切勿见笑. 3.如果对您学习有帮助,欢迎各种转载,注 ...
- Java 8 的 Nashorn 脚本引擎教程
本文为了解所有关于 Nashorn JavaScript 引擎易于理解的代码例子. Nashorn JavaScript 引擎是Java SE 8的一部分,它与其它像Google V8 (它是Goog ...
- SQL Server-聚焦计算列或计算列持久化查询性能(二十二)
前言 上一节我们详细讲解了计算列以及计算列持久化的问题,本节我们依然如前面讲解来看看二者查询性能问题,简短的内容,深入的理解,Always to review the basics. 持久化计算列比非 ...
- Linux学习之文件操作
Linux,一起学习进步- mkdir The mkdir command is used to create directories.It works like this: mkdir命令是用 ...
- DDD 领域驱动设计-两个实体的碰撞火花
上一篇:<DDD 领域驱动设计-领域模型中的用户设计?> 开源地址:https://github.com/yuezhongxin/CNBlogs.Apply.Sample(代码已更新) 在 ...
- [转载]SQL语句中的日期计算
1. 本月的第一天SELECT DATEADD(mm, DATEDIFF(mm,0,getdate()), 0) 2. 本月的最后一天SELECT dateadd(ms,-3,DATEADD( ...
- Jquery 获得当前标签的名称和标签属性
得到标签的名称 $("#name").prop("tagName"); 或者 $("#name")[0].tagName; 注意:1.得到的 ...