Java进阶知识08 Hibernate多对一单向关联(Annotation+XML实现)
1、Annotation 注解版
1.1、在多的一方加外键
1.2、创建Customer类和Order类
 package com.shore.model;

 import javax.persistence.Entity;

 import javax.persistence.Id;

 import javax.persistence.Table;

 /**

  * @author DSHORE/2019-9-19

  * 多对一,单向关联(注解版)

  */

 @Entity

 @Table(name="anno_customer")

 public class Customer {//顾客  (“一”的一方)

     private Integer id;

     private String name;

     private Integer age;

     @Id

     public Integer getId() {

         return id;

     }

     public void setId(Integer id) {

         this.id = id;

     }

     public String getName() {

         return name;

     }

     public void setName(String name) {

         this.name = name;

     }

     public Integer getAge() {

         return age;

     }

     public void setAge(Integer age) {

         this.age = age;

     }

 }
Order类
 package com.shore.model;

 import javax.persistence.Entity;

 import javax.persistence.Id;

 import javax.persistence.JoinColumn;

 import javax.persistence.ManyToOne;

 import javax.persistence.Table;

 /**

  * @author DSHORE/2019-9-19

  * 多对一,单向关联(注解版)

  */

 @Entity

 @Table(name="anno_order") //Order是MySQL数据库关键字。需重新定义表名

 public class Order {//订单  (“多”的一方),在多的一方加外键

     private Integer id;

     private String number;

     private Float sum;

     private Customer customer; //映射外键【看他的getCustomer()方法处】

     @Id

     public Integer getId() {

         return id;

     }

     public void setId(Integer id) {

         this.id = id;

     }

     public String getNumber() {

         return number;

     }

     public void setNumber(String number) {

         this.number = number;

     }

     public Float getSum() {

         return sum;

     }

     public void setSum(Float sum) {

         this.sum = sum;

     }

     @ManyToOne   //多对一

     @JoinColumn(name="customerId") //外键

     public Customer getCustomer() {

         return customer;

     }

     public void setCustomer(Customer customer) {

         this.customer = customer;

     }

 }
1.3、创建hibernate.cfg.xml核心配置文件
 <?xml version='1.0' encoding='utf-8'?>

 <!DOCTYPE hibernate-configuration PUBLIC

         "-//Hibernate/Hibernate Configuration DTD 3.0//EN"

         "http://www.hibernate.org/dtd/hibernate-configuration-3.0.dtd">

 <hibernate-configuration>

     <session-factory>

         <!-- Database connection settings -->

         <property name="connection.driver_class">com.mysql.jdbc.Driver</property>

         <property name="connection.url">jdbc:mysql://localhost:3306/hibernate</property>

         <property name="connection.username">root</property>

         <property name="connection.password">123456</property>

         <property name="dialect">org.hibernate.dialect.MySQLDialect</property>

         <property name="cache.provider_class">org.hibernate.cache.NoCacheProvider</property>

         <property name="show_sql">true</property>

         <property name="hbm2ddl.auto">create</property>

         <mapping class="com.shore.model.Customer" />

         <mapping class="com.shore.model.Order" />

     </session-factory>

 </hibernate-configuration>
1.4、开始测试
 package com.shore.test;

 import org.hibernate.cfg.AnnotationConfiguration;

 import org.hibernate.tool.hbm2ddl.SchemaExport;

 import org.junit.Test;

 /**

  * @author DSHORE/2019-9-19

  *

  */

 public class AnnotationTest {

     @Test

     public void test() {//简单测试,只创建表,不插入数据

         new SchemaExport(new AnnotationConfiguration().configure()).create(

                 false, true);

     }

 }
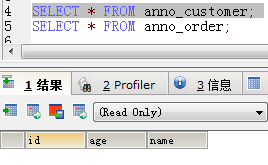
测试结果图:


2、XML版 的实现
2.1、创建Customer类和Order类
 package com.shore.model;

 /**

  * @author DSHORE/2019-9-19

  * 多对一,单向关联(xml版)

  */

 public class Customer {//顾客  (“一”的一方)

     private Integer id;

     private String name;

     private Integer age;

     public Integer getId() {

         return id;

     }

     public void setId(Integer id) {

         this.id = id;

     }

     public String getName() {

         return name;

     }

     public void setName(String name) {

         this.name = name;

     }

     public Integer getAge() {

         return age;

     }

     public void setAge(Integer age) {

         this.age = age;

     }

 }
Order类
 package com.shore.model;

 /**

  * @author DSHORE/2019-9-19

  * 多对一,单向关联(xml版)

  */

 public class Order {//订单  (“多”的一方),在多的一方加外键

     private Integer id;

     private String number;

     private Float sum;

     private Customer customer; //映射外键【看他的Order.hbm.xml配置文件对应的字段customer处】

     public Integer getId() {

         return id;

     }

     public void setId(Integer id) {

         this.id = id;

     }

     public String getNumber() {

         return number;

     }

     public void setNumber(String number) {

         this.number = number;

     }

     public Float getSum() {

         return sum;

     }

     public void setSum(Float sum) {

         this.sum = sum;

     }

     public Customer getCustomer() {

         return customer;

     }

     public void setCustomer(Customer customer) {

         this.customer = customer;

     }

 }
2.2、创建 Customer.hbm.xml 配置文件和 Order.hbm.xml 配置文件
 <?xml version="1.0"?>

 <!DOCTYPE hibernate-mapping PUBLIC

         "-//Hibernate/Hibernate Mapping DTD 3.0//EN"

         "http://www.hibernate.org/dtd/hibernate-mapping-3.0.dtd">

 <hibernate-mapping package="com.shore.model">

     <class name="Customer" table="customer_xml">

         <id name="id">

             <generator class="native"/>

         </id>

         <property name="name" type="java.lang.String"/>

         <property name="age" type="java.lang.Integer"/>

     </class>

 </hibernate-mapping>
Order.hbm.xml 配置文件
 <?xml version="1.0"?>

 <!DOCTYPE hibernate-mapping PUBLIC

         "-//Hibernate/Hibernate Mapping DTD 3.0//EN"

         "http://www.hibernate.org/dtd/hibernate-mapping-3.0.dtd">

 <hibernate-mapping package="com.shore.model">

     <class name="Order" table="order_xml">

         <id name="id">

             <generator class="native"/>

         </id>

         <property name="number" type="java.lang.String"/>

         <property name="sum" type="java.lang.Float"/>

         <!-- 多对一   -->

         <many-to-one name="customer" column="customerId"/>

     </class>

 </hibernate-mapping>
2.3、创建hibernate.cfg.xml 核心配置文件
 <?xml version='1.0' encoding='utf-8'?>

 <!DOCTYPE hibernate-configuration PUBLIC

         "-//Hibernate/Hibernate Configuration DTD 3.0//EN"

         "http://www.hibernate.org/dtd/hibernate-configuration-3.0.dtd">

 <hibernate-configuration>

     <session-factory>

         <!-- Database connection settings -->

         <property name="connection.driver_class">com.mysql.jdbc.Driver</property>

         <property name="connection.url">jdbc:mysql://localhost:3306/hibernate</property>

         <property name="connection.username">root</property>

         <property name="connection.password">123456</property>

         <property name="dialect">org.hibernate.dialect.MySQLDialect</property>

         <property name="cache.provider_class">org.hibernate.cache.NoCacheProvider</property>

         <property name="show_sql">true</property>

         <property name="hbm2ddl.auto">create</property>

         <!-- <mapping class="com.shore.model.Customer" />

         <mapping class="com.shore.model.Order" /> -->

         <mapping resource="com/shore/model/Customer.hbm.xml" />

         <mapping resource="com/shore/model/Order.hbm.xml" />

     </session-factory>

 </hibernate-configuration>
2.4、开始测试
 package com.shore.test;

 import org.hibernate.cfg.Configuration;

 import org.hibernate.tool.hbm2ddl.SchemaExport;

 import org.junit.Test;

 /**

  * @author DSHORE/2019-9-19

  *

  */

 public class XMLTest {

     @Test

     public void test() {//简单测试,只创建表,不插入数据

                 //xml版,此处用Configuration()方法

         new SchemaExport(new Configuration().configure()).create(

                 false, true);

     }

 }
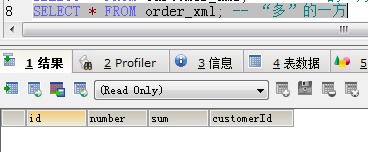
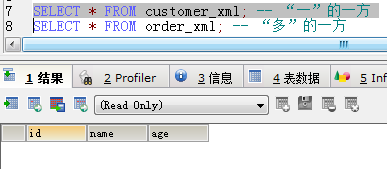
测试结果图:


Hibernate一对一单向关联映射(Annotation+XML实现):https://www.cnblogs.com/dshore123/p/11545058.html
Hibernate一对一双向关联映射(Annotation+XML实现):https://www.cnblogs.com/dshore123/p/11545077.html
Hibernate多对一单向关联映射(Annotation+XML实现):https://www.cnblogs.com/dshore123/p/11553213.html
Hibernate一对多单向关联映射(Annotation+XML实现):https://www.cnblogs.com/dshore123/p/11553215.html
Hibernate一对多和多对一双向关联映射(Annotation+XML实现):https://www.cnblogs.com/dshore123/p/11560433.html
Hibernate多对多单向关联映射(Annotation+XML实现):https://www.cnblogs.com/dshore123/p/11568536.html
Hibernate多对多双向关联映射(Annotation+XML实现):https://www.cnblogs.com/dshore123/p/11568963.html
|
原创作者:DSHORE 作者主页:http://www.cnblogs.com/dshore123/ 原文出自:https://www.cnblogs.com/dshore123/p/11553213.html 版权声明:欢迎转载,转载务必说明出处。(如果本文对您有帮助,可以点击一下右下角的 推荐,或评论,谢谢!) |
Java进阶知识08 Hibernate多对一单向关联(Annotation+XML实现)的更多相关文章
- Java进阶知识11 Hibernate多对多单向关联(Annotation+XML实现)
1.Annotation 注解版 1.1.应用场景(Student-Teacher):当学生知道有哪些老师教,但是老师不知道自己教哪些学生时,可用单向关联 1.2.创建Teacher类和Student ...
- Java进阶知识12 Hibernate多对多双向关联(Annotation+XML实现)
1.Annotation 注解版 1.1.应用场景(Student-Teacher):当学生知道有哪些老师教,老师也知道自己教哪些学生时,可用双向关联 1.2.创建Teacher类和Student类 ...
- Java进阶知识09 Hibernate一对多单向关联(Annotation+XML实现)
1.Annotation 注解版 1.1.在一的一方加Set 1.2.创建Customer类和Order类 package com.shore.model; import java.util.Hash ...
- Java进阶知识05 Hibernate联合主键之Annotation(注解)和XML实现方式
1.Hibernate联合主键(Annotation实现) 1.1.单列主键 1.1.1.为什么要有主键? //唯一确定一条记录 1.1.2.一个表能否有多个主键? //不能 1.1.3. ...
- Java进阶知识10 Hibernate一对多_多对一双向关联(Annotation+XML实现)
本文知识点(目录): 1.Annotation 注解版(只是测试建表) 2.XML版 的实现(只是测试建表) 3.附录(Annotation 注解版CRUD操作)[注解版有个问题:插入值时 ...
- Java进阶知识06 Hibernate一对一单向外键关联(Annotation+XML实现)
1.Annotation 注解版 1.1.创建Husband类和Wife类 package com.shore.model; import javax.persistence.Entity; impo ...
- Java进阶知识07 Hibernate一对一双向外键关联(Annotation+XML实现)
1.Annotation 注解版 1.1.创建Husband类和Wife类 package com.shore.model; import javax.persistence.Entity; impo ...
- hibernate多对一单向关联
关联是类(类的实例)之间的关系,表示有意义和值得关注的连接. 本系列将介绍Hibernate中主要的几种关联映射 Hibernate一对一主键单向关联Hibernate一对一主键双向关联Hiberna ...
- Hibernate多对多单向关联和双向关联 --Hibernate框架
Hibernate关联关系中相对比较特殊的就是多对多关联,多对多关联与一对一关联和一对多关联不同,多对多关联需要另外一张映射表用于保存多对多映射信息.本例介绍多对多单向关联和双向关联.单向关联 :指具 ...
随机推荐
- 码云以及Git的使用
码云以及Git的使用 码云就是一个远程管理的仓库,Git是用来上传和下载数据的工具. 首先访问网站 https://gitee.com/ 进行注册 注册完成后,进入如下页面 点击新建仓库 设置自己的仓 ...
- mydumper,myloader原理及实战
mydumper 特性 (1)多线程备份(和mysqlpump的多线程不同,mysqlpump多线程备份的粒度是表,mydumper多线程备份的粒度是行,这对于备份大表特别有用)(2)因为是多线程逻辑 ...
- k8s之自定义指标API部署prometheus
1.自定义指标-prometheus node_exporter是agent;PromQL相当于sql语句来查询数据; k8s-prometheus-adapter:prometheus是不能直接解析 ...
- No database provider has been configured for this DbContext
var context = ((IInfrastructure<IServiceProvider>)set).GetService<DbContext>(); 在EF Core ...
- Eclipse MyEclipse 反编译.class文件 myeclipse source not found
首先,需要下载两个必须的插件包. 一个是:准备反编译需要的jad.exe 下载地址:http://varaneckas.com/jad/ 二个是:反编译编辑器net.sf.jadclipse_3.3. ...
- 手把手封装axios
大佬链接: https://juejin.im/post/5b55c118f265da0f6f1aa354 一.axios的封装 在vue项目中,和后台交互获取数据这块,我们通常使用的是axios库, ...
- 较新版FlowPortal BPM不能回车登录
在BPM安装目录中找到路径:WEB\YZSoft\Login\2018\js\login.js 加回车登录代码如下 //回车登录 $('.yz-input.yzglyph.uid').bind('ke ...
- HTTP中GET,POST和PUT的区别
一.HTTP中定义了以下几种请求方法: 1.GET:2.POST:3.PUT:4.DELETE;5.HEAD:6.TRACE:7.OPTIONS: 二.各个方法介绍: 1.GET方法:对这个资源的查操 ...
- 第一篇.markdown
目录 Day 01 1.markdown的使用感受 2.markdown的基本语法 2.1 标题 2.2 加粗 2.3 斜体 2.4 高亮 2.5 上标 2.6 下标 2.7 代码引用(>式) ...
- 13_Redis_持久化
一:概述: Redis的高性能是山于其将所有数据都存储在了内存中,为了使Redis在重启之后仍能保证数据不丢失,需要将数据从内存中同步到硬盘中,这一过程就是持久化. Redis支持两种方式的持久化,一 ...