Python图形编程探索系列-08-再次认识标签
标签的各种属性
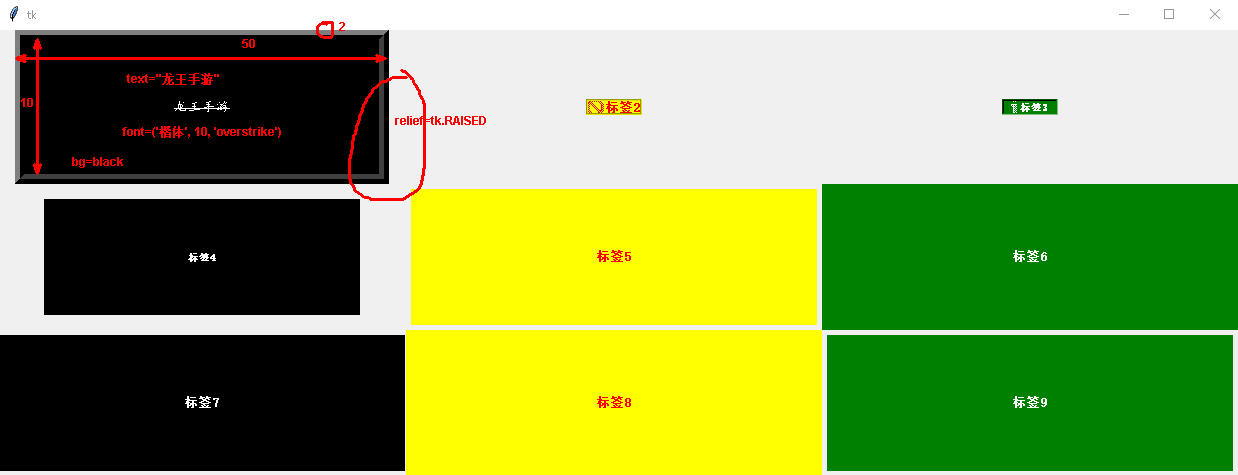
**代码展示:**
```
import tkinter as tk
root = tk.Tk()
root.geometry = '500x300'
label1 = tk.Label(root, text='龙王手游', width=50, height=10, bd=10)
label1.config(fg='white', bg='black', relief=tk.RAISED, font=('楷体', 10, 'overstrike'))
label2 = tk.Label(root, text='标签2', relief=tk.GROOVE, width=50, height=10, bd=2)
label2.config(fg='red', compound=tk.LEFT, bitmap='error', bg='yellow', font=('隶书', 10, 'bold'))
label3 = tk.Label(root, text='标签3', compound=tk.LEFT, bitmap='info', relief=tk.SUNKEN, width=50, height=10, bd=2)
label3.config(fg='white', bg='green', font=('隶书', -10, 'bold'))
label4 = tk.Label(root, text='标签4', width=50, height=10, bd=2)
label4.config(fg='white', bg='black', font=('楷书', -10, 'bold'))
label5 = tk.Label(root, text='标签5', width=50, height=10)
label5.config(fg='red', bg='yellow', bd=2, font=('隶书', 10, 'bold'))
label6 = tk.Label(root, text='标签6', width=50, height=10, bd=2)
label6.config(fg='white', bg='green', font=('隶书', 10, 'bold'))
label7 = tk.Label(root, text='标签7', width=50, height=10, bd=2)
label7.config(fg='white', bg='black', font=('隶书', 10, 'bold'))
label8 = tk.Label(root, text='标签8', width=50, height=10, bd=2)
label8.config(fg='red', bg='yellow', font=('隶书', 10, 'bold'))
label9 = tk.Label(root, text='标签9', width=50, height=10)
label9.config(fg='white', bg='green', bd=2, font=('隶书', 10, 'bold'))
label1.grid(row=0, column=0, ipadx=1, ipady=1)
label2.grid(row=0, column=1, padx=5, pady=5)
label3.grid(row=0, column=2, padx=1, pady=1)
label4.grid(row=1, column=0, ipadx=5, ipady=5)
label5.grid(row=1, column=1, padx=1, pady=1)
label6.grid(row=1, column=2, ipadx=5, ipady=5)
label7.grid(row=2, column=0, padx=1, pady=1)
label8.grid(row=2, column=1, ipadx=5, ipady=5)
label9.grid(row=2, column=2, padx=1, pady=1)
root.mainloop()
**结果:**
<h1 style="background:cyan;">标签按钮合作案例</h1>
单击按钮是从新设置标签上的显示内容
import tkinter as tk # 导入tkinter库
root = tk.Tk() # 建立程序主窗口
root.title("Button按钮的使用") # 设置主窗口的标题
root.geometry('600x500')
------功能函数
def f1():
var.set("单击按钮1")
def f2():
var.set("单击按钮2")
def f3():
var.set("单击按钮3")
------建立标签
labelx = tk.Label(root)
labelx.config(width=10, height=5)
labelx.config(activebackground='red')
labelx.config(activeforeground='yellow')
labelx.config(relief=tk.SUNKEN)
labelx.config(anchor=tk.CENTER)
定义字符串变量
var = tk.StringVar()
labelx.config(textvariable=var)
------建立第一个按钮
button1 = tk.Button(root, text='按钮1')
button1.config(width=5, height=2)
button1.config(activebackground='red')
button1.config(activeforeground='yellow')
button1.config(anchor=tk.CENTER)
button1.config(bd=2)
button1.config(relief=tk.RAISED)
button1.config(font=('隶书', -20))
button1.config(command=f1)
------建立第二个按钮
button2 = tk.Button(root, text='按钮2')
button2.config(width=5, height=2)
button2.config(activebackground='red')
button2.config(activeforeground='yellow')
button2.config(anchor=tk.CENTER)
button2.config(bd=2)
button2.config(relief=tk.RAISED)
button2.config(font=('隶书', -20))
button2.config(command=f2)
------建立第三个按钮
button3 = tk.Button(root, text='按钮3')
button3.config(width=5, height=2)
button3.config(activebackground='red')
button3.config(activeforeground='yellow')
button3.config(anchor=tk.CENTER)
button3.config(bd=2)
button3.config(relief=tk.RAISED)
button3.config(font=('隶书', -20))
button3.config(command=f3)
各个组件排兵布阵
labelx.grid(row=0, column=1)
button1.grid(row=1, column=0)
button2.grid(row=1, column=1)
button3.grid(row=1, column=2)
root.mainloop()
<h1 style="background:cyan;">标签案例</h1>

在主窗口中定义了三个标签
import tkinter as tk
root = tk.Tk()
label1 = tk.Label(root, text='标签1')
label1.config(fg='white', bg='black')
label2 = tk.Label(root, text='标签2')
label2.config(fg='red', bg='yellow')
label3 = tk.Label(root, text='标签3')
label3.config(fg='white', bg='green')
label1.grid(row=0, column=3)
label2.grid(row=1, column=2)
label3.grid(row=1, column=1)
root.mainloop()
Python图形编程探索系列-08-再次认识标签的更多相关文章
- Python图形编程探索系列-09-tkinter与matplotlib结合案例
案例1 案例来自于:https://bbs.csdn.net/topics/390326088 代码示例: import matplotlib matplotlib.use('TkAgg') from ...
- Python图形编程探索系列-07-程序登录界面设计
设计任务 初步设计程序登录界面,详细分析设计步骤. 程序详细分析 基本框架设计 import tkinter as tk import tkinter.messagebox root = tk.Tk( ...
- Python图形编程探索系列-04-网上图片与标签组件的结合
跳转到自己的博客 任务设定 任务:从网上找到一张图片,然后将其显示在标签上? 网上图片网站:http://pic.58pic.com/58pic/17/56/38/52w58PICtER_1024.j ...
- Python图形编程探索系列-03-标签组件(Label)
跳转到自己的博客 tkinter.Label介绍 什么是标签? 通俗的将就相当于word的功能,能够进行显示不可修改的文字.图片或者图文混排. 直观体会一下 图1 背景图构成:内容区(黑色),填充区( ...
- Python图形编程探索系列-06-按钮批量生产函数
设计任务 初步设计一个批量生产按钮的函数,根据需要的按钮数量,自动生成多少按钮. 函数设计 import tkinter as tk # 导入tkinter库 root = tk.Tk() # 建立程 ...
- Python图形编程探索系列-05-用控制变量构建对话程序
跳转到自己的博客 控制变量 变量 符号 意义 默认值 1 var = tk.BooleanVar() 布尔型 0 2 var = tk.StringVar() 字符串控制变量 空字符串 3 var = ...
- Python图形编程探索系列-02-框架设计
跳转到我的博客 设计任务 在主窗口root中放置三个容器用于容纳组件,容器采用框架设计. 代码初步设计 import tkinter as tk root = tk.Tk() root.geometr ...
- Python图形编程探索系列-01-初级任务
设计任务 设计一个主窗口,在其中添加三个标签和三个按钮,当点击按钮时,对标签的内容和色彩进行修改. 代码初步设计 import tkinter as tk root = tk.Tk() def f1( ...
- linux python 图形编程 qt开发环境搭建
我的系统是 ubuntu14.04 我们使用的是python2.7,建议安装qt4+pyqt4+eric4 eric是pyqt的界面设计器的代码生成软件. 1.安装sip 这个是python和qt之间 ...
随机推荐
- 【转】#ifdef __cplusplus+extern "C"的用法
时常看到别人的头文件中,有这样的代码: #ifdef __cplusplus extern "C" { #endif //一段代码 #ifdef __cplusplus } #en ...
- Android开发之Activity转场动画
引子 相信开发过iOS的程序员都知道iOS ViewController之间的跳转动画非常多,很酷对不对?这让开发Android的羡慕不已,曾几何时,Android中的Activity跳转是何等的生硬 ...
- --save-dev和--save的区别
使用npm来进行前端包管理的时候,我们会用到npm install或者cnpm install命令来安装需要用到的包资源 1: npm install *** --save-dev 2: npm in ...
- 【ES】学习8-聚合1
参考资料: https://elasticsearch.cn/book/elasticsearch_definitive_guide_2.x/_combining_the_two.html 特定概念: ...
- java 格式化
一. 可以之际像c语言一样用System.out.printf()格式化输出 二. System.out.format 1. format()方法模仿自printf(), 可用于PrintStream ...
- Jmeter NonGUI模式
一般情况下我们都是在NonGUI模式下运行jmeter.这样做有两个好处 节省系统资源,能够产生更大的负载 可以通过命令行参数对测试场景进行更精细的配置 示例 创建luzhi.jmx脚本 jmeter ...
- whiledo循环输出数组中的分数
var scores = [24, 32, 17]; var arrayLength = scores.length; var i =0; while(i < arrayLength){ var ...
- android系统属性获取及设置
系统属性获取及设置中的设置值 data/data/com.android.providers.settings/databases/settings.db 1.系统属性获取及设置 android.os ...
- vue2.0路由
现在用vue-cli搭建的环境里面vue-router是下载好的 vue2.0路由方式和以前也有些不同 没了了map和start方法 目录结构如上图 这里有三个文件,app.vue显示,main.js ...
- php 前一天或后一天的日期
php 判断今天的前一天,或前后多少天的代码 <?php date_default_timezone_set('PRC'); //默认时区 echo "今天:",date(& ...