
照着官网来安装openstack pike之nova安装
nova组件安装分为控制节点和计算节点,还是先从控制节点安装
# mysql -u root -p

MariaDB [(none)]> CREATE DATABASE nova_api;

MariaDB [(none)]> CREATE DATABASE nova;

MariaDB [(none)]> CREATE DATABASE nova_cell0;

GRANT ALL PRIVILEGES ON nova_api.* TO 'nova'@'localhost' IDENTIFIED BY 'nova';

GRANT ALL PRIVILEGES ON nova_api.* TO 'nova'@'%' IDENTIFIED BY 'nova';

GRANT ALL PRIVILEGES ON nova.* TO 'nova'@'localhost' IDENTIFIED BY 'nova';

GRANT ALL PRIVILEGES ON nova.* TO 'nova'@'%' IDENTIFIED BY 'nova';

GRANT ALL PRIVILEGES ON nova_cell0.* TO 'nova'@'localhost' IDENTIFIED BY 'nova';

GRANT ALL PRIVILEGES ON nova_cell0.* TO 'nova'@'%' IDENTIFIED BY 'nova';
2、验证keystone
# source admin-openrc
3、创建计算服务认证:
# openstack user create --domain default --password-prompt nova

输入密码:nova

# openstack role add --project service --user nova admin

# openstack service create --name nova --description "OpenStack Compute" compute
4、创建计算服务的API endpoints:
# openstack endpoint create --region RegionOne compute public    http://192.168.101.10:8774/v2.1

# openstack endpoint create --region RegionOne compute internal http://192.168.101.10:8774/v2.1

# openstack endpoint create --region RegionOne compute admin http://192.168.101.10:8774/v2.1
5、创建一个placement服务的用户,并设置密码:
# openstack user create --domain default --password-prompt placement

输入密码:placement
6、添加placement用户到service这个项目中,使用admin角色:
# openstack role add --project service --user placement admin
7、Create the Placement API entry in the service catalog:
# openstack service create --name placement --description "Placement API" placement
8、创建一个placement API service endpoints:
# openstack endpoint create --region RegionOne placement public http://192.168.101.10:8778

# openstack endpoint create --region RegionOne placement internal http://192.168.101.10:8778

# openstack endpoint create --region RegionOne placement admin http://192.168.101.10:8778
9、安装nova服务需要的依赖:
# yum install openstack-nova-api openstack-nova-conductor openstack-nova-console openstack-nova-novncproxy openstack-nova-scheduler openstack-nova-placement-api
安装完成后,需要修改配置文件进行设置
[DEFAULT]

enabled_apis = osapi_compute,metadata
在[api_database]和[database]下:
[api_database]

connection = mysql+pymysql://nova:nova@192.168.101.10/nova_api

[database]

connection = mysql+pymysql://nova:nova@192.168.101.10/nova

[DEFAULT]

transport_url = rabbit://openstack:openstack@192.168.101.10

    使用的是:openstack:openstack账号和密码登录的rabbitmq

[api]

auth_strategy = keystone

[keystone_authtoken]

auth_uri = http://192.168.101.10:5000

auth_url = http://192.168.101.10:35357

memcached_servers = 192.168.101.10:11211

auth_type = password

project_domain_name = default

user_domain_name = default

project_name = service

username = nova

password = nova          这里是nova在keystone那里认证的账号和密码

[DEFAULT]

my_ip = 192.168.101.10

use_neutron = True

firewall_driver = nova.virt.firewall.NoopFirewallDriver
By default, Compute uses an internal firewall driver. Since the Networking service includes a firewall driver, you must disable the Compute firewall driver by using the nova.virt.firewall.NoopFirewallDriver firewall driver.
[vnc]

enabled = true

vncserver_listen = $my_ip

vncserver_proxyclient_address = $my_ip

[glance]

api_servers = http://192.168.101.10:9292

[oslo_concurrency]

lock_path = /var/lib/nova/tmp

[placement]

os_region_name = RegionOne

project_domain_name = Default

project_name = service

auth_type = password

user_domain_name = Default

auth_url = http://192.168.101.10:35357/v3

username = placement

password = placement
设置能够访问placement API的权限:/etc/httpd/conf.d/00-nova-placement-api.conf(追加到此文件)
<Directory /usr/bin>

     <IfVersion >= 2.4>

        Require all granted

     </IfVersion>

     <IfVersion < 2.4>

        Order allow,deny

        Allow from all

     </IfVersion>

</Directory>
然后重启httpd服务:
# systemctl restart httpd
向nova-api数据库导入数据:
# su -s /bin/sh -c "nova-manage api_db sync" nova
Ignore any deprecation messages in this output.
# su -s /bin/sh -c "nova-manage cell_v2 map_cell0" nova
创建cell1:
# su -s /bin/sh -c "nova-manage cell_v2 create_cell --name=cell1 --verbose" nova
导入nova数据:
# su -s /bin/sh -c "nova-manage db sync" nova

# nova-manage cell_v2 list_cells
最后开启计算服务:
# systemctl enable openstack-nova-api.service openstack-nova-consoleauth.service openstack-nova-scheduler.service openstack-nova-conductor.service openstack-nova-novncproxy.service

# systemctl start openstack-nova-api.service openstack-nova-consoleauth.service openstack-nova-scheduler.service openstack-nova-conductor.service openstack-nova-novncproxy.service
至此nova的控制节点已经安装成功,接下来nova在计算节点的安装:
[root@node2 ~]# cat /etc/hosts

127.0.0.1   localhost localhost.localdomain localhost4 localhost4.localdomain4

::1         localhost localhost.localdomain localhost6 localhost6.localdomain6

192.168.101.10    node1

192.168.101.11    node2
2、时间同步(控制节点)
# yum install chrony
修改vim /etc/chrony.conf
allow 192.168.101.0/16    开启

注释掉:

#server 0.centos.pool.ntp.org iburst

#server 1.centos.pool.ntp.org iburst

#server 2.centos.pool.ntp.org iburst

#server 3.centos.pool.ntp.org iburst

server 192.168.101.10 iburst           (新增控制节点)

开启:

systemctl enable chronyd.service

systemctl start chronyd.service
校验:

3、在计算节点上执行需要的包:
# yum install centos-release-openstack-pike

# yum upgrade

    If the upgrade process includes a new kernel, reboot your host to activate it.

reboot

# yum install python-openstackclient

# yum install openstack-selinux

    RHEL and CentOS enable SELinux by default. Install the openstack-selinux package to automatically manage security policies for OpenStack services:
前提环境安装完成后,于是开始安装必须必要的包环境:
# yum install openstack-nova-compute
修改配置文件/etc/nova/nova.conf
[DEFAULT]

enabled_apis = osapi_compute,metadata

transport_url = rabbit://openstack:openstack@192.168.101.10

my_ip = 192.168.101.11

use_neutron = True

firewall_driver = nova.virt.firewall.NoopFirewallDriver

[api]

auth_strategy = keystone

[keystone_authtoken]

auth_uri = http://192.168.101.10:5000

auth_url = http://192.168.101.10:35357

memcached_servers = 192.168.101.10:11211

auth_type = password

project_domain_name = default

user_domain_name = default

project_name = service

username = nova

password = nova

[vnc]

enabled = True

vncserver_listen = 0.0.0.0

vncserver_proxyclient_address = $my_ip

novncproxy_base_url = http://192.168.101.10:6080/vnc_auto.html

[glance]

api_servers = http://192.168.101.10:9292

[oslo_concurrency]

lock_path = /var/lib/nova/tmp

[placement]

os_region_name = RegionOne

project_domain_name = Default

project_name = service

auth_type = password

user_domain_name = Default

auth_url = http://192.168.101.10:35357/v3

username = placement

password = placement
上述参数中my_ip = MANAGEMENT_INTERFACE_IP_ADDRESS 用计算节点的管理ip替换,这里的计算节点ip为192.168.101.11,所以改为
# egrep -c '(vmx|svm)' /proc/cpuinfo
a、如果结果为one or greater,那么计算节点能够支持硬件加速,配置文件就无需修改
[libvirt]

virt_type = qemu
执行上述命令:
[root@node2 ~]# egrep -c '(vmx|svm)' /proc/cpuinfo

2
所以支持虚拟化技术,默认kvm,所以配置libvirt不需要修改
# systemctl enable libvirtd.service openstack-nova-compute.service

# systemctl start libvirtd.service openstack-nova-compute.service
If the nova-compute service fails to start, check /var/log/nova/nova-compute.log. The error message AMQP server on controller:5672 is unreachable likely indicates that the firewall on the controller node is preventing access to port 5672. Configure the firewall to open port 5672 on the controller node and restart nova-compute service on the compute node.
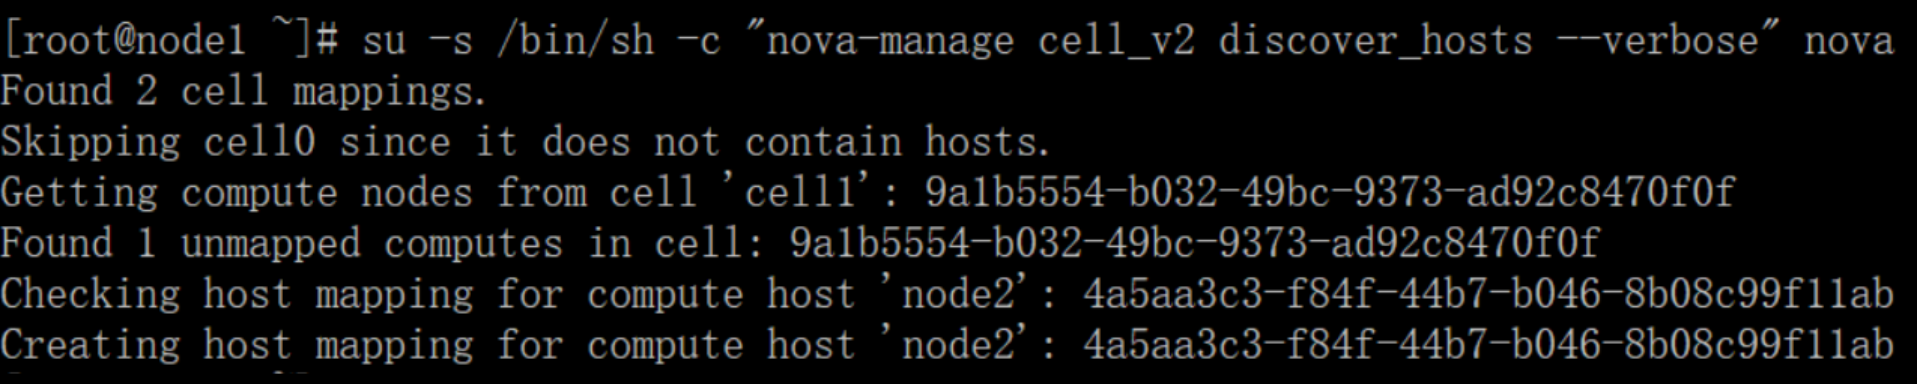
控制节点和计算节点都安装完成后,于是需要将计算节点添加到控制节点,于是接下来的操作在控制节点node1上操作:
# source admin-openrc   进行身份认证

# openstack compute service list --service nova-compute

# su -s /bin/sh -c "nova-manage cell_v2 discover_hosts --verbose" nova
[scheduler]

discover_hosts_in_cells_interval = 300
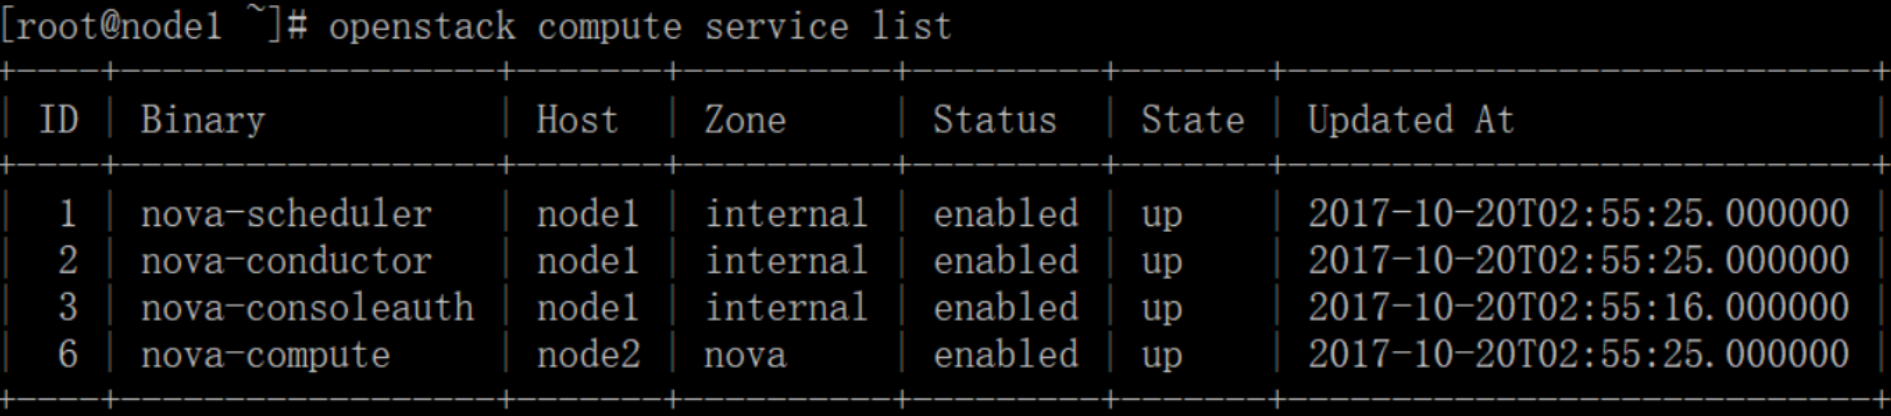
最后检验操作:在控制节点node1上执行
# source admin-openrc 进行身份认证
列出计算服务组件
# openstack compute service list
# openstack catalog list
列出镜像的连接状态:
# openstack image list
Check the cells and placement API are working successfully:
# nova-status upgrade check

照着官网来安装openstack pike之nova安装的更多相关文章
- 照着官网来安装openstack pike之keystone安装
openstack基础环境安装完成后,现在开启安装keystone服务(在控制节点上执行下面所有操作) 1.为keystone创建数据库 mysql -u root -p MariaDB [(none ...
- 照着官网来安装openstack pike之neutron安装
neutron组件安装分为控制节点和计算节点,还是先从控制节点安装 1.前提条件,数据库为nova创建库和账户密码来连接数据库 # mysql -u root -p MariaDB [(none)]& ...
- 照着官网来安装openstack pike之glance安装
镜像服务image service(glance)的安装还是在控制节点上进行: 1.前提条件,数据库为glance创建库和账户密码来连接数据库 # mysql -u root -p MariaDB [ ...
- 照着官网来安装openstack pike之创建并启动instance
有了之前组件(keystone.glance.nova.neutron)的安装后,那么就可以在命令行创建并启动instance了 照着官网来安装openstack pike之environment设置 ...
- openstack pike 单机 一键安装 shell
#openstack pike 单机 centos 一键安装 shell #openstack pike 集群高可用 安装部署 汇总 http://www.cnblogs.com/elvi/p/7 ...
- 照着官网来安装openstack pike之environment设置
安装openstack前的准备环境: 两个centos7系统的环境:192.168.101.10 node1,192.168.101.11 node2 控制节点node1,计算节点node2 1.统一 ...
- 照着官网来安装openstack pike之安装dashboard
上文提到了利用命令行下使用openstack的命令来创建虚拟机,这里选择安装dashboard来安装基于web界面的openstack平台 利用dashboard界面来创建虚拟机 dashboard这 ...
- Devstack 安装OpenStack Pike版本(单机环境)
问题背景 最近在研究OpenStack的时候,需要对其源代码进行调试,公司服务器上部署的OpenStack环境又不能随意的进行折腾,为了研究的持续性和方便性,就决定再自己的虚拟机上面使用Devstac ...
- CentOS7安装OpenStack(Rocky版)-05.安装一个nova计算节点实例
上一篇文章分享了控制节点的nova计算服务的安装方法,在实际生产环境中,计算节点通常会安装一些单独的节点提供服务,本文分享单独的nova计算节点的安装方法 ---------------- 完美的分 ...
随机推荐
- 【BZOJ3894】文理分科 最小割
[BZOJ3894]文理分科 Description 文理分科是一件很纠结的事情!(虽然看到这个题目的人肯定都没有纠结过) 小P所在的班级要进行文理分科.他的班级可以用一个n*m的矩阵进行描述,每个格 ...
- ERROR 1290 (HY000): The MySQL server is running with the --secure-file-priv opti on so it cannot exe
Mysql导入csv文件时报错:ERROR 1290 (HY000): The MySQL server is running with the --secure-file-priv opti on ...
- 简单安装与配置mysql数据库(绿色版)
目录 绿色版下载 mysql绿色版(5.7版本的安装与配置) 绿色版下载: mysql官网下载地址:https://www.oracle.com/index.html mysql绿色版(5.7版本的安 ...
- Tomcat----->软件密码学基础配置tomcat http连接器 https
公钥只能私钥解开,私钥只能公钥解开. 类似于别人给你一个盒子,你用他的盒子和自己盒子加密,他手中有他的钥匙和自己的钥匙,可以解开就既能证明是你发的也能相信内容. 每个数据有自己的数据指纹,数据指纹是由 ...
- [iOS微博项目 - 4.2] - 设置转发微博背景
github: https://github.com/hellovoidworld/HVWWeibo A.转发微博部分的淡灰色背景 1.需求 转发微博部分需要设置背景色 使用图片作为背景 2.思路 ...
- 页面加载异常 清除浏览器静态文件 js css 缓存 js动态加载js css文件,可以配置文件后辍,防止浏览器缓存
js清除浏览器缓存的几种方法 - 兔老霸夏 - 博客园 https://www.cnblogs.com/Mr-Rocker/p/6031096.html js清除浏览器缓存的几种方法 一.CSS和 ...
- webservice接口问题:Payload: No message body writer has been found for class domain, ContentType: application/xml
当在使用cxf-rs的webservice的时候,有时候在传输数据,会发生这种错误 错误代码: Response-Code: 500 Content-Type: text/plain Headers: ...
- python迟邦定
1.绑定 将函数体和函数调用关联起来,就叫绑定 2.迟绑定 在程序运行之前(也就是编译和链接时)执行的绑定是早绑定,迟绑定(late binding)是发生在运行时. 3.实例说明 def outer ...
- ansible(2)
一.ansible模块(yum.pip.service.conr.user.group) 上篇中我们已经学了ansible的几个模块,接下来再来学习几个,那么你是否知道ansible一共有多少模块呢? ...
- sql server dba概念系列引用
原文转自:https://www.cnblogs.com/gaochundong/p/everyone_is_a_dba_sqlserver_architecture.html <人人都是 DB ...