
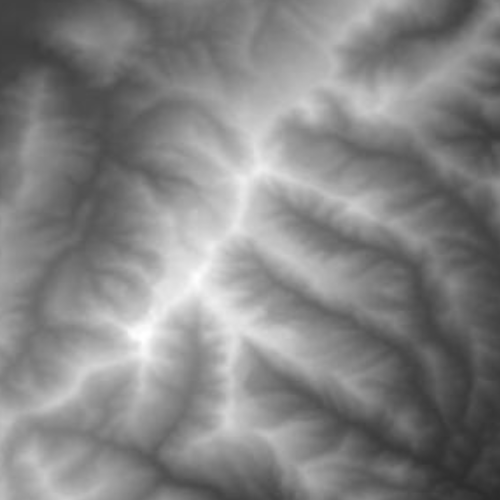
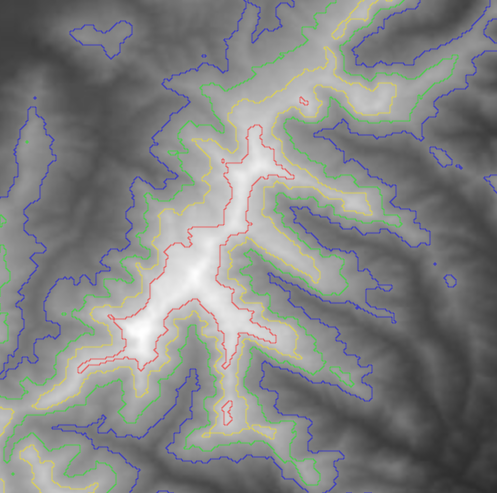
unity读取灰度图生成等值线图
using System.Collections;

using System.Collections.Generic;

using UnityEngine;

using UnityEngine.UI;

//生成等值线图

public class IsoLinesCreate : MonoBehaviour {

    private Texture2D importImage;//输入灰度图

    private Texture grayImage;//加载灰度图

    private Texture2D outputImage;//输出等值线图

    private bool bCreate=false;

    [Tooltip("用作显示输出的等高线图")]

    public RawImage showImage;

    private int tGrayWidth = 0, tGrayHeight = 0;//灰度图的宽和高

    void Start () {

        StartCoroutine(loadImage("grayTest.png", (t) => grayImage = t));

    }

	void Update () {

        if (grayImage!=null)

        {

            if (bCreate==false)

            {

                importImage = (Texture2D)grayImage;

                outputImage = (Texture2D)grayImage;

                tGrayWidth = grayImage.width;

                tGrayHeight = grayImage.height;

                showImage.rectTransform.sizeDelta = new Vector2(tGrayWidth,tGrayHeight);

                //测试不同阈值不同颜色等值线绘制

                trackIsoline(0.5f,Color.blue,2);

                trackIsoline(0.6f, Color.green, 2);

                trackIsoline(0.7f, Color.yellow, 2);

                trackIsoline(0.8f, Color.red, 2);

                showImage.texture = outputImage;

                bCreate = true;

            }

        }

	}

    //加载图片

    IEnumerator loadImage(string imagePath, System.Action<Texture> action)

    {

        WWW www = new WWW("file://" + Application.streamingAssetsPath + "/" + imagePath);

        yield return www;

        if (www.error == null)

        {

            action(www.texture);

        }

    }

    /// <summary>

    /// 等值线追踪

    /// </summary>

    /// <param name="threshold">灰度阈值</param>

    /// <param name="colorP">颜色</param>

    /// <param name="step">步长 为偶数</param>

    private void trackIsoline(float threshold,Color colorP,int step)

    {

        for (int i = 0; i < tGrayWidth-step; i+=step)

        {

            for (int j = 0; j < tGrayHeight-step; j+=step)

            {

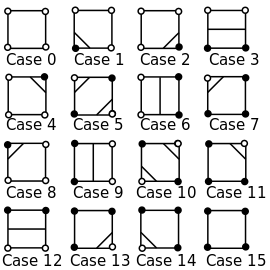
                //标记顶点状态

                int tempCount = 0;//0000

                if (importImage.GetPixel(i,j).grayscale>threshold)

                {

                    tempCount += 1;//0001

                }

                if (importImage.GetPixel(i+step, j).grayscale > threshold)

                {

                    tempCount += 8;//1000

                }

                if (importImage.GetPixel(i+step, j+step).grayscale > threshold)

                {

                    tempCount += 4;//0100

                }

                if (importImage.GetPixel(i, j+step).grayscale > threshold)

                {

                    tempCount += 2;//0010

                }

                int t = step / 2;

                //根据顶点标记情况处理中点连线(此处对中点进行上色)

                switch (tempCount)

                {

                    case 0:

                    case 15:

                        break;

                    case 1:

                    case 14:

                        outputImage.SetPixel(i+t,j,colorP);

                        outputImage.SetPixel(i,j+t,colorP);

                        break;

                    case 2:

                    case 13:

                        outputImage.SetPixel(i , j+t, colorP);

                        outputImage.SetPixel(i+t, j + 2*t, colorP);

                        break;

                    case 3:

                    case 12:

                        outputImage.SetPixel(i+t, j, colorP);

                        outputImage.SetPixel(i + t, j + 2 * t, colorP);

                        break;

                    case 4:

                    case 11:

                        outputImage.SetPixel(i +2* t, j+t, colorP);

                        outputImage.SetPixel(i + t, j + 2 * t, colorP);

                        break;

                    case 5:

                        outputImage.SetPixel(i + t, j, colorP);

                        outputImage.SetPixel(i + 2*t, j +  t, colorP);

                        outputImage.SetPixel(i , j + t, colorP);

                        outputImage.SetPixel(i + t, j + 2 * t, colorP);

                        break;

                    case 6:

                    case 9:

                        outputImage.SetPixel(i, j + t, colorP);

                        outputImage.SetPixel(i +2* t, j + t, colorP);

                        break;

                    case 7:

                    case 8:

                        outputImage.SetPixel(i+t, j, colorP);

                        outputImage.SetPixel(i + 2 * t, j + t, colorP);

                        break;

                    case 10:

                        outputImage.SetPixel(i + t, j, colorP);

                        outputImage.SetPixel(i, j + t, colorP);

                        outputImage.SetPixel(i + 2*t, j+t, colorP);

                        outputImage.SetPixel(i + t, j + 2*t, colorP);

                        break;

                }

            }

        }

        outputImage.Apply();

    }

}
本文链接 https://www.cnblogs.com/gucheng/p/10107696.html
unity读取灰度图生成等值线图的更多相关文章
- unity读取灰度图生成三维地形mesh
准备灰度图 IGray.png及草地贴图 IGrass.jpg ,放入Assets下StreamingAssets文件夹中. 创建空材质,用作参数传入脚本. 脚本如下,挂载并传入材质球即可 ...
- unity 读取灰度图生成按高程分层设色地形模型
准备灰度图 1.高程按比例对应hue色相(hsv)生成mesh效果 o.color = float4(hsv2rgb(float3(v.vertex.y/100.0, 0.5, 0.75)), 1.0 ...
- unity 读取灰度图生成三维地形并贴图卫星影像
从 https://earthexplorer.usgs.gov/ 下载高程数据 从谷歌地球上保存对应地区卫星图像 从灰度图创建地形模型,并将卫星影像作为贴图 using System.Collect ...
- opengl读取灰度图生成三维地形并添加光照
转自:https://www.cnblogs.com/gucheng/p/10152889.html 准备第三方库 glew.freeglut.glm.opencv 准备一张灰度图 最终效果 代码如下 ...
- ue4读取灰度图生成三维地形mesh
转自:https://www.cnblogs.com/gucheng/p/10116857.html 新建ue c++工程. 在Build.cs中添加"ProceduralMeshCompo ...
- opengl读取灰度图生成三维地形
准备第三方库 glew.freeglut.glm.opencv 准备灰度图片和草地贴图 最终效果 代码包括主程序源文件mainApp.cpp.顶点着色器shader.vs.片元着色器shader.fs ...
- blender导入灰度图生成地形模型
安装软件 在此处下载blender并安装. 添加平面 1.打开blender,右键删除初始的立方体. 2.shift+a选择平面添加进场景: 3.按下s键鼠标拖动调节平面大小确定后按下鼠标左键: 4. ...
- unity 读取excel表 生成asset资源文件
做unity 项目也有一段时间了,从unity项目开发和学习中也遇到了很多坑,并且也从中学习到了很多曾经未接触的领域.项目中的很多功能模块,从今天开始把自己的思路和代码奉上给学渣们作为一份学习的资料. ...
- c语言实现灰度图转换为二值图
将上篇得到的灰度图转换为二值图,读取像素数据,低于某一值置0,否则设置为255,为得到更好的效果不同图片应采用不同的值 /* 2015年6月2日11:16:22 灰度图转换为二值图 blog:http ...
随机推荐
- P3183 [HAOI2016]食物链[拓扑/记忆化搜索]
题目来源:洛谷 题目描述 如图所示为某生态系统的食物网示意图,据图回答第1小题现在给你n个物种和m条能量流动关系,求其中的食物链条数.物种的名称为从1到n编号M条能量流动关系形如a1 b1a2 b2a ...
- 0002SpringBoot整合Junit
前提条件:SpringBoot已经整合了Mybatis,至于SpringBoot如何整合Mybatis可参考我的上一篇文章 SpringBoot为什么要整合Juni? SpringBoot整合了Jun ...
- VisualGC,JVMStat安装配置
通过VisualGC工具可以通过图形化方式查看JVM垃圾收集的情况. http://www.oracle.com/technetwork/java/jvmstat-142257.html 下载 htt ...
- lvs+keepalived做高可用方案1
本文我们主要讲解的是LVS通过keepalived来实现负载均衡和高可用,而不是我们第三篇文章介绍的通过手动的方式来进行配置.通过脚本的方式来显示RS节点的健康检查和LVS的故障切换.此文会通过一个实 ...
- 「数据结构与算法(Python)」(一)
算法的提出 算法的概念 算法是计算机处理信息的本质,因为计算机程序本质上是一个算法来告诉计算机确切的步骤来执行一个指定的任务.一般地,当算法在处理信息时,会从输入设备或数据的存储地址读取数据,把结果写 ...
- 将pandas的DataFrame数据写入MySQL数据库 + sqlalchemy
将pandas的DataFrame数据写入MySQL数据库 + sqlalchemy import pandas as pd from sqlalchemy import create_engine ...
- 爬取淘宝商品数据并保存在excel中
1.re实现 import requests from requests.exceptions import RequestException import re,json import xlwt,x ...
- 001_Python安装
1. 判断电脑是否已经安装python,电脑->运行->输入:python 2. 如果没有安装,去官网下载:https://www.python.org/downloads/ 3. 安装过 ...
- 基于ARM的SoC设计入门[转]
原文:基于ARM的SoC设计入门 我们跳过所有对ARM介绍性的描述,直接进入工程师们最关心的问题.要设计一个基于ARM的SoC,我们首先要了解一个基于ARM的SoC的结构.图1是一个典型的SoC的结构 ...
- 数据结构实验之二叉树三:统计叶子数 SDUT 3342
#include <stdio.h> #include <string.h> struct node { char data; struct node *l,*r; }; st ...