PyTorch显存机制分析
参考:

=======================================================
在pytorch中有几个关于显存的关键词:
在pytorch中显存为缓存和变量分配的空间之和叫做reserved_memory,为变量分配的显存叫做memory_allocated,由此可知reserved_memory一定大于等于memory_allocated,但是pytorch获得总显存要比reserved_memory要大,pytorch获得的总显存空间为reserved_memory+PyTorch context。
在不同显卡和驱动下PyTorch context的大小是不同的,如:
https://zhuanlan.zhihu.com/p/424512257
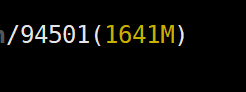
所述,RTX 3090的context 开销。其中3090用的CUDA 11.3,开销为1639MB。
执行代码:
import torch

temp = torch.tensor([1.0]).cuda()
NVIDIA显存消耗:
其中:

我们知道memory_reserved大小为2MB,那么context大小大约为1639MB。
给出
https://zhuanlan.zhihu.com/p/424512257
图片:
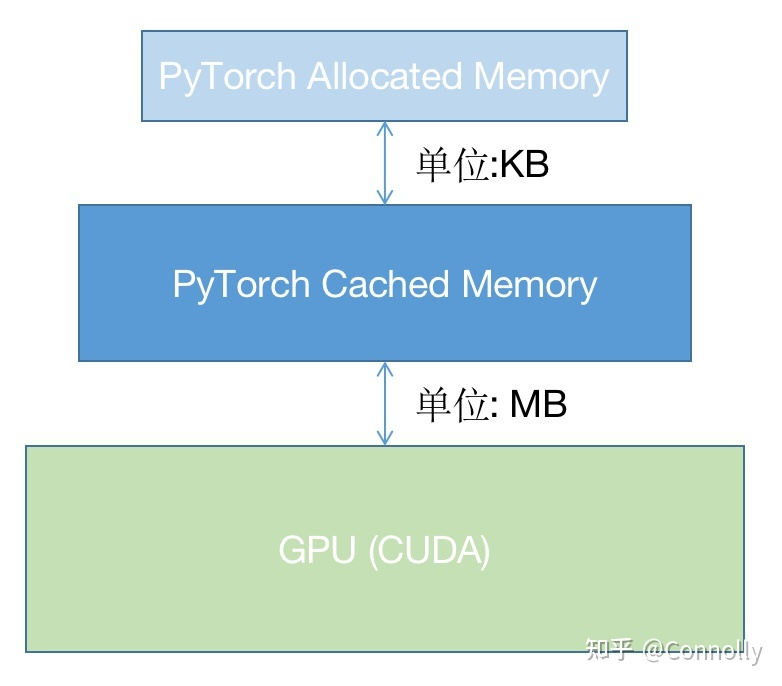
可以知道,pytorch并没有直接采用操作系统的显存管理机制而是自己又写了一个显存管理机制,使用这种层级的管理机制在cache中申请显存不需要向OS申请而是在自己的显存管理程序中进行调配,如果自己的cache中显存空间不够再会通过OS来申请显存,通过这种方法可以进一步提升显存的申请速度和减少显存碎片,当然这样也有不好的地方,那就是多人使用共享显卡的话容易导致一方一直不释放显存而另一方无法获得足够显存,当然pytorch也给出了一些显存分配的配置方法,但是主要还是为了减少显存碎片的。
对 https://zhuanlan.zhihu.com/p/424512257 中代码进行一定修改:
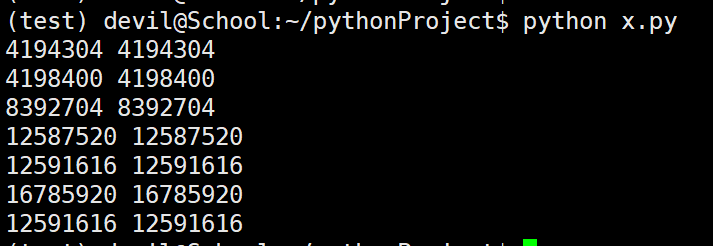
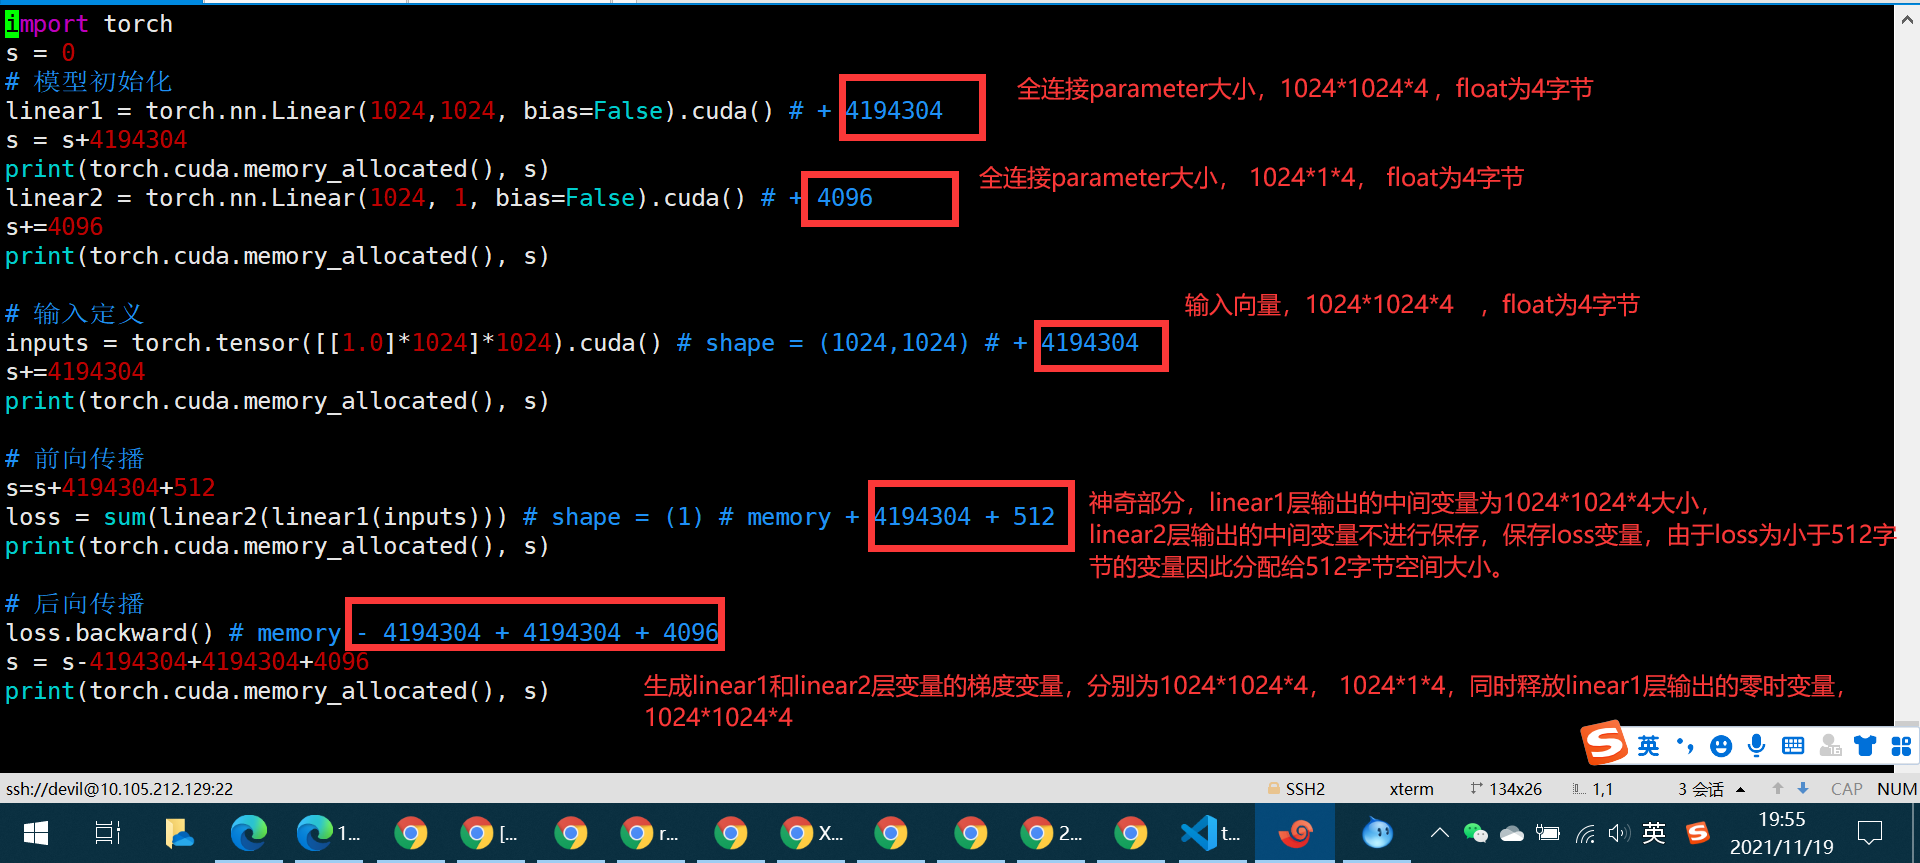
import torch s = 0 # 模型初始化
linear1 = torch.nn.Linear(1024,1024, bias=False).cuda() # + 4194304
s = s+4194304
print(torch.cuda.memory_allocated(), s)
linear2 = torch.nn.Linear(1024, 1, bias=False).cuda() # + 4096
s+=4096
print(torch.cuda.memory_allocated(), s) # 输入定义
inputs = torch.tensor([[1.0]*1024]*1024).cuda() # shape = (1024,1024) # + 4194304
s+=4194304
print(torch.cuda.memory_allocated(), s) # 前向传播
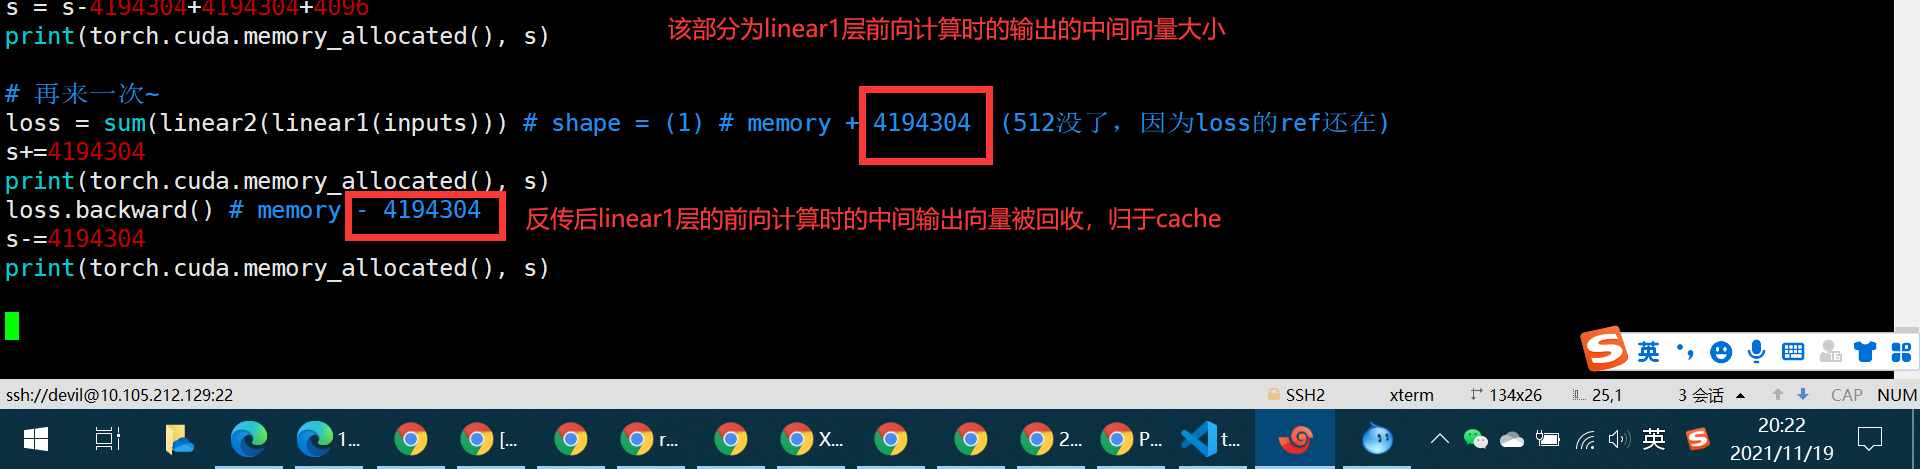
s=s+4194304+512
loss = sum(linear2(linear1(inputs))) # shape = (1) # memory + 4194304 + 512
print(torch.cuda.memory_allocated(), s) # 后向传播
loss.backward() # memory - 4194304 + 4194304 + 4096
s = s-4194304+4194304+4096
print(torch.cuda.memory_allocated(), s) # 再来一次~
loss = sum(linear2(linear1(inputs))) # shape = (1) # memory + 4194304 (512没了,因为loss的ref还在)
s+=4194304
print(torch.cuda.memory_allocated(), s)
loss.backward() # memory - 4194304
s-=4194304
print(torch.cuda.memory_allocated(), s)
============================================
=================================================
修改代码:


import torch

s = 0

# 模型初始化

linear1 = torch.nn.Linear(1024,1024, bias=False).cuda() # + 4194304

s = s+4194304

print(torch.cuda.memory_allocated(), s)

linear2 = torch.nn.Linear(1024, 1, bias=False).cuda() # + 4096

s+=4096

print(torch.cuda.memory_allocated(), s)

# 输入定义

inputs = torch.tensor([[1.0]*1024]*1024).cuda() # shape = (1024,1024) # + 4194304

s+=4194304

print(torch.cuda.memory_allocated(), s)

# 前向传播

s=s+4194304+512

loss = sum(linear2(linear1(inputs))) # shape = (1) # memory + 4194304 + 512

print(torch.cuda.memory_allocated(), s)

# 后向传播

loss.backward() # memory - 4194304 + 4194304 + 4096

s = s-4194304+4194304+4096

print(torch.cuda.memory_allocated(), s)

# 再来一次~

for _ in range(10000):

    loss = sum(linear2(linear1(inputs))) # shape = (1) # memory + 4194304  (512没了,因为loss的ref还在)

    loss.backward() # memory - 4194304

print(torch.cuda.max_memory_reserved()/1024/1024, "MB")

print(torch.cuda.max_memory_allocated()/1024/1024, "MB")

print(torch.cuda.max_memory_cached()/1024/1024, "MB")

print(torch.cuda.memory_summary())
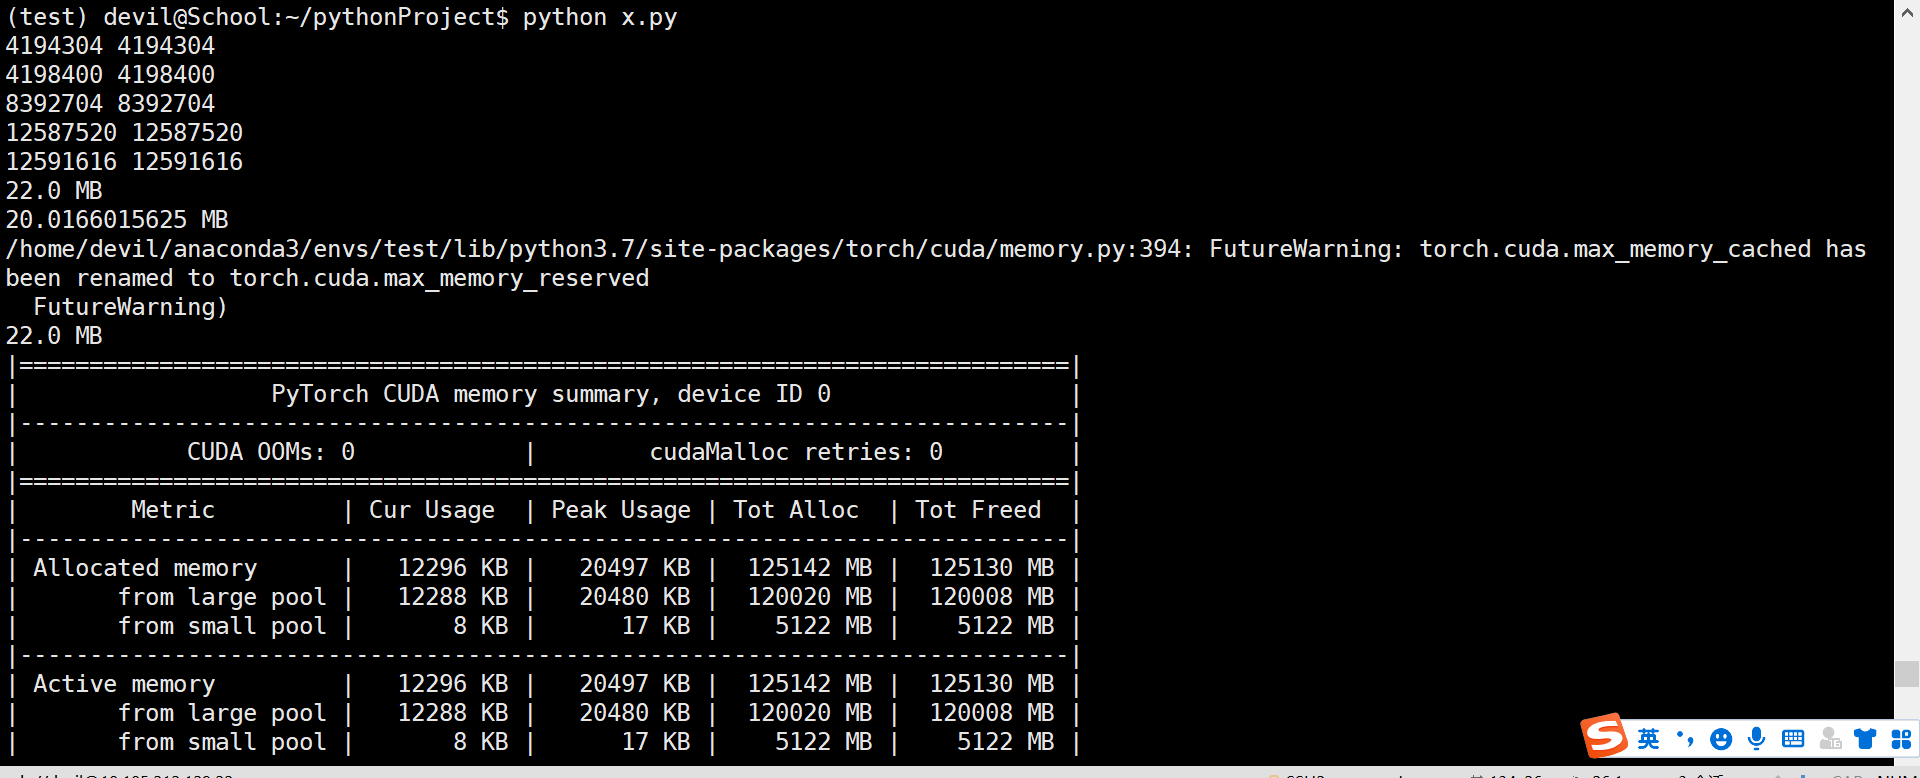

那么问题来了,问了保证这个程序完整运行下来的显存量是多少呢???
已经知道最大的reserved_memory 为 22MB,那么保证该程序运行的最大显存空间为reserved_memory+context_memory,
这里我们是使用1060G显卡运行,先对一下context_memory:
执行代码:
import torch

temp = torch.tensor([1.0]).cuda()
NVIDIA显存消耗:
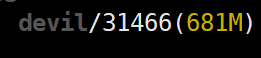
所以context_memory为681MB-2MB=679MB
由于max_reserved_memory=22MB,因此该程序完整运行下来最高需要679+22=701MB,验证一下:
再次运行代码:
import torch

import time

s = 0

# 模型初始化

linear1 = torch.nn.Linear(1024,1024, bias=False).cuda() # + 4194304

s = s+4194304

print(torch.cuda.memory_allocated(), s)

linear2 = torch.nn.Linear(1024, 1, bias=False).cuda() # + 4096

s+=4096

print(torch.cuda.memory_allocated(), s)

# 输入定义

inputs = torch.tensor([[1.0]*1024]*1024).cuda() # shape = (1024,1024) # + 4194304

s+=4194304

print(torch.cuda.memory_allocated(), s)

# 前向传播

s=s+4194304+512

loss = sum(linear2(linear1(inputs))) # shape = (1) # memory + 4194304 + 512

print(torch.cuda.memory_allocated(), s)

# 后向传播

loss.backward() # memory - 4194304 + 4194304 + 4096

s = s-4194304+4194304+4096

print(torch.cuda.memory_allocated(), s)

# 再来一次~

for _ in range(10000):

    loss = sum(linear2(linear1(inputs))) # shape = (1) # memory + 4194304  (512没了,因为loss的ref还在)

    loss.backward() # memory - 4194304

print(torch.cuda.max_memory_reserved()/1024/1024, "MB")

print(torch.cuda.max_memory_allocated()/1024/1024, "MB")

print(torch.cuda.max_memory_cached()/1024/1024, "MB")

print(torch.cuda.memory_summary())

time.sleep(60)

发现 803-701=102MB,这中间差的数值无法解释,只能说memory_context可以随着程序不同数值也不同,不同程序引入的pytorch函数不同导致context_memory也不同,这里我们按照这个想法反推,context_memory在这里为803-22=781MB,为了验证我们修改代码:
修改代码:
import torch

import time

s = 0

# 模型初始化

linear1 = torch.nn.Linear(1024,1024*2, bias=False).cuda() # + 4194304

s = s+4194304

print(torch.cuda.memory_allocated(), s)

linear2 = torch.nn.Linear(1024*2, 1, bias=False).cuda() # + 4096

s+=4096

print(torch.cuda.memory_allocated(), s)

# 输入定义

inputs = torch.tensor([[1.0]*1024]*1024).cuda() # shape = (1024,1024) # + 4194304

s+=4194304

print(torch.cuda.memory_allocated(), s)

# 前向传播

s=s+4194304+512

loss = sum(linear2(linear1(inputs))) # shape = (1) # memory + 4194304 + 512

print(torch.cuda.memory_allocated(), s)

# 后向传播

loss.backward() # memory - 4194304 + 4194304 + 4096

s = s-4194304+4194304+4096

print(torch.cuda.memory_allocated(), s)

# 再来一次~

for _ in range(100):

    loss = sum(linear2(linear1(inputs))) # shape = (1) # memory + 4194304  (512没了,因为loss的ref还在)

    loss.backward() # memory - 4194304

print(torch.cuda.max_memory_reserved()/1024/1024, "MB")

print(torch.cuda.max_memory_allocated()/1024/1024, "MB")

print(torch.cuda.max_memory_cached()/1024/1024, "MB")

print(torch.cuda.memory_summary())

time.sleep(60)
运行结果:
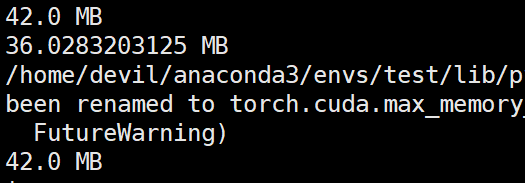
那么该代码完整运行需要的显存空间为:781+42=823MB
参考NVIDIA显卡的显存消耗:

发现支持刚才的猜想,也就是说不同的pytorch函数,显卡型号,驱动,操作系统,cuda版本都是会影响context_memory大小的。
其中最为难以测定的就是pytorch函数,因为你可能一直在同一个平台上跑代码但是不太可能一直都用相同的pytorch函数,所以一个程序跑完最低需要的显存空间的测定其实是需要完整跑一次网络的反传才可以测定的。
我这里采用的测定最低需要的显存空间的方法是不考虑context_memory而去直接考虑一次反传后最大需要的显存,此时我们可以一次反传后把程序挂住,如sleep一下,然后看下NVIDIA显卡一共消耗了多少显存。而且由上面的信息可知context_memory的测定是与具体使用的函数相关的,因此最稳妥的方法就是使用NVIDIA-smi监测一次完整反传后最大显存的消耗。
=====================================================
PyTorch显存机制分析的更多相关文章
- Pytorch显存动态分配规律探索
下面通过实验来探索Pytorch分配显存的方式. 实验 显存到主存 我使用VSCode的jupyter来进行实验,首先只导入pytorch,代码如下: import torch 打开任务管理器查看主存 ...
- [Pytorch]深度模型的显存计算以及优化
原文链接:https://oldpan.me/archives/how-to-calculate-gpu-memory 前言 亲,显存炸了,你的显卡快冒烟了! torch.FatalError: cu ...
- Pytorch训练时显存分配过程探究
对于显存不充足的炼丹研究者来说,弄清楚Pytorch显存的分配机制是很有必要的.下面直接通过实验来推出Pytorch显存的分配过程. 实验实验代码如下: import torch from torch ...
- 深度学习中GPU和显存分析
刚入门深度学习时,没有显存的概念,后来在实验中才渐渐建立了这个意识. 下面这篇文章很好的对GPU和显存总结了一番,于是我转载了过来. 作者:陈云 链接:https://zhuanlan.zhihu. ...
- 【原创】Linux环境下的图形系统和AMD R600显卡编程(4)——AMD显卡显存管理机制
显卡使用的内存分为两部分,一部分是显卡自带的显存称为VRAM内存,另外一部分是系统主存称为GTT内存(graphics translation table和后面的GART含义相同,都是指显卡的页表,G ...
- 科普帖:深度学习中GPU和显存分析
知乎的一篇文章: https://zhuanlan.zhihu.com/p/31558973 关于如何使用nvidia-smi查看显存与GPU使用情况,参考如下链接: https://blog.csd ...
- Android内存机制分析1——了解Android堆和栈
//----------------------------------------------------------------------------------- Android内存机制分析1 ...
- Linux内核态抢占机制分析(转)
Linux内核态抢占机制分析 http://blog.sina.com.cn/s/blog_502c8cc401012pxj.html 摘 要]本文首先介绍非抢占式内核(Non-Preemptive ...
- [置顶]
基于FPGA的VGA简易显存设计&NIOS ii软核接入
项目简介 本项目基于Altera公司的Cyclone IV型芯片,利用NIOS II软核,2-port RAM与时序控制模块,实现64*48分辨率的显存(再大的显存板载资源m9k不够用) 实现效果如下 ...
- 自制操作系统Antz(3)——进入保护模式 (中) 直接操作显存
Antz系统更新地址: https://www.cnblogs.com/LexMoon/category/1262287.html Linux内核源码分析地址:https://www.cnblogs. ...
随机推荐
- Kubernetes监控手册03-宿主监控实操
生产环境大都是在 Linux 下的,所以这篇文章我们先来分享如何使用 Categraf 采集 Linux OS 相关的指标.读完本篇内容,你应该可以完成机器层面的监控了. 原理概述 Categraf ...
- Linux 内核:GPIO子系统(1)软件框架
Linux 内核:GPIO子系统(1)软件框架 背景 在很多驱动开发中,GPIO用得很多,因此学习一下:也会顺便看看pinctrl 子系统. 原文(有删改):http://www.wowotech.n ...
- uboot 修改代码 增加 环境变量
--- title: uboot修改代码增加环境变量 date: 2019-12-27 21:26:39 categories: tags: - uboot --- 以"tftp下载kern ...
- KES数据库实践指南:探索KES数据库的事务隔离级别
引言 前两篇文章我们详细讲解了如何安装KES金仓数据库,并提供了快速查询和搭建基于coze平台的智能体的解决方案.今天,我们的焦点将放在并发控制机制和事务隔离级别上. 本文将通过一系列实验操作,深入探 ...
- FPGA案例开发手册——基于全志T3+Logos FPGA核心板
前 言 本文档主要提供评估板FPGA端案例测试方法,适用的开发环境为Windows 7 64bit和Windows 10 64bit. 本文案例基于创龙科技的全志T3+Logos FPGA核心板,它是 ...
- 有手就会的 Java 处理压缩文件
@ 目录 前言 背景 第一步:编写代码 1.1 请求层 1.2 业务处理层 1.3 新增配置 第二步:解压缩处理 2.1 引入依赖 2.2 解压缩工具类 总结 前言 请各大网友尊重本人原创知识分享,谨 ...
- 从 Dict 转到 Dataclass
从 dataclass 转到 dict 可以用 asdict 函数 , 反向转换的时候 就比较困难. 不用外部的包的情况下, 提供一种思路. def mask(v, d): #v 是 dict 数据, ...
- Linux开机启动自定义脚本
方式一:chkconfig命令 首先编写好自启的脚本 /etc/init.d/test.sh #!/bin/sh # chkconfig: 2345 10 90 # 创建个文件 touch /opt/ ...
- django python 循环一个月的每一天
from datetime import datetime, timedelta def get_dates_in_month(year, month): start_date = datetime( ...
- oeasy教您玩转vim - 72 - # 缩写abbreviation
缩写abbreviation 回忆上次折叠的细节 这次了解到了:mkview.:loadview 保存和加载视图 可以把当前的状态保存下来 可以在 viewoption 中配置保存选项,设置哪些需 ...