RestTemplate学习
在学习spring cloud的时候,用到了RestTemplate,找到一篇博客,写的很好,学习转载!
文章转载自:https://blog.csdn.net/itguangit/article/details/78825505
详解 RestTemplate 操作
作为开发人员,我们经常关注于构建伟大的软件来解决业务问题。数据只是软件完成工作时
要处理的原材料。但是如果你问一下业务人员,数据和软件谁更重要的话,他们很可能会选择
数据。数据是许多业务的生命之血。软件通常是可以替换的,但是多年积累的数据是永远不能
替换的。
近几年来,以信息为中心的表述性状态转移(Representational State Transfer,REST)已经称为替代传统SOAP Web 服务的流行方案.
SOAP关注的一般是行为和处理,而REST关注的是要处理的数据.
从Spring3.0开始,Spring为创建Rest API提供了良好的支持.
REST提供了一个更简单的可选方案。另外,很多的现代化应用都会有移动或富JavaScript客户端,它们都会使用运行在服务器上REST API。
REST的基础知识
**当谈论REST时,有一种常见的错误就是将其视为“基于URL的Web服务”——将REST作为另一
种类型的远程过程调用(remote procedure call,RPC)机制,就像SOAP一样,只不过是通过简单
的HTTP URL来触发,而不是使用SOAP大量的XML命名空间。**
**恰好相反,REST与RPC几乎没有任何关系。RPC是面向服务的,并关注于行为和动作;而REST
是面向资源的,强调描述应用程序的事物和名词**。
更简洁地讲,**REST就是将资源的状态以最适合客户端或服务端的形式从服务器端转移到客户
端(或者反过来)**。
在REST中,资源通过URL进行识别和定位。至于RESTful URL的结构并没有严格的规则,但是
URL应该能够识别资源,而不是简单的发一条命令到服务器上。再次强调,关注的核心是事
物,而不是行为。
Spring 中如何使用Rest资源
借助 RestTemplate,Spring应用能够方便地使用REST资源
Spring的 RestTemplate访问使用了模版方法的设计模式.
模版方法将过程中与特定实现相关的部分委托给接口,而这个接口的不同实现定义了接口的不同行为.
RestTemplate定义了36个与REST资源交互的方法,其中的大多数都对应于HTTP的方法。
其实,这里面只有11个独立的方法,其中有十个有三种重载形式,而第十一个则重载了六次,这样一共形成了36个方法。
delete() 在特定的URL上对资源执行HTTP DELETE操作
exchange()
在URL上执行特定的HTTP方法,返回包含对象的ResponseEntity,这个对象是从响应体中
映射得到的execute() 在URL上执行特定的HTTP方法,返回一个从响应体映射得到的对象
getForEntity() 发送一个HTTP GET请求,返回的ResponseEntity包含了响应体所映射成的对象
getForObject() 发送一个HTTP GET请求,返回的请求体将映射为一个对象
postForEntity()
POST 数据到一个URL,返回包含一个对象的ResponseEntity,这个对象是从响应体中映射得
到的postForObject() POST 数据到一个URL,返回根据响应体匹配形成的对象
headForHeaders() 发送HTTP HEAD请求,返回包含特定资源URL的HTTP头
optionsForAllow() 发送HTTP OPTIONS请求,返回对特定URL的Allow头信息
postForLocation() POST 数据到一个URL,返回新创建资源的URL
put() PUT 资源到特定的URL
实际上,由于Post 操作的非幂等性,它几乎可以代替其他的CRUD操作.
Get请求

RestTemplate 的get方法有以上几个,可以分为两类: getForEntity() 和 getForObject()
首先看 getForEntity() 的返回值类型 ResponseEntity
<T> ResponseEntity<T> getForEntity()看一下 ResponseEntity 的文档描述:
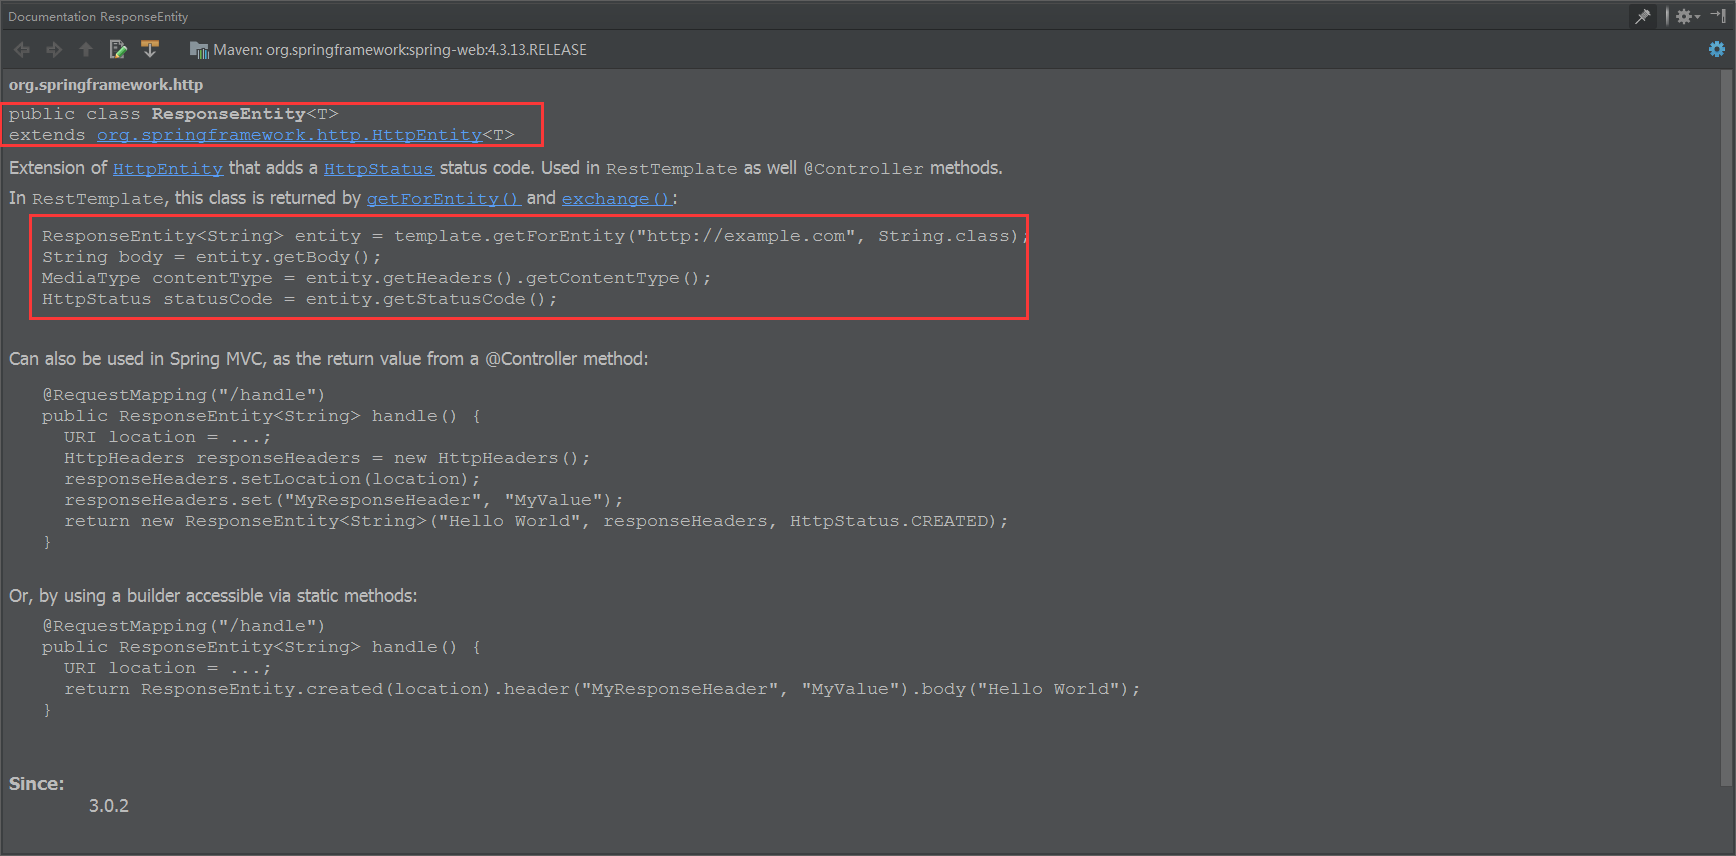
可以看到 它继承了HttpEntity. 封装了返回的响应信息,包括 响应状态,响应头 和 响应体.
在测试之前我们首先 创建一个Rest服务,模拟提供Rest数据,这里给出Controller层代码,具体可以查看源码,文章最后会给出:
/**

 * @author itguang

 * @create 2017-12-17 10:37

 **/

@RestController

public class UserController {

    @Autowired

    private UserService userService;

    @RequestMapping(value = "getAll")

    public List<UserEntity> getUser() {

        List<UserEntity> list = userService.getAll();

        return list;

    }

    @RequestMapping("get/{id}")

    public UserEntity getById(@PathVariable(name = "id") String id) {

        return userService.getById(id);

    }

    @RequestMapping(value = "save")

    public String save(UserEntity userEntity) {

        return "保存成功";

    }

    @RequestMapping(value = "saveByType/{type}")

    public String saveByType(UserEntity userEntity,@PathVariable("type")String type) {

        return "保存成功,type="+type;

    }

}
测试: getForEntity
- 无参数的 getForEntity 方法
@RequestMapping("getForEntity")

    public List<UserEntity> getAll2() {

        ResponseEntity<List> responseEntity = restTemplate.getForEntity("http://localhost/getAll", List.class);

        HttpHeaders headers = responseEntity.getHeaders();

        HttpStatus statusCode = responseEntity.getStatusCode();

        int code = statusCode.value();

        List<UserEntity> list = responseEntity.getBody();

        System.out.println(list.toString());

        return list;

    }
2.有参数的 getForEntity 请求,参数列表,可以使用 {} 进行url路径占位符
   //有参数的 getForEntity 请求,参数列表

    @RequestMapping("getForEntity/{id}")

    public UserEntity getById2(@PathVariable(name = "id") String id) {

        ResponseEntity<UserEntity> responseEntity = restTemplate.getForEntity("http://localhost/get/{id}", UserEntity.class, id);

        UserEntity userEntity = responseEntity.getBody();

        return userEntity;

    }
3.有参数的 get 请求,使用map封装参数
   //有参数的 get 请求,使用map封装参数

    @RequestMapping("getForEntity/{id}")

    public UserEntity getById4(@PathVariable(name = "id") String id) {

        HashMap<String, String> map = new HashMap<>();

        map.put("id",id);

        ResponseEntity<UserEntity> responseEntity = restTemplate.getForEntity("http://localhost/get/{id}", UserEntity.class, map);

        UserEntity userEntity = responseEntity.getBody();

        return userEntity;

    }
通过断点调试我们看下 返回的 responseEntity 的信息如图:
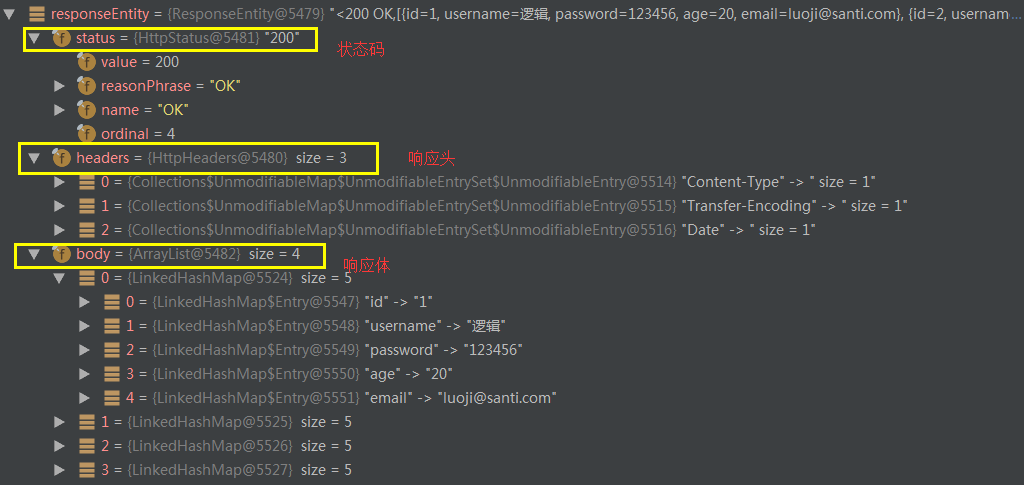
因此我们可以获取Http请求的全部信息.
但是,通常情况下我们并不想要Http请求的全部信息,只需要相应体即可.对于这种情况,RestTemplate提供了 getForObject() 方法用来只获取 响应体信息.
getForObject 和 getForEntity 用法几乎相同,指示返回值返回的是 响应体,省去了我们 再去 getBody() .
测试: getForObject
- 无参数的 getForObject 请求
   //无参数的 getForObject 请求

    @RequestMapping("getAll2")

    public List<UserEntity> getAll() {

        List<UserEntity> list = restTemplate.getForObject("http://localhost/getAll", List.class);

        System.out.println(list.toString());

        return list;

    }
2.有参数的 getForObject 请求,使用参数列表
   //有参数的 getForObject 请求

    @RequestMapping("get2/{id}")

    public UserEntity getById(@PathVariable(name = "id") String id) {

        UserEntity userEntity = restTemplate.getForObject("http://localhost/get/{id}", UserEntity.class, id);

        return userEntity;

    }
3.有参数的 get 请求,使用map封装请求参数
   //有参数的 get 请求,使用map封装请求参数

    @RequestMapping("get3/{id}")

    public UserEntity getById3(@PathVariable(name = "id") String id) {

        HashMap<String, String> map = new HashMap<>();

        map.put("id",id);

        UserEntity userEntity = restTemplate.getForObject("http://localhost/get/{id}", UserEntity.class, map);

        return userEntity;

    }
Post请求
了解了get请求后,Post请求就变得很简单了,我们可以看到post有如下方法:

测试: postForEntity
- post 请求,保存 UserEntity 对像
//post 请求,提交 UserEntity 对像
@RequestMapping("saveUser")
public String save(UserEntity userEntity) { ResponseEntity<String> responseEntity = restTemplate.postForEntity("http://localhost/save", userEntity, String.class);
String body = responseEntity.getBody(); return body;
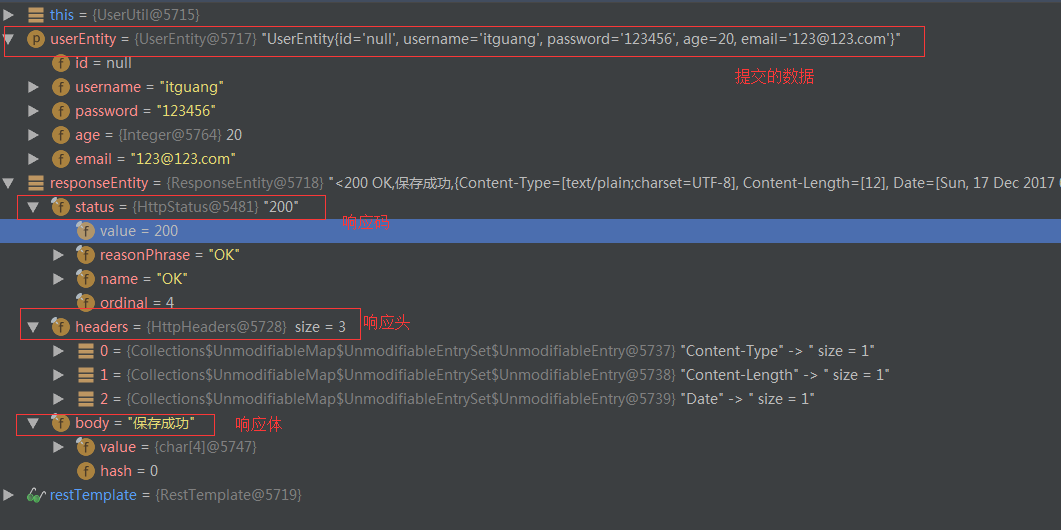
}浏览器访问: http://localhost/saveUser?username=itguang&password=123456&age=20&email=123@123.com 我们再次断点调试,查看 responseEntity 中的信息:
2.参数的 postForEntity 请求
    // 有参数的 postForEntity 请求

    @RequestMapping("saveUserByType/{type}")

    public String save2(UserEntity userEntity,@PathVariable("type")String type) {

        ResponseEntity<String> responseEntity = restTemplate.postForEntity("http://localhost/saveByType/{type}", userEntity, String.class, type);

        String body = responseEntity.getBody();

        return body;

    }

    // 有参数的 postForEntity 请求,使用map封装

    @RequestMapping("saveUserByType2/{type}")

    public String save3(UserEntity userEntity,@PathVariable("type")String type) {

        HashMap<String, String> map = new HashMap<>();

         map.put("type", type);

        ResponseEntity<String> responseEntity = restTemplate.postForEntity("http://localhost/saveByType/{type}", userEntity, String.class,map);

        String body = responseEntity.getBody();

        return body;

    }
我们浏览器访问: localhost/saveUserByType/120?username=itguang&password=123456&age=20&email=123@123.com
就会返回: 保存成功,type=120
对与其它请求方式,由于不常使用,所以这里就不再讲述.
源码地址: https://github.com/itguang/springcloud-learn/tree/master/resttemplate-test
RestTemplate学习的更多相关文章
- Spring boot ----RestTemplate学习笔记
****spring boot-----restTemplate 封装了HttpURLConnection,HttpClient,Netty等接口访问实现库 restTemplet包含以下部分 Htt ...
- HttpClient&&RestTemplate学习
1. 什么是HttpClient HttpClient是Apache下面的子项目,可以提供高效的,最新的,功能丰富的支持HTTP协议的客户端编程工具包. 2. 为什么要学习HttpClient Htt ...
- 「 从0到1学习微服务SpringCloud 」04服务消费者Ribbon+RestTemplate
系列文章(更新ing): 「 从0到1学习微服务SpringCloud 」01 一起来学呀! 「 从0到1学习微服务SpringCloud 」02 Eureka服务注册与发现 「 从0到1学习微服务S ...
- 【Spring-web】RestTemplate源码学习——梳理内部实现过程
2016-12-28 by 安静的下雪天 http://www.cnblogs.com/quiet-snowy-day/p/6228198.html 提示:使用手机浏览时请注意,图多费流量. 本篇 ...
- 【Spring-web】RestTemplate源码学习
2016-12-22 by 安静的下雪天 http://www.cnblogs.com/quiet-snowy-day/p/6210288.html 前言 在Web开发工作中,有一部分开发任务 ...
- RestTemplate post如何传递参数
背景 今天跟同事接口联调,使用RestTemplate请求服务端的post接口(使用python开发).诡异的是,post请求,返回500 Internal Server Error,而使用get请求 ...
- SpringCloud学习之Ribbon
一.负载均衡与Ribbon 负载均衡,在集群中是很常见的一个“名词”,顾名思义是根据一定的算法将请求分摊至对应的服务节点上,常见的算法有如下几种: 轮询法:所有请求被依次分发到每台应用服务器上,每台服 ...
- Spring Cloud 微服务架构学习笔记与示例
本文示例基于Spring Boot 1.5.x实现,如对Spring Boot不熟悉,可以先学习我的这一篇:<Spring Boot 1.5.x 基础学习示例>.关于微服务基本概念不了解的 ...
- Spring Cloud Alibaba基础教程:支持的几种服务消费方式(RestTemplate、WebClient、Feign)
通过<Spring Cloud Alibaba基础教程:使用Nacos实现服务注册与发现>一文的学习,我们已经学会如何使用Nacos来实现服务的注册与发现,同时也介绍如何通过LoadBal ...
随机推荐
- Linux学习笔记之Linux运行脚本时 $'\r' 错误
1.Windows上操作 用notepad++编译器打开脚本,编辑->文档格式转换->转换为UNIX格式,然后保存. 重新上传.运行,问题解决 2.Linux上操作 用vi/vim命令打开 ...
- Redis Desktop Manager 利用ssh连接 Redis
需开启6379端口,如果不设置密码,就忽略1,2步骤 第一步: 第二步: 第三步: 第四步: 第五步:
- 如何用Tensorflow训练模型成pb文件和和如何加载已经训练好的模型文件
这篇薄荷主要是讲了如何用tensorflow去训练好一个模型,然后生成相应的pb文件.最后会将如何重新加载这个pb文件. 首先先放出PO主的github: https://github.com/ppp ...
- Java常用API基础
1:打开帮助文档2:点击显示,找到索引,看到输入框3:你要学习什么内容,你就在框框里面输入什么内容 举例:Random4:看包 java.lang包下的类在使用的时候是不需要导包的5:看类的描述 Ra ...
- Failed to set session cookie. Maybe you are using HTTP instead of HTTPS to access phpMyAdmin.
原因:使用负载均衡的时候,第一次请求phpMyAdmin主页的时候web01进行处理,页面返回的cookie存放在web01上.填写用户名密码提交之后,是web02进行处理的,此时给页面的cookie ...
- iOS开发 -------- 九宫格坐标计算
一 要求 完成下面的布局 二 分析 寻找规律,每一个UIView的x坐标和y坐标 三 实现思路 (1) 明确每一块用得是什么View; (2) 明确每个View之间的父子关系,每个视图都只有一个父视图 ...
- Flask学习【第8篇】:flask-session组件
简介 flask-session是flask框架的session组件,由于原来flask内置session使用签名cookie保存,该组件则将支持session保存到多个地方,如 redis:保存数据 ...
- (转)Spring Cloud(一)
(二期)22.微服务框架spring cloud(一) [课程22]spirng c...简介.xmind54KB [课程22]spirng cl...架构.xmind0.5MB [课程22]负载均. ...
- hotmail 发送邮件 的服务器地址如下
hotmail的服务器地址如下: pop服务器地址:pop-mail.outlook.com smtp服务器地址:smtp-mail.outlook.com imap服务器地址:imap-mail.o ...
- Css下拉菜单设置
<style type="text/css"> *{margin:0px;padding:0px;}设置所有标签属性<初始化页面属性> #nav{backg ...