How to install cacti on centos 6
Cacti – Network and performance monitoring tool
Cacti is one of best monitoring tool used to monitor network, CPU load, memory, Disk and other services.
Cacti uses PHP for front end, RRDTool for graphing and mysql for storage.
Cacti installation on centos requires LAMP setup and SNMP.
Install cacti on centos 6.
Before installing cacti, first we need to setup apache with php, mysql and SNMP services. you can also refer this post (Installing Apache2 , Mysql server and PHP on Centos 6 (LAMP)) for complete LAMP setup.
Install apache, php and mysql
注意 : 新版本Cacti要求版本在5.6以上
Install cacti on centos 6.
Step 1 » Issue the below command to install apache, php and mysql.#####[root@krizna ~]# yum install mysql-server mysql php php-mysql httpd
[root@krizna ~]# yum install httpd
下载安装最新的rpm文件
rpm -Uvh http://repo.mysql.com/mysql-community-release-el6-5.noarch.rpm

- 6
安装MySQL,输入命令:
yum install mysql-community-server
Step 2 » Start mysql and apache service[root@krizna ~]# chkconfig --level 235 httpd on
[root@krizna ~]# service httpd start
[root@krizna ~]# chkconfig --level 235 mysqld on
[root@krizna ~]# service mysqld start
Setup mysql server
Step 3 » Issue the below command to create mysql root password.[root@krizna ~]# mysqladmin -u root password 'newpassword'
[and]
issue this command to secure your mysql database.[root@krizna ~]# /usr/bin/mysql_secure_installation
Step 4 » Create new database “cactidb” and username/password to access “cactidb” database .[root@krizna ~]# mysql -u root -pmysql> create database cactidb;
Query OK, 1 row affected (0.00 sec)mysql> GRANT ALL ON cactidb.* TO usercacti@localhost IDENTIFIED BY 'passwordcacti';
Query OK, 0 rows affected (0.00 sec)
mysql> quit
Here “usercacti” is the username and “passwordcacti” is the password to access “cactidb” database.
Install SNMP
Step 5 » Now install SNMP by typing the below command.[root@krizna ~]# yum install net-snmp-utils php-snmp net-snmp-libs
Step 6 » Rename the original snmpd.conf file and create a new one .[root@krizna ~]# mv /etc/snmp/snmpd.conf snmpd.conf.org
[root@krizna ~]# touch /etc/snmp/snmpd.conf
Step 7 » Add the below lines to /etc/snmp/snmpd.conf ( New file ).
|
1
2
3
4
5
6
7
8
|
com2sec local localhost public
group MyRWGroup v1 local
group MyRWGroup v2c local
group MyRWGroup usm local
view all included .1 80
access MyRWGroup "" any noauth exact all all none
syslocation srvroom , linux monitor
syscontact krizna (admin@krizna.com)
|
Step 8 » Now start the snmp service[root@krizna ~]# chkconfig --level 235 snmpd on
[root@krizna ~]# service snmpd start
Step 9 » Issue the below command to test your snmp config[root@krizna ~]# snmpwalk -v 1 -c public localhost IP-MIB::ipAdEntIfIndex
IP-MIB::ipAdEntIfIndex.127.0.0.1 = INTEGER: 1
IP-MIB::ipAdEntIfIndex.192.168.1.10 = INTEGER: 2
You should able to get your ip details .
Install Cacti
For installing cacti through yum , you must enable EPEL repository. you can find latest EPEL repository rpm here ( http://ftp.jaist.ac.jp/pub/Linux/Fedora/epel/6/i386/repoview/epel-release.html )
Step 10 »Install the latest EPEL rpm .[root@krizna ~]# rpm -ivh http://ftp.jaist.ac.jp/pub/Linux/Fedora/epel/6/i386/epel-release-6-8.noarch.rpm
Step 11 » Install cacti through yum[root@krizna ~]# yum install cacti
Configure cacti
Step 12 » Now import cacti database tables from the file cacti.sql . Issue the below command to find the location of cacti.sql file.[root@krizna ~]# rpm -ql cacti | grep cacti.sql
/usr/share/doc/cacti-0.8.8a/cacti.sql
Issue the below command to import tables to cactidb[root@krizna ~]# mysql -u root -p cactidb < /usr/share/doc/cacti-0.8.8a/cacti.sql
Step 13 » Now open /etc/cacti/db.php file and edit the below lines .
|
1
2
3
4
|
$database_default = "cactidb";
$database_hostname = "localhost";
$database_username = "usercacti";
$database_password = "passwordcacti";
|
Step 14 » Open /etc/httpd/conf.d/cacti.conf file and comment all “Deny from all” lines.
Step 15 » open /etc/cron.d/cacti file and uncomment the line .*/5 * * * * cacti /usr/bin/php /usr/share/cacti/poller.php > /dev/null 2>&1
Step 16» Now restart apache and cron services[root@krizna ~]# service httpd restart
[root@krizna ~]# service crond restart
Step 17» Now open http://serverip/cacti in your browser , you can see the cacti installation page.
if you are not getting installation page , Disable the firewall ( iptables ) and selinux service on your server .
Disable firewall ( Iptables ) »[root@krizna ~]# service iptables stop
[root@krizna ~]# chkconfig iptables off
Disable Selinux » open the file /etc/selinux/config and find the lineSELINUX=enforcing
and replace withSELINUX=disabled
now reboot the server and try again.
After getting installation page, proceed with the default values and make sure all the binary paths are found as per the below image.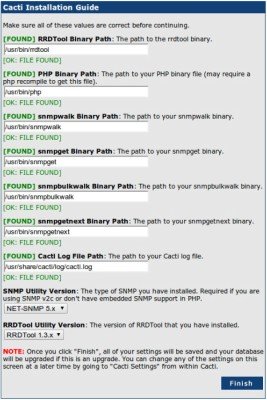
upon completion, you can see the login prompt .
Step 18» The default username and password for cacti is admin/admin. you will be forced to change the password at first login.
Step 19» After login . Choose – > Devices – > Localhost and find “SNMP Options“. select SNMP Version -> “Version 2” and SNMP Community -> public and click the “save” button at the bottom.
Step 20» Now you can see the SNMP information at the TOP . Click “Create Graphs for this Host” and choose Graph Types:-> ALL and choose all the check boxes as below and press “create“. Now choose the colour option ( Leave as it is ) and press “create“.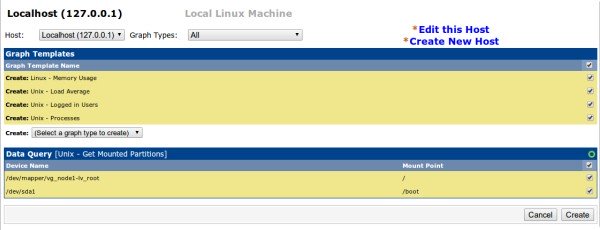
After few minutes , you can see the initial stage of graphs for localhost in the Graphs section . after few hours you can see the graphs like below .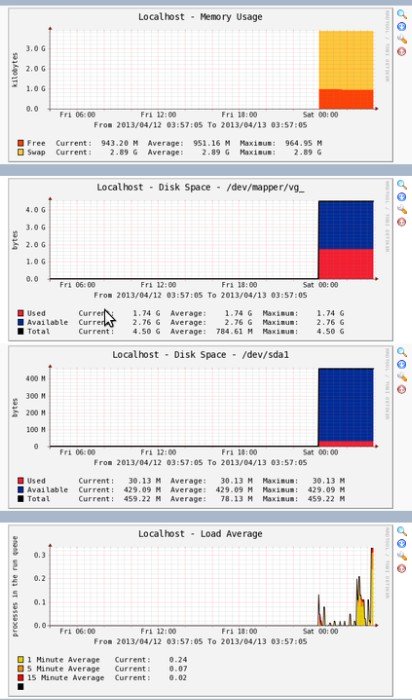
Adding linux machines
» Follow steps 5,6,7,8 and 9 ( In client ).
» Now in cacti , “Create devices” and Add description and hostname (or) IP .
» Choose “Host Template” as “Local linux machine”.
» Under SNMP Options select SNMP Version -> “Version 2” and SNMP Community -> public and click the “save” button at the bottom.
» Follow step 20
» Add the device to the Graph tree.
Adding Windows machines
» Enable SNMP service ( Refer this post)
» Make sure you added community name “public” and allowed your Cacti server IP.
» Now in cacti , “Create devices” and Add description and hostname (or) IP .
» Choose “Host Template” as “Windows 2000/XP host”.
» Under SNMP Options select SNMP Version -> “Version 2” and SNMP Community -> public and click the “save” button at the bottom.
» Follow step 20
» Add the device to the Graph tree.
Good luck
How to install cacti on centos 6的更多相关文章
- How To Install Java on CentOS and Fedora
PostedDecember 4, 2014 453.8kviews JAVA CENTOS FEDORA Introduction This tutorial will show you how ...
- Install Redis on CentOS 6.4--转
Install Redis on CentOS 6.4 source:http://thoughts.z-dev.org/2013/05/27/install-redis-on-centos-6-4/ ...
- Install ssdb-rocks on CentOS 6
Install ssdb-rocks on CentOS 6 C.C. 发表于 2014年08月10日 20:14 | Hits: 649 为了优化节操精选的弹幕系统,打算更换到Facebook的R ...
- How to install cacti With Nginx
转载于:https://github.com/blackyboy/Ubuntu-Linux-Stuffs/blob/master/How-to-install-Cacti-Monitoring-Ser ...
- Steps to Install Hadoop on CentOS/RHEL 6---reference
http://tecadmin.net/steps-to-install-hadoop-on-centosrhel-6/# The Apache Hadoop software library is ...
- How to install MP4box on CentOS 6
How to install MP4box on CentOS 6 MP4Box is a MP4 multiplexer. It can import MPEG-4 video, DivX, Xvi ...
- How to Install MySQL on CentOS 7
CentOS 7的yum源中貌似没有正常安装mysql时的mysql-sever文件,需要去官网上下载 # wget http://dev.mysql.com/get/mysql-communit ...
- How to install Jenkins on CentOS 7
How to install Jenkins on CentOS 7 on March 3, 2018 by AmirLeave a comment Introduction Jenkins is a ...
- How To Install Cacti On Ubuntu 14
How To Install Cacti On Ubuntu 14.04/14.10 by anismaj Cacti is an open source web based network moni ...
随机推荐
- Js 操作 Cookies
<script language=javascript> // cookie其实是一个key=value就是一个cookie而不是 //获得coolie 的值 function cooki ...
- css去掉input记住密码的黄色
input:-webkit-autofill,input:-webkit-autofill:hover,input:-webkit-autofill:focus,input:-webkit-autof ...
- ZOJ 2965 Accurately Say "CocaCola"!(预处理)
Accurately Say "CocaCola"! Time Limit: 2 Seconds Memory Limit: 65536 KB In a party he ...
- 【HTML5】使用 JavaScript 来获取电池状态(Battery Status API)
HTML5 规范已经越来越成熟,可以让你访问更多来自设备的信息,其中包括最近提交的 "Battery Status API".如其名称所示,该 API 允许你通过 JavaScri ...
- Linux0.11信号处理详解
之前在看操作系统信号这一章的时候,一直是云里雾里的,不知道信号到底是个啥玩意儿..比如在看<Unix环境高级编程>时,就感觉信号是个挺神奇的东西.比如看到下面这段代码: #include& ...
- java.sql.SQLException: Unsupported character encoding 'utf8mb4'.
四月 12, 2017 3:47:52 下午 org.apache.catalina.core.StandardWrapperValve invoke 严重: Servlet.service() fo ...
- Java泛型常见面试题
怀着崇拜的心情读完这篇文章,却发现作者不是原创,而不标注转载~所以转载地址不详~ 1. Java中的泛型是什么 ? 使用泛型的好处是什么? 这是在各种Java泛型面试中,一开场你就会被问到的问题中的一 ...
- 我也说说Emacs吧(3) - 文件基本操作
Spacemacs文件基本操作 有了前两讲的积累,我们知道了: 1. 我们既要学习emacs的操作,也要学习vi的操作 2. emacs是一个可扩展的平台,我们并不是从头配置,而是使用一套成熟的集成方 ...
- asp.net 输入框在chrome中无法关闭自动提示
将asp:TextBox 的属性AutoCompleteType设为Disabled,希望在chrome中点击记住用户名密码后输入框不再自动提示,但不起作用. 解决方法: <asp:TextBo ...
- ibatis 参数类型为map,map里面有list
<select id="getChannelLayerList" parameterClass="java.util.HashMap" re ...