
吴裕雄 python 机器学习——集成学习随机森林RandomForestRegressor回归模型
import numpy as np

import matplotlib.pyplot as plt

from sklearn import datasets,ensemble

from sklearn.model_selection import train_test_split

def load_data_regression():

    '''

    加载用于回归问题的数据集

    '''

    #使用 scikit-learn 自带的一个糖尿病病人的数据集

    diabetes = datasets.load_diabetes()

    # 拆分成训练集和测试集,测试集大小为原始数据集大小的 1/4

    return train_test_split(diabetes.data,diabetes.target,test_size=0.25,random_state=0)

#集成学习随机森林RandomForestRegressor回归模型

def test_RandomForestRegressor(*data):

    X_train,X_test,y_train,y_test=data

    regr=ensemble.RandomForestRegressor()

    regr.fit(X_train,y_train)

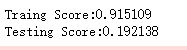
    print("Traing Score:%f"%regr.score(X_train,y_train))

    print("Testing Score:%f"%regr.score(X_test,y_test))

# 获取分类数据

X_train,X_test,y_train,y_test=load_data_regression()

# 调用 test_RandomForestRegressor

test_RandomForestRegressor(X_train,X_test,y_train,y_test)
def test_RandomForestRegressor_num(*data):

    '''

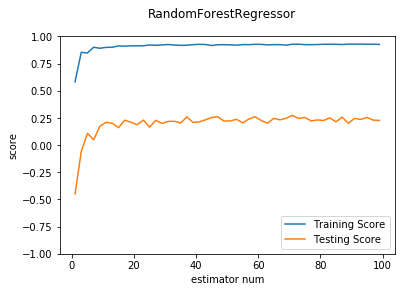
    测试 RandomForestRegressor 的预测性能随  n_estimators 参数的影响

    '''

    X_train,X_test,y_train,y_test=data

    nums=np.arange(1,100,step=2)

    fig=plt.figure()

    ax=fig.add_subplot(1,1,1)

    testing_scores=[]

    training_scores=[]

    for num in nums:

        regr=ensemble.RandomForestRegressor(n_estimators=num)

        regr.fit(X_train,y_train)

        training_scores.append(regr.score(X_train,y_train))

        testing_scores.append(regr.score(X_test,y_test))

    ax.plot(nums,training_scores,label="Training Score")

    ax.plot(nums,testing_scores,label="Testing Score")

    ax.set_xlabel("estimator num")

    ax.set_ylabel("score")

    ax.legend(loc="lower right")

    ax.set_ylim(-1,1)

    plt.suptitle("RandomForestRegressor")

    plt.show()

# 调用 test_RandomForestRegressor_num

test_RandomForestRegressor_num(X_train,X_test,y_train,y_test)
def test_RandomForestRegressor_max_depth(*data):

    '''

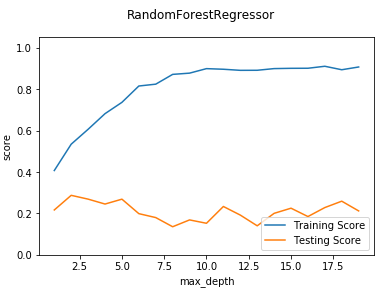
    测试 RandomForestRegressor 的预测性能随  max_depth 参数的影响

    '''

    X_train,X_test,y_train,y_test=data

    maxdepths=range(1,20)

    fig=plt.figure()

    ax=fig.add_subplot(1,1,1)

    testing_scores=[]

    training_scores=[]

    for max_depth in maxdepths:

        regr=ensemble.RandomForestRegressor(max_depth=max_depth)

        regr.fit(X_train,y_train)

        training_scores.append(regr.score(X_train,y_train))

        testing_scores.append(regr.score(X_test,y_test))

    ax.plot(maxdepths,training_scores,label="Training Score")

    ax.plot(maxdepths,testing_scores,label="Testing Score")

    ax.set_xlabel("max_depth")

    ax.set_ylabel("score")

    ax.legend(loc="lower right")

    ax.set_ylim(0,1.05)

    plt.suptitle("RandomForestRegressor")

    plt.show()

# 调用 test_RandomForestRegressor_max_depth

test_RandomForestRegressor_max_depth(X_train,X_test,y_train,y_test)
def test_RandomForestRegressor_max_features(*data):

    '''

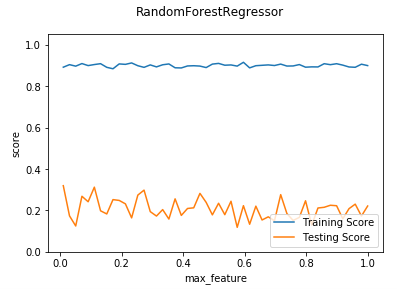
   测试 RandomForestRegressor 的预测性能随  max_features 参数的影响

    '''

    X_train,X_test,y_train,y_test=data

    max_features=np.linspace(0.01,1.0)

    fig=plt.figure()

    ax=fig.add_subplot(1,1,1)

    testing_scores=[]

    training_scores=[]

    for max_feature in max_features:

        regr=ensemble.RandomForestRegressor(max_features=max_feature)

        regr.fit(X_train,y_train)

        training_scores.append(regr.score(X_train,y_train))

        testing_scores.append(regr.score(X_test,y_test))

    ax.plot(max_features,training_scores,label="Training Score")

    ax.plot(max_features,testing_scores,label="Testing Score")

    ax.set_xlabel("max_feature")

    ax.set_ylabel("score")

    ax.legend(loc="lower right")

    ax.set_ylim(0,1.05)

    plt.suptitle("RandomForestRegressor")

    plt.show()

# 调用 test_RandomForestRegressor_max_features

test_RandomForestRegressor_max_features(X_train,X_test,y_train,y_test)
吴裕雄 python 机器学习——集成学习随机森林RandomForestRegressor回归模型的更多相关文章
- 吴裕雄 python 机器学习——集成学习随机森林RandomForestClassifier分类模型
import numpy as np import matplotlib.pyplot as plt from sklearn import datasets,ensemble from sklear ...
- 吴裕雄 python 机器学习——集成学习梯度提升决策树GradientBoostingRegressor回归模型
import numpy as np import matplotlib.pyplot as plt from sklearn import datasets,ensemble from sklear ...
- 吴裕雄 python 机器学习——集成学习AdaBoost算法回归模型
import numpy as np import matplotlib.pyplot as plt from sklearn import datasets,ensemble from sklear ...
- 吴裕雄 python 机器学习——集成学习AdaBoost算法分类模型
import numpy as np import matplotlib.pyplot as plt from sklearn import datasets,ensemble from sklear ...
- 机器学习:集成学习:随机森林.GBDT
集成学习(Ensemble Learning) 集成学习的思想是将若干个学习器(分类器&回归器)组合之后产生一个新学习器.弱分类器(weak learner)指那些分类准确率只稍微好于随机猜测 ...
- 吴裕雄 python 机器学习——伯努利贝叶斯BernoulliNB模型
import numpy as np import matplotlib.pyplot as plt from sklearn import datasets,naive_bayes from skl ...
- 吴裕雄 python 机器学习——数据预处理过滤式特征选取SelectPercentile模型
from sklearn.feature_selection import SelectPercentile,f_classif #数据预处理过滤式特征选取SelectPercentile模型 def ...
- 吴裕雄 python 机器学习——数据预处理过滤式特征选取VarianceThreshold模型
from sklearn.feature_selection import VarianceThreshold #数据预处理过滤式特征选取VarianceThreshold模型 def test_Va ...
- 吴裕雄 python 机器学习——数据预处理字典学习模型
from sklearn.decomposition import DictionaryLearning #数据预处理字典学习DictionaryLearning模型 def test_Diction ...
随机推荐
- pip工具下载速度慢的问题
由于pip安装默认的访问地址为 http://pypi.python.org/simple/ 为外网,速度慢而且容易超时报错 国内常用的镜像源有 :阿里云 http://mirrors.aliyun. ...
- 假期学习【十一】Python切词,以及从百度爬取词典
今天主要对从CSDN爬取的标题利用jieba(结巴)进行分词,但在分词过程中发现,如大数据被分成了大/数据,云计算被分隔成了云/计算. 后来又从百度百科--->信息领域爬取了相关词语作为词典,预 ...
- 小I选宾馆
小 I 选宾馆 Time Limit: 1000 ms Memory Limit: 65536 KiB Problem Description 小 I 去天津玩啦,一路上,他跟他的同学发生了许多有趣的 ...
- 论文阅读笔记(三)【AAAI2017】:Learning Heterogeneous Dictionary Pair with Feature Projection Matrix for Pedestrian Video Retrieval via Single Query Image
Introduction (1)IVPR问题: 根据一张图片从视频中识别出行人的方法称为 image to video person re-id(IVPR) 应用: ① 通过嫌犯照片,从视频中识别出嫌 ...
- 洛谷 P3796 【模板】AC自动机(加强版)(AC自动机)
题目链接:https://www.luogu.com.cn/problem/P3796 AC自动机:复杂度$O( (N+M)\times L )$,N为模式串个数,L为平均长度,M为文章长度. ins ...
- 【Python】输出12个星座
原理:利用Unicode编码 for i in range(12): print(chr(9800+i),end="")
- [Luogu]三步必杀
Description Luogu4231 Solution 我最近到底怎么了,这种题都做不出来了,一看题第一反应李超线段树(虽然不会),觉得不可做,看一眼题解才发现这个题可以差分,然后差分还打错了好 ...
- MFC对话框常用操作文章收藏
1.改变控件文本 参考链接:https://blog.csdn.net/active2489595970/article/details/88856235 所有控件的文本都可以用这种方式动态改变. 2 ...
- java基础之 类型转换
一.自动类型转换 1.java中不同类型的数据在计算时,为保证数据的精度,数据的类型会以大容量的类型为主: 2.自动类型转换的排序: char.byte.short -> int -> l ...
- HTMLinput标签
<input> 标签用于搜集用户信息. 常用的属性: type指定输入项的类型 name定义 input 元素的名称. id给输入项取一个名字,方便后期找到和操作 type指定输入项的类型 ...