SpringCloud学习笔记(7):使用Spring Cloud Config配置中心
简介
Spring Cloud Config为分布式系统中的外部化配置提供了服务器端和客户端支持,服务器端统一管理所有配置文件,客户端在启动时从服务端获取配置信息。服务器端有多种配置方式,如将配置文件存储在本地或者存储在远程Git仓库等等,并且在配置文件被更改时,可以通过多种途径如actuator的/refresh端点或者Spring Cloud Bus来动态刷新客户端的配置,而无需重新启动客户端。
项目介绍
- sc-parent,父模块(请参照SpringCloud学习笔记(1):Eureka注册中心)
- sc-eureka,注册中心(请参照SpringCloud学习笔记(1):Eureka注册中心)
- sc-config-client,访问配置中心的客户端
- sc-config-server,本地配置中心
- sc-config-server-git,远程配置中心
创建访问配置中心的客户端
1.在父模块下创建子模块项目sc-config-client,pom.xml:
<project xmlns="http://maven.apache.org/POM/4.0.0" xmlns:xsi="http://www.w3.org/2001/XMLSchema-instance" xsi:schemaLocation="http://maven.apache.org/POM/4.0.0 http://maven.apache.org/xsd/maven-4.0.0.xsd">

  <modelVersion>4.0.0</modelVersion>

  <parent>

    <groupId>com.cf</groupId>

    <artifactId>sc-parent</artifactId>

    <version>0.0.1-SNAPSHOT</version>

  </parent>

  <artifactId>sc-config-client</artifactId>

  <dependencies>

  	<dependency>

		<groupId>org.springframework.cloud</groupId>

		<artifactId>spring-cloud-starter-config</artifactId>

	</dependency>

  </dependencies>

</project>
2.创建启动类configclient.ConfigClientApplication:
package configclient;

import org.springframework.boot.SpringApplication;

import org.springframework.boot.autoconfigure.SpringBootApplication;

@SpringBootApplication

public class ConfigClientApplication {

	public static void main(String[] args) {

		SpringApplication.run(ConfigClientApplication.class, args);

	}

}
3.创建configclient.controller.ConfigClientController:
package configclient.controller;

import org.springframework.beans.factory.annotation.Value;

import org.springframework.web.bind.annotation.GetMapping;

import org.springframework.web.bind.annotation.RequestMapping;

import org.springframework.web.bind.annotation.RestController;

@RestController

@RequestMapping("/client")

public class ConfigClientController {

	@Value("${nickName}")

	private String nickName;

	@GetMapping("/hello")

	public String hello(){

		return "hello," + nickName;

	}

}
4.创建bootstrap.yml:
spring:

  application:

    name: sc-config-client

  profiles:

    active: dev

  cloud:

    config:

      uri:  http://localhost:9003

      fail-fast: true

server:

  port: 9002
spring.cloud.config.uri:指定配置中心地址
spring.cloud.config.fail-fase:当连接不上配置中心服务器时,是否使当前客户端异常停止,而不是以默认配置启动。
使用本地配置中心
1.在父模块下创建子模块项目sc-config-server,pom.xml:
<project xmlns="http://maven.apache.org/POM/4.0.0" xmlns:xsi="http://www.w3.org/2001/XMLSchema-instance" xsi:schemaLocation="http://maven.apache.org/POM/4.0.0 http://maven.apache.org/xsd/maven-4.0.0.xsd">

  <modelVersion>4.0.0</modelVersion>

  <parent>

    <groupId>com.cf</groupId>

    <artifactId>sc-parent</artifactId>

    <version>0.0.1-SNAPSHOT</version>

  </parent>

  <artifactId>sc-config-server</artifactId>

  <dependencies>

  	<dependency>

		<groupId>org.springframework.cloud</groupId>

		<artifactId>spring-cloud-config-server</artifactId>

	</dependency>

  </dependencies>

</project>
2.创建启动类configserver.ConfigServerApplication:
package configserver;

import org.springframework.boot.SpringApplication;

import org.springframework.boot.autoconfigure.SpringBootApplication;

import org.springframework.cloud.config.server.EnableConfigServer;

@SpringBootApplication

@EnableConfigServer

public class ConfigServerApplication {

	public static void main(String[] args) {

		SpringApplication.run(ConfigServerApplication.class, args);

	}

}
3.创建application.yml:
server:

  port: 9003

spring:

  application:

    name: sc-config-server

  profiles:

    active: native

  cloud:

    config:

      server:

        native:

          searchLocations: classpath:/conf
spring.profiles.active:配置文件的获取方式
spring.cloud.config.server.native.search-locations:本地配置文件的存放路径
4.创建/src/main/resources/conf/sc-config-client-dev.yml文件:
nickName: Luke
该文件内容为客户端需要从服务端获取的配置信息,文件名称和客户端配置是相对应的,如sc-config-client-dev.yml=【spring.application.name】-【 spring.profiles.active】.yml
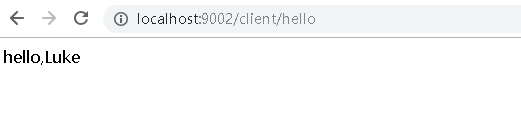
5.测试
启动本地配置中心sc-config-server成功后再启动客户端sc-config-client,访问http://localhost:9002/client/hello,客户端成功从配置中心获取nickName的配置:
使用远程配置中心
1.在父模块下创建子模块项目sc-config-server-git,pom.xml:
<project xmlns="http://maven.apache.org/POM/4.0.0" xmlns:xsi="http://www.w3.org/2001/XMLSchema-instance" xsi:schemaLocation="http://maven.apache.org/POM/4.0.0 http://maven.apache.org/xsd/maven-4.0.0.xsd">

  <modelVersion>4.0.0</modelVersion>

  <parent>

    <groupId>com.cf</groupId>

    <artifactId>sc-parent</artifactId>

    <version>0.0.1-SNAPSHOT</version>

  </parent>

  <artifactId>sc-config-server-git</artifactId>

  <dependencies>

  	<dependency>

		<groupId>org.springframework.cloud</groupId>

		<artifactId>spring-cloud-config-server</artifactId>

	</dependency>

	<dependency>

	    <groupId>org.springframework.cloud</groupId>

	    <artifactId>spring-cloud-starter-netflix-eureka-client</artifactId>

	</dependency>

  </dependencies>

</project>
2.创建启动类configserver.GitConfigServerApplication:
package configserver;

import org.springframework.boot.SpringApplication;

import org.springframework.boot.autoconfigure.SpringBootApplication;

import org.springframework.cloud.config.server.EnableConfigServer;

@SpringBootApplication

@EnableConfigServer

public class GitConfigServerApplication {

	public static void main(String[] args) {

		SpringApplication.run(GitConfigServerApplication.class, args);

	}

}
3.创建application.yml:
server:

  port: 9005

eureka:

  client:

    serviceUrl:

      defaultZone: http://localhost:8080/eureka/

spring:

  application:

    name: sc-config-server-git

  cloud:

    config:

      server:

        git:

          uri: https://github.com/yinchao3577/test777.git

          username: xxxxx

          password: xxxxx

      label: master

      fail-fast: true
spring.cloud.config.server.git.uri:git存储库地址
spring.cloud.config.server.git.username:用户名
spring.cloud.config.server.git.password:密码
spring.cloud.config.server.git.searchPaths:配置文件所在目录,若在根目录则无需配置
spring.cloud.config.label:Git Repository的分支,默认为master
4.更改客户端配置
pom.xml添加Eureka依赖:
	<dependency>

	    <groupId>org.springframework.cloud</groupId>

	    <artifactId>spring-cloud-starter-netflix-eureka-client</artifactId>

	</dependency>
bootstrap.yml改为:
spring:

  application:

    name: sc-config-client

  cloud:

    config:

      name: myconfig2

      label: master

      discovery:

        enabled: true

        service-id: sc-config-server-git #使用Eureka注册中心来发现Config配置中心服务

server:

  port: 9002

eureka:

  client:

    serviceUrl:

      defaultZone: http://localhost:8080/eureka/
spring.cloud.config.name:远程仓库中配置文件的名称
spring.cloud.config.discovery.enabled:是否开启配置中心服务发现
spring.cloud.config.discovery.service-id:配置中心服务名称
5.测试
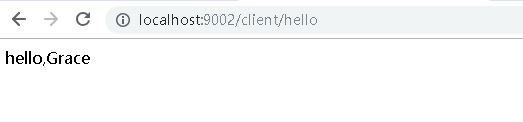
远程仓库myconfig2.yml值为:
nickName: Grace
依次启动注册中心sc-eureka、远程配置中心sc-config-server-git,sc-config-server-git启动成功后再启动客户端sc-config-client,访问http://localhost:9002/client/hello,客户端成功从配置中心获取nickName的配置:
手动刷新配置
actuator中包含一个/refresh的端点,用于配置的刷新。对该端点的调用实质是对RefreshScope类的调用,RefreshScope是上下文中的一个bean,它包含一个公共refreshAll()方法和refresh(String)方法,分别用来刷新范围内的所有bean或者指定的单个bean。
1.更改客户端配置
pom.xml添加actuator依赖:
	<dependency>

        <groupId>org.springframework.boot</groupId>

        <artifactId>spring-boot-starter-actuator</artifactId>

    </dependency>
bootstrap.yml添加开启refresh节点的配置:
management:

  endpoints:

    web:

      exposure:

        include: 'refresh'
2.在ConfigClientController类上添加@RefreshScope注解,表示该类可以在运行时刷新配置,当调用完/actuator/refresh端点后,在下一次访问该Controller时,该Controller会重新初始化以及注入到容器中,初始化时会重新加载配置,所以在访问时将会访问到最新配置的值。
3.按之前测试的步骤进行启动和访问,修改github中配置的值后,重新访问客户端后值并没有更改,通过Postman工具发送POST请求到http://localhost:9002/actuator/refresh后,再重新访问客户端,值已经被更新成最新配置的值。
SpringCloud学习笔记(7):使用Spring Cloud Config配置中心的更多相关文章
- 跟我学SpringCloud | 第七篇:Spring Cloud Config 配置中心高可用和refresh
SpringCloud系列教程 | 第七篇:Spring Cloud Config 配置中心高可用和refresh Springboot: 2.1.6.RELEASE SpringCloud: Gre ...
- 微服务SpringCloud之Spring Cloud Config配置中心Git
微服务以单个接口为颗粒度,一个接口可能就是一个项目,如果每个项目都包含一个配置文件,一个系统可能有几十或上百个小项目组成,那配置文件也会有好多,对后续修改维护也是比较麻烦,就和前面的服务注册一样,服务 ...
- 微服务SpringCloud之Spring Cloud Config配置中心服务化
在前面两篇Spring Cloud Config配置中心的博客中都是需要指定配置服务的地址url:spring.cloud.config.uri,客户端都是直接调用配置中心的server端来获取配置文 ...
- spring cloud --- config 配置中心 [本地、git获取配置文件]
spring boot 1.5.9.RELEASE spring cloud Dalston.SR1 1.前言 spring cloud config 配置中心是什么? 为了统一管理配 ...
- 微服务SpringCloud之Spring Cloud Config配置中心SVN
在回来的路上看到一个个的都抱着花,吃了一路的狗粮,原本想着去旁边的工业园里跑跑步呢,想想还是算了,人家过七夕,俺们过巴西.上一博客学习了Spring Cloud Config使用git作为配置中心,本 ...
- Spring Cloud Config 配置中心实践过程中,你需要了解这些细节!
本文导读: Spring Cloud Config 基本概念 Spring Cloud Config 客户端加载流程 Spring Cloud Config 基于消息总线配置 Spring Cloud ...
- Spring Cloud Config 配置中心 自动加解密功能 jasypt方式
使用此种方式会存在一种问题:如果我配置了自动配置刷新,则刷新过后,加密过后的密文无法被解密.具体原因分析,看 SpringCloud 详解配置刷新的原理 使用 jasypt-spring-boot- ...
- Spring Cloud Config 配置中心高可用
详细参见 <Spring Cloud 与 Docker微服务架构实战> p163-9.10 Spring Cloud Config 与 Eureka 配合使用 p163-9.12 Conf ...
- Spring Cloud Config 配置中心
请将远程配置文件的格式写对: 比如使用 *.yml 或者 *.properties yml: testconfig: testvalue properties: testconfig=testvalu ...
随机推荐
- django前后端分离部署
部署静态文件: 静态文件有两种方式1:通过django路由访问2:通过nginx直接访问 方式1: 需要在根目录的URL文件中增加,作为入口 url(r'^$', TemplateView.as_vi ...
- tab栏切换制作
tab栏切换制作 先上图 要求1:默认状态,第一个选项卡被选中,展示第一个选项卡的内容 策略:第一个选项卡默认有被选中的样式,第一个选项卡对应的display: block,其他的dispaly设为n ...
- MongoDB的一些高级语法.md
MongoDB的一些高级语法 AND 和 OR操作 AND操作 OR操作 嵌入式文档 插入 查询 数组(Array)字段 插入 查询 聚合(Aggregation) 筛选数据 修改字段 注意事项 ...
- Android Studio启动模拟器失败
启动Android Studio的模拟器报“Emulator: Process finished with exit code -1073741819 (0xC0000005)”错误教程: 1.进入该 ...
- ionic app 监听网络功能
安装cordova插件: cordova plugin add cordova-plugin-network-information 在app.js 的run()里面的function()注入$cor ...
- tomcat8 编写字符编码Filter过滤器无效问题
做一个解决全站的字符编码过滤器,过滤器类和配置如下: 过滤器类: package com.charles.web.filter; import java.io.IOException; import ...
- Spring框架入门之AOP
Spring框架入门之AOP 一.Spring AOP简单介绍 AOP AOP(Aspect Oriented Programming),即面向切面编程,可以说是OOP(Object Oriented ...
- Leetcode之二分法专题-153. 寻找旋转排序数组中的最小值(Find Minimum in Rotated Sorted Array)
Leetcode之二分法专题-153. 寻找旋转排序数组中的最小值(Find Minimum in Rotated Sorted Array) 假设按照升序排序的数组在预先未知的某个点上进行了旋转. ...
- HDU 5324 Boring Class CDQ分治
题目传送门 题目要求一个3维偏序点的最长子序列,并且字典序最小. 题解: 这种题目出现的次数特别多了.如果不需要保证字典序的话直接cdq就好了. 这里需要维护字典序的话,我们从后往前配对就好了,因为越 ...
- Junit测试Controller(MockMVC使用),以及传输@RequestBody数据解决办法
转自:http://www.importnew.com/21153.html 一.单元测试的目的 简单来说就是在我们增加或者改动一些代码以后对所有逻辑的一个检测,尤其是在我们后期修改后(不论是增加新功 ...